The post Homemade Pumpkin Puree appeared first on Never. Not. Eating..
]]>
WHAT’S THE DIFFERENCE?
The puree from the store often includes preservatives, such as sugar and salt, so I prefer to avoid those additives by making my own. It’s the easiest thing to do, so if you were just thinking “Way too much work,” you’re wrong. Try it!
CHOOSING THE PROPER PUMPKIN
The most important part of this recipe is selecting the appropriate pumpkin variety. Those really big ones that you carve into on Halloween….No bueno. They are really bland in taste, and such a hassle to cut up due to their size. You CAN eat them, but they are not a good choice for pies or any other baked goods that include pumpkin. Your best bet is to find a Pie Pumpkin. They are sweeter and more flavourful and can be used in both sweet and savoury recipes.
I typically hold off on seasoning the pumpkin too much as one pumpkin usually makes a large enough batch to use in both savoury and sweet recipes, and each type of recipe would be seasoned differently. If you are making the puree solely for pie, pancakes, pumpkin spiced lattes, or anything on the sweeter end, you can definitely add some cinnamon and nutmeg to this recipe to jazz it up! On the contrary, you can grind some pepper and add some dried thyme or sage if you plan to use the puree in more savoury-type dishes, like soups or casseroles.
Like I said, pumpkin puree is really easy to make. The most challenging part is just getting your pumpkin cut up! So, grab yourself some sharp knives, and let’s roll!
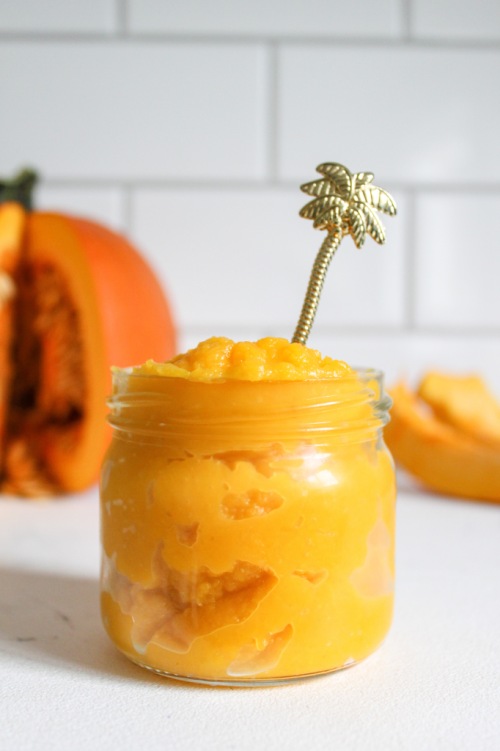
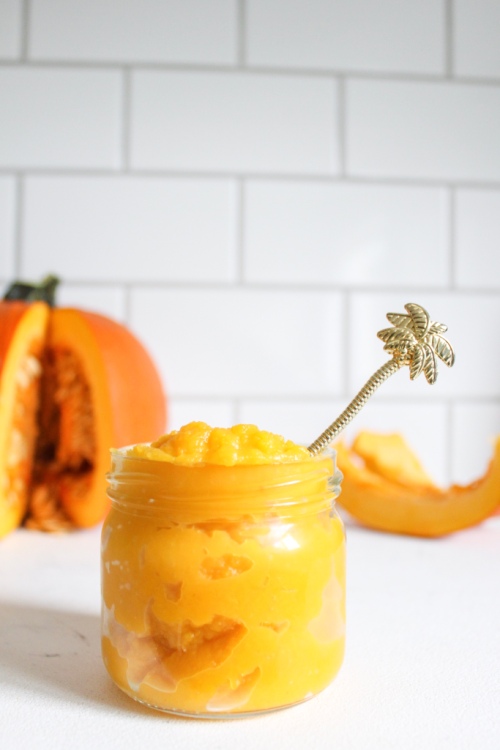
Homemade Pumpkin Puree
Yield: About 3 cups (depending on the size of your pumpkin)
Prep time: 10 minutes
Cook time: 30 minutes
Ingredients:
- 1 pie pumpkin
- 1 tbsp olive oil
- 1/2 tsp salt
Instructions:
- Preheat oven to 375 degrees Fahrenheit.
- Using a sharp knife, cut your pumpkin into 1-inch wedges and remove the seeds. Lay the wedges flat, on a parchment-lined baking sheet. Drizzle them with the olive oil and sprinkle with salt. Use your hands to coat all of the wedges and then bake in the oven for 30-40 minutes, flipping once halfway through. When you can easily pierce a fork through the pumpkin, they are done.
- Let the wedges cool completely on the baking sheet and then remove the skin and discard. Place pumpkin into a food processor and blend until smooth. Transfer to an airtight container and store in the fridge for up to three days. You can also freeze the puree if you wish to use it later.
The post Homemade Pumpkin Puree appeared first on Never. Not. Eating..
]]>The post Sweet Potato Fries appeared first on Never. Not. Eating..
]]>
This is a simple recipe. Simple, yet impactful. It took me a while to nail sweet potato fries. They are tricky little buggers. But, I’ve learned a few tricks along this long and winding road that have helped me up my SPG (Sweet Potato Game). Let me tell you what they are:

Trick #1 – Cornstarch. Dredge these fries with it to help with the crispy-factor. I use this trick with more than just potatoes, too. I ALWAYS sprinkle my tofu with cornstarch before frying it. It’s a surefire way to get that perfect texture on the exterior, and it’s gluten-free!
Trick #2 – Place your baking sheet into a hot oven for five minutes before dumping the SPF (Sweet Potato Fries) on it. When they hit the pan, they automatically start cooking and developing that gorg brown colour. It’s kind of like preheating a pan on your stovetop!
Trick #3 – Space out your SPFs. If you load a pan with too many fries, they won’t have room to crisp up, and will steam instead. Let them socially distance. It’s for the best.
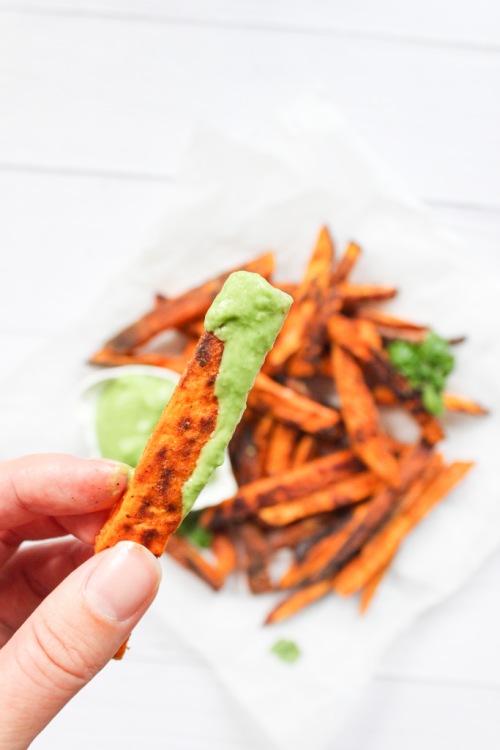
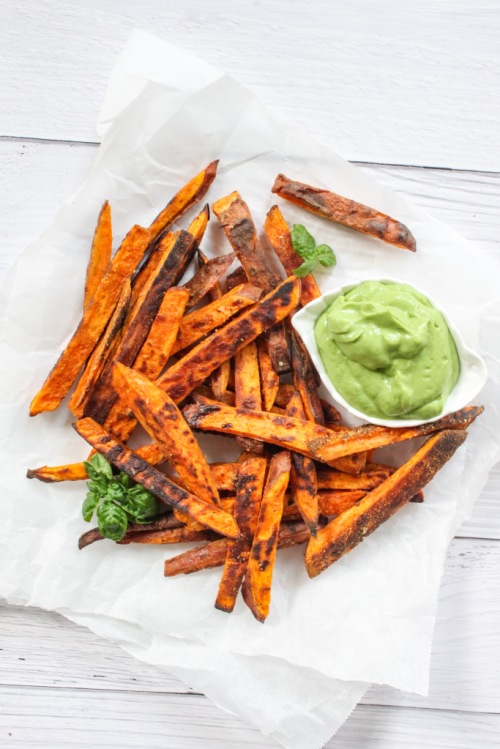
Well, now that I’ve given you all of my tricks, I only have one other thing to say – Dip these babies in my 5-Minute Good-on-Everything Green Sauce. Nothing else compares. Picture crispy sweet ‘tates dunkin’ in a pool of thick and creamy and greeny and herby and…freshy (?) sauce. And, then you eat them. Like, what?! A marriage of two extraordinary foods and memories that will last a lifetime.

If you make these SPF with my 5MGOETGS, take a pic and tag me on Instagram (@nevernoteatingca). I love seeing people make my recipes!
Also, if you understood that last paragraph, I applaud you.
Sweet Potato Fries
Serving size: 2
Prep time: 10 minutes
Cook time: 18 minutes
Ingredients:
- 1 large sweet potato, cut into long, 1/4 inch matchstick slices and patted dry
- 1 tbsp cornstarch
- 1/4 tsp paprika
- 1/4 tsp salt
- pinch of cayenne (optional)
- pinch of fresh black pepper
- olive oil
- sea salt, for topping
Instructions:
- Preheat oven to 425 degrees Fahrenheit. Place a large baking sheet into the oven while it preheats.
- In a small bowl, combine cornstarch, paprika, salt, cayenne and pepper.
- Add sweet potatoes to a large bowl and sprinkle the cornstarch mixture over them. Use your hands to toss the potatoes and dry ingredients together until coated.
- Carefully remove the baking sheet from oven and place sweet potato fries onto it. Be sure to space them out. Lightly drizzle some olive oil over the fries to help them crisp up.
- Bake for 10 minutes, flip and return to oven for another 5-8 minutes, or until browned and crispy.
- Finish with some flaky sea salt and serve with my 5-Minute Good-on-Everything Green Sauce.
The post Sweet Potato Fries appeared first on Never. Not. Eating..
]]>The post Roasted Garlic Mashed Cauliflower (Low-Carb) appeared first on Never. Not. Eating..
]]>We are officially entering Fall and that means, Thanksgiving. I’m a lover of enjoying seventy-four side dishes and can always forego the main one. I am always on the hunt for new and fun sides to add to any meal…especially those around the holidays!

This Roasted Garlic Mashed Cauliflower is the perfect side for Thanksgiving, Christmas, Easter…you name it! It’s low-carb and will please your keto and vegan family members. Bonus: It tastes just as good as mashed potatoes!
How to Make Vegan Roasted Garlic Mashed Cauliflower
I highly recommend a good food processor or blender. The Ninja Kitchen line is a great product and I use their food processor every single day. I make EVERYTHING in it – smoothie bowls, pestos, pastry doughs and this mashed cauliflower. It is an affordable alternative to the well-known Vitamix.

For this recipe, everything gets precooked, placed in your food processor and then blended until smooth – it’s THAT easy! Here is what you will need:
- One medium-sized head of cauliflower
- A head of garlic
- Vegetable broth
The Roasted Garlic
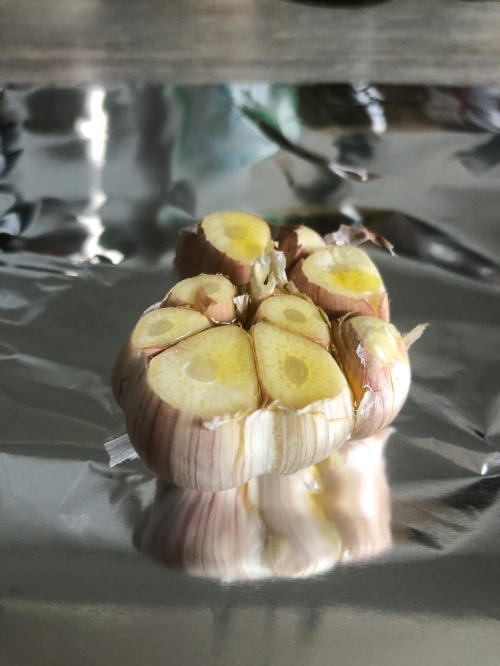
Let’s talk about the garlic – is there anything better?! For this recipe I love using roasted garlic, and although it may take longer, it’s so worth it. In addition, you will also have leftover cloves that you can use in other dishes that you will be serving (or just save them for another day). Roasting a head of garlic is a great move for large dinner parties or holiday gatherings.
To roast, all you have to do is cut off the top of the entire head of garlic, leaving the top of the cloves exposed. Drizzle the head with olive oil, wrap in tin foil and place on a baking sheet and into the oven for 45 minutes. If you want to save on time, you can mince your raw garlic, add to a pan over low heat with some olive oil for about 30 seconds to one minute, and use this in place of the roasted stuff in the recipe. Above all, don’t skimp on the garlic!
Cooking the Cauliflower
To cook the cauliflower, place the florets into a large pot with about a cup and a half of veggie stock. Cover and set your burner to high, and when the liquid starts boiling, turn the burner down slightly and let steam for about 5-10 minutes (depending on how small your florets are). They will be ready when they are fork-tender. Don’t overcook them because you will end up with mushy cauliflower instead of mashed cauliflower!
After you cook the garlic and cauliflower, all that’s left to do is throw it all into your food processor and watch it come together – Pillowy, low-carb clouds of heaven!

More Amazing Cauliflower Sides
Sumac Roasted Cauliflower (a showstopper)
Hot and Sweet Cauliflower Wings (perfect for game day)
East Creamy Cauliflower Soup (a winter hit)
This post contains affiliate links and I may earn a small commission when purchases are made after clicking the links, at no cost to you. Thank you!
Vegan Roasted Garlic Mashed Cauliflower
Servings: 4
Prep time: 10 minutes
Cook time: 45 minutes
Ingredients:
- 1 whole head of garlic
- medium head of cauliflower, broken into florets
- 1 1/2 cups vegetable stock
- salt
- pepper
- olive oil
- fresh thyme, for topping (optional)
Instructions
For the garlic:
- Preheat oven to 375 degrees Fahrenheit.
- Peel the outer layer of skin off of the garlic and slice the top of the head off (see photo above). Place on a piece of tin foil and drizzle the top with about one tablespoon of olive oil. Wrap the garlic up so that there are no holes for the steam to escape and place on a baking sheet and then in the oven for 45-55 minutes.
For the cauliflower:
- When the garlic has been roasting for about half hour, start your cauliflower. Place the florets into a large pot with the vegetable stock, cover and bring to a boil. Once boiling, reduce slightly to a rolling boil and allow the cauliflower to steam for 5-10 minutes, or until just fork tender – do not drain.
- Use a slotted spoon to transfer the cauliflower to a food processor or blender and add one tablespoon of the veggie stock that the cauliflower was cooking in.
- Remove the garlic from the oven and carefully unwrap. Use your fingers to squeeze out two of the cloves (or as many as you want!) and place in the food processor with the cauliflower and stock. Add in 1/4 teaspoon of salt and a few grinds of fresh black pepper and pulse everything to combine and then blend until smooth. Be patient and scrape down the sides often. You can add more of the veggie stock to help loosen it, but don’t add too much or else it will become mushy. Eventually, if you continue to blend and scrape, the mixture will become smooth without the added veggie stock.
- Taste and add more salt and pepper or another clove of garlic, if desired. I like to put more than 1/4 teaspoon of salt, but it is always better to start with less and add more, than to add too much for your taste.
- Transfer the cauliflower to a serving bowl, drizzle with some olive oil and top with fresh thyme, if desired.
The post Roasted Garlic Mashed Cauliflower (Low-Carb) appeared first on Never. Not. Eating..
]]>The post The Best Chocolate Chunk Banana Bread appeared first on Never. Not. Eating..
]]>
I’ve only ever made one banana bread recipe, and it’s this one. It is my absolute favourite…moist, fluffy and delicious. I’ve played around with the recipe a little bit over the years – making it dairy-free, egg-free and including less sugar – and it always works out pretty well, regardless of the change. In the recipe below, you will see the original recipe as well as some healthier adaptations, if you so wish. Your choice.

The dry: You are going to need flour (All Purpose, but sometimes I do half AP and half whole wheat), baking soda, baking powder and salt. Mix, mix, mix.

The wet: Beat one cup of sugar (less if you want) with two eggs (or use “flax eggs” – mix two tablespoons of ground flax with five tablespoons of water and let sit for ten minutes in the fridge to thicken), vanilla and vegetable oil until combined.

In three additions, add the dry mixture alternatively with half a cup of buttermilk (for non-dairy, mix together half a tablespoon of white vinegar with half cup of almond milk and let sit for five minutes before adding to the wet ingredients), mixing just to combine. Do not over mix!

Now comes the part that makes this bread drool-worthy. Toss in a bunch of dark chocolate chunks – the more, the merrier. Mash up those bananas with a fork and dump them right in, too! NOTE: Your bananas should have a brown peel. They are so much sweeter when they are at this stage and perfect for banana bread. I promise.

Oh Em Gee. Look at that yumminess… Talk about goals.
Carefully fold in the bananas and chocolate chunks and then pour into a greased loaf pan.

Toss a couple more chocolate chunks on top to make it look pretty…and for more chocolate chunks on top. Duh.
Now it’s time for the oven. Waiting is the worst part, but it is so worth it in the end. Bake for 45-55 minutes or until a toothpick inserted into the middle comes out clean.

Cool on a wire rack and just try not to eat it. Or eat it…we’re working on our winter bodies…right?!

The Best Chocolate Chunk Banana Bread
Prep time: 10 minutes
Cook time: 50 minutes
Ingredients:
- 2 cups all-purpose flour*
- 3/4 teaspoon baking soda
- 1/2 teaspoon baking powder
- 3/4 teaspoon salt
- 1 cup sugar
- 1/2 cup canola oil
- 2 large eggs
- 1 teaspoon pure vanilla
- 1/2 cup buttermilk**
- 3 overripe bananas, mashed
- 1 cup dark chocolate chunks
Instructions:
- Preheat the oven to 350 degrees and grease a loaf pan.
- In a medium-sized bowl, whisk together the flour, baking soda, baking powder and salt. Set aside.
- In a separate, larger bowl, beat the sugar, oil, eggs and vanilla together until smooth and combined.
- Add the dry ingredients and buttermilk alternately in three additions, being careful not to over mix the batter.
- Add the mashed bananas and chocolate chunks and carefully fold with a spatula until incorporated into the mixture.
- Pour into prepared pan and bake for 45-55 minutes, or until a toothpick inserted in the middle comes out clean.
- Run a butterknife along the edges of the loaf to loosen and turn out onto a wire rack to cool completely.
NOTES:
*You can also use whole wheat flour or half AP and half whole wheat.
**If you are dairy-free, substitute the buttermilk for almond milk mixed with 1/2 tablespoon of white vinegar (let sit for about 5 minutes)
The post The Best Chocolate Chunk Banana Bread appeared first on Never. Not. Eating..
]]>