The post Blueberry Basil Moscow Mule appeared first on Never. Not. Eating..
]]>
You know when you go to a bar, or your parent’s house, and it’s drink o’clock and you want something a bit different?! You want taste without the bloat of beer, flavour without the immense sugar bomb of a cooler, a party without the headache brought on by wine… Yah feel? Welp, I got you, boo.
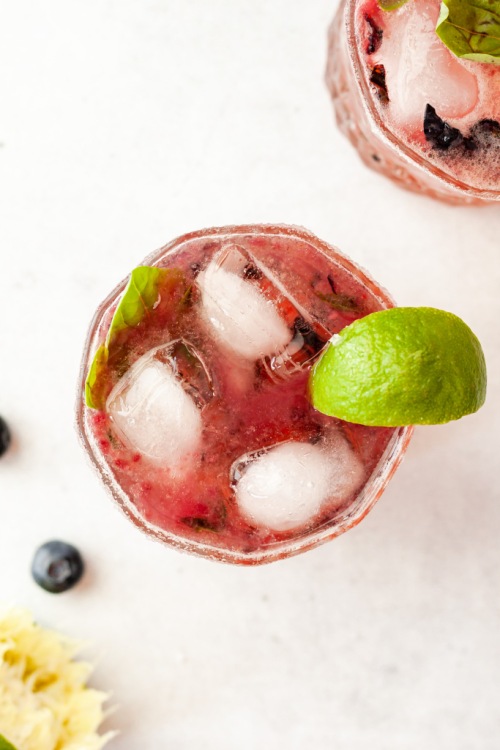
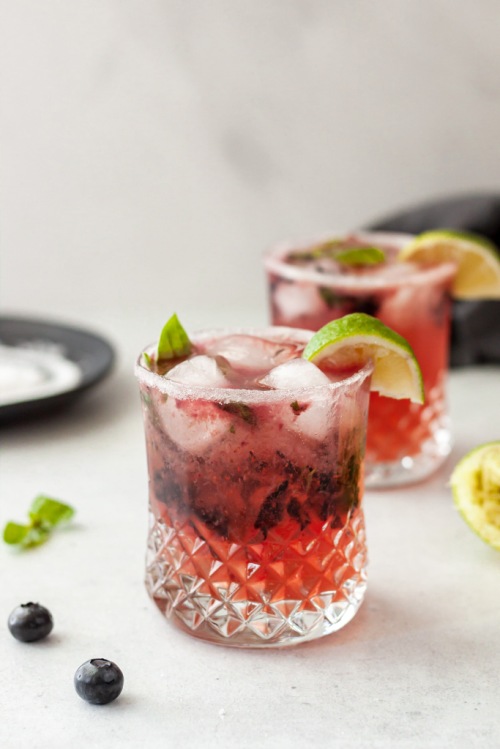
This Blueberry Basil Moscow Mule is the perfect summer drink. It’s fresh and vibrant and a little sassy with that ginger beer. She bad!
This recipe makes two drinks (or one, depending on you), and here is what you will need:
- Blueberries
- Basil
- Vodka
- Ginger beer
- Lime juice (freshly squeezed)
- Sugar for the rim
The first step is to add the blueberries, basil, vodka and lime juice to a tall glass (or a mason jar), and use a muddler to release the juices of the blueberries and lime. Muddle everything together really well so all of the flavours meld together.
Next you’re going to want to rim your glass. This is totally optional, but it makes it look super pretty, and gives it a touch of sweetness, since there is no added sugar in this drink! Run a wedge of lime around the lip of your glass and then dip it into a plate with some sugar. You can also use coconut sugar for this. Fill your glass with some ice and strain the muddled blueberry mixture right over top. Finish it up with some ginger beer, add an extra lime wedge and a few basil leaves and that’s a cocktail!

That’s it! Grab your bluebs, peeps. Let’s mule!
Blueberry Basil Moscow Mule
Servings: Makes 2 drinks
Prep time: 5 minutes
Ingredients:
- 1/4 cup fresh blueberries, washed
- 7-8 small basil leaves
- juice of half a lime (about 1 tbsp), plus one wedge of lime for rimming
- 2 oz vodka
- 3 tbsp sugar
- 10 oz ginger beer
Instructions:
- Add the blueberries, basil, lime juice and vodka to a tall glass, bowl or mason jar, and muddle together to release the juices of the blueberries and the basil.
- Pour sugar onto a flat plate. Use the wedge of lime to rim the lip of two cocktail glasses and then place each glass upside down into the sugar to coat the rim.
- Fill each glass with ice and strain the muddled mixture over top, dividing it appropriately.
- Top up with the ginger beer, an extra lime wedge and a few basil leaves.
NOTES:
Place some of the crushed blueberries in each drink for a pop of colour and delicious texture!
The post Blueberry Basil Moscow Mule appeared first on Never. Not. Eating..
]]>The post Middle Eastern Orzo Pilaf appeared first on Never. Not. Eating..
]]>
Okay, I am in love with all flavours of all regions of the world (literally), but Middle Eastern…AND Italian?! Two heavyweights in the culinary world and I’m here for it! Like a hundo P’s.
Let me break down this fusion for you. We have the following Italian/Mediterannean ingredients:
- Orzo
- Feta
- Basil
And those from the Middle East include:
- Dried fruit (apricots, cherries, currants)
- Pistachios
- Olives
- Pomegranate seeds
- Cilantro
- Spices (Turmeric, Paprika, Cumin, Coriander, etc.)
Together, they are Chrissy and John. Rachel and Ross. Bey and Jay. Me and me.
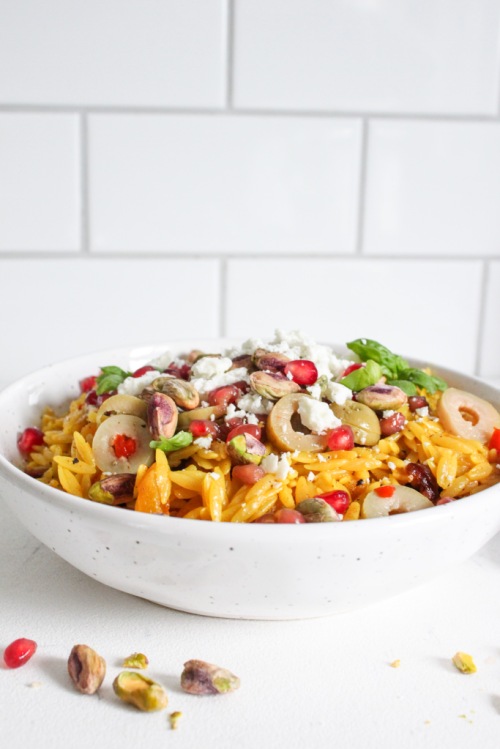
The warm flavours of the spices paired with creamy orzo, sweet fruit and salty olives and feta…hawt damn! I’m drooling.

Oh, one more thing…This makes the perfect lunch the next day. Leftovers for the win!
Middle Eastern Orzo Pilaf
Serving Size: 4
Prep time: 10 minutes
Cook time: 12 minutes
Ingredients:
- 1 tbsp olive oil
- 1 clove garlic, minced
- 1/2 tsp cumin
- 1/4 tsp turmeric
- 1/4 tsp paprika
- 1/4 tsp ground coriander
- pinch of fresh nutmeg
- pinch of black pepper
- 1 cup uncooked orzo, rinsed well
- 1 1/2 cups vegetable broth
- salt
- 1 cup dried fruit (I use cherries, currants and chopped apricots)
- 1 tbsp freshly squeezed lemon juice (optional)
- 4-5 olives, chopped
- 1/4 cup feta, crumbled
- 1/4 cup pomegranate arils
- 1/4 cup pistachios, shelled
- fresh herbs (cilantro and basil) for topping, (optional)
Instructions:
- Heat olive oil in a large pan over medium heat. Add the garlic and cook for 30 seconds or until fragrant. Add the cumin, turmeric, paprika, coriander, nutmeg and pepper and stir until toasted, another 30 seconds to 1 minute. Add the orzo and stir to coat with the spices. Once coated, pour in the broth, add 1/4 tsp salt and bring up to a boil and then reduce heat and let simmer for 8 minutes, with the lid on.
- After the 8 minutes, quickly lift the lid, add the dried fruit, and stir to incorporate with the orzo. Place the lid back on and let stand for 2 more minutes off the heat.
- Squeeze some fresh lemon juice into the pan and stir to combine. Transfer the orzo to a serving dish and top with olives, feta, pomegranate seeds, pistachios and fresh herbs. Serve immediately or let cool and refrigerate in an airtight container for up to three days.
The post Middle Eastern Orzo Pilaf appeared first on Never. Not. Eating..
]]>The post Sweet Potato Fries appeared first on Never. Not. Eating..
]]>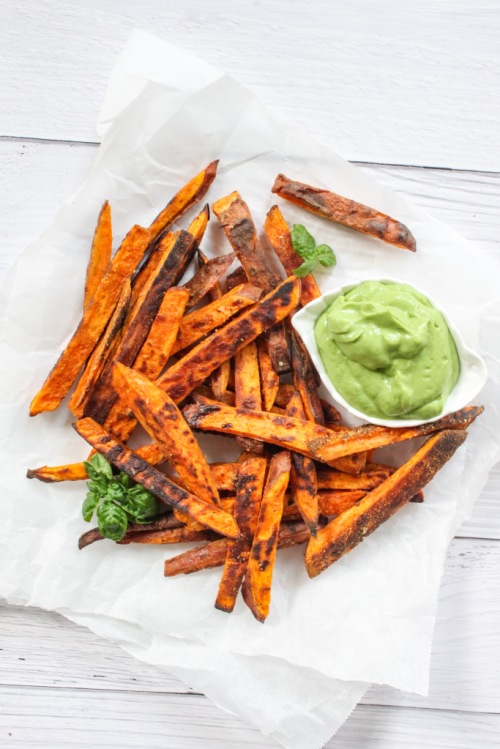
This is a simple recipe. Simple, yet impactful. It took me a while to nail sweet potato fries. They are tricky little buggers. But, I’ve learned a few tricks along this long and winding road that have helped me up my SPG (Sweet Potato Game). Let me tell you what they are:

Trick #1 – Cornstarch. Dredge these fries with it to help with the crispy-factor. I use this trick with more than just potatoes, too. I ALWAYS sprinkle my tofu with cornstarch before frying it. It’s a surefire way to get that perfect texture on the exterior, and it’s gluten-free!
Trick #2 – Place your baking sheet into a hot oven for five minutes before dumping the SPF (Sweet Potato Fries) on it. When they hit the pan, they automatically start cooking and developing that gorg brown colour. It’s kind of like preheating a pan on your stovetop!
Trick #3 – Space out your SPFs. If you load a pan with too many fries, they won’t have room to crisp up, and will steam instead. Let them socially distance. It’s for the best.
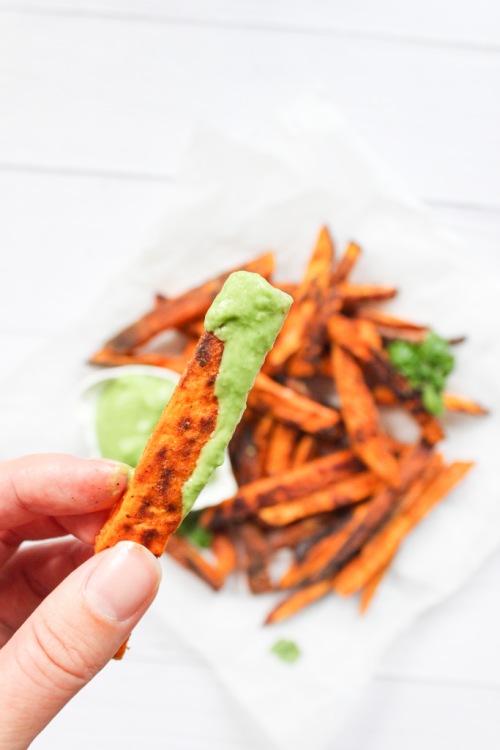
Well, now that I’ve given you all of my tricks, I only have one other thing to say – Dip these babies in my 5-Minute Good-on-Everything Green Sauce. Nothing else compares. Picture crispy sweet ‘tates dunkin’ in a pool of thick and creamy and greeny and herby and…freshy (?) sauce. And, then you eat them. Like, what?! A marriage of two extraordinary foods and memories that will last a lifetime.

If you make these SPF with my 5MGOETGS, take a pic and tag me on Instagram (@nevernoteatingca). I love seeing people make my recipes!
Also, if you understood that last paragraph, I applaud you.
Sweet Potato Fries
Serving size: 2
Prep time: 10 minutes
Cook time: 18 minutes
Ingredients:
- 1 large sweet potato, cut into long, 1/4 inch matchstick slices and patted dry
- 1 tbsp cornstarch
- 1/4 tsp paprika
- 1/4 tsp salt
- pinch of cayenne (optional)
- pinch of fresh black pepper
- olive oil
- sea salt, for topping
Instructions:
- Preheat oven to 425 degrees Fahrenheit. Place a large baking sheet into the oven while it preheats.
- In a small bowl, combine cornstarch, paprika, salt, cayenne and pepper.
- Add sweet potatoes to a large bowl and sprinkle the cornstarch mixture over them. Use your hands to toss the potatoes and dry ingredients together until coated.
- Carefully remove the baking sheet from oven and place sweet potato fries onto it. Be sure to space them out. Lightly drizzle some olive oil over the fries to help them crisp up.
- Bake for 10 minutes, flip and return to oven for another 5-8 minutes, or until browned and crispy.
- Finish with some flaky sea salt and serve with my 5-Minute Good-on-Everything Green Sauce.
The post Sweet Potato Fries appeared first on Never. Not. Eating..
]]>The post Lemony Vegan Basil Pesto appeared first on Never. Not. Eating..
]]>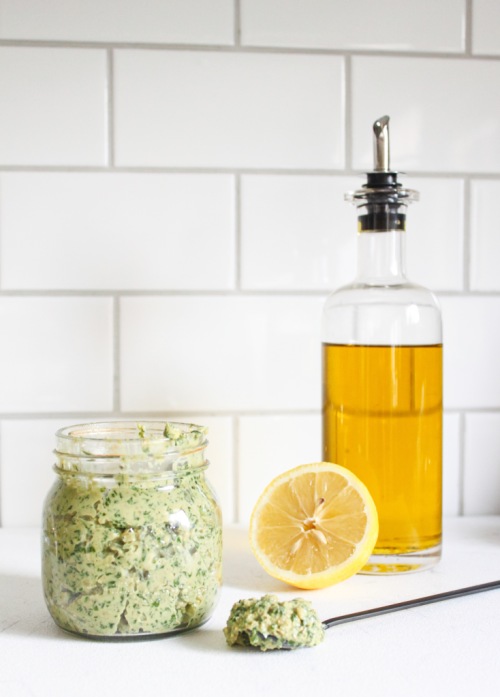
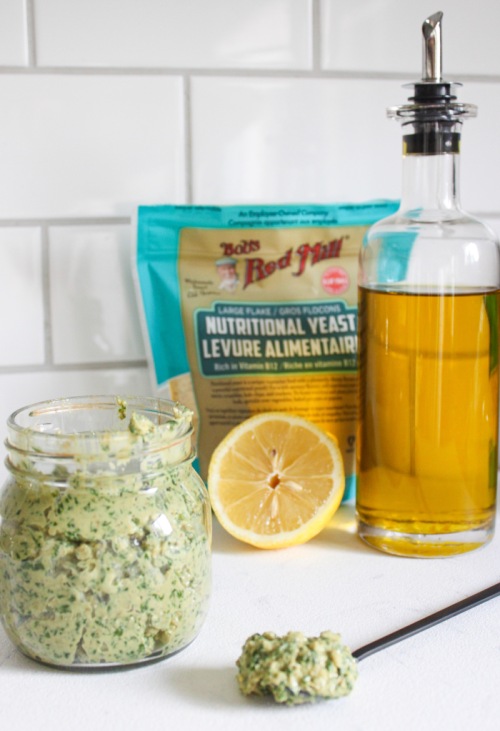
Pesto is a highly underused food, IMO. It is so versatile – from a sauce for pasta or pizza to a simple spread for toast, it is a complete flavour bomb!
Traditionally, pesto is made with five key ingredients: Basil, pine nuts, parmesan, olive oil and garlic (plus salt, but that doesn’t count). And, you want to know the greatest thing about pesto? The ingredients are easily adaptable. That is why turning it vegan is so easy to do.
The herbs – Basil is traditional in pestos, and I stick with it in this recipe as well. However, it can easily be swapped out for any leafy green such as parsley, cilantro, spinach or a combination of these. It depends on what you have, what you like and how adventurous you are!
The nuts – Pine nuts are typically what you find in pesto, but since one bag costs more than my monthly gym membership, I usually switch them for another type of nut. I love walnuts and I chose to use them in this recipe. Pecans would also be good for a sweeter turn-out. Toasting the nuts prior to using them in a pesto also adds another dimension of flavour.
The cheese – Pesto is made with a dry-aged cheese, like parmesan. You can, however, sub it for a cheese of your choice, like romano or even an old sharp cheddar. Since this recipe is vegan, I am using the cheesiest vegan ingredient I know of – Nutritional Yeast. Nutritional Yeast is an inactive yeast that is very cheesy in flavour and is packed with a number of healthy nutrients including: Thiamine, Riboflavin, Niacin, Vitamin B6, Folate and my favourite, Vitamin B12. I am almost positive it is the only vegetarian food you can find that has B12 in it, which makes me love it even more! The one I use can be found here.
The oil – Use extra virgin olive oil. There are no exceptions for this ingredient. Make it a good olive oil, too, like this one.
Garlic – Same.
Acid – I like to put lemon juice as well as the zest into my pesto. It gives it a ‘zip’ of freshness that adds brightness and vibrancy to any dish!
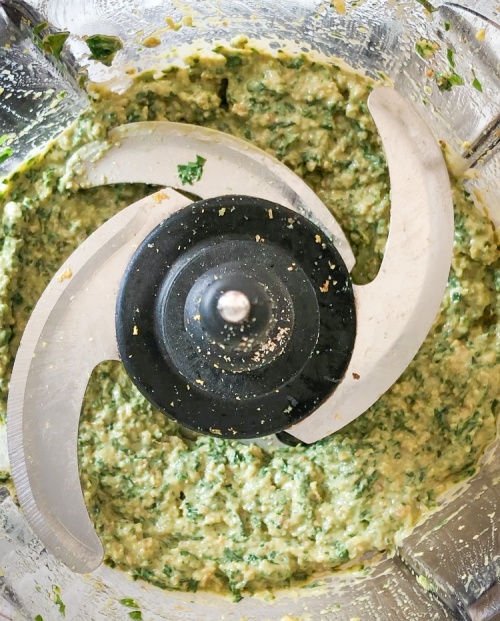
The process of making pesto can be completed in many ways. Traditionally, it is made by cutting all of the ingredients together with a sharp knife and then pouring the olive over them. It could also be made in a mortar and pestle. I like to use my food processor to save on time.
Whichever ingredients you choose to use and whichever method you bring them together in, I hope you get to enjoy pesto this summer. There is nothing better!
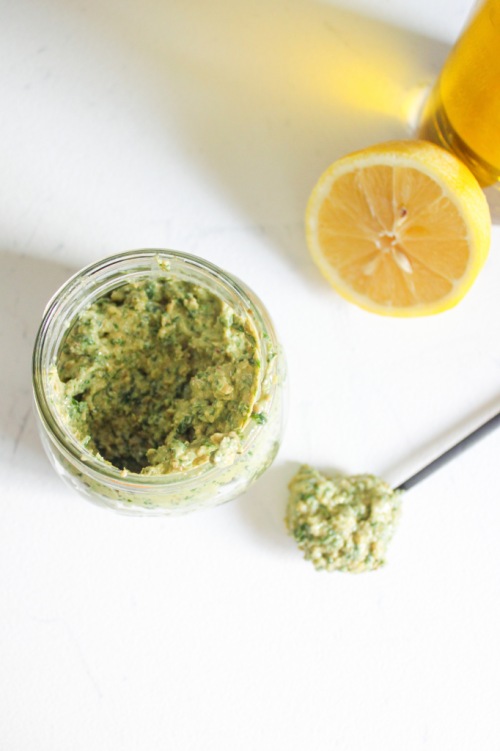
Lemony Vegan Basil Pesto
Serving size: Makes about 1/2 cup
Prep time: 10 minutes
Ingredients:
- 2.5 cups packed fresh basil, washed and dried
- 1/2 cup walnuts
- 1 clove garlic
- 1/4 tsp sea salt
- 2 tbsp nutritional yeast
- zest of one lemon
- 1.5 tbsp fresh lemon juice
- 1/4-1/3 cup good extra virgin olive oil
Instructions:
- To your food processor, add the basil, walnuts, garlic, salt, nutritional yeast and lemon zest. Pulse until the mixture has broken down into smaller pieces. Add the lemon juice and set your processor to blend. While blending, drizzle in the olive oil slowly. If you want a thicker pesto, add 1/4 cup of oil. If you are looking for a thinner sauce, continue to add more oil until you have reached your desired consistency. Taste and adjust seasonings (salt, lemon juice) accordingly.
This is best used immediately, but can be stored in an airtight container in the fridge for up to three days.
The post Lemony Vegan Basil Pesto appeared first on Never. Not. Eating..
]]>The post Butternut Squash and Kale Lasagne Roll-Ups appeared first on Never. Not. Eating..
]]>
Thaz right. The layers in this lasagne aren’t lookin’ like a sedimentary rock, nuh uh. They are more like a snail shell. Yah feel me?!
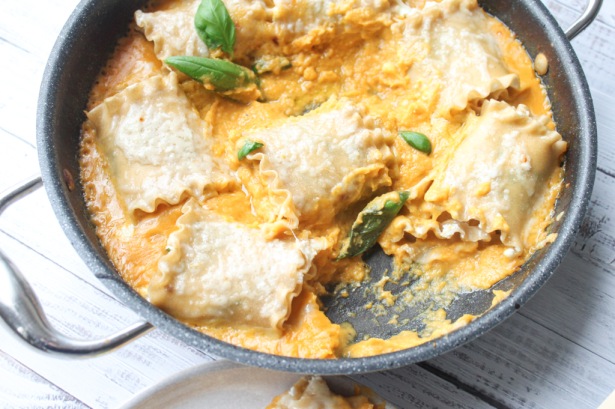
This is a lasagne revolution – the pasta sheet laid out, smothered with the toppings and then rolled up into a cute little present that takes a bath in squash. I mean sauce. I mean squash sauce. And, although I love the standard tomato sauce with all of my heart, squash sauce is my side piece and needs attention, too.
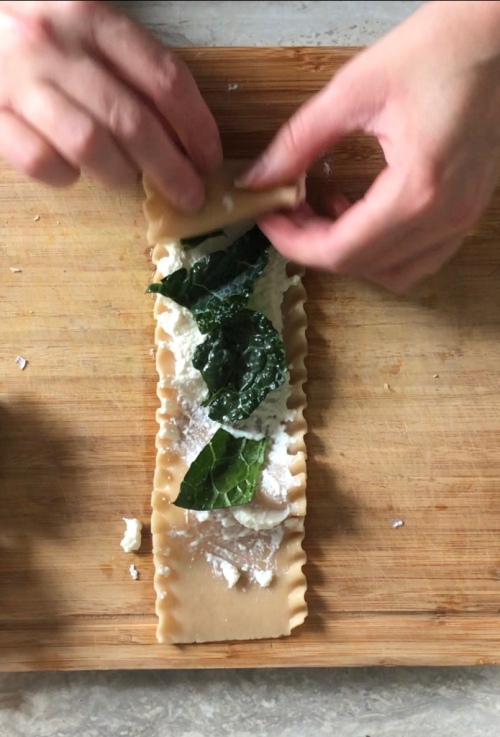
Okay, for reals – this lasagne dish is everything. It starts with the creamy sauce. Roasted butternut squash, pureed and then hit with some garlic, coconut milk and flavourful pasta water – an important ingredient for any great sauce. Nutritious kale and fluffy, whipped ricotta cheese on top of a perfectly cooked lasagne noodle, rolled up and finished off together in the oven with some extra parm on top for that nuttiness. DROOL.

This should be your next pasta night recipe.
Butternut Squash and Kale Lasagne Roll-Ups
Servings: Makes 10 rolls (feeds about 3 people)
Prep time: 20 minutes
Cook time: 50 minutes
Ingredients:
- 1 large butternut squash, diced into 1/2 inch cubes
- olive oil
- salt
- pepper
- 5 large kale leaves, thick stem removed (I prefer Tuscan Kale)
- 2 cups ricotta cheese
- 1 tbsp fresh lemon juice + more for serving (optional)
- 1 cup vegetable stock
- 1/4 tsp fresh (or packaged) nutmeg
- 10 lasagne sheets
- 2 cloves garlic, minced
- 1 cup canned coconut milk
- 1 cup fresh parmesan or mozzarella cheese, shredded
- fresh basil for topping (optional)
Instructions:
- Preheat your oven to 400 degrees Fahrenheit.
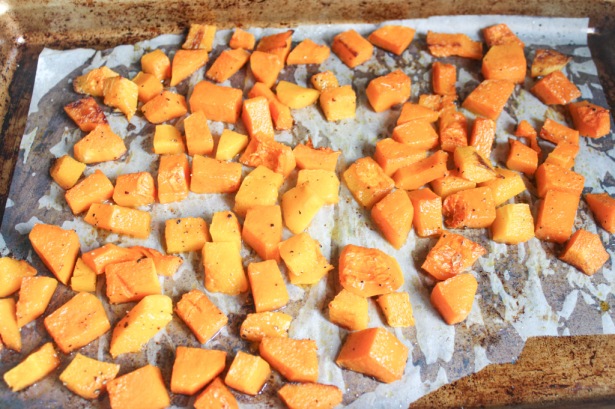
- Place the squash onto a parchment lined baking sheet. Drizzle with 1-2 tbsp olive oil and add a generous pinch of salt and a few grinds of fresh black pepper. Toss with your hands until coated and roast in the oven for 25-30 minutes, flipping once throughout the cooking time. Squash should be tender throughout.
- Lower the oven to 350 degrees Fahrenheit.
- While the squash is cooking, prepare your other ingredients. Chop the kale into small, bite-size pieces and massage with a little bit of olive oil. This helps to tenderize the kale.
- Use an electric mixer to beat the ricotta with 1 tbsp of lemon juice and a pinch of salt and pepper. Whip until smooth.
- Add the cooked squash to a food processor with the vegetable stock, nutmeg, 1/2 tsp salt and 1/4 tsp pepper. Blend until smooth.
- In the meantime, bring a large pot of heavily salted water to a boil and add the lasagne sheets. Cook according to package directions. Reserve 1/4 cup of the pasta water before draining.
- Set a large, oven-safe saucepan over medium-low heat and add 2 tbsp olive oil. Add the garlic and cook for 30 seconds, or until fragrant. Immediately add the squash puree from your food processor as well as the reserved pasta water and let simmer for 5 minutes, stirring frequently. Pour in the coconut milk and stir until smooth.
- Make the rolls by taking a sheet of the cooked lasagne, spreading the ricotta mixture on it, topping with a few pieces of kale and then rolling it up, starting at one end and working your way to the other. Tuck the roll into the squash sauce, placing the side with the seam down. Do this for all of the rolls.
- Evenly distribute the cheese overtop of the rolls and sauce. Bake in the oven for 10 minutes, or until the cheese is fully melted. Remove and let cool a few minutes before serving. Top with fresh basil and a squeeze of lemon!
The post Butternut Squash and Kale Lasagne Roll-Ups appeared first on Never. Not. Eating..
]]>The post Heirloom Tomato, Pesto and Ricotta Tart appeared first on Never. Not. Eating..
]]>
When I was a kid, I would (regularly) eat an entire tomato, one bite at a time, sprinkling on salt between mouthfuls. I knew what was up. My love for tomatoes hasn’t changed in the least. I honestly don’t even believe in sandwiches without them. That may be why I developed this fresh, juicy, delicious, tomato-forward tart that screams summer and brings me back to my childhood. Try it out if you were anything like me as a child (or adult).

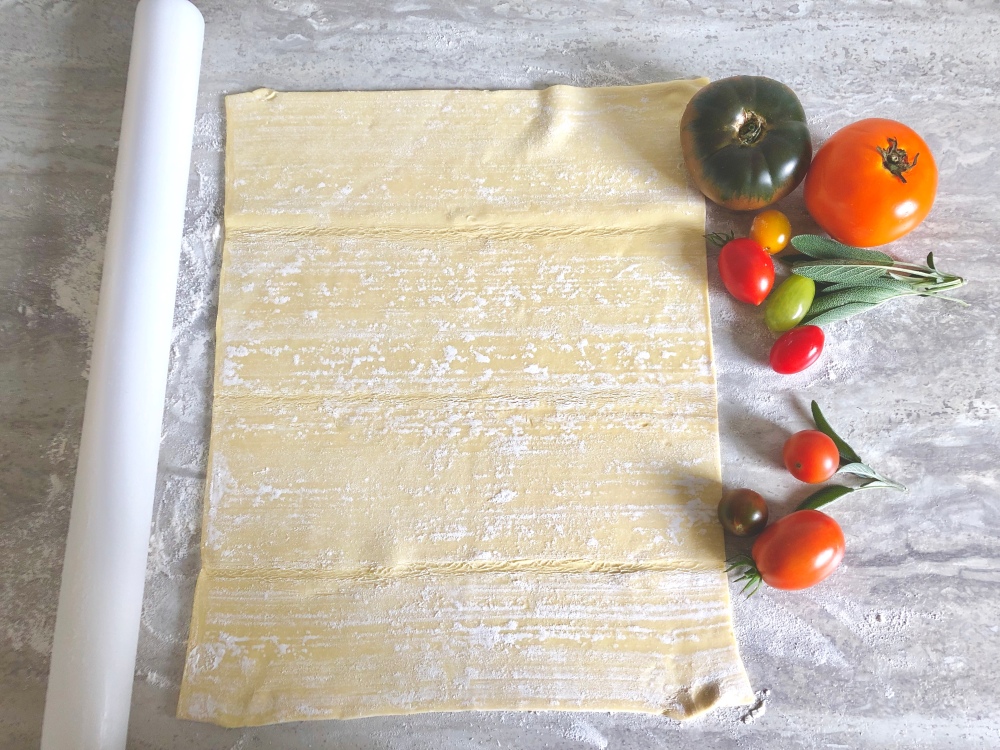
Let’s start with the star of the show – Tomatoes. You really can use any kind for this recipe, however, I really love the colour variance that heirloom tomatoes provide…It makes the tart look stunning. I prefer to use a range of sizes as well…from the large, funny-shaped ones to the teeny, tiny, mini ones. If you make this tart in the summer, heirloom tomatoes are the way to go. If it is past their season though, it would be better to use your regular supermarket hybrid tomato, as heirlooms don’t travel well.

Secondly, pesto. Traditionally, a delicious mix of basil leaves, pine nuts, garlic, lemon juice, olive oil, salt and parmesan cheese. I make a vegan-style pesto that I prefer to use with this recipe (click here for the recipe), but you can use your favourite one. Store bought is a good option throughout the winter.

The Puff – the base of this tart is made with puff pastry. This stuff is magic. A little heat and it rises up, turns golden brown and develops crispy edges that are drool-worthy. You can buy it in the freezer section of any grocery store. Just take one sheet out of the freezer about an hour before making this recipe to allow it to defrost.
Finally – ricotta. An italian triumph and a perfect pair for tomatoes. Spread over the tart at your own will. No one should limit your ricotta intake.

Let’s get to it!

Heirloom Tomato, Pesto and Ricotta Tart
Servings: 6
Prep time: 15 minutes
Cook time: 30 minutes
Ingredients:
- 1 sheet of puff pastry, thawed
- 1/2 cup ricotta
- 5-7 tbsp my Lemony Vegan Basil Pesto (or store-bought)
- tomatoes (3 large, 1 medium, 10-15 cherry tomatoes)
- flaky sea salt
- fresh basil
Instructions:
- Preheat oven to 400 degrees F.
- On a lightly floured surface, roll the puff pastry out until it is about 1/4 of an inch thick and in a rectangular shape. Transfer dough to a parchment lined baking sheet.
- Spread the ricotta evenly over the pastry.
- Spoon 2-3 tablespoons of basil pesto over the ricotta layer.
- Begin placing your tomatoes, filling in the gaps with the smaller cherry tomatoes, and leaving a 1-inch border all the way around.
- Drizzle another 2-3 tablespoons of pesto overtop of the tomato layer.
- Fold the border of the pastry overtop of the tomatoes and pinch at the corners. Brush another tablespoon or two of pesto onto the edges of the puff pastry.
- Bake in the oven for 30 minutes, or until pastry has puffed up and is golden brown in colour.
- Remove from oven and sprinkle some flaky sea salt over top.
- Let cool for 5 minutes before slicing with a pizza cutter. Top with fresh basil and a few more drizzles of pesto (optional).
The post Heirloom Tomato, Pesto and Ricotta Tart appeared first on Never. Not. Eating..
]]>