The post Dark Chocolate Almond Butter Bars appeared first on Never. Not. Eating..
]]>
I’m a HUGE choco + peanut butter fan, but I thought I’d switch it up today and choose a slightly healthier nut butter to create a slightly less-healthy dessert. Balance.

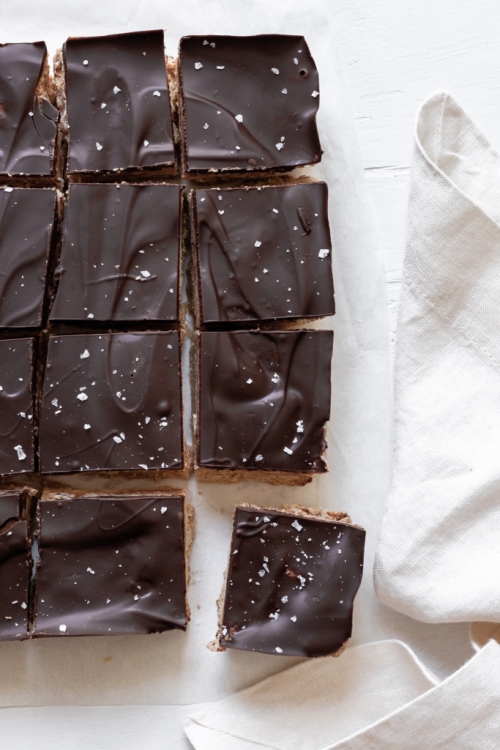
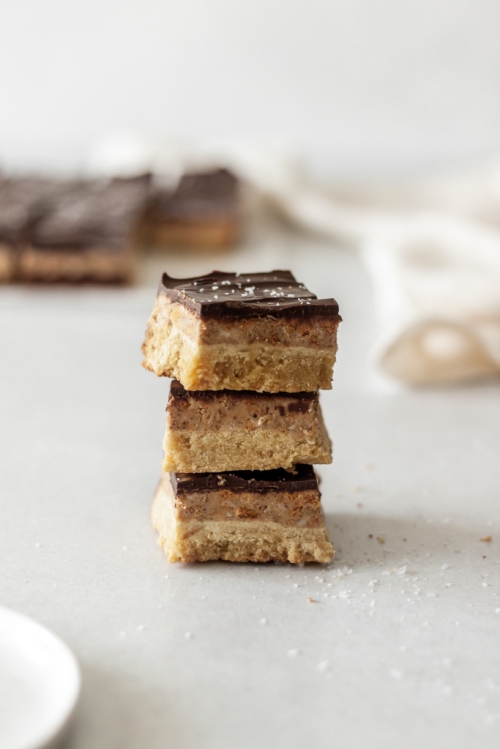
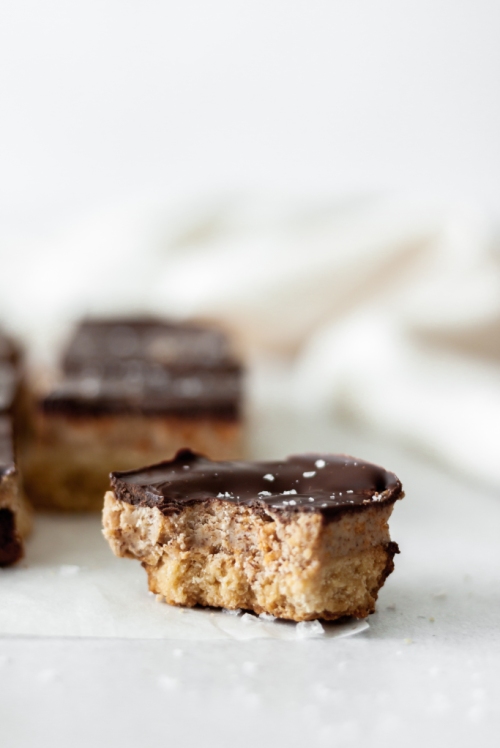
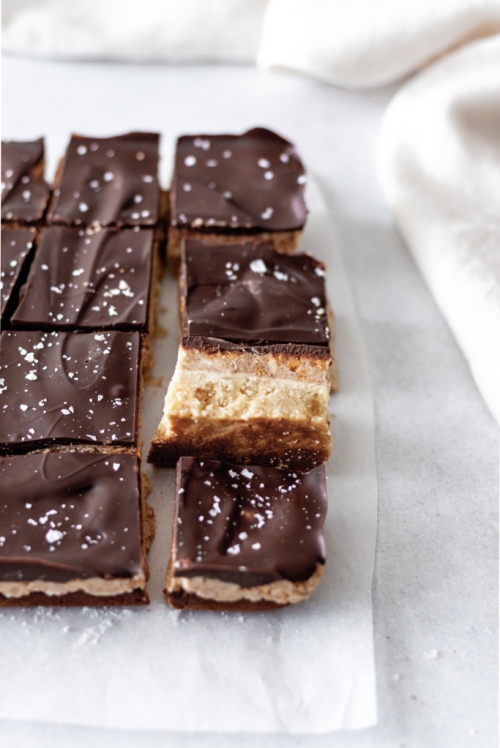
These bars have a thick shortbread-type bottom layer, a crunchy and sweet almond butter centre, and a lush dark chocolate top. They are friggin’ delish.
In order to keep these bars gluten-free, I’ve made the crust with a mix of almond flour and Bob’s Red Mill Gluten-Free All Purpose Flour, and I’ve crushed up my favourite gluten-free cereal to add texture to the middle. Feel free to swap for any gluten-filled flour or cereal you wish!
Let’s make them!
Dark Chocolate Almond Butter Bars
Servings: Makes 16 squares
Prep time: 10 minutes
Cook time: 10 minutes
Cool time: 1 hour
Ingredients:
For the bottom layer:
- 1 cup almond flour
- 1 1/2 cups gluten-free flour
- pinch of salt
- 3-4 tbsp agave
- 4 tbsp (1/4 cup) cold coconut oil
For the almond butter layer:
- 1/2 cup smooth almond butter
- 1/3 cup coconut oil, melted
- 1 cup powdered sugar
- 1 cup of your favourite gluten-free cereal, made into crumbs (makes a heaping 1/2 cup)
- pinch of salt
- 1/2 tbsp vanilla
For the chocolate layer:
- 150 g dark chocolate, chopped
- flaky sea salt, for topping (optional)
Instructions:
- Preheat oven to 350 degrees Fahrenheit and line an 8 x 8 inch baking pan with parchment paper.
- For the bottom layer – Combine the flours and salt in a food processor and pulse to combine. Add the coconut oil and three tablespoons of agave and pulse. If the dough does not start coming together, add the fourth tablespoon of agave. Dump into parchment lined pan and use your hands or the bottom of a glass to distribute evenly. Pierce the top a few times with a fork. Bake for 10-15 minutes, or until it turns light brown around the edges. Cool completely.
- For the almond butter layer – Combine all ingredients in a large bowl and stir to combine. Dollop the mixture onto the cooled bottom layer and use your hands to press down and spread evenly. Set aside.
- For the chocolate layer – Add the chocolate to a glass or heatproof bowl set over a double boiler. Melt, watching closely and stirring often. Alternatively, melt the chocolate in the microwave in small increments. Pour melted chocolate over the almond butter layer and place in the fridge to set for at least an hour. Cut into squares and serve!
Store in an airtight container in the fridge for up to 5 days.
The post Dark Chocolate Almond Butter Bars appeared first on Never. Not. Eating..
]]>The post Sweet Potato Creme Brulee (Vegan, GF) appeared first on Never. Not. Eating..
]]>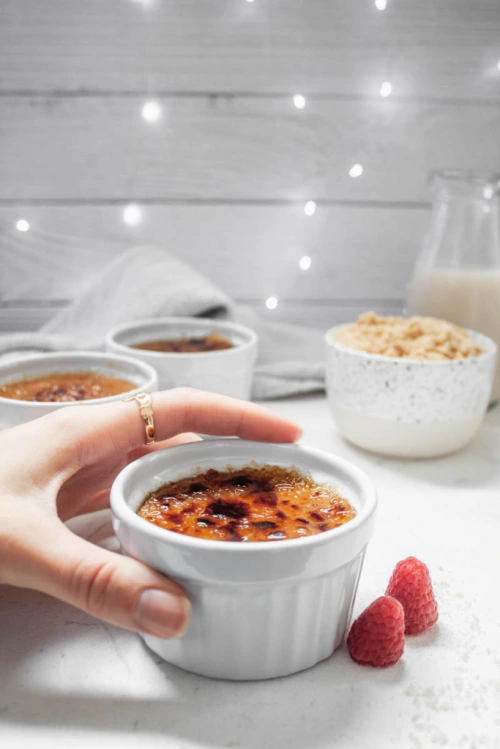
WHAT IS SWEET POTATO CREME BRULEE?
I really love sweet potatoes and I always have them at this time of year. I prefer them to white potatoes and always experiment with different ways of using them. This week, I turned them into the cutest little desserts, that are also dairy-free and gluten-free! ‘Cause who doesn’t love to be free?!

INGREDIENTS
So, real talk: My appreciation for coconut milk grows by the day. Nature seriously did us a solid by serving us coconuts, and I am down for it. You can very likely turn any animal-based recipe into a plant-based one with a simple can of coconut milk, just in case you were wondering!
Coconut milk and sweet potatoes are the two main ingredients in this recipe. You will also need a sweetener, and since sweet potatoes and maple go really well together, I use syrup (that pure Canadian kind)! Some cinnamon and fresh nutmeg bring in the warm, cozy feelings of winter. Finally, the glue that holds it all together is the agar agar. Agar agar is basically a vegan gelatin. You can buy it on Amazon, or if you have any specialty grocery stores in your ‘hood, try that!
HOW TO MAKE SWEET POTATO CREME BRULEE
The first step is to roast the sweet potato. I really hate a mess (and I’m lazy), so I just pierce my potato with a fork a few times and stick it directly on the rack of my oven, place a piece of tin foil on the rack below it (to catch any drippings), set my oven to 400 degrees and walk away for an hour. You will see the potato begin to ooze out (yes, it’s normal) and that’s usually how you know it is ready. Stick a fork in it, just in case.
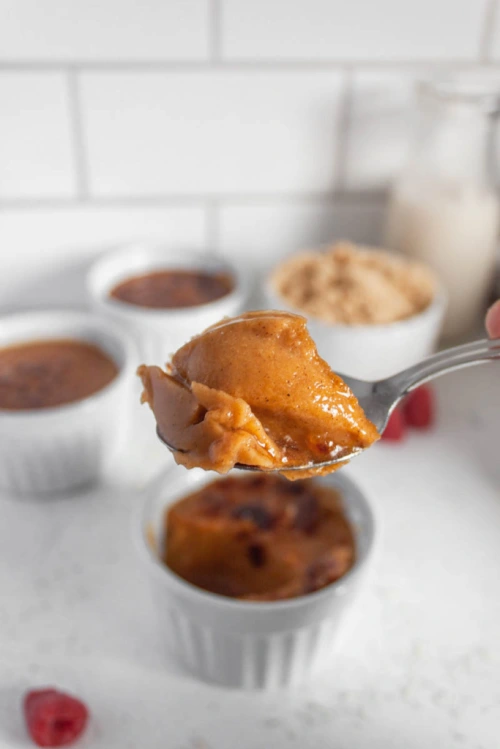
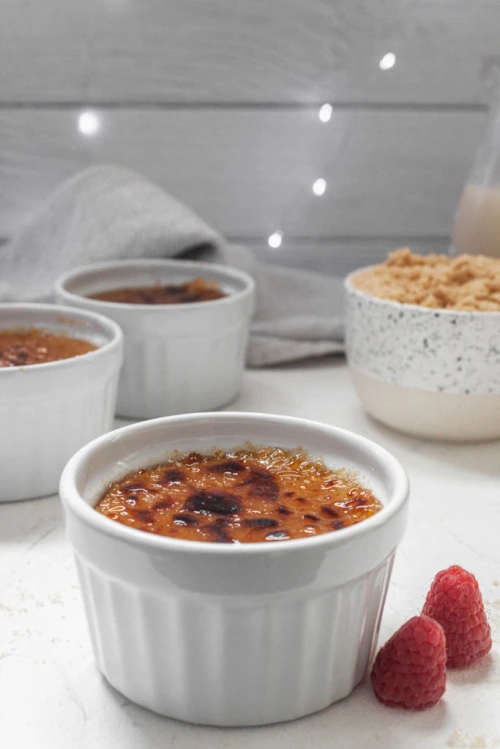
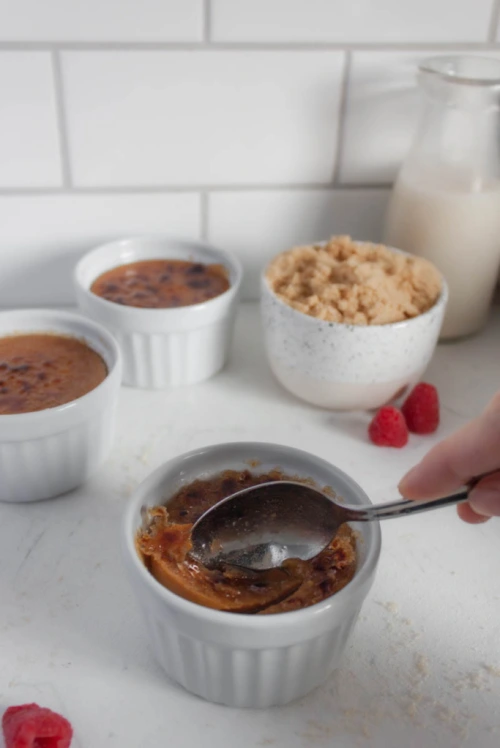
Next, you place the potato, milk and syrup in a blender and blend until smooth. Transfer to a pot with some salt and the spices and bring to a boil. Add the agar agar and reduce heat, whisking for about a minute to ensure the agar is completely combined. Strain the mixture and pour into small ramekins and when ready to serve, top with some sugar (I do a mix of white and brown) and torch!
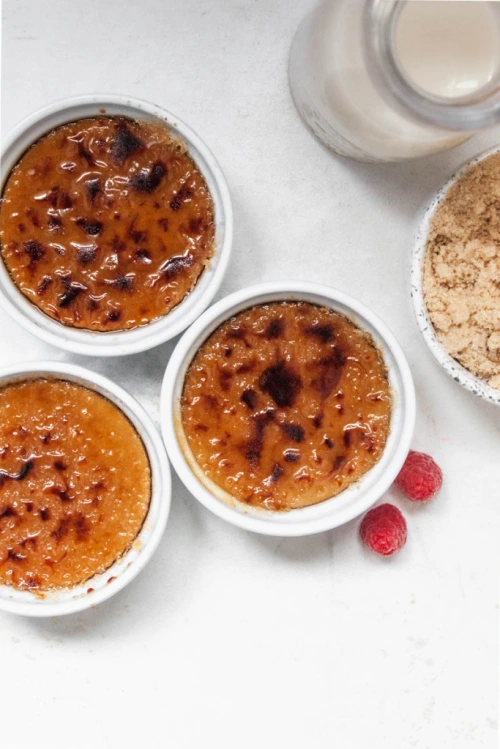
Your holiday guests will love cracking the hardened sugar on top and diving in to this semi-healthy treat!
OTHER VEGAN DESSERTS
Vegan Whipped Cream (the perfect dessert topping)
Vegan Rice Crispy Chocolate Treats (a perfect bite-sized snack)
Chocolate Chai Ganache (amazing for cake decorating)
TOOLS I USED TO MAKE THIS RECIPE


Sweet Potato Creme Brulee (Vegan, GF)
Servings: 4
Prep time: 5 minutes
Cook time: 1 hour 10 minutes
Ingredients:
- 1 medium sweet potato
- 1 can full-fat coconut milk
- 1/2 cup coconut milk (I use Silk brand)
- 2 tbsp maple syrup
- 1 tsp cinnamon
- pinch of fresh nutmeg
- A pinch salt
- 1/2 tsp agar agar
- 1 tsp pure vanilla extract
- 4 tbsp sugar (I mix equal parts white and brown)
Instructions:
- Preheat oven to 400 degrees Fahrenheit. Pierce the sweet potato with a fork a few times. When oven is ready, place potato directly on the middle rack, and put a piece of tin foil on the rack below it, to catch any drippings. Bake for 1 hour, or until fork inserts easily into the centre. Carefully remove skin.
- To your blender, add the sweet potato, both coconut milks and the syrup. Blend until smooth and then transfer to a pot.
- Place the pot on the stove over medium-high heat. Add the salt, cinnamon and nutmeg and bring to a boil, stirring often. Once boiling, add the agar agar, lower the heat to a simmer and whisk continuously for one minute, or until the agar agar is completely dissolved. Remove from heat and whisk in the vanilla.
- Strain the mixture through a fine mesh sieve directly into four small ramekins. Place in the fridge to firm up for at least one hour.
- Right before serving, sprinkle the tops of each ramekin with one tablespoon of the sugar and use a kitchen torch to melt the sugar until it is a deep brown colour. Let it sit for a minute before serving.
- Crack the top with a spoon and enjoy!
The post Sweet Potato Creme Brulee (Vegan, GF) appeared first on Never. Not. Eating..
]]>The post Middle Eastern Orzo Pilaf appeared first on Never. Not. Eating..
]]>
Okay, I am in love with all flavours of all regions of the world (literally), but Middle Eastern…AND Italian?! Two heavyweights in the culinary world and I’m here for it! Like a hundo P’s.
Let me break down this fusion for you. We have the following Italian/Mediterannean ingredients:
- Orzo
- Feta
- Basil
And those from the Middle East include:
- Dried fruit (apricots, cherries, currants)
- Pistachios
- Olives
- Pomegranate seeds
- Cilantro
- Spices (Turmeric, Paprika, Cumin, Coriander, etc.)
Together, they are Chrissy and John. Rachel and Ross. Bey and Jay. Me and me.
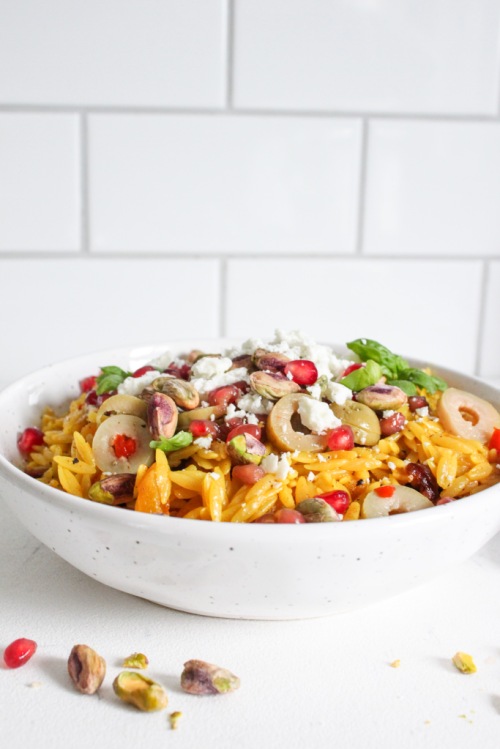
The warm flavours of the spices paired with creamy orzo, sweet fruit and salty olives and feta…hawt damn! I’m drooling.

Oh, one more thing…This makes the perfect lunch the next day. Leftovers for the win!
Middle Eastern Orzo Pilaf
Serving Size: 4
Prep time: 10 minutes
Cook time: 12 minutes
Ingredients:
- 1 tbsp olive oil
- 1 clove garlic, minced
- 1/2 tsp cumin
- 1/4 tsp turmeric
- 1/4 tsp paprika
- 1/4 tsp ground coriander
- pinch of fresh nutmeg
- pinch of black pepper
- 1 cup uncooked orzo, rinsed well
- 1 1/2 cups vegetable broth
- salt
- 1 cup dried fruit (I use cherries, currants and chopped apricots)
- 1 tbsp freshly squeezed lemon juice (optional)
- 4-5 olives, chopped
- 1/4 cup feta, crumbled
- 1/4 cup pomegranate arils
- 1/4 cup pistachios, shelled
- fresh herbs (cilantro and basil) for topping, (optional)
Instructions:
- Heat olive oil in a large pan over medium heat. Add the garlic and cook for 30 seconds or until fragrant. Add the cumin, turmeric, paprika, coriander, nutmeg and pepper and stir until toasted, another 30 seconds to 1 minute. Add the orzo and stir to coat with the spices. Once coated, pour in the broth, add 1/4 tsp salt and bring up to a boil and then reduce heat and let simmer for 8 minutes, with the lid on.
- After the 8 minutes, quickly lift the lid, add the dried fruit, and stir to incorporate with the orzo. Place the lid back on and let stand for 2 more minutes off the heat.
- Squeeze some fresh lemon juice into the pan and stir to combine. Transfer the orzo to a serving dish and top with olives, feta, pomegranate seeds, pistachios and fresh herbs. Serve immediately or let cool and refrigerate in an airtight container for up to three days.
The post Middle Eastern Orzo Pilaf appeared first on Never. Not. Eating..
]]>The post Vegan Pumpkin Coconut Cake appeared first on Never. Not. Eating..
]]>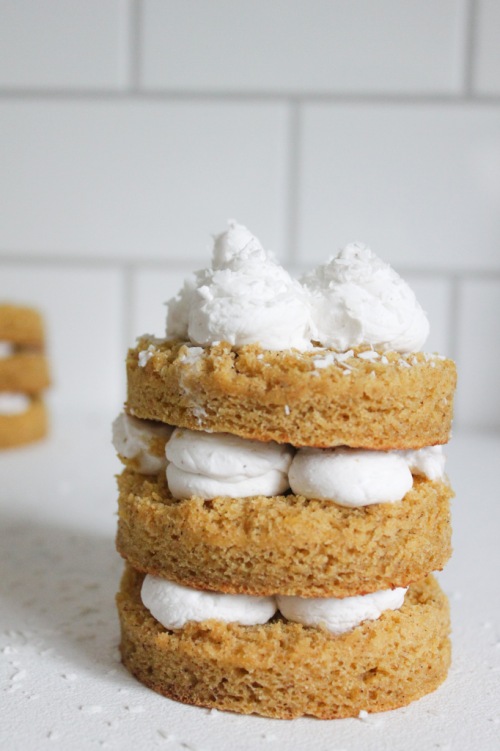
That’s right…Eggless, milkless, and as a bonus – glutenless! No bad foods allowed. A perfect Thanksgiving dessert for the upcoming long weekend!
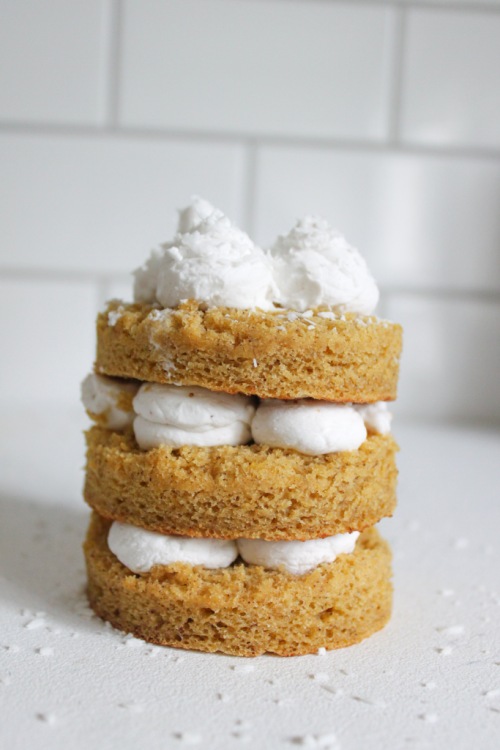
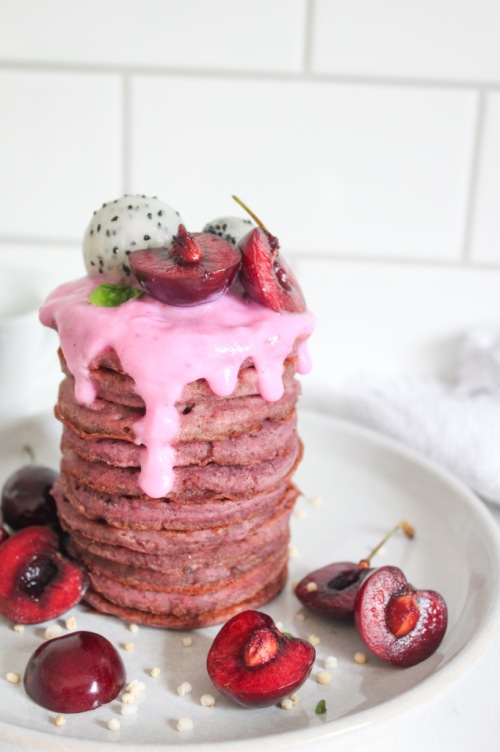
This cake takes minutes to put together, minutes to bake, and seconds to eat. It is moist and fluffy and perfect. You can make individually stacked cakes (as seen in the photos), or you can make one, two-layered cake.
Here is what you will need for the cake:
- My homemade pumpkin puree (or store bought, but it’s just not as fresh)
- Gluten-free flour
- Apple cider vinegar
- Oat milk
- Pumpkin pie spice
- Salt
- Banana
- Brown sugar
- Vanilla
- Baking soda
- Baking powder
For the whipped coconut cream:
- Canned coconut milk
- Vanilla
- Cinnamon
- Salt
- Powdered sugar
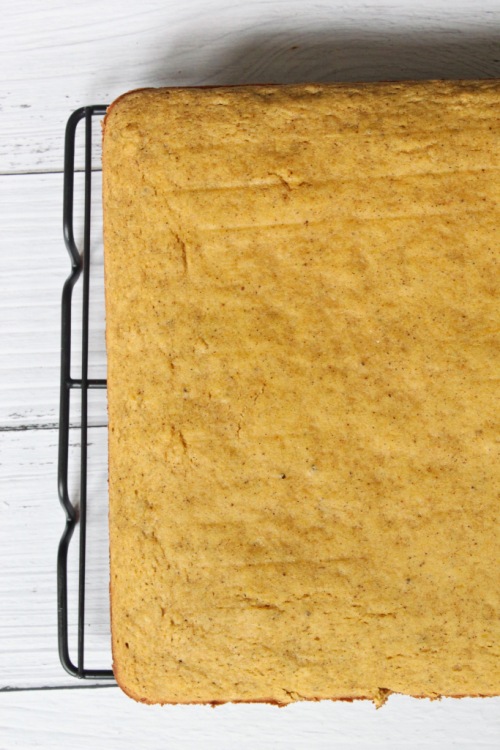
To make the cake, prepare a baking pan by greasing it, lining the bottom with parchment paper and then sprinkling with flour. Combine the apple cider vinegar and oat milk and let sit for 5 minutes. This is a buttermilk substitute, which helps makes the cake fluffy and gives it a bit of a tang. Next, blend all of the ‘wet’ ingredients together – the pumpkin, banana, vanilla and brown sugar. In a separate bowl, sift together the flour, baking soda, baking powder, salt and pumpkin pie spice. Add the dry ingredients and milk mixture to the wet ingredients in four additions, starting with the flour. Pour into prepared baking pan. This will bake for around 12-15 minutes.
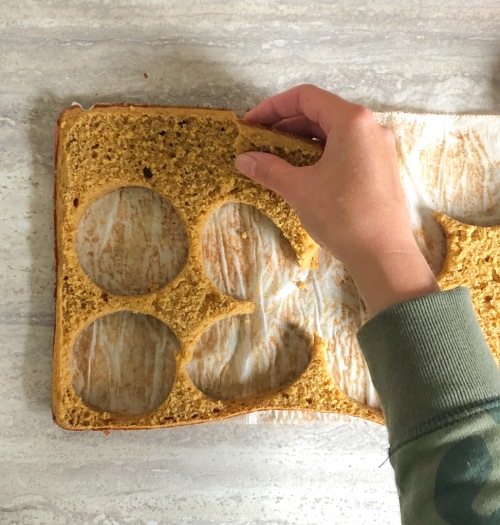
Once cooled, you can assemble you mini cakes (or one large cake) by using a round cookie cutter and cutting out circles to stack on top of one another. Alternatively, you can slice the cake down the middle and create a two-layered cake. This is a good option if you want to feed a larger party.
Baking this cake fills your house with all the smells of Fall and that, my friends, is never a bad thing! Happy baking!
Vegan Pumpkin Coconut Cake
Serving size: Makes three individual cakes or one, two-layer cake
Prep time: 10 minutes
Cook time: 12 minutes
Ingredients:
- 1/2 tbsp apple cider vinegar
- 1/2 cup oat milk (or any plant-based milk)
- 1 cup pure pumpkin (not pumpkin pie filling)
- 1 banana, mashed
- 1/2 cup brown sugar, tightly packed
- 1 tsp pure vanilla extract, separated
- 1.5 cups gluten-free flour
- 1 tsp baking soda
- 1 tsp baking powder
- 1 tsp pumpkin pie spice
- 1/2 tsp salt
- 1 14 oz can full-fat coconut milk (placed in the fridge for at least 24 hours)
- 2 tbsp powdered sugar
- 1/4 tsp cinnamon
- 2 tbsp dried coconut flakes, for topping (optional)
Instructions:
- Preheat the oven to 350 degrees Fahrenheit. Grease a 13 x 9 inch rectangular pan, line with parchment paper and dust with flour. Place a mixing bowl and electric mixer attachment into the freezer (to prepare for the whipped cream).
- Combine apple cider vinegar and oat milk together in a small bowl. Set aside.
- Beat pumpkin, banana, brown sugar and 1/2 tsp vanilla together in a large bowl until smooth.
- In a separate bowl, sift the flour, baking soda, baking powder, pumpkin pie spice and salt together.
- In four additions, add the flour mixture and oat milk to the wet ingredients, starting with the flour, and beating until combined.
- Pour batter into prepared pan and bang the pan on the counter a few times to release any air bubbles. Bake for 12-15 minutes, or until an inserted toothpick comes out clean. Remove from oven and let cool in the pan for five minutes before flipping onto a wire rack to finish cooling completely.
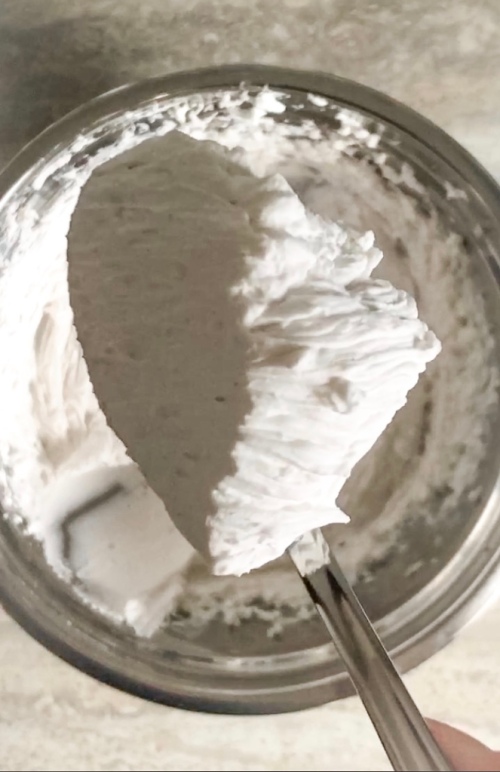
- While the cake cools, make the whipped cream. Remove the bowl and mixers from the freezer and carefully open the can of coconut milk from the fridge. Scoop the solid white part at the top of the can into a bowl (refrigerate the water at the bottom of the can and save for smoothies). Beat the coconut solids on medium speed for 30 seconds. Add the powdered sugar, the cinnamon, the rest of the vanilla and a pinch of salt. Beat for another minute until it is thick and creamy.
- When the cake is cool, use a round cookie cutter to cut out nine circles (or cut the cake in half to make two layers). Spread some of the whipped cream onto the first cut out circle. Top with the second and repeat. Add some whipped cream on top of the third circle and sprinkle with some of the dried coconut, if desired. Alternatively, if making one large cake, spread some of the whipped cream on the first layer of cake, top with the second layer and then dollop the rest of the whipped cream on top. Sprinkle with coconut flakes.
- Serve immediately or store in the fridge for up to 48 hours.
The post Vegan Pumpkin Coconut Cake appeared first on Never. Not. Eating..
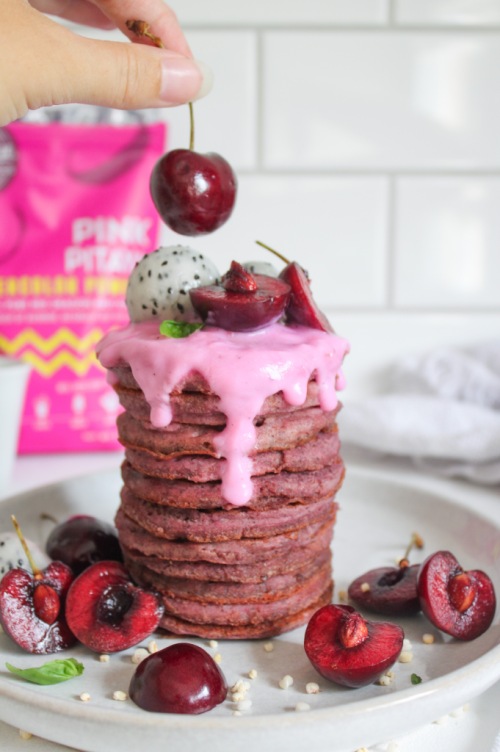
]]>The post The Triple P’s – Pink Pitaya Pancakes (Vegan & GF) appeared first on Never. Not. Eating..
]]>
Not only is pink a pretty hue, but it has also made its mark on our planet. Pink ribbons are used to raise awareness for breast cancer, a pink shirt is a symbol for anti-bullying, and pink flowers and hearts are given to express one’s love for another.
Pink food is more enjoyable as well, and that’s a fact. Okay, fine…it’s not a fact, but it’s my very strong opinion and I dare you to challenge me!
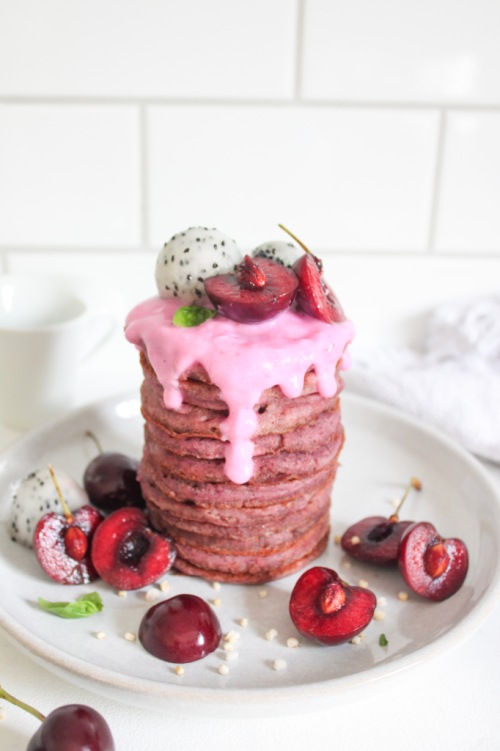
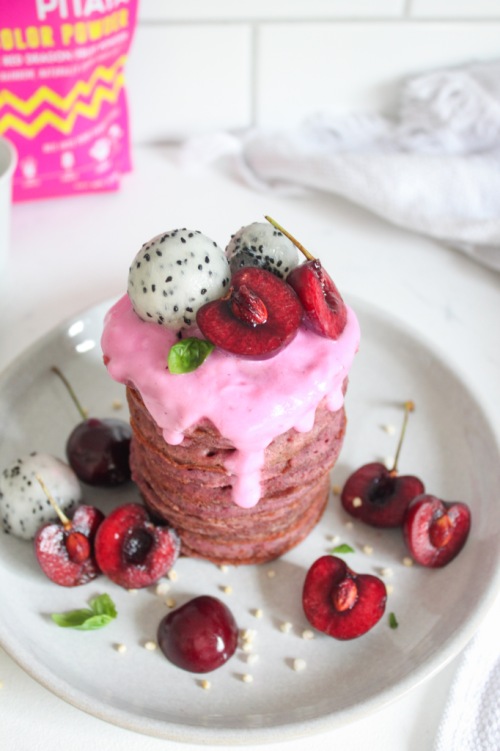
Anywho, since we now agree that pink food is better than non-pink food, I have a pretty sweet recipe for you – The Triple P’s! PINK PITAYA PANCAKES.
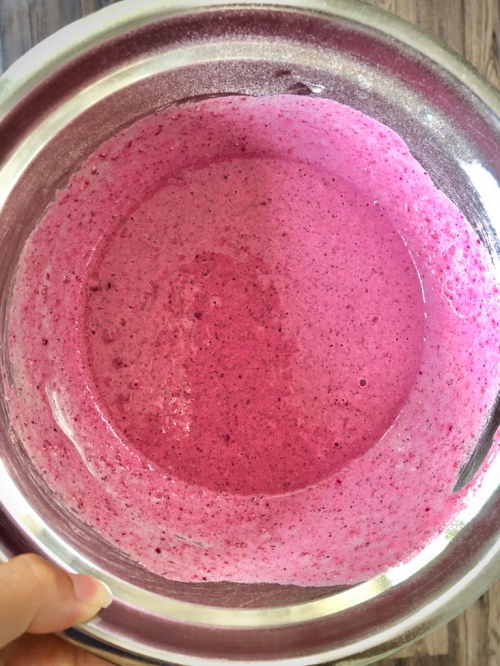
Since we’ve already discussed the importance of the colour pink, let’s talk about pitayas. If you don’t know, a pitaya is a fruit, commonly known as “dragonfruit” in North America. It has a pink skin with scale-like spikes shooting out of the exterior. It’s quite unique in appearance, and also quite beautiful. The inside of a pitaya can be white or a bright pink, with little black seeds, similar to that of a kiwi. It has a very mild taste and soft, fleshy texture. The pitaya I am using in this recipe is actually in powder form. The fruit is dried out and then finely ground so it can be used in smoothies, baking, and today – PANCAKES! You can find pink pitaya powder here.
And, these aren’t just any pancakes, peeps. These are gluten-free, vegan, and refined sugar-free! You. Are. Welcome. So, what replaces all of the glutenous, sugary, dairy-forward ingredients, you ask? Well, let’s start with the dry:
Buckwheat flour – I love, love, love using buckwheat flour as a substitute for all-purpose. It is NOT made out of wheat, and therefore is gluten-free. Buckwheat is actually a seed and it is ground up and sold in ‘flour’ form. I consider it to be the best GF flour for pancakes because it holds up and acts the most similar to regular flour. I also really like the nuttier taste.
Flax – Eggs are a typical pancake ingredient, but if I added them to this recipe then the pancakes wouldn’t be vegan. So instead, I use a flax ‘egg,’ which is literally just flax meal and water mixed together and left to sit for a few minutes to thicken up. It’s the perfect vegan binder.
Oat Milk – In any standard flapjack recipe, you will either find milk or buttermilk. And, again, since I’m going for vegan pancakes today, dairy products just don’t cut it. That’s why I have created my vegan ‘buttermilk’ by mixing some organic apple cider vinegar with oat milk instead of the baby cow elixir. You can also use white vinegar for this, if you don’t have ACV. Make sure you are using a certified gluten-free oat milk, as oats themselves do not have gluten in them, but often can be cross-contaminated with other glutenous products. If you can’t find a gluten-free oat milk, you can definitely use almond, cashew or soy milk instead!
Maple Syrup – Finally, the sweet stuff. Obviously white refined sugar is standard, but that shiz is so bad for you, man. I typically could eat these pancakes without any sugar, just because I’m sweet enough, but sometimes I like to add a little maple syrup to bring out the Canadian in me. It’s completely optional, but you do you. You can add more than what is called for if you like a sweeter pancake.
Alright, I think I’ve covered all of the important bases here. Let’s make some flippy flappies!
The Triple P’s – Pink Pitaya Pancakes (Vegan, GF)
Serving size: Makes about 15 small pancakes
Prep time: 10 minutes
Cook time: 15 minutes
Ingredients:
- 1 tbsp flax meal
- 1/2 tsp apple cider vinegar or white vinegar
- 3/4 cup gluten-free oat milk (or your preferred dairy-free milk)
- 1/2 cup buckwheat flour
- 1/2 tsp baking powder
- 1/4 tsp baking soda
- 1/4 tsp salt
- 1 tsp maca powder (optional)
- 1.5 tbsp pink pitaya powder (optional)
- 1-3 tbsp pure maple syrup (according to how sweet you want them, I do 1 tbsp)
- 1/2 tsp pure vanilla extract
- coconut oil
Instructions:
- To a small bowl, add flax meal and 2.5 tablespoons of water. Mix well and place in the fridge for at least 5 minutes.
- Add vinegar and plant-based milk to a measuring cup and stir. Set aside.
- To a medium bowl, add buckwheat flour, baking powder, baking soda, salt, maca powder and pitaya powder, if using. Whisk to combine and set aside.
- Add the maple syrup and vanilla to the measuring cup with the vinegar and milk. Remove flax mixture from the fridge and add to the milk mixture as well. Stir and then pour into the dry ingredients. Whisk until combined.
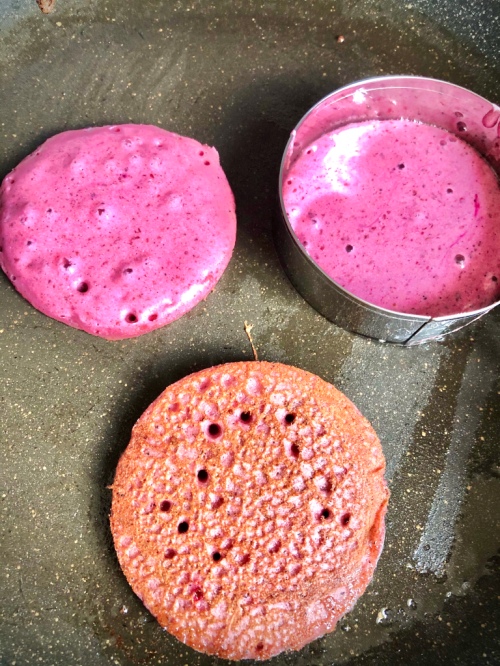
- Add about 1/2 tablespoon of coconut oil to a pan set over medium heat. When the oil is hot, use a ladle to pour some of the pancake batter into the pan. When bubbles begin to appear around the edges (about 1-2 minutes), flip the pancake and cook for 30 seconds to one minute more. Remove from heat and continue with rest of batter, adding more coconut oil as needed.
- Serve immediately or store in an airtight container in the fridge for up to three days.
NOTES:
I love serving these with fresh fruit, yogurt and pure maple syrup.
This recipe feeds approximately two people. You can double the recipe if feeding a larger family.
The post The Triple P’s – Pink Pitaya Pancakes (Vegan & GF) appeared first on Never. Not. Eating..
]]>The post Lemony Vegan Basil Pesto appeared first on Never. Not. Eating..
]]>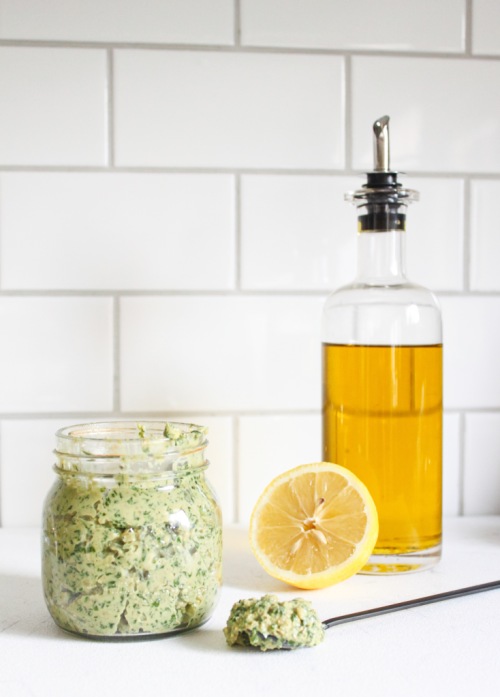
Pesto is a highly underused food, IMO. It is so versatile – from a sauce for pasta or pizza to a simple spread for toast, it is a complete flavour bomb!
Traditionally, pesto is made with five key ingredients: Basil, pine nuts, parmesan, olive oil and garlic (plus salt, but that doesn’t count). And, you want to know the greatest thing about pesto? The ingredients are easily adaptable. That is why turning it vegan is so easy to do.
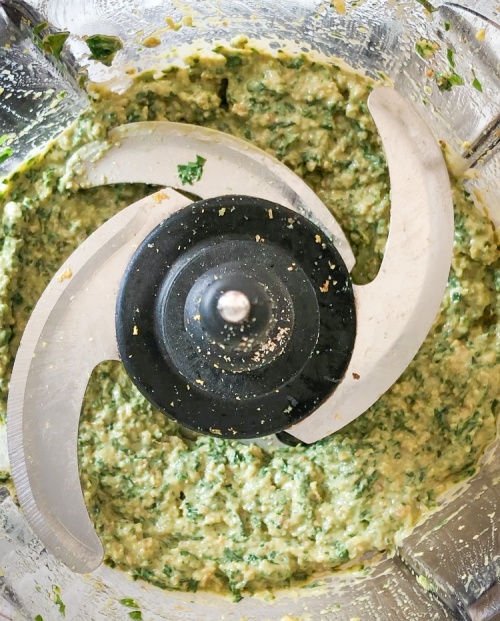
The herbs – Basil is traditional in pestos, and I stick with it in this recipe as well. However, it can easily be swapped out for any leafy green such as parsley, cilantro, spinach or a combination of these. It depends on what you have, what you like and how adventurous you are!
The nuts – Pine nuts are typically what you find in pesto, but since one bag costs more than my monthly gym membership, I usually switch them for another type of nut. I love walnuts and I chose to use them in this recipe. Pecans would also be good for a sweeter turn-out. Toasting the nuts prior to using them in a pesto also adds another dimension of flavour.
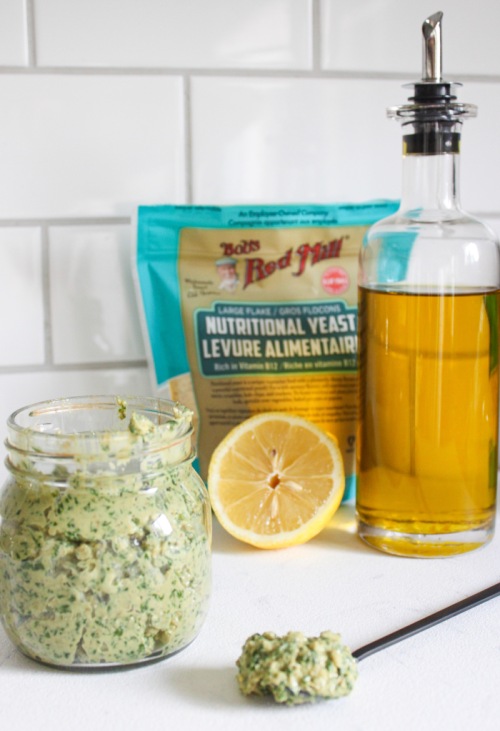
The cheese – Pesto is made with a dry-aged cheese, like parmesan. You can, however, sub it for a cheese of your choice, like romano or even an old sharp cheddar. Since this recipe is vegan, I am using the cheesiest vegan ingredient I know of – Nutritional Yeast. Nutritional Yeast is an inactive yeast that is very cheesy in flavour and is packed with a number of healthy nutrients including: Thiamine, Riboflavin, Niacin, Vitamin B6, Folate and my favourite, Vitamin B12. I am almost positive it is the only vegetarian food you can find that has B12 in it, which makes me love it even more! The one I use can be found here.
The oil – Use extra virgin olive oil. There are no exceptions for this ingredient. Make it a good olive oil, too, like this one.
Garlic – Same.
Acid – I like to put lemon juice as well as the zest into my pesto. It gives it a ‘zip’ of freshness that adds brightness and vibrancy to any dish!
The process of making pesto can be completed in many ways. Traditionally, it is made by cutting all of the ingredients together with a sharp knife and then pouring the olive over them. It could also be made in a mortar and pestle. I like to use my food processor to save on time.
Whichever ingredients you choose to use and whichever method you bring them together in, I hope you get to enjoy pesto this summer. There is nothing better!
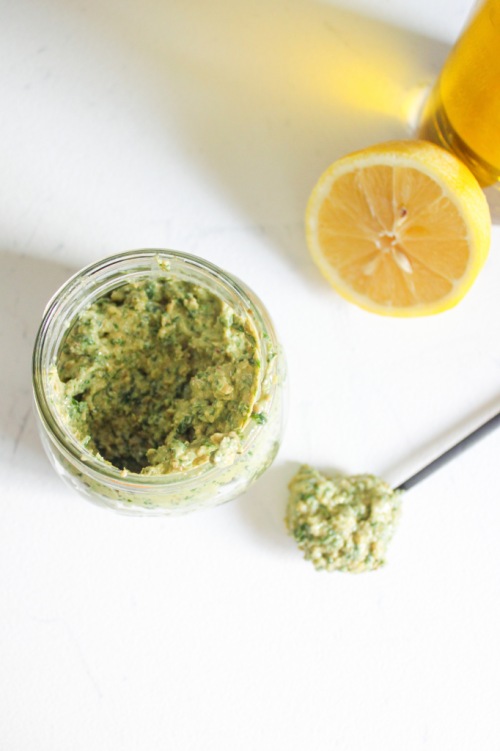
Lemony Vegan Basil Pesto
Serving size: Makes about 1/2 cup
Prep time: 10 minutes
Ingredients:
- 2.5 cups packed fresh basil, washed and dried
- 1/2 cup walnuts
- 1 clove garlic
- 1/4 tsp sea salt
- 2 tbsp nutritional yeast
- zest of one lemon
- 1.5 tbsp fresh lemon juice
- 1/4-1/3 cup good extra virgin olive oil
Instructions:
- To your food processor, add the basil, walnuts, garlic, salt, nutritional yeast and lemon zest. Pulse until the mixture has broken down into smaller pieces. Add the lemon juice and set your processor to blend. While blending, drizzle in the olive oil slowly. If you want a thicker pesto, add 1/4 cup of oil. If you are looking for a thinner sauce, continue to add more oil until you have reached your desired consistency. Taste and adjust seasonings (salt, lemon juice) accordingly.
This is best used immediately, but can be stored in an airtight container in the fridge for up to three days.
The post Lemony Vegan Basil Pesto appeared first on Never. Not. Eating..
]]>The post Peanut Butter and Jam Cups appeared first on Never. Not. Eating..
]]>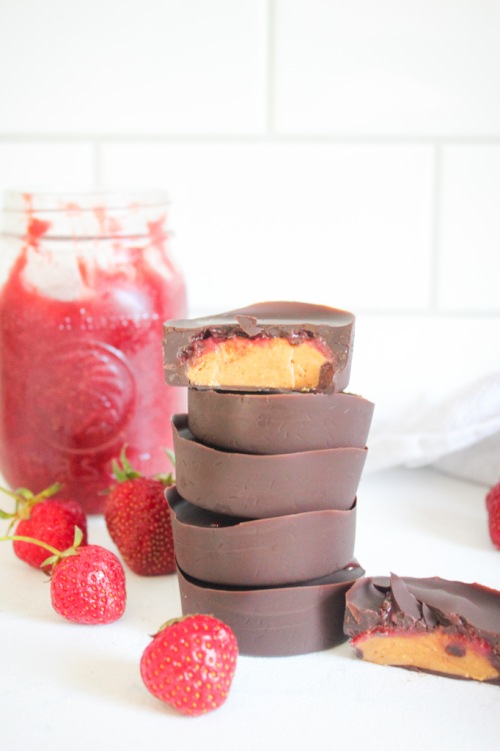
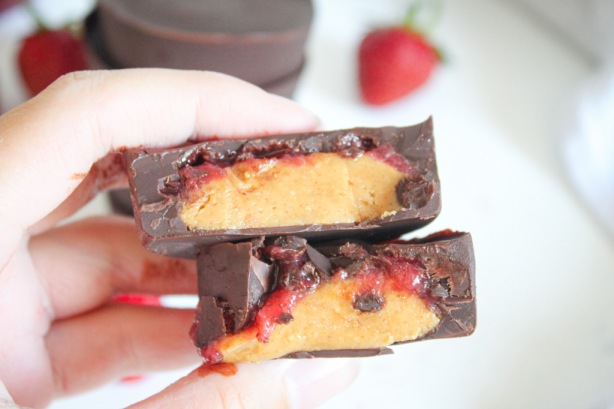
I recently posted a Strawberry Rhubarb Jam recipe, and since then have been trying to find different ways of incorporating it into a variety of different dishes. Since peanut butter is jam’s homeboy, I thought, why not add it to my classic 5-ingredient PB cups?!
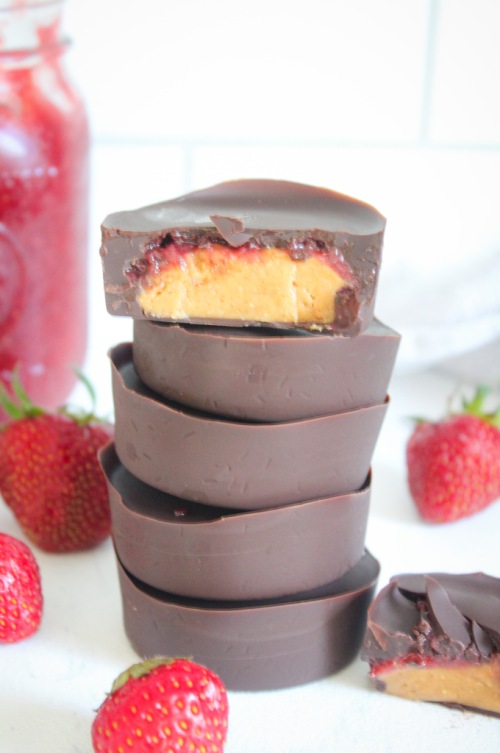
A healthier version of the regular PB cup, with a POW of sweet jam. Yaaasss!
To make these little beauties, you only need:
- Dark chocolate
- Peanut butter (try my Homemade Peanut Butter)
- Maple syrup
- Vanilla
- Coconut oil
- Jam
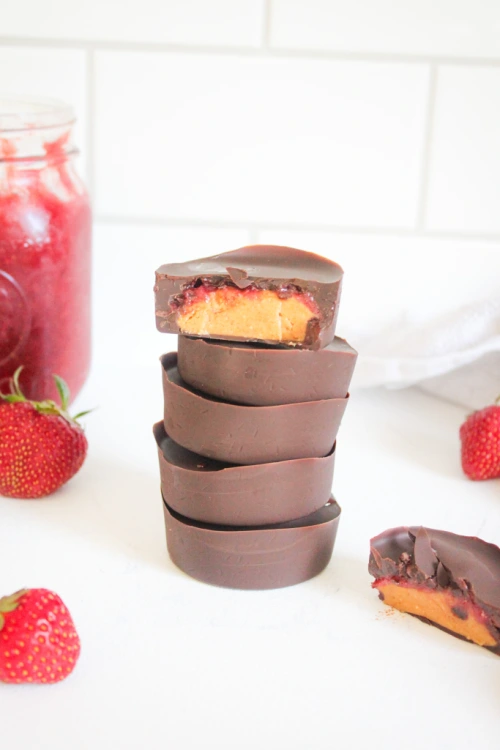
These take minutes to whip up, minutes to set and seconds to eat. You will not regret it!
Peanut Butter and Jam Cups
Serving size: Makes 12 peanut butter cups
Prep time: 25 minutes
Cook time: 5 minutes
Ingredients:
- 1 cup natural peanut butter
- 2 tbsp pure maple syrup
- 1 tsp pure vanilla extract
- 300 g dark chocolate, separated and chopped into small pieces
- 1 tbsp coconut oil
- 1/4 cup your favourite jam (try my Strawberry Rhubarab Jam)
Instructions:
- In a medium-sized bowl, mix together peanut butter, maple syrup and vanilla until combined. Form into twelve, 1-inch balls and flatten onto a plate lined with parchment paper. Place in freezer while you prepare the chocolate.
- Fill a small pot with one inch of water and place over a burner on medium-high heat. Bring water to a simmer. In a heatproof bowl, add 250 g of the chocolate as well as the coconut oil. Place a wooden spoon in the pot with simmering water and the bowl on top of the pot. The spoon allows the steam to escape. Use a rubber spatula to constantly stir the chocolate until melted. Remove from heat.
- To temper the chocolate, slowly add in the remaining 50 g of chocolate, one small chunk at a time, stirring until melted after each addition. This process takes a bit of time, but helps to set the chocolate properly.
- To a silicone muffin tray (or into muffin liners), pour in enough melted chocolate to just coat the bottom of twelve of the cups. Remove the peanut butter discs from the freezer and place one in each of the cups with chocolate. Add a small dollop of the jam to each one and then top them off with the remainder of the melted chocolate, making sure to completely cover the peanut butter and jam. Refrigerate for 15 minutes to set.
Store these in the fridge and remove a few minutes before serving.
The post Peanut Butter and Jam Cups appeared first on Never. Not. Eating..
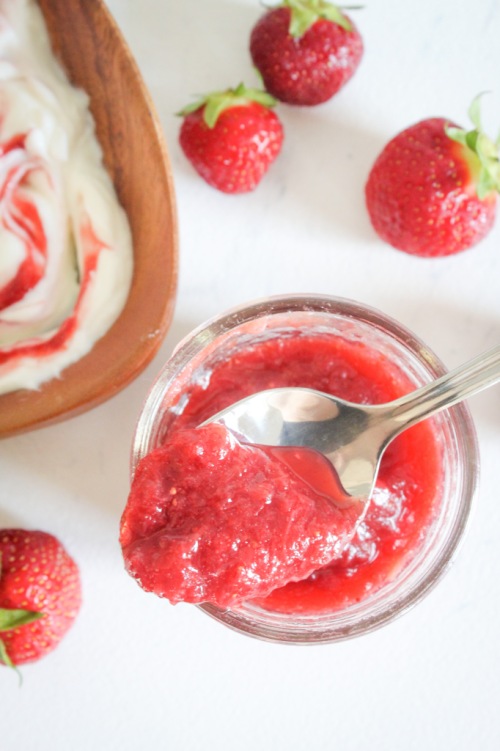
]]>The post Strawberry Rhubarb Jam appeared first on Never. Not. Eating..
]]>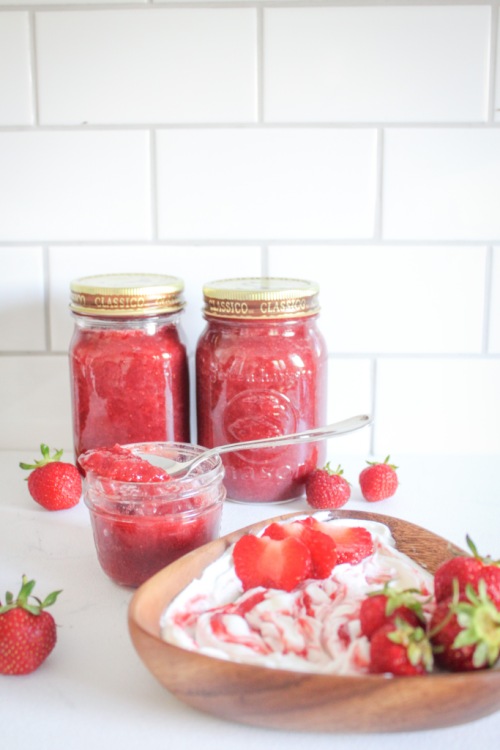
Growing up, we would always go strawberry picking and my mom would spend the rest of the day making delicious strawberry jam that we would be able to enjoy for months to come. Little did I know back then, jam is good on everything…not just toast. I swirl it into my yogurt, add it to ice cream and am currently in the process of developing a peanut butter and jam chocolate cup.
To give it a bit of dimension, I decided to add rhubarb as well. Typically, I don’t like really sweet foods, so the tartness of the rhubarb helps to balance out the super sweet strawberries.
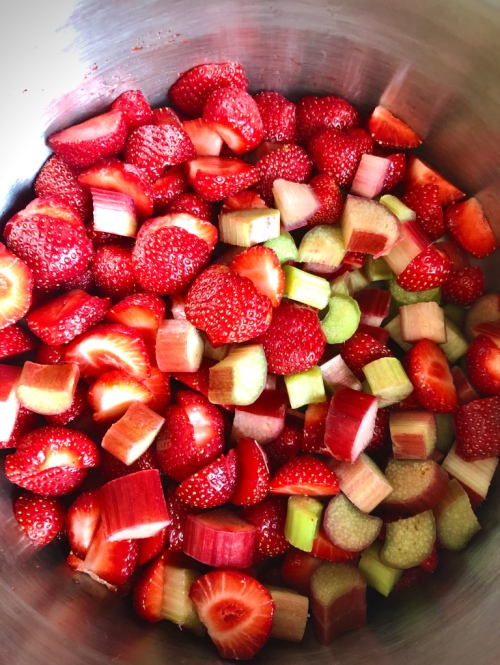
Jam is deceivingly simple to make. This recipe only requires for ingredients:
- Strawberries
- Rhubarb
- Sugar
- Lemon juice
Many jam recipes call for pectin, which is sold in isolated form at most grocery stores, however, pectin is actually a natural substance found in many fruits, especially citrus. Pectin works as a thickener when it is mixed with sugar and heated. It is what gives the jam body. This recipe does not call for pectin. Instead, I use lemon juice, where it can be found naturally.
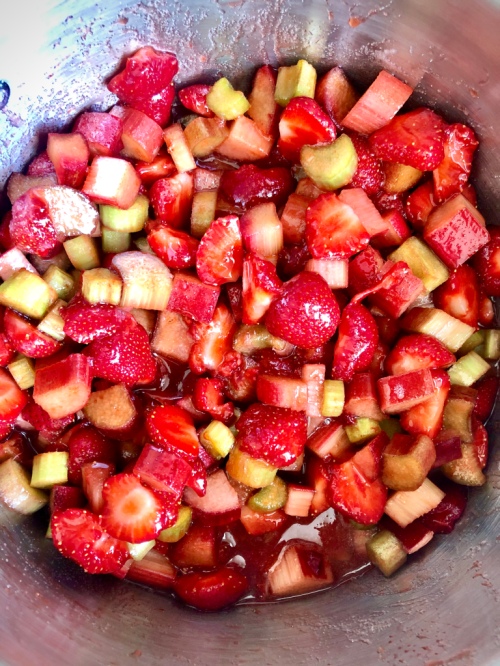
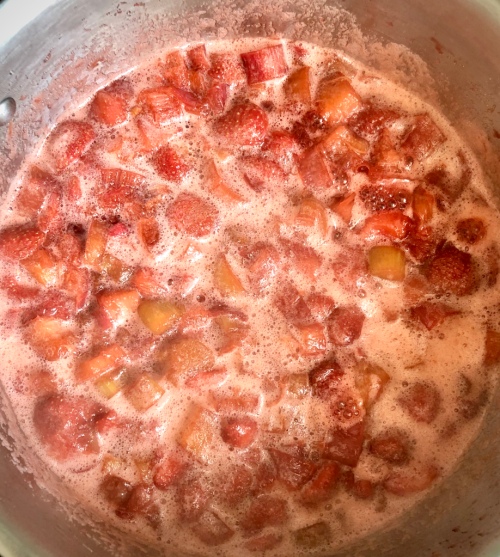
To make this jam, all you have to do is add all of your ingredients to a large pot, bring up to a boil, reduce heat and let gently simmer for an hour while stirring frequently. That’s it!
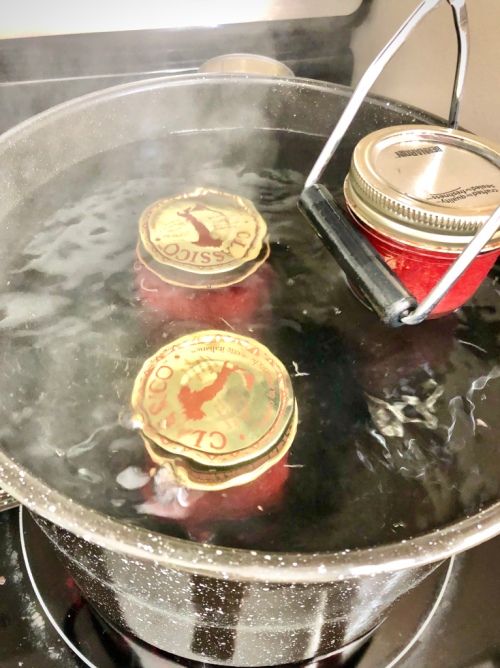
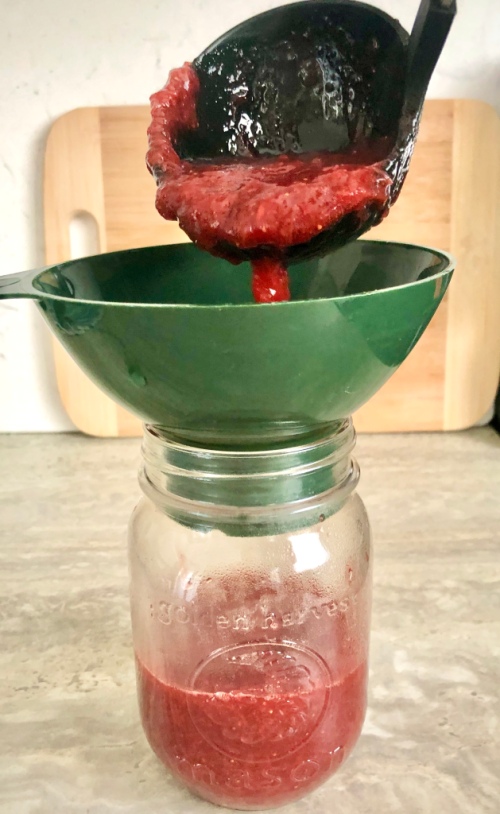
This recipe fills three regular mason jars (or you can reuse old pasta jars, as seen in the pictures). If they will not all be consumed within a month’s time, you must seal your jars. To do this, bring water to a boil in a large stock pot. First, disinfect all of your tools – all of your mason jars and lids, a funnel (if you have one), and your jam jar lifter. Carefully drop each tool into the boiling water and let disinfect for 10 minutes. Remove and set on a clean tea towel while jam cooks.
When jam is finished cooking, place the funnel on top of your first jar and scoop in the hot jam, leaving about 1/2 inch from the top. Place the lid on being sure that the rim of your jar is clean, and then screw on the ring so that it is sealed, but not too tight. Use your jar lifters to drop the jars into a stock pot of gently boiling water. Jars will sit on the bottom of the pot. Keep them in the pot for 10 minutes and then remove them with the lifters onto a clean tea towel. You should hear the lid “pop” shortly after removing them from the pot.
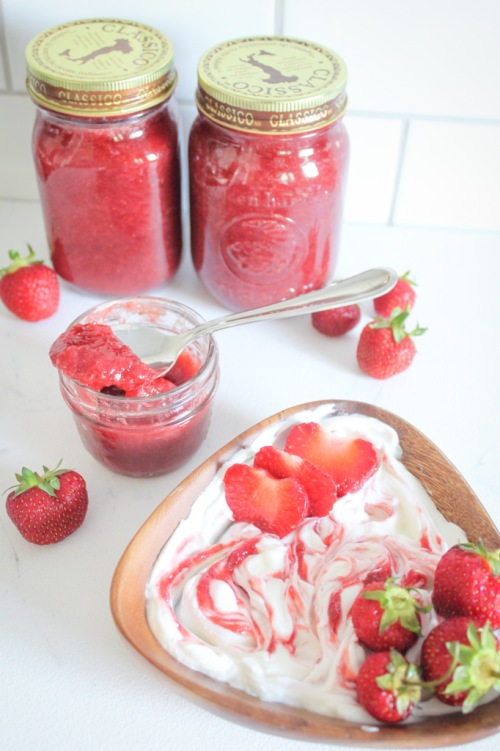
After you have sealed the jars, leave them on your counter at room temperature, undisturbed for at least 24 hours. Store jars in a cool dark place for up to one year. Once opened, jars must be refrigerated and are best if consumed within one month’s time. Depending on how much jam you eat, it may be better to fill smaller mason jars to help prevent waste.
Strawberry Rhubarb Jam
Yield: 3, 16 oz mason jars
Prep time: 10 minutes
Cook time: 1 hour
Ingredients:
- 6 cups rhubarb (stalks), cut into 1/2 inch chunks
- 4 cups fresh strawberries, halved
- 2 cups sugar
- 3 tbsp freshly squeezed lemon juice
Instructions:
- Add rhubarb, strawberries, sugar and lemon juice to a large pot. Turn heat to low until the sugar has melted and then increase to medium-high, bringing to a gentle boil. Once boiling, reduce heat again until you have a consistent, very gentle simmer. Ensure that it is not rapidly bubbling. Cook for about an hour, stirring often to prevent burning. Jam will be done when it takes on a thicker consistency.
- While the jam cooks, disinfect your tools. Bring a large stock pot of water to a boil. Once boiling, add your mason jars, lids and funnel (if using) and allow them to disinfect for 10 minutes. Use your jar lifters to carefully remove from the water and place on a clean tea towel.
- When jam is finished cooking, place the funnel on top of your first jar and scoop in the hot jam, leaving about 1/2 inch from the top. Place the lid on, being sure that the rim of your jar is clean, and then screw on the ring so that it is sealed, but not too tight. Do this for the remaining two jars.
- Using your jar lifters again, drop the jam jars into a stock pot of gently boiling water. Jars will sit on the bottom of the pot. Keep them in the pot for 10 minutes and then remove them with the lifters onto a clean tea towel. You should hear the lid “pop” shortly after removing them from the pot. Let them sit on the tea towel, undisturbed for at least 24 hours.
NOTES:
Store jars in a cool dark place for up to one year. Once opened, jars must be refrigerated and are best if consumed within one month’s time. Depending on how much jam you eat, it may be better to fill smaller mason jars to help prevent waste.
The post Strawberry Rhubarb Jam appeared first on Never. Not. Eating..
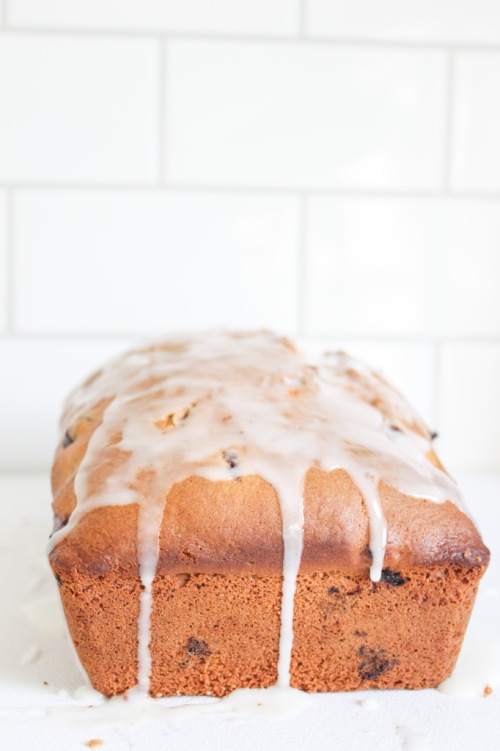
]]>The post Lemon Blueberry Loaf appeared first on Never. Not. Eating..
]]>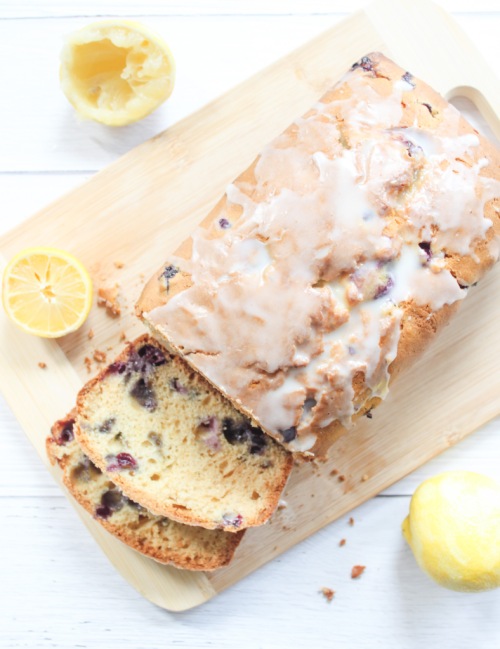
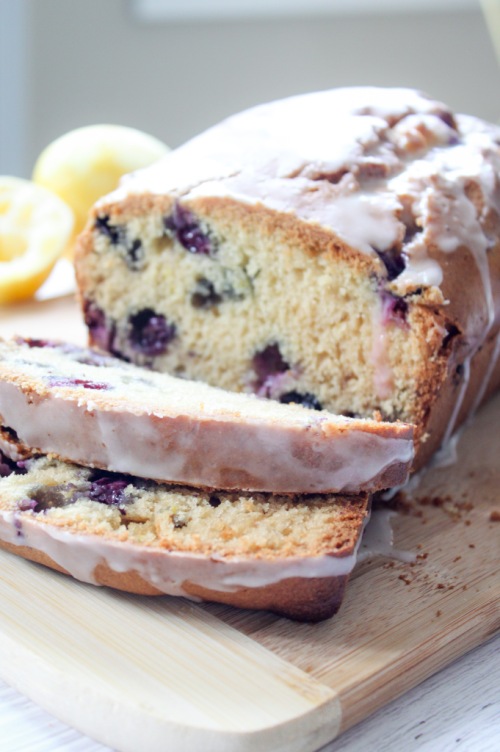
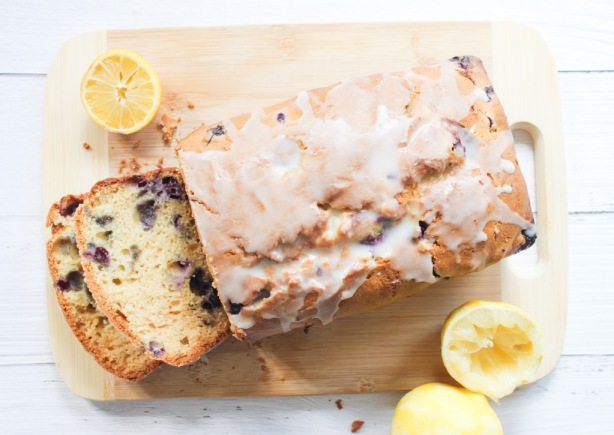
This recipe has two of my loves – gluten and fruit. That’s half healthy!
But seriously, this is the perfect morning treat with coffee. It is a great snack between meals. It’s a wonderful end to the day with tea. It’s just good anytime. You can’t put limits on loaves.
When I want to bake something, I always have this idea in my head that I need to set aside a ton of time for it. Then I get started and, every time, I realize that it actually just takes minutes to put together, and even the bake time isn’t too bad. This loaf honestly takes around 10 minutes to prep, and although the oven time is around an hour…It’s passive time. You can do anything while it is in the oven: laundry, work from home, lunges, paint… Whatever, man!

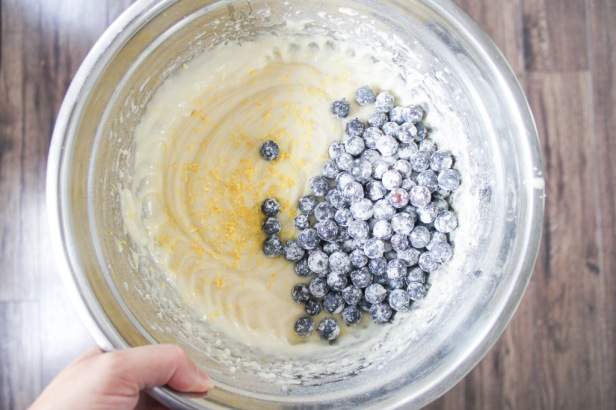
The first thing you need to do is whisk together all of your dry ingredients – flour, baking soda, baking powder and salt. Set this aside and move on to your wet – sugar, eggs, vanilla and oil. Beat this until smooth, and then in a few additions add the dry to the wet, alternating with some buttermilk. Fold in the lemon zest and blueberries and you are done! Easy breezy.
This loaf fills your house with the most delicious aroma. There is nothing more “home-y” than walking into a house that is filled with the smell of fresh baked goods. It let’s guests know that you have it together. You got it goin’ on. You are a successful adult.
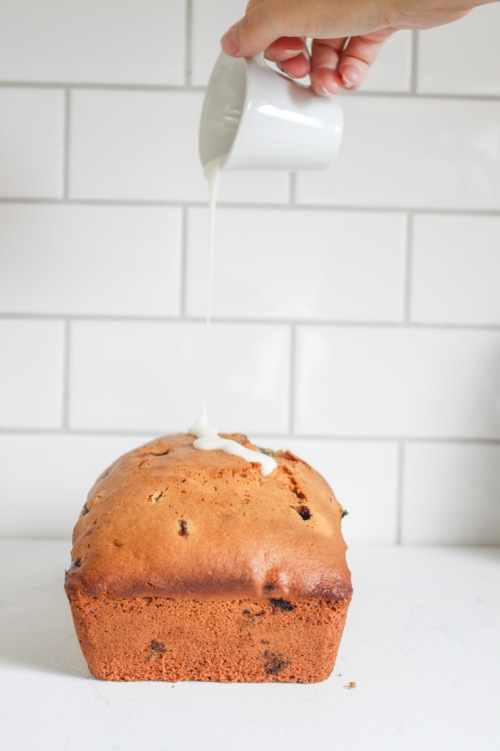
While your creation is forming in the oven, start making the glaze. This is not necessary, but it adds a little bit of sweetness to the loaf and also makes it look really pretty. All it requires is a little bit of powdered sugar and some lemon juice whisked together until smooth. I like to drizzle it over the top when the loaf is still warm so it can absorb all of the goodness throughout.
Loaf drop.
Lemon Blueberry Loaf
Prep time: 10 minutes
Cook time: 50 minutes
Ingredients:
- 2 cups all-purpose flour + 1 tbsp
- 3/4 teaspoon baking soda
- 1/2 teaspoon baking powder
- 3/4 teaspoon salt
- 1 cup sugar
- 1/2 cup canola oil
- 2 large eggs
- 1 teaspoon pure vanilla
- 3/4 cup buttermilk
- zest of one lemon
- 1 heaping cup blueberries, washed and dried
For the lemon glaze:
- 1/3 cup powdered sugar
- 1-2 tbsp freshly squeezed lemon juice
Instructions:
- Preheat the oven to 350 degrees and grease a loaf pan.
- In a medium-sized bowl, whisk together the two cups of flour, baking soda, baking powder and salt. Set aside.
- In a separate, larger bowl, beat the sugar, oil, eggs and vanilla together until smooth and combined.
- Add the dry ingredients and buttermilk alternately in three additions, being careful not to overmix the batter.
- Sprinkle the remaining tablespoon of flour over the blueberries and toss until coated. Shake off any excess flour and then carefully fold the blueberries into the batter along with the zest.
- Pour into prepared pan and bake for 50-60 minutes, or until a toothpick inserted in the middle comes out clean.
- Run a butter knife along the edges of the loaf to loosen and turn out onto a wire rack to cool completely.
- To prepare your glaze – add the powdered sugar to a small bowl and whisk in the lemon juice, a half tablespoon at a time, until you reach your desired consistency. Drizzle over the loaf* and use an offset spatula to evenly distribute over the top.
NOTES:
*I like to drizzle the glaze on the loaf when it is still warm. This way, the loaf absorbs the liquid and it gets distributed throughout. You will not be able to see the glaze on top if you do this. If you are going for more of a “look,” let the loaf cool completely before topping with the glaze.
The post Lemon Blueberry Loaf appeared first on Never. Not. Eating..
]]>The post Gluten-Free Cereal Bars appeared first on Never. Not. Eating..
]]>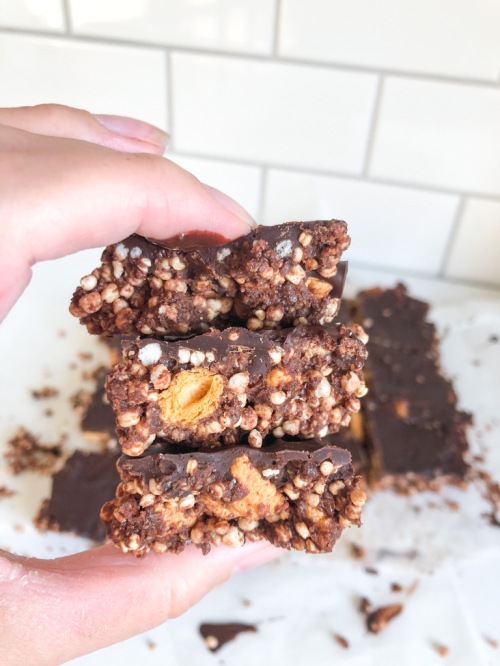
These chocolate cereal bars are crispy, crunchy and so satisfying. They have currently replaced my after-dinner-before-bedtime snack.
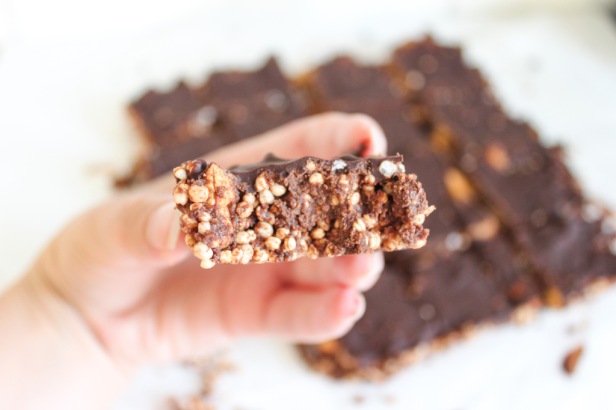
Here is what you will need to make them:
- Your favourite gluten-free cereal (I use a combination of Quaker Corn Squares and Puffed Quinoa)
- Peanut butter (try out my homemade peanut butter, found here)
- Pure vanilla extract
- Pure maple syrup
- Cinnamon
- Dark chocolate
- Flaky sea salt (optional)
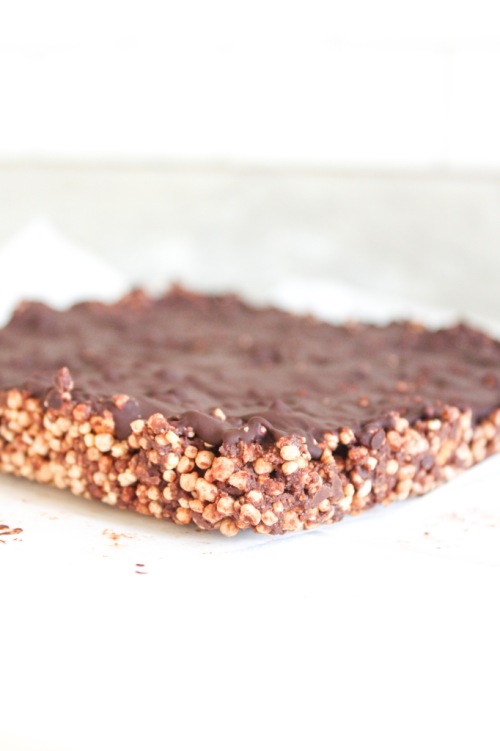
These take minutes and are such a yummy treat. Check out the recipe below!
Gluten-Free Cereal Bars
Serving size: Fills an 8 x 8 inch square pan
Prep time: 5 minutes
Cook time: 8-10 minutes
Set time: 20 minutes
Ingredients:
- 200 g dark chocolate, divided
- 1/2 cup peanut butter
- 1/2 tsp pure vanilla extract
- 1/4 tsp cinnamon (optional)
- 1 tbsp pure maple syrup
- 1.5 cups corn square cereal*
- 1 cup puffed quinoa*
- Flaky sea salt (optional)
Instructions:
- Prepare an 8 x 8 inch square baking pan by lining it with two pieces of parchment paper for easy release.
- Over a double boiler, or in the microwave, melt 75 g of the chocolate in a medium-sized heat-resistant bowl. Once melted, add the peanut butter, vanilla, cinnamon and maple syrup. Stir to combine.
- Place the corn squares and puffed quinoa in a separate, large bowl. Pour the chocolate-peanut butter mix over and use your hands to incorporate the ingredients. Press into prepared baking pan.
- Melt the remainder of the dark chocolate and pour over cereal mixture. Spread evenly. Top with flaky sea salt, if desired. Place in the fridge to set for at least 20 minutes. Cut into squares and store in an airtight container in the fridge.
NOTES:
*Feel free to use your favourite gluten-free cereals
The post Gluten-Free Cereal Bars appeared first on Never. Not. Eating..
]]>