The post Caramelized Pear Trifle appeared first on Never. Not. Eating..
]]>
WHAT IS A TRIFLE?
Trifle is an English dessert that usually includes alcohol-soaked cake, beneath layers of custard, fruit and whipped cream. There are many different ways to compose a trifle, but the key is for all of those beautiful ingredients to be layered in a glass bowl so they are visible to those who will be eating it.

THE LAYERS OF THIS CARAMELIZED PEAR TRIFLE
This may not be your traditional trifle, but nothing I do is traditional, so you’ll have to excuse me as I add my own flair to my recipes. This trifle includes four delicious layers – a winter spiced pear cake, gooey caramelized pears, a crunchy walnut crumble and fluffy vanilla whipped cream.
Winter Spiced Pear Cake – This cake is one of my favourites, as it’s actually completely vegan (if you want to make it on it’s own), and gluten-free! I add ginger, cinnamon and nutmeg, to give it that warm, cozy, winter appeal.
Caramelized Pears – You can’t have a caramelized pear trifle without caramelized pears! Finely diced pears warmed with brown sugar and cinnamon – these pears are to-die-for in this trifle, and on their own…by the spoonful!
Crunchy Walnut Crumble – Dessert isn’t dessert without a crunch factor, and this is it. Toasted walnuts tossed with melted butter and sugar bring this dessert to life!
Vanilla Whipped Cream – The perfect and prettiest topping to finish it all off!

HOW TO MAKE THIS DESSERT FULLY VEGAN
The cake itself is actually a fully vegan cake, so if you would like to keep this dessert vegan, follow the instructions below:
- Make the cake layer in the exact same way.
- For the caramelized pear and crunchy walnut layers – substitute regular butter for vegan butter.
- For the whipped cream, use canned coconut milk that has been chilling in the fridge for at least 24 hours, instead of whipping cream. Scoop the top, solid milk from the can and whip in the same manner as the recipe suggests!

THE PERFECT TIME TO MAKE THIS TRIFLE
When I think of pears, I often think of winter and warm spices. This trifle would definitely be a kick-ass dessert to serve during any fall or winter holiday – Thanksgiving, Christmas, New Year’s – you name it! Each individual component can be made the day before and then assembled prior to serving. This is definitely a dessert that feeds a crowd!
OTHER DELICIOUS LAYERED DESSERTS YOU MUST TRY:
Vegan Coconut Panna Cotta with a Mango Compote (made in individual serving cups!)
Dark Chocolate Almond Butter Bars (what’s better than nut butter + chocolate?!)
This post contains affiliate links and I may earn a small commission when purchases are made after clicking the links, at no cost to you. Thank you!
Caramelized Pear Trifle
*I highly recommend reading through this recipe in full first, before making.
Serving size: 8-10
Prep time: 45 minutes
Cook time: 35 minutes
Ingredients
For the spiced cake layer:
- 1 cup full-fat, canned coconut milk
- 1 tbsp apple cider vinegar
- 3/4 cup brown sugar, packed
- 1 banana, mashed
- 2 tsp vanilla
- 2 cups gluten-free flour, plus 1 tbsp for dusting cake pans, I use Bob’s Red Mill
- 1 tsp cinnamon, separated
- 1/2 tsp dried ginger
- 1/4 tsp nutmeg
- 1 tsp salt
- 3/4 tsp baking powder
- 1/2 tsp baking soda
For the caramelized pear layer:
- 2 tbsp unsalted butter (or vegan butter)
- 4 pears, small dice (I like to use Bartlett)
- 1/4 cup brown sugar
- 1/2 tsp cinnamon powder
- pinch of salt
For the crunchy walnut layer:
- 1 cup walnuts, chopped into small pieces
- 2 tbsp unsalted butter (or vegan butter), melted
- 1 tbsp brown sugar
- pinch of salt
For the vanilla whipped cream layer:
- 2 cups heavy whipping cream
- 2 tbsp powdered sugar
- 1 tbsp pure vanilla extract
Instructions
For the spiced cake layer:
- Preheat oven to 350 degrees Fahrenheit and prepare two, six-inch cake pans by buttering, lining the bottom with parchment, and dusting with some of the gluten free flour.
- Stir the apple cider vinegar into the coconut milk and set aside.
- Using a stand mixer or a hand mixer, beat together the brown sugar, banana and vanilla in a large bowl until combined.
- In a separate, medium bowl, sift the flour, cinnamon, ginger, nutmeg, salt, baking powder and baking soda.
- In a few additions, alternate between adding the dry ingredients and coconut milk to the banana mixture, beating until combined and smooth.
- Divide batter evenly between pans and bake for 25-30 minutes, or until inserted toothpick comes out clean.
- Let cool in pan for 5 minutes and then transfer to wire rack to finish cooling.
For the caramelized pear layer:
- Place all ingredients in a saucepan over medium-low heat and cook until the pears are soft, approximately 10 minutes. Remove from heat and set aside while preparing the remainder of the ingredients.
For the crunchy walnut layer:
- Preheat oven to 350 degrees Fahrenheit.
- Place walnuts on a parchment lined baking sheet and toast in the oven for 5-10 minutes, watching very carefully – they burn quickly! Remove when they are starting to look a bit more brown in colour and they become fragrant.
- Mix the walnuts with the melted butter, brown sugar and a pinch of salt and set aside.
For the vanilla whipped cream layer:
- Place a large bowl and beaters into the freezer for at least 15 minutes.
- Pour the heavy whipping cream into the cold bowl and beat on medium-high speed with the cold beaters, until soft peaks form. Add in the powdered sugar and beat again until medium peaks form (about 1-2 minutes in total). Add the vanilla and beat until just combined.
To assemble this Caramelized Pear Trifle:
- Slice the cake rounds into cubes and place 3/4 of them on the bottom of your glass trifle bowl.
- Spoon over half of the caramelized pears.
- Sprinkle half of the crunchy walnuts.
- Top with half of the whipped cream.
- Repeat steps 1-4 with the remaining ingredients and finish it off with a dusting of cinnamon on top! Enjoy!
I recommend serving this trifle immediately. It can be stored in the fridge for up to two days.

The post Caramelized Pear Trifle appeared first on Never. Not. Eating..
]]>The post Grilled Peaches with Cinnamon Coconut Whipped Cream and a Balsamic Reduction (Vegan & GF) appeared first on Never. Not. Eating..
]]>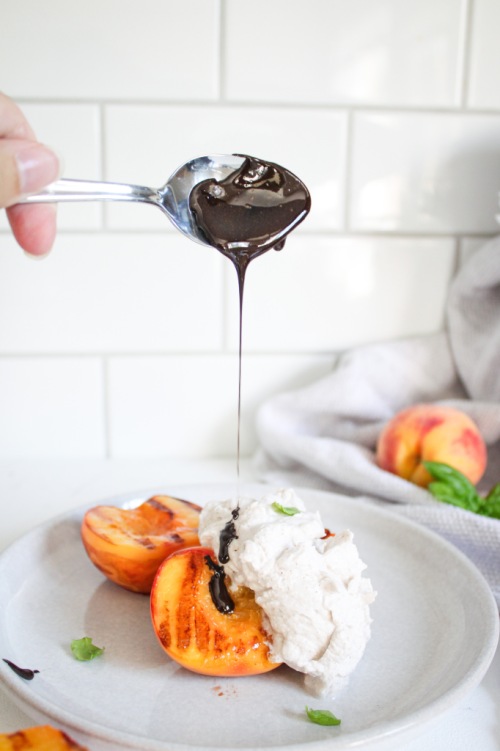
Okay, picture this – you are watching the abnormally late NBA playoffs (thanks, Covid), and you’re eating your wings, nachos and burgs. Halftime comes and you need something sweet. Why not fire up the BBQ and throw on some peaches? Dress them up with some coconut whip cream? A little sweet balsamic reduction? Yes, yes and yes. I vote yes.
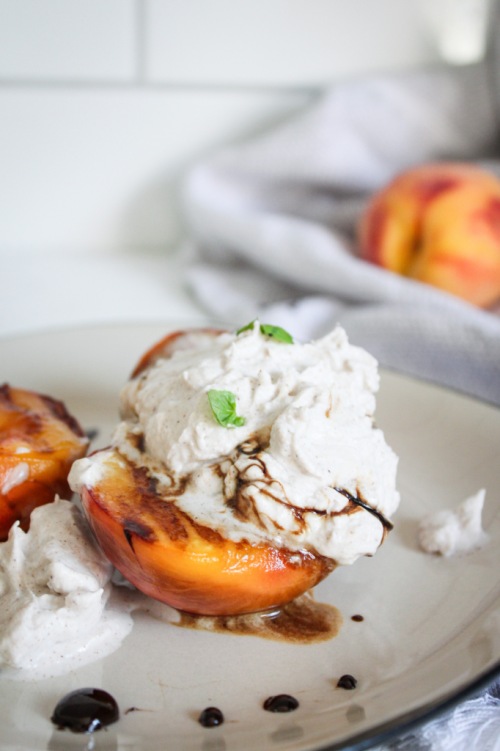
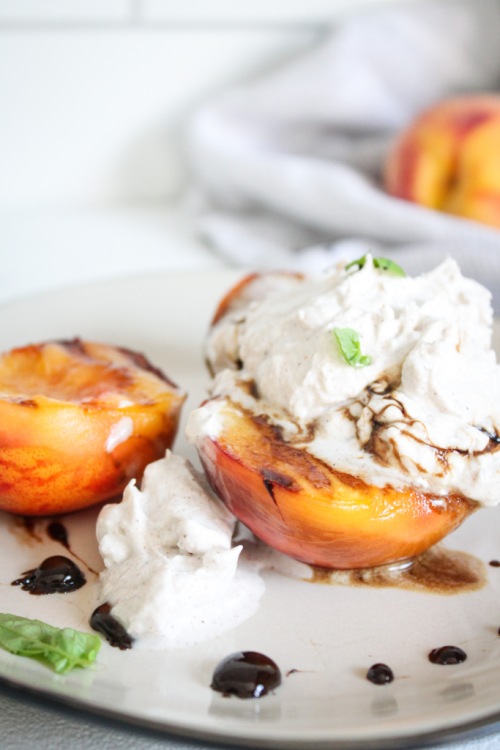
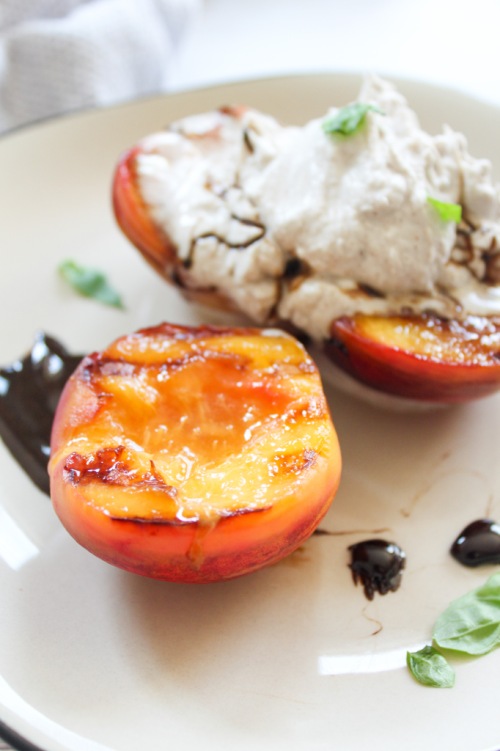
Even easier, you can use a cast iron grill pan on your stovetop. I use the one found here, and I love it! It’s perfect for those without a barbeque, or anyone who just wants an easier clean-up. All you need to do is set it over medium-high heat and brush the peaches with olive oil before cooking them for about 2-3 minutes per side. They will still develop those beautiful grill marks that you get on the Q, just with less hassle.
The coconut whip cream is my favourite. As a traditional whip cream lover, finding a vegan alternative was super exciting. This part is a bit tricky, as you need to find a can that solidifies properly when you store it in the fridge. I have found that 365 Everyday Value and Aroy-D are the best for this. To make the whipped cream, place a can of coconut milk in the fridge for at LEAST 24 hours. The longer, the better. Also, try not to shake the can too much before placing it in the fridge. The coconut milk and water will naturally separate, and we want to keep it that way, so shaking it before refrigerating it will slow the process of separation and then solidification.
When it is time to make the whipped cream, place your mixing bowl and mixers into the freezer to get super cold, about 15 minutes before you plan on beginning. Carefully open the can (without shaking) and scoop out the firm top part into your bowl. You will notice a clearer liquid at the bottom of the can (the water) – do not add this to the bowl. Save this and add to a morning smoothie! Add some cinnamon and vanilla to the coconut milk and whip until soft peaks form. Next, add in your sugar – I like to use maple syrup, but you can use powdered sugar as well. Continue beating until stiff peaks form. It is unlikely that they will become as stiff as regular whip cream, but sometimes I put the bowl in the freezer for ten minutes and re-whip for a few more seconds before serving. This usually does the trick!
For the balsamic glaze, place some balsamic vinegar with a dash of maple syrup into a small pot and bring to a gentle simmer. Let it reduce for about eight minutes. TIP: Keep the pot over the lowest heat up until you use the reduction, as it cools quickly and becomes very sticky.
Now, grab a plate, put the peaches down, scoop on some whipped cream and drizzle with that lush reduction! It’s the freshest summer dessert one could ask for!
Grilled Peaches with Cinnamon Coconut Whipped Cream and a Balsamic Reduction (Vegan & GF)
Servings: 4
Prep time: 15 minutes
Cook time: 10 minutes
Ingredients:
- 1 14 oz can of full-fat coconut milk (I like Aroy-D and 365 Everyday Value), refrigerated for at LEAST 24 hours
- 1/2 tsp cinnamon powder
- 1/2 tsp pure vanilla extract
- 2 tbsp pure maple syrup (or confectioner’s sugar), divided
- 1/2 cup balsamic vinegar
- 4 peaches, halved and pits removed
- olive oil
Instructions:
- Place a medium bowl and your beaters into the freezer for at least 15 minutes.
- Remove the coconut milk from the fridge and carefully open it, without shaking. Scoop the top, white part into the cold bowl. You will see a clearer liquid at the bottom (the water), DO NOT add this to the bowl (save for morning smoothies). Add the cinnamon and vanilla to the coconut milk and whip on high until soft peaks. Add one tablespoon of syrup (or sugar) and whip again until stiff peaks form.* Place in the fridge while preparing the rest of the recipe.
- To a small pot over medium heat, add the balsamic and the remaining tablespoon of maple syrup. Bring to a gentle simmer and let cook down for about 8 minutes, stirring frequently. Turn the heat to the lowest setting to keep the reduction loose and drizzle-able. It cools quickly and becomes very sticky, so keeping it on the lowest heat prevents it from becoming taffy-like.
- Set your grill to medium-high heat and brush the peach halves with olive oil (I like to use my cast iron grill pan for this). Place the peaches cut side down onto your grill and cook for about 2 minutes, without touching them. Flip and cook for another three to four minutes, or until tender but not too soft.
- Place your peaches on a plate, top with the coconut whipped cream and drizzle with the balsamic reduction!
NOTES:
*Coconut whipped cream will not always create stiff peaks, as regular whipped cream does. It depends on how hot your kitchen is. If your whipped cream is looser, place the bowl back in the freezer for 10 minutes and re-whip for a few seconds when ready to plate.
The post Grilled Peaches with Cinnamon Coconut Whipped Cream and a Balsamic Reduction (Vegan & GF) appeared first on Never. Not. Eating..
]]>