The post Mediterranean Rice Bowl (GF) appeared first on Never. Not. Eating..
]]>
WHAT IS A MEDITERRANEAN RICE BOWL?
This recipe is a mix between a buddha bowl and a salad. It’s all of your favourites from a Greek salad thrown together with some rice and, my favourite – homemade hummus!

THE INGREDIENTS
I love this Mediterranean Rice Bowl because the ingredients are so fresh and vibrant. They are easy to prepare and can be swapped out or omitted based on your preferences. You will need:
- your favourite rice
- spinach (or your favourite lettuce)
- cherry tomatoes
- cucumber
- feta cheese
- olives
- homemade hummus
- olive oil
- red wine vinegar
- a lemon
- dijon mustard
- garlic
- dried herbs (oregano & basil)
HOW TO MAKE THIS MEDITERRANEAN RICE BOWL
There are two cooked components to this bowl – the rice and the hummus. You may choose to use store-bought hummus, but if you haven’t made your own before, I highly suggest you try it. Check out my recipe here. It’s seriously a game-changer!

The rest of the ingredients are “toppers” which will be added to the bowl with the rice. Dice up your cucumber, halve the tomatoes and olives, and crumble up the feta.
To prepare the dressing, stir together the vinegar, juice of half a lemon, mustard, minced garlic and herbs and then drizzle in the olive oil while whisking to combine.
BUILDING THE BOWL
Firstly, lay your spinach in the bottom of your favourite bowl. Top it with the rice, tomatoes, olives, cucumber, feta and a big dollop of the hummus. Next, drizzle your dressing over top of the ingredients and toss with two spoons to combine. Add salt and pepper according to taste, dig in and enjoy!
MORE RECIPES IN A BOWL
Rainbow Buddha Bowl with Garlic Tahini Dressing (taste the rainbow and get all your nutrients)
Roasted Vegetable Quinoa Bowl (protein-packed and super easy)
TOOLS NEEDED FOR THIS RECIPE
Click below to check out what I use to make this Mediterranean Rice Bowl.


This post contains affiliate links and I may earn a small commission when purchases are made after clicking the links, at no cost to you – thank you!
MEDITERRANEAN RICE BOWL (GF)
Serving size: 4
Prep time: 10 minutes
Cook time: 25 minutes
INGREDIENTS
- 1 cup rice
- 4 handfuls baby spinach
- 1 cup cherry tomatoes, halved
- 1/2 cup olives, pitted and sliced
- 1 cup cucumbers, chopped
- 1/2 cup feta cheese, crumbled
- 1/2 cup homemade or store-bought hummus
For the dressing:
- 2 tbsp red wine vinegar
- 1/4 tsp dried oregano
- 1/4 tsp dried basil
- 2 garlic cloves, minced
- juice of 1/2 a lemon (about 2 tbsp)
- 1 tsp dijon mustard
- 1/2 cup olive oil
- salt
- pepper
INSTRUCTIONS
- Cook the rice according to package directions.
- Place one handful of spinach into each of the four serving bowls and top with the cooked rice. Divide the tomatoes, cucumbers, olives, feta cheese and hummus amongst the four bowls, on top of the rice and spinach.
- In a separate small bowl or measuring cup, mix together the vinegar, oregano, basil, garlic, lemon juice and mustard. Slowly drizzle in the olive oil while whisking to combine and season with a pinch of salt and pepper. Drizzle the dressing overtop of the assembled bowls. Toss, serve and enjoy!
The post Mediterranean Rice Bowl (GF) appeared first on Never. Not. Eating..
]]>The post Easy Chia Pudding Parfait appeared first on Never. Not. Eating..
]]>
WHY CHOOSE CHIA SEEDS?
I love chia pudding as my morning meal because these seeds are full of energy-boosting nutrients to start your day. Firstly, FIBRE. Absolutely essential for a healthy lifestyle, fibre enhances gut health and makes you feel full, longer.
Chia seeds are also high in protein. Protein is needed in the body to help rebuild muscle, strengthen hair, skin and nails, and provide energy. Chia seeds are a great way to incorporate protein into your diet, especially as a vegetarian or vegan!

This superfood is also high in iron. As someone with low iron, I’m always searching for more iron-rich foods to add to my diet. Iron helps carry oxygen throughout the body and develop red blood cells.
If that isn’t convincing enough, chia seeds also contain calcium, good fats, antioxidants and have no sugar. Get yourself a bag of seeds and I’ll show you how to use them in this yummy parfait recipe!
WHAT YOU NEED TO KNOW ABOUT MAKING THIS EASY CHIA PUDDING PARFAIT
Chia seeds are like sponges – any liquid added to them gets sucked up and the seeds expand and become almost gel-like. You can add any kind of milk you prefer, but this recipe is fully vegan and therefore calls for plant-based milk.
HOW TO MAKE EASY CHIA PUDDING PARFAIT
When mixing the seeds with your choice of liquid, I like to whisk them together in a bowl to avoid forming clumps. I set the bowl in the fridge for about 10 minutes and then whisk again. After another 10 minutes, the seeds have usually absorbed their capacity of liquid and are ready to be made into a parfait!
Depending on you, many of the extra ingredients in this recipe can be swapped out for others you prefer.
For example, if maple syrup isn’t your favourite choice of sweetener, feel free to switch it up by adding agave or honey (not vegan). Cinnamon can be taken out completely or swapped with a superfood powder, such as beetroot or spirulina. Maybe you would like to get funky with it and use an almond extract or a hazelnut syrup instead of the vanilla. Be crafty! The possibilities are endless.
STORING YOUR EASY CHIA PUDDING PARFAIT
If you are following this recipe to meal prep, it makes four servings. I love using these cute little mason jars to store them in, as they are airtight and keep them fresh in the fridge.
OTHER MEAL PREP IDEAS
Vegan Power Muffins (for a quick energy boost)
Middle Eastern Orzo Pilaf (makes a great side to any meal)
The Fluffiest Gluten-Free Pumpkin Pancakes (perfect for the kiddos – make ahead and pop in the toaster for a quick breakfast)
This post contains affiliate links and I may earn a small commission when purchases are made after clicking the links, at no cost to you. Thank you for supporting me!
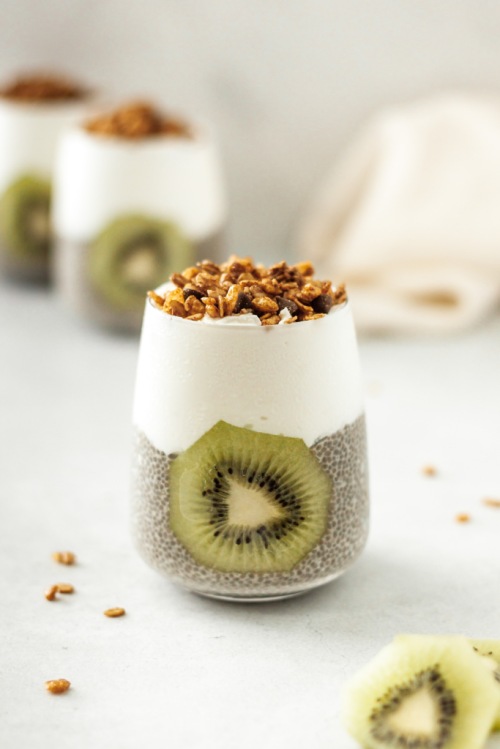
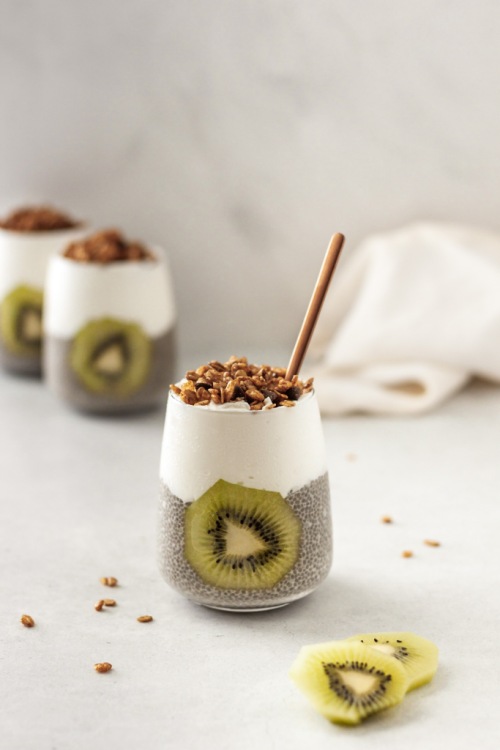
Easy Chia Pudding Parfait
Servings: 4
Prep time: 5 minutes
Chill time: 20 minutes
Ingredients:
- 1/2 cup chia seeds
- 1.5 cups plant-based milk
- 2 tbsp pure maple syrup
- 1 tsp pure vanilla extract
- 1/4 tsp cinnamon
- pinch of salt
- 1 cup coconut yogurt
- fresh fruit, for topping
- granola, for topping
Instructions:
- In a medium bowl, whisk together the chia seeds, milk, maple syrup, vanilla, cinnamon and salt. Place in the fridge for 20 minutes, whisking a few times in between.
- Divide the mixture between 4 mason jars, or bowls, if serving immediately. Top with 1/4 cup of yogurt and some of the fruit. Sprinkle with granola before serving!
Store jars in the fridge for up to 4 days.
The post Easy Chia Pudding Parfait appeared first on Never. Not. Eating..
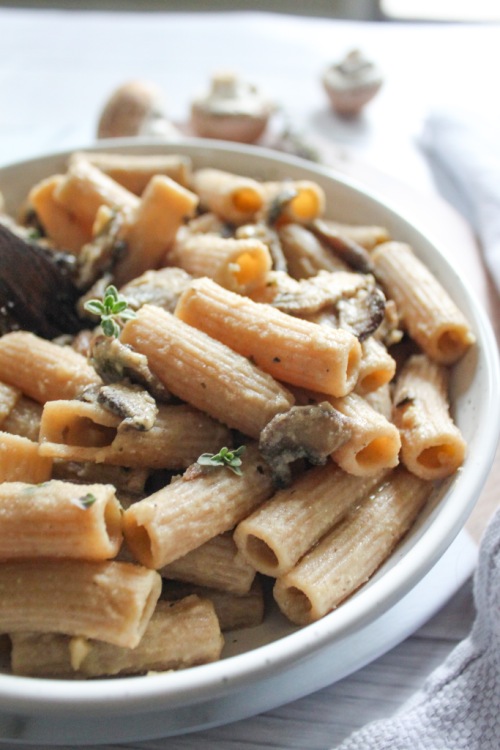
]]>The post Creamy Vegan Mushroom Rigatoni appeared first on Never. Not. Eating..
]]>
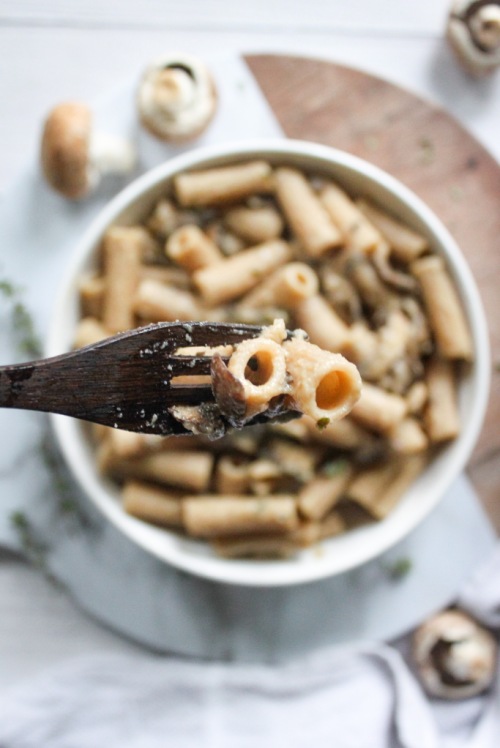
Now I love those little fungi so much. That’s why I had to dedicate this pasta to them – to say I’m sorry for a lifetime of neglect, and it won’t happen again.
One thing I never neglected – Rigatoni. Isn’t it such a great pasta choice? Those sweet little grooves that hold all the sauce? Yes, please! I love using spelt pasta, but any pasta works for this recipe. Make sure you cook it to al dente, as it will continue to cook once added to that creamy mushroom sauce!
The sauce – Simple, yet delicious. Creamy, but vegan. This easy-to-make sauce requires only a few ingredients:
- garlic
- mushrooms
- thyme
- white wine
- stock
- coconut milk
- vegan butter
Start by adding the mushrooms to some olive oil and salt in a pan. Cook them down and caramelize them up! Next, add in the garlic, thyme and white wine. Cook until you cannot smell the alcohol anymore and then add the stock and milk. Let simmer until it thickens up, and transfer the pasta into the sauce to finish cooking. Finally, add in some of the pasta water to bring everything together and you got yourself some mushroom pasta!
Let’s all show our love to mushrooms!
Creamy Vegan Mushroom Rigatoni
Servings: 2
Prep time: 5 minutes
Cook time: 20 minutes
Ingredients:
- 200 g rigatoni
- 3 cups sliced mushrooms
- olive oil
- salt
- pepper
- 2 cloves garlic, minced
- 2 sprigs thyme, stems removed
- 1/4 cup white wine
- 3/4 cup vegetable stock
- 3/4 cup full-fat canned coconut milk
- 1 tbsp vegan butter
Instructions:
- Cook the pasta according to package instructions, in heavily salted boiling water. Reserve 1/4 cup of the pasta water before draining.
- Add two tablespoons of olive oil to a large saucepan over medium-low heat. When the oil begins to move easily in the pan, add the mushrooms and a pinch of salt. Cook for 6-8 minutes, stirring occasionally. Add the garlic and thyme to the pan and cook until fragrant, about 30 seconds. Add the wine and let simmer for about 5 minutes, or until the alcohol smell is gone. Pour in the vegetable stock, stir, and follow with the coconut milk. Let the sauce simmer until thickened, about 10 minutes. Finish with the butter and some cracks of fresh black pepper.
- Transfer the pasta into the pan, pour in the reserved pasta water, and mix to coat with the sauce. Taste and adjust seasoning as necessary. Enjoy!
The post Creamy Vegan Mushroom Rigatoni appeared first on Never. Not. Eating..
]]>The post Hot and Sweet Cauliflower Wings appeared first on Never. Not. Eating..
]]>
I put a pot of oil on the stove and waited. And waited, and waited, and waited. It didn’t start to boil, so I just kept waiting. Like I said, I knew NOTHING about cooking. All of a sudden, plumes of smoke started emerging from the pot. And, then I couldn’t breathe. The smoke filled the house and my roommates were like, “WTF Mate?!” It was so thick that it coated our lungs as we hacked up a storm. So, I carefully took the pot outside and stuck it in a pile of snow and ran far, far away.
Never have I tried frying again. Until today. Thank goodness for endless episodes of the Food Network that have guided me in my growth as a food fryer.
So, in case you have never fried before, here are my learnings:
- Oil doesn’t boil
- Do not fry food without a thermometer
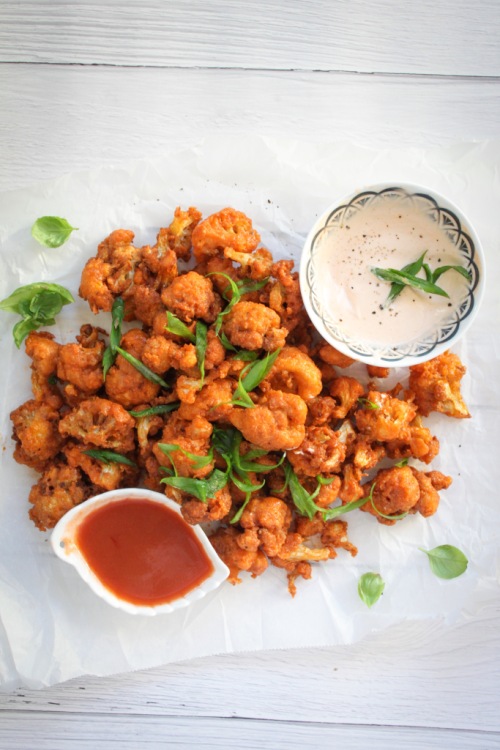
Now that the PSA is out of the way, let me introduce you to my first fry recipe – Cauliflower wings. We all know them. We all love them. But, I can’t tell you how many times I have tested recipes that have you bake these little guys, and they never create the texture that I want. That crispy AF texture. So, we fryin’ today.
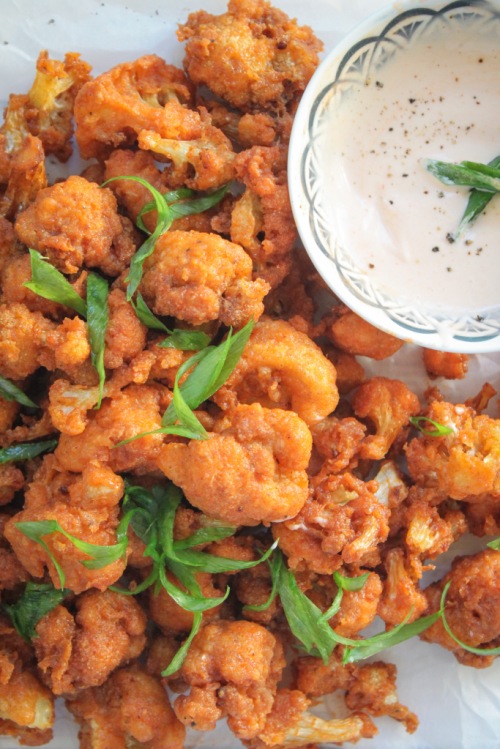
This recipe is really quick and surprisingly easy. You need to break off your cauli into smaller florets – the larger they are, the more water they absorb. Then, get that batter going – add some flour, cornstarch (my favourite “crisping” ingredient), paprika, chili powder, salt and pepper to a bowl and whisk. Next, pour in some canned coconut milk, mixed with another milk of choice – oat, cashew, almond, etc. Whisk it all together and you will get a nice batter. Give those florets a dunk and carefully place them into the pot of oil. Let them cook for about 3-4 minutes, until golden brown.
After you have fried all of the cauliflower, get your sauce ready. Combine a quarter cup of Frank’s Red Hot Sauce with 1 tablespoon of honey and slather over the wings. Give them a toss and they are ready.

If you are into dipping things into other things, then make my “Frank’s Aioli.” Mix about 1/2 teaspoon of Frank’s Hot Sauce with 2 tablespoons of mayo and give ‘er a few cracks of pepper and you’re Gucci.
I’m very pleased with my personal growth. Let me help you achieve your culinary fry goals with this recipe! Happy frying!
Hot and Sweet Cauliflower Wings
Servings: 4
Prep time: 15 minutes
Cook time: 15-20 minutes
Ingredients:
- Canola or vegetable oil, to fry
- 1 small head of cauliflower, broken into florest
- 1/2 cup whole wheat flour (or all-purpose)
- 1/4 cup cornstarch
- 1 tsp paprika
- 1 tsp chili powder
- 1 tsp salt, plus more for seasoning
- 1/4 tsp pepper
- 1/4 cup canned coconut milk (or skip and add 1 whole cup of ‘other’ milk)
- 3/4 cup milk of choice (cashew, coconut, oat, etc.)
- 1/4 cup plus 1/2 tsp Frank’s Red Hot Sauce (or your favourite hot sauce), separated
- 1 tbsp honey
- 2 tbsp mayonnaise
- Scallions, sliced, for topping (optional)
Instructions:
- Set up your frying station by pouring the oil into a dutch oven, or heavy pot. Have at least 3 inches of oil in your pot. Place a thermometer in the pot and turn the burner on medium-high.
- Whisk together the flour, cornstarch, paprika, chili powder, salt and pepper in a medium bowl.
- Mix together the two milks and pour over the dry ingredients. Whisk until combined and then add the cauliflower, stirring to coat with the batter.
- When your oil temperature reaches 350 degrees F, use metal tongs to carefully drop in a few of the coated cauliflower florets, making sure you don’t crowd the pot as it will significantly bring the temperature down. Fry for 3-4 minutes, or until golden brown. Remove carefully with a stainless steel spider and place on a paper towel lined plate. Immediately season with a pinch of salt. Wait until the oil comes back up to temperature before continuing with the rest of the cauliflower.
- To make the sauce, combine 1/4 cup hot sauce with 1 tablespoon honey. Transfer the cauliflower wings to a large bowl and drizzle the sauce over them. Toss to combine.
- To make the aioli, combine the mayonnaise with 1/2 teaspoon of hot sauce and a pinch of pepper. Stir to combine.
- Top with sliced scallions and serve immediately.
The post Hot and Sweet Cauliflower Wings appeared first on Never. Not. Eating..
]]>The post Middle Eastern Orzo Pilaf appeared first on Never. Not. Eating..
]]>
Okay, I am in love with all flavours of all regions of the world (literally), but Middle Eastern…AND Italian?! Two heavyweights in the culinary world and I’m here for it! Like a hundo P’s.
Let me break down this fusion for you. We have the following Italian/Mediterannean ingredients:
- Orzo
- Feta
- Basil
And those from the Middle East include:
- Dried fruit (apricots, cherries, currants)
- Pistachios
- Olives
- Pomegranate seeds
- Cilantro
- Spices (Turmeric, Paprika, Cumin, Coriander, etc.)
Together, they are Chrissy and John. Rachel and Ross. Bey and Jay. Me and me.
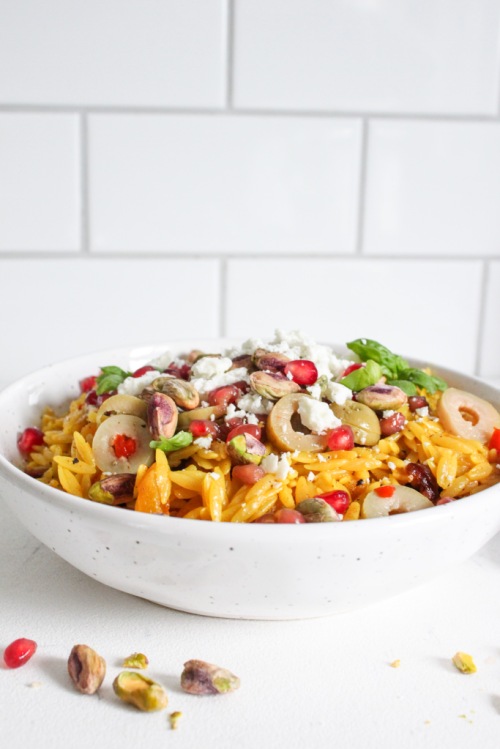
The warm flavours of the spices paired with creamy orzo, sweet fruit and salty olives and feta…hawt damn! I’m drooling.

Oh, one more thing…This makes the perfect lunch the next day. Leftovers for the win!
Middle Eastern Orzo Pilaf
Serving Size: 4
Prep time: 10 minutes
Cook time: 12 minutes
Ingredients:
- 1 tbsp olive oil
- 1 clove garlic, minced
- 1/2 tsp cumin
- 1/4 tsp turmeric
- 1/4 tsp paprika
- 1/4 tsp ground coriander
- pinch of fresh nutmeg
- pinch of black pepper
- 1 cup uncooked orzo, rinsed well
- 1 1/2 cups vegetable broth
- salt
- 1 cup dried fruit (I use cherries, currants and chopped apricots)
- 1 tbsp freshly squeezed lemon juice (optional)
- 4-5 olives, chopped
- 1/4 cup feta, crumbled
- 1/4 cup pomegranate arils
- 1/4 cup pistachios, shelled
- fresh herbs (cilantro and basil) for topping, (optional)
Instructions:
- Heat olive oil in a large pan over medium heat. Add the garlic and cook for 30 seconds or until fragrant. Add the cumin, turmeric, paprika, coriander, nutmeg and pepper and stir until toasted, another 30 seconds to 1 minute. Add the orzo and stir to coat with the spices. Once coated, pour in the broth, add 1/4 tsp salt and bring up to a boil and then reduce heat and let simmer for 8 minutes, with the lid on.
- After the 8 minutes, quickly lift the lid, add the dried fruit, and stir to incorporate with the orzo. Place the lid back on and let stand for 2 more minutes off the heat.
- Squeeze some fresh lemon juice into the pan and stir to combine. Transfer the orzo to a serving dish and top with olives, feta, pomegranate seeds, pistachios and fresh herbs. Serve immediately or let cool and refrigerate in an airtight container for up to three days.
The post Middle Eastern Orzo Pilaf appeared first on Never. Not. Eating..
]]>The post Roasted Garlic Mashed Cauliflower (Low-Carb) appeared first on Never. Not. Eating..
]]>We are officially entering Fall and that means, Thanksgiving. I’m a lover of enjoying seventy-four side dishes and can always forego the main one. I am always on the hunt for new and fun sides to add to any meal…especially those around the holidays!

This Roasted Garlic Mashed Cauliflower is the perfect side for Thanksgiving, Christmas, Easter…you name it! It’s low-carb and will please your keto and vegan family members. Bonus: It tastes just as good as mashed potatoes!
How to Make Vegan Roasted Garlic Mashed Cauliflower
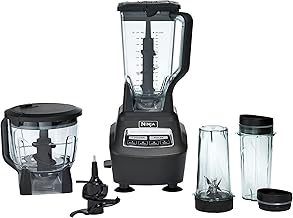
I highly recommend a good food processor or blender. The Ninja Kitchen line is a great product and I use their food processor every single day. I make EVERYTHING in it – smoothie bowls, pestos, pastry doughs and this mashed cauliflower. It is an affordable alternative to the well-known Vitamix.

For this recipe, everything gets precooked, placed in your food processor and then blended until smooth – it’s THAT easy! Here is what you will need:
- One medium-sized head of cauliflower
- A head of garlic
- Vegetable broth
The Roasted Garlic
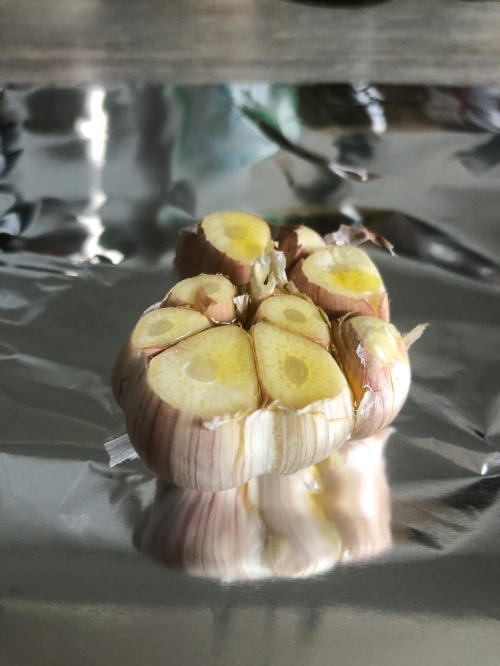
Let’s talk about the garlic – is there anything better?! For this recipe I love using roasted garlic, and although it may take longer, it’s so worth it. In addition, you will also have leftover cloves that you can use in other dishes that you will be serving (or just save them for another day). Roasting a head of garlic is a great move for large dinner parties or holiday gatherings.
To roast, all you have to do is cut off the top of the entire head of garlic, leaving the top of the cloves exposed. Drizzle the head with olive oil, wrap in tin foil and place on a baking sheet and into the oven for 45 minutes. If you want to save on time, you can mince your raw garlic, add to a pan over low heat with some olive oil for about 30 seconds to one minute, and use this in place of the roasted stuff in the recipe. Above all, don’t skimp on the garlic!
Cooking the Cauliflower
To cook the cauliflower, place the florets into a large pot with about a cup and a half of veggie stock. Cover and set your burner to high, and when the liquid starts boiling, turn the burner down slightly and let steam for about 5-10 minutes (depending on how small your florets are). They will be ready when they are fork-tender. Don’t overcook them because you will end up with mushy cauliflower instead of mashed cauliflower!
After you cook the garlic and cauliflower, all that’s left to do is throw it all into your food processor and watch it come together – Pillowy, low-carb clouds of heaven!

More Amazing Cauliflower Sides
Sumac Roasted Cauliflower (a showstopper)
Hot and Sweet Cauliflower Wings (perfect for game day)
East Creamy Cauliflower Soup (a winter hit)
This post contains affiliate links and I may earn a small commission when purchases are made after clicking the links, at no cost to you. Thank you!
Vegan Roasted Garlic Mashed Cauliflower
Servings: 4
Prep time: 10 minutes
Cook time: 45 minutes
Ingredients:
- 1 whole head of garlic
- medium head of cauliflower, broken into florets
- 1 1/2 cups vegetable stock
- salt
- pepper
- olive oil
- fresh thyme, for topping (optional)
Instructions
For the garlic:
- Preheat oven to 375 degrees Fahrenheit.
- Peel the outer layer of skin off of the garlic and slice the top of the head off (see photo above). Place on a piece of tin foil and drizzle the top with about one tablespoon of olive oil. Wrap the garlic up so that there are no holes for the steam to escape and place on a baking sheet and then in the oven for 45-55 minutes.
For the cauliflower:
- When the garlic has been roasting for about half hour, start your cauliflower. Place the florets into a large pot with the vegetable stock, cover and bring to a boil. Once boiling, reduce slightly to a rolling boil and allow the cauliflower to steam for 5-10 minutes, or until just fork tender – do not drain.
- Use a slotted spoon to transfer the cauliflower to a food processor or blender and add one tablespoon of the veggie stock that the cauliflower was cooking in.
- Remove the garlic from the oven and carefully unwrap. Use your fingers to squeeze out two of the cloves (or as many as you want!) and place in the food processor with the cauliflower and stock. Add in 1/4 teaspoon of salt and a few grinds of fresh black pepper and pulse everything to combine and then blend until smooth. Be patient and scrape down the sides often. You can add more of the veggie stock to help loosen it, but don’t add too much or else it will become mushy. Eventually, if you continue to blend and scrape, the mixture will become smooth without the added veggie stock.
- Taste and add more salt and pepper or another clove of garlic, if desired. I like to put more than 1/4 teaspoon of salt, but it is always better to start with less and add more, than to add too much for your taste.
- Transfer the cauliflower to a serving bowl, drizzle with some olive oil and top with fresh thyme, if desired.
The post Roasted Garlic Mashed Cauliflower (Low-Carb) appeared first on Never. Not. Eating..
]]>The post Gluten-Free Zucchini Galette appeared first on Never. Not. Eating..
]]>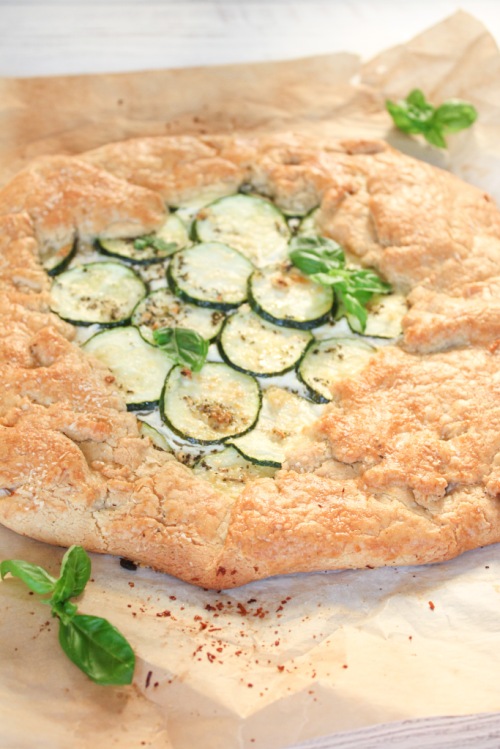
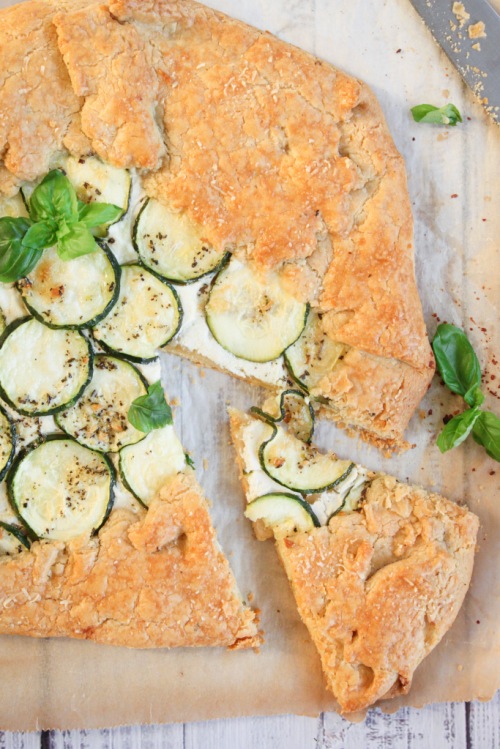
If you know me, you know I love a good galette. And I love mixing it up and creating both sweet and savoury galettes. I’ve tried everything from stone fruit to tomato to apple, and now, zucchini! You can literally wrap any produce in flaky pastry and 90% of the time it will be tasty. WORD.
I decided to make this galette gluten-free, mostly because I avoid gluten as much as I can, but also because I just bought an All-Purpose Gluten-Free Flour by Bob’s Red Mill that I was really excited to try. Of course, anything made with gluten-free flour has a different taste than that made with regular, wheat flour, but I must say, I was impressed with how this crust held together and how flaky it was. If you eat regular wheat flour, feel free to swap in some all-purpose in it’s place!
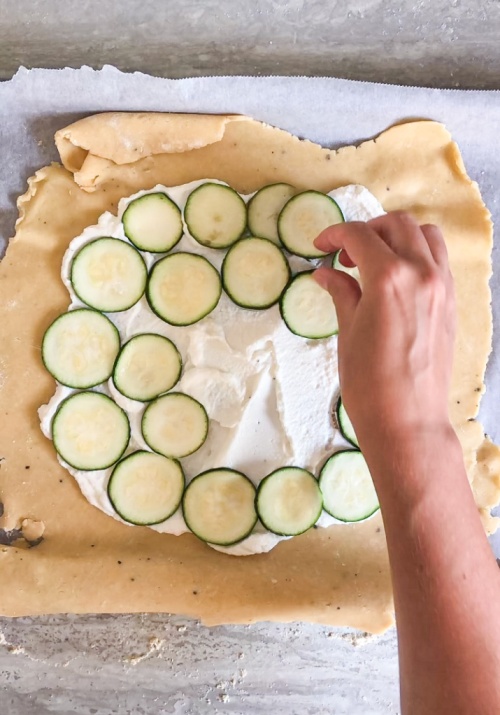
Let’s talk filling – Smooth, lemony ricotta. This is my favourite part. Extra creamy ricotta with lemon juice and zest, salt and pepper whipped together to make the dreamiest of beds for the lucky zucchini. Smear the crust with as little or as much as you want. The addition of lemon brings a brightness to the dish that makes it perfect for Spring or Summer.
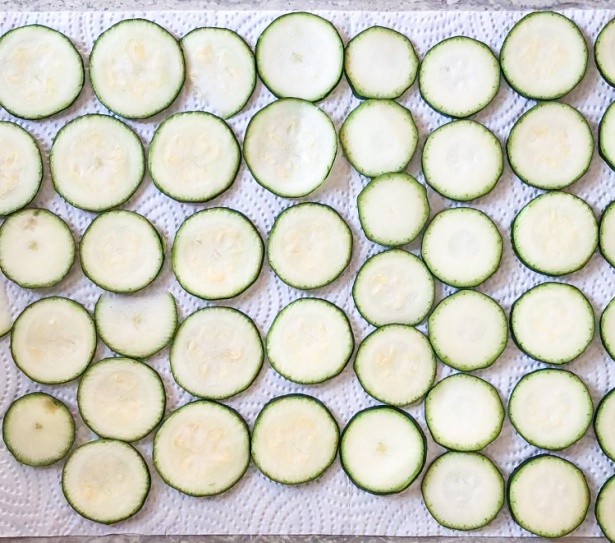
The leading actress here is the zucchini. A few important tips that will help you achieve the ideal galette would be to slice the zucchini about a quarter of an inch thick, making sure they are all the same thickness, place the slices onto paper towels for 30 minutes before assembling your tart and salt them well. This allows the (abundant) excess water to be pulled out, avoiding a soggy mess.

The dough – Finally, let’s talk about the dough. I used to be intimidated when making pastry dough, but it’s actually quite an easy skill to master. The most important part of pastry is to use very cold butter. If the butter is cold, it melts down slower into the flour and, in turn, creates air pockets, which make for flaky pastry. To ensure your butter is perfect, cut it into cubes and store it in the fridge up until you need to use it. After combining it with the flour and forming a disc shape, wrap it in plastic wrap and return it to the fridge to firm up again. After I roll out the dough and assemble the galette, I like to pop it in the fridge yet again for ten minutes. Tip: Assemble your galette, put it in the fridge and set your oven. When your oven is ready, the galette can go right from your fridge to that 400 degree heat!
That’s it…Not too complicated, right?!
Gluten-Free Zucchini Galette
Serving size: 4
Prep time: 15 minutes
Chill time: 30 minutes
Cook time: 30 minutes
Ingredients:
For the crust:
- 1 1/2 cups gluten-free flour
- 1/2 tsp salt
- 1/4 tsp black pepper
- 1/3 cup parmesan cheese, grated, plus more for topping
- 3/4 cup cold butter, cubed
- 1 tbsp white vinegar
- 3-5 tbsp ice-cold water
For the ricotta filling:
- 1 cup ricotta cheese (I use extra creamy)
- zest of one lemon
- 1 tbsp lemon juice
- a few grinds black pepper
- pinch of salt
- 1 small zucchini, sliced into 1/8-inch rounds
- 2 tbsp olive oil
- 1/2 tsp dried basil
- 1 clove garlic, minced
- 1 egg, beaten
Instructions:
For the crust:
- To a food processor, add the flour, salt and pepper and pulse a few times to combine. Add parmesan cheese and the cold butter and pulse again until dough resembles small pea shape crumbs (see photo). Add vinegar and two tablespoons of ice cold water and pulse. Continue to add water, one tablespoon at a time, until dough begins to come together. Typically, I use around four tablespoons in total. Dump the dough onto a piece of plastic wrap, form into a disc and then wrap and place in fridge to chill for 30 minutes.
- Prepare the zucchini by laying the rounds onto paper towels and sprinkling salt on the tops to draw out any excess water. Let sit for at least 30 minutes.
For the ricotta filling:
- To a small bowl, add the ricotta, zest, lemon juice, pepper and salt and mix to combine. Place in the fridge until ready to assemble.
For the rest of the galette:
- Combine olive oil, basil and garlic in a small bowl. Set aside.
- Flour your work surface and remove the dough from the fridge. Roll out into a circle about 1/4-inch thick. Carefully transfer the dough to a parchment lined baking sheet.
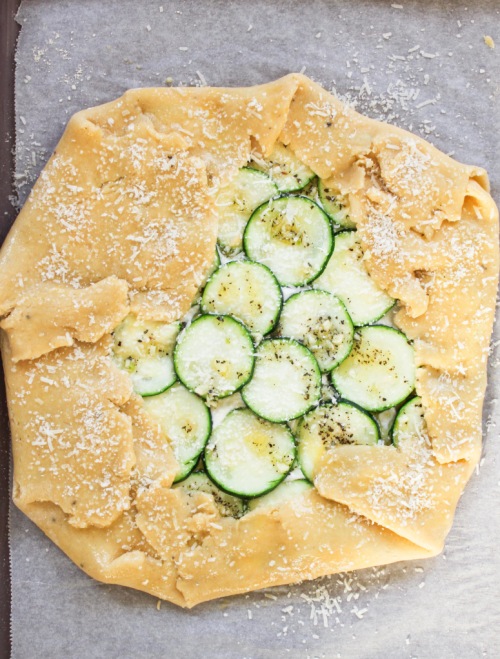
- Spread the ricotta mixture onto the dough, leaving a 2-inch border all the way around. Arrange the zucchini slices on top of the ricotta. Drizzle the olive oil mixture on top of the zucchini. Fold over the edges of the pastry. Preheat your oven to 400 degrees Fahrenheit and transfer the galette to the fridge for 10 minutes, or until the oven is ready. Right before placing the galette into the oven, brush the exposed pastry edges with the egg wash and sprinkle on some extra parmesan cheese, if desired. Bake for 25-30 minutes, or until galette is golden brown in colour.
The post Gluten-Free Zucchini Galette appeared first on Never. Not. Eating..
]]>The post Easy Creamy Cauliflower Soup appeared first on Never. Not. Eating..
]]>
I used my Simple Living Soup Maker to make this soup. If you haven’t heard of Simple Living and their products, you need to check them out! I love my soup maker – It makes dinners easy – heating, blending and cooking soups in 30 minutes! Their soup maker can also be used to make smoothies and alcoholic beverages…My fav! Not to mention it is so quick to clean and easy to store. The BEST.
If you don’t have a Soup Maker, you can use a large pot and then an immersion blender to puree the soup after it is done cooking.
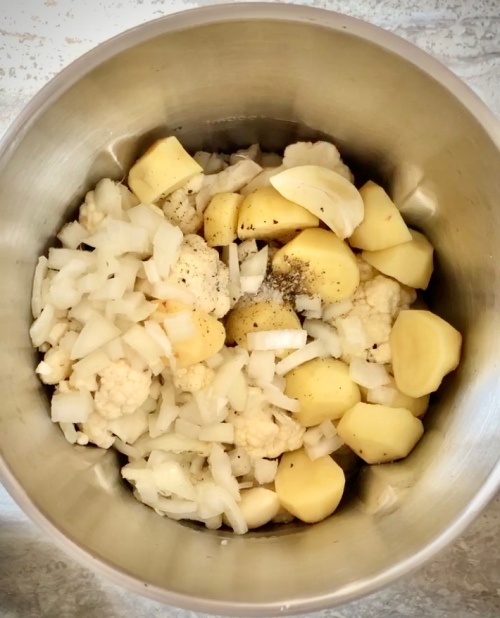
Let’s talk ingredients. Here is what you will need to make this flavourful soup:
- cauliflower
- a yellow or white potato
- yellow onion
- garlic
- dried/fresh sage
- vegetable broth
Everything goes into your Soup Maker and it gets set to “Smooth,” and then turned on. Half an hour later, the soup is hot, creamy and ready to serve.
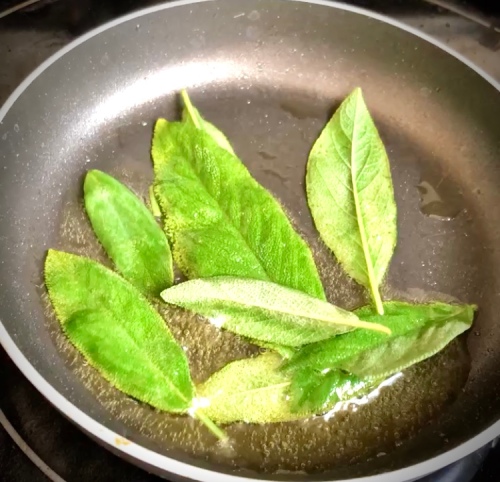
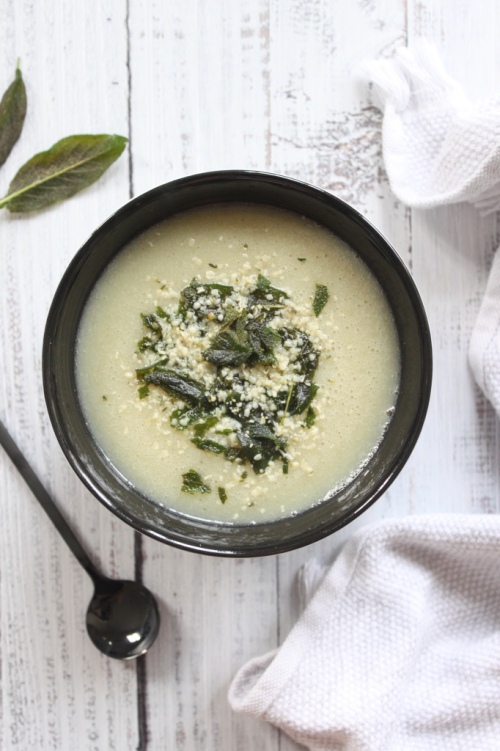
While the soup is cooking, I like to fry some fresh sage leaves to put on top. These are GOLD. All you have to do is add them to a hot pan with a thin layer of oil and fry until crispy! This only takes a minute or two. Drain them on some paper towels and when the soup is done, sprinkle them on top. So good!
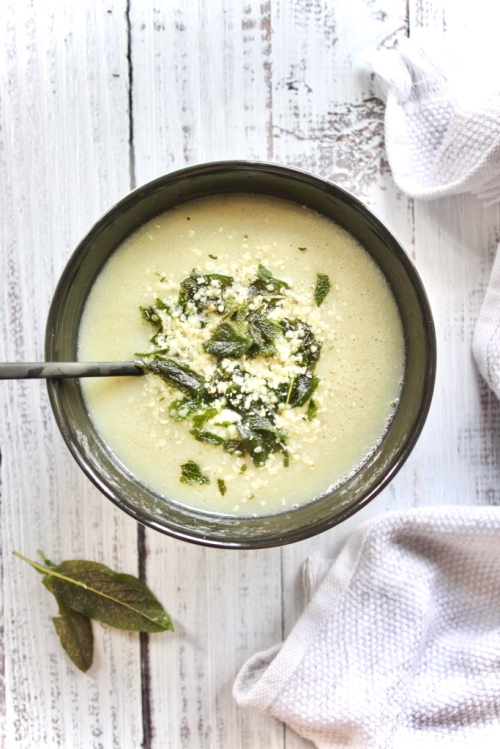
This recipe is the perfect, healthy, post-work meal that will feed a family of four. It’s great for those long days at work, when you come home and need something quick to whip up. The Soup Maker makes it even more practical – I will never make soup in anything else again!
Easy Creamy Cauliflower Soup
Servings: 4
Prep time: 15 minutes
Cook time: 30 minutes
Ingredients:
- one small head of cauliflower, cleaned and broken into florets
- one medium yellow or white potato, cut into 1/2 inch chunks
- 1/2 yellow onion, diced
- 2 cloves garlic (minced, if cooking stovetop)
- 1/2 tsp dried sage
- 1/4 tsp salt
- a few grinds of fresh black pepper
- 3 cups of vegetable broth (plus 1/2 cup if cooking stovetop)
- olive oil
Instructions:
Soup Maker steps:
- Put all ingredients into your soup maker. Feel free to add more broth right up to the MAX line. Secure the lid and set to “Smooth.” Press “ON.” Once the soup is done, check the seasoning and add more salt/pepper if desired. Pour into bowls and drizzle with a splash of olive oil.
Stovetop steps:
- Add 1 tablespoon olive oil to a large pot over medium heat. Once the oil has warmed, add your onion and let cook, stirring occasionally, until soft – about 5 minutes. Add the garlic and stir frequently, cooking until fragrant – about 30 seconds to 1 minute. Add the cauliflower, potatoes, sage, salt and pepper to the pot. Pour in the vegetable broth and stir to combine. Bring up to a boil and then reduce the heat to a simmer. Cover and cook for 30 minutes.
- Once the soup is done and all vegetables are tender, blend the soup with an immersion blender until smooth. Alternatively, you can very carefully pour the soup into a blender, blend until smooth and then return to the pot. At this point, taste the soup and adjust salt and pepper accordingly. Serve immediately or store in airtight containers in the fridge for up to 3 days.
NOTES:
I like to top this soup with crispy sage leaves and hemp hearts. To fry fresh sage leaves, coat the bottom of a small pan with a thin layer of oil. Place the pan over medium-high heat, and when the oil is hot, drop the sage leaves in. They should sizzle immediately. Cook for 1-2 minutes or until crispy. Drain on paper towels before serving on top of the soup.
The post Easy Creamy Cauliflower Soup appeared first on Never. Not. Eating..
]]>The post Avocado Croutons appeared first on Never. Not. Eating..
]]>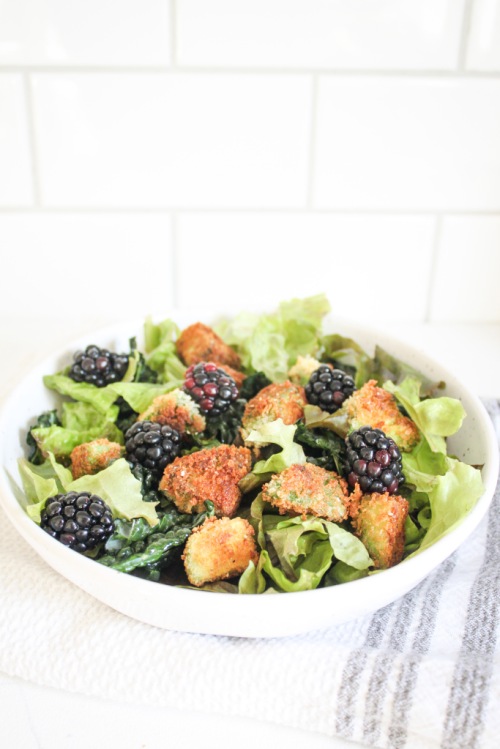
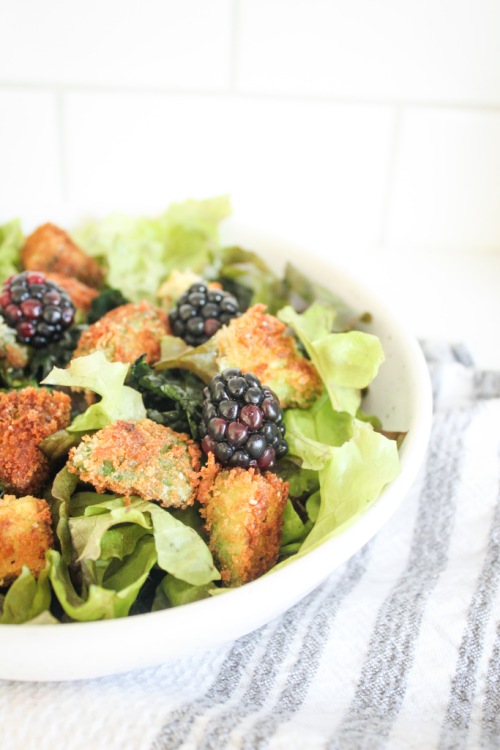
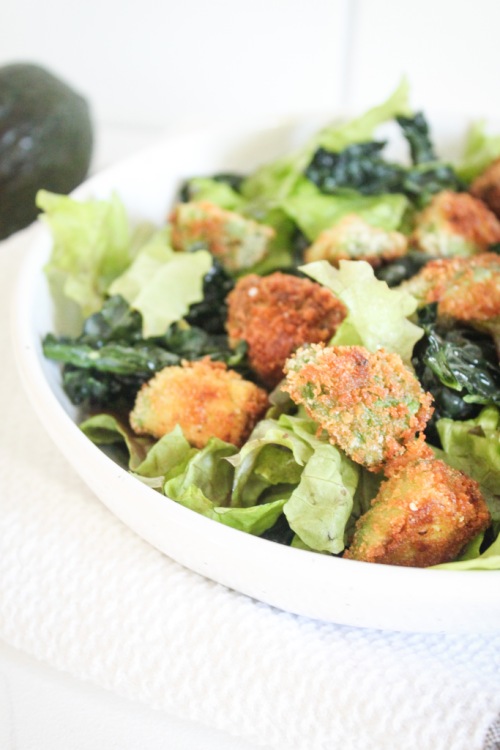
Not sure where this idea came from, but I’m grateful for it. Avocado croutons are my new regular croutons.
If you are tired of waiting for your avo to soften, make croutons! Or, if you just want croutons, make croutons!
All you will need is an unripe avocado, some Panko breadcrumbs, cornstarch, an egg and some salt and pepper to season.
Tip: When dicing your avocado, cut it in half, lengthwise and remove the pit by tapping it carefully with the sharp blade of your knife. Twist and it should pop right out. Place the avocado on your cutting board, cut side down and peel the skin off with your fingers. This will make it easier to achieve equal cubes when cutting! I suggest 9-12 cubes per half.
Tip #2: Season at every step. Season the avocado directly, season the breadcrumbs and season the croutons after they come out of the pan. Avocados are pretty bland, so adding salt turns up the flavour.
When life gives you avocados, make croutons.
Avocado Croutons
Prep time: 10 minutes
Cook time: 5 minutes
Ingredients:
- 1 unripe avocado (look for mostly darker skin with a few firm, green areas still), pit removed, skin off and diced into 1/2-inch cubes (about 9-12 cubes per half)
- salt
- pepper
- 3 tbsp cornstarch
- 1 egg, beaten
- 1/3 cup Panko breadcrumbs
- olive oil
Instructions:
- Set up your breading stations – have one bowl for the corn starch, the next bowl with the beaten egg and the final bowl with the Panko, mixed with 1/4 teaspoon of salt and a few grinds of fresh black pepper.
- Sprinkle your diced avocado with a pinch of salt and pepper and then toss carefully in the cornstarch. Ensure all sides have a light coating of cornstarch on them and then place into the egg and then into the Panko. Make sure all sides of the avocado are coated in the breadcrumbs.
- Add enough olive oil to generously coat the bottom of a large pan. Turn heat to medium-high, and when oil is hot, carefully drop each avocado piece into the oil, being careful not to crowd the pan. Cook for about 30 seconds-1 minute per side, or until browned. Make sure you turn the avocado to cook each side.
- Remove from pan and drain the croutons on paper towels.
Eat with your favourite salad, or on their own with your favourite creamy dipping sauce (like, ranch or chipotle mayo)!
The post Avocado Croutons appeared first on Never. Not. Eating..
]]>The post Butternut Squash and Kale Lasagne Roll-Ups appeared first on Never. Not. Eating..
]]>
Thaz right. The layers in this lasagne aren’t lookin’ like a sedimentary rock, nuh uh. They are more like a snail shell. Yah feel me?!
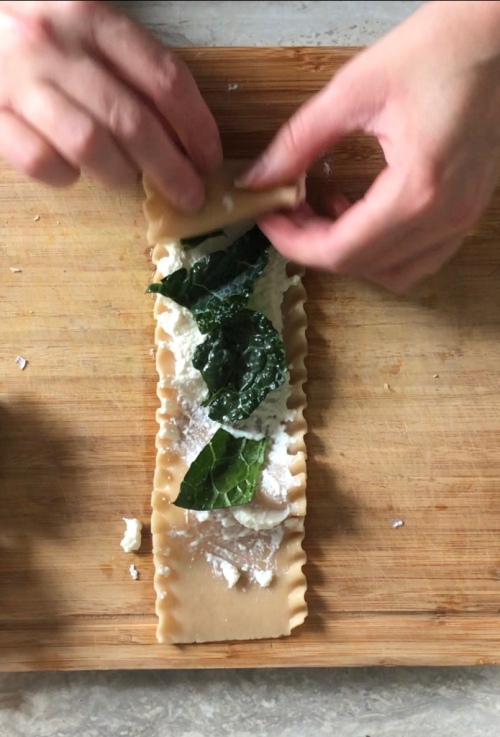
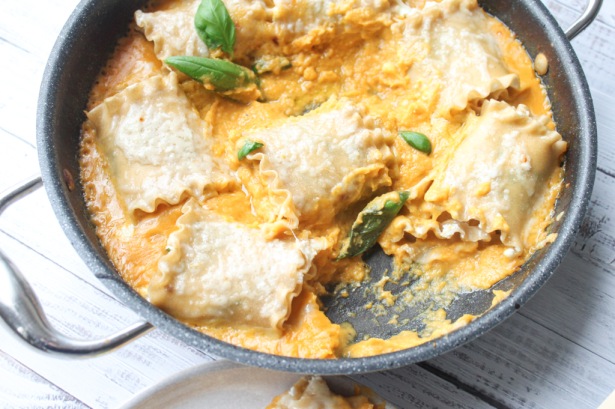
This is a lasagne revolution – the pasta sheet laid out, smothered with the toppings and then rolled up into a cute little present that takes a bath in squash. I mean sauce. I mean squash sauce. And, although I love the standard tomato sauce with all of my heart, squash sauce is my side piece and needs attention, too.
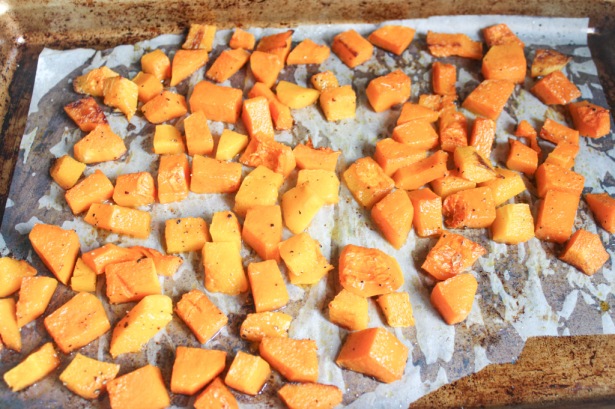
Okay, for reals – this lasagne dish is everything. It starts with the creamy sauce. Roasted butternut squash, pureed and then hit with some garlic, coconut milk and flavourful pasta water – an important ingredient for any great sauce. Nutritious kale and fluffy, whipped ricotta cheese on top of a perfectly cooked lasagne noodle, rolled up and finished off together in the oven with some extra parm on top for that nuttiness. DROOL.

This should be your next pasta night recipe.
Butternut Squash and Kale Lasagne Roll-Ups
Servings: Makes 10 rolls (feeds about 3 people)
Prep time: 20 minutes
Cook time: 50 minutes
Ingredients:
- 1 large butternut squash, diced into 1/2 inch cubes
- olive oil
- salt
- pepper
- 5 large kale leaves, thick stem removed (I prefer Tuscan Kale)
- 2 cups ricotta cheese
- 1 tbsp fresh lemon juice + more for serving (optional)
- 1 cup vegetable stock
- 1/4 tsp fresh (or packaged) nutmeg
- 10 lasagne sheets
- 2 cloves garlic, minced
- 1 cup canned coconut milk
- 1 cup fresh parmesan or mozzarella cheese, shredded
- fresh basil for topping (optional)
Instructions:
- Preheat your oven to 400 degrees Fahrenheit.
- Place the squash onto a parchment lined baking sheet. Drizzle with 1-2 tbsp olive oil and add a generous pinch of salt and a few grinds of fresh black pepper. Toss with your hands until coated and roast in the oven for 25-30 minutes, flipping once throughout the cooking time. Squash should be tender throughout.
- Lower the oven to 350 degrees Fahrenheit.
- While the squash is cooking, prepare your other ingredients. Chop the kale into small, bite-size pieces and massage with a little bit of olive oil. This helps to tenderize the kale.
- Use an electric mixer to beat the ricotta with 1 tbsp of lemon juice and a pinch of salt and pepper. Whip until smooth.
- Add the cooked squash to a food processor with the vegetable stock, nutmeg, 1/2 tsp salt and 1/4 tsp pepper. Blend until smooth.
- In the meantime, bring a large pot of heavily salted water to a boil and add the lasagne sheets. Cook according to package directions. Reserve 1/4 cup of the pasta water before draining.
- Set a large, oven-safe saucepan over medium-low heat and add 2 tbsp olive oil. Add the garlic and cook for 30 seconds, or until fragrant. Immediately add the squash puree from your food processor as well as the reserved pasta water and let simmer for 5 minutes, stirring frequently. Pour in the coconut milk and stir until smooth.
- Make the rolls by taking a sheet of the cooked lasagne, spreading the ricotta mixture on it, topping with a few pieces of kale and then rolling it up, starting at one end and working your way to the other. Tuck the roll into the squash sauce, placing the side with the seam down. Do this for all of the rolls.
- Evenly distribute the cheese overtop of the rolls and sauce. Bake in the oven for 10 minutes, or until the cheese is fully melted. Remove and let cool a few minutes before serving. Top with fresh basil and a squeeze of lemon!
The post Butternut Squash and Kale Lasagne Roll-Ups appeared first on Never. Not. Eating..
]]>