The post Vegan Cilantro Lime Dressing appeared first on Never. Not. Eating..
]]>
WHAT IS VEGAN CILANTRO LIME DRESSING
Okay, I’ve been struggling big time. I love a creamy dressing, more than words can express, but usually they have a dairy base, and I’m just not down for that. Thank goodness I tested out this creamy Vegan Cilantro Lime Dressing using cashews instead, and it worked! It is just as creamy, dairy-free and so delicious. Therefore, you must give it a try!

WHY I LIKE THIS DRESSING
Other than because it is vegan, I love this dressing as it is multi-purpose. It’s not just for salads, but also is great for using as a dip or a drizzle on potatoes, French fries, buddha bowls, and so much more! It is also super healthy, packed with cilantro, which has a plethora of health benefits, including hosting a number of vitamins.
THE INGREDIENTS
This is the simplest dressing to make. It requires:
- Soaked cashews
- Cilantro
- Lime juice
- Salt
- Pepper
- Garlic

MAKING VEGAN CILANTRO LIME DRESSING
To make this dressing, simply pack all of the ingredients into a blender and whip up until smooth – it’s that easy! Add in a tiny bit of water at a time until you reach your desired consistency.
TIPS
- Make sure you soak your cashews for at least three hours. This will allow them to soften up and blend easily, resulting in a smoother, creamier dressing.
- Use the stems and leaves of your cilantro – less prep and more nutrition that way!
- After blending your ingredients, give the dressing a taste and add more salt, pepper, lime juice or cilantro, according to your taste.
SALAD RECIPES TO TRY
Jewelled Brussel Sprout Kale Salad (the perfect Fall side)
Candied Walnut Salad with Pear and Gorgonzola (another Fall favourite)
Beet and Orange Salad with Goat Cheese (fresh for summer)
TOOLS I USED TO MAKE THIS VEGAN CILANTRO LIME DRESSING
Click on the images below to see what I used for this recipe.


Vegan Cilantro Lime Dressing
Serving size: Makes 8oz
Prep time: 5 minutes
Inactive time: 3 hours
Ingredients
- 1/4 cup raw cashews, soaked for 3-4 hours in water
- 1 cup cilantro, packed (leaves and stems)
- juice of 1 lime (approximately 2 tbsp)
- 1 garlic clove
- 1/4 tsp salt
- pinch of pepper
Instructions
- First, drain the cashews from their soaking water and rinse well.
- Add the cashews, cilantro, lime juice, garlic, salt and pepper to a blender with two tablespoons of water and blend until creamy and smooth. If the dressing is too thick, continue to add more water, one tablespoon at a time until you’ve reached your desired consistency.
- Finally, try the dressing and add more salt and pepper to taste.
- Pour into an 8oz mason jar or a small, airtight container and store in the fridge for up to 4 days.

The post Vegan Cilantro Lime Dressing appeared first on Never. Not. Eating..
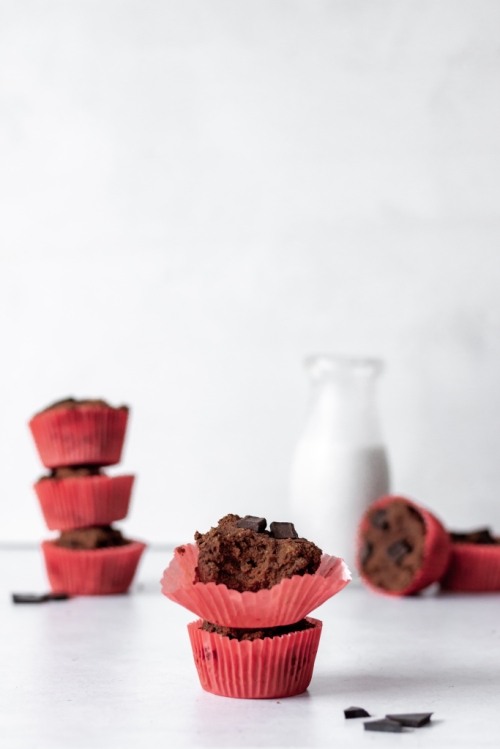
]]>The post Vegan Rice Crispy Chocolate Treats appeared first on Never. Not. Eating..
]]>
WHAT ARE VEGAN RICE CRISPY CHOCOLATE TREATS?
I’m telling you, these are such a fun snack – they are basically a peanut butter and rice crispy cereal ball coated in chocolate, and they are so delicious. Not to mention, they are much healthier than the well-known Rice Crispy Treat because they don’t have marshmallows, but stick together with peanut butter and maple syrup instead. They are crispy, light and make for a perfect snack at any time of day!

WHY I LIKE THESE VEGAN RICE CRISPY CHOCOLATE TREATS
I am always trying to reinvent traditional desserts and snacks into healthier versions that I feel good about eating, and this recipe does exactly that. That is why these would be an amazing snack for kids as they are refined sugar-free and have protein and healthy fats from the all-natural peanut butter! I chose to use Lily’s brand sugar-free chocolate to keep these completely refined-sugar free, but you can use any chocolate you would like.

THE INGREDIENTS
To make these snacks, you only need a few simple ingredients that you likely already have in your pantry, including:
- Gluten-free, sugar-free Rice Crispy Cereal
- Natural peanut butter
- Maple syrup
- Vanilla
- Chocolate
- Flaky sea salt (optional)
MAKING VEGAN RICE CRISPY CHOCOLATE TREATS
The first thing you will need to do is create the rice crispy balls. To do this, you will add peanut butter, maple syrup and vanilla in a big bowl and mix to combine. Pour in the Rice Crispy Cereal and use a spatula to incorporate the cereal into the peanut butter mixture. When it’s fully combined, roll small portions of the cereal into small spherical balls. Place them on a parchment lined plate and freeze while making the chocolate coating.
Melt the chocolate over a double boiler and then remove the treats from the freezer and dip into the chocolate until fully coated. Return the chocolate covered treat balls to the parchment lined plate and place in the fridge in order for them to set up.

TIPS
- I like to use a new jar of peanut butter as it has a runnier consistency when first opened, before begin refrigerated – this really helps to easily mix the treat ingredients without making crumbs out of the Rice Crispy Cereal.
- To portion the balls, I use a small cookie scoop so that they are all the same size.
- Use a fork to lift the chocolate-coated treats out of the melted chocolate and tap on the side of your bowl to let any excess chocolate drip back into the bowl.
- Add a tablespoon of coconut oil to the chocolate chips while melting to get a glossier chocolate coating.

OTHER HEALTHY SNACKS YOU NEED TO TRY
No-Measure Oatmeal Almond Butter Cookies (my absolute favourite anytime snack)
Vegan Protein Energy Balls (a great pre-gym snack)
Vegan Ice Cream Bars (the perfect summer treat)
TOOLS I USED TO MAKE THESE VEGAN RICE CRISPY CHOCOLATE TREATS
Click on the images below to see what I use for this recipe.


This post contains affiliate links and I may earn a small commission when purchases are made after clicking the links, at no cost to you – thank you!
Vegan Rice Crispy Chocolate Treats
Servings: Makes 15 small treats
Prep time: 15 minutes
Chill time: 20 minutes
Ingredients
- 1 cup smooth natural peanut butter (see tips above)
- 1/4 cup 100% pure maple syrup
- 1 tsp pure vanilla extract
- 2 cups gluten-free Rice Crispies cereal
- 150 grams dark chocolate
- 1 tablespoon coconut oil (optional)
- flaky sea salt (optional)
Instructions
- In a large bowl, mix together the peanut butter, maple syrup and vanilla until combined. Pour in the cereal and stir with a spatula until fully incorporated into the peanut butter mixture.
- When the mixture is incorporated, use a small cookie scoop to portion the mixture into your hands and roll into spherical shapes – it should make around 15 treat balls. Place them on a parchment lined plate or tray and into the freezer while melting your chocolate.
- Set up a double boiler: Add about an inch of water to a small pot and place it over medium heat. Pour the chocolate into a heat-proof glass bowl and add the coconut oil, if using. Place the bowl on top of the pot to melt the chocolate, stirring regularly, and once the chocolate has melted, remove the bowl from the pot.
- Finally, remove the Rice Crispy treats from the freezer and dip into the melted chocolate, coating fully. Place them back on the parchment lined plate and repeat for all of the treats. Sprinkle with a little bit of flaky sea salt, if desired, and then refrigerate for about 20 minutes or until set.
Store in the fridge for up to 5 days.

The post Vegan Rice Crispy Chocolate Treats appeared first on Never. Not. Eating..
]]>The post Chocolate Chai Ganache (Vegan, Gluten-Free) appeared first on Never. Not. Eating..
]]>
WHAT IS CHOCOLATE CHAI GANACHE?
A ganache is traditionally a mixture of chocolate and warmed cream. It is often used as a filling or icing for cakes, to serve with fruit or something to stuff pastries with! It is also really addicting on it’s own…by the spoonful. Just sayin’.
THE INGREDIENTS
This Chocolate Chai Ganache is fully vegan, meaning no dairy whatsoever! Whoop, whoop! Instead, I use full-fat coconut milk. You can also use a lower-fat coconut milk, if you prefer. To make this recipe, you will need three ingredients – vegan chocolate, chai tea bags and one can of coconut milk.

THE PROCESS
The first step is to infuse that beautiful chai flavour into the coconut milk. Pour the coconut milk into a small saucepan and add two chai tea bags. Bring to a gentle simmer for 15 minutes. You don’t want to simmer for much longer, or else you will lose more of the liquid. 15 minutes is the perfect length of time to retain enough liquid and still get a rich chai flavour!
When the milk is ready, simply pour it over the vegan chocolate, wait one minute, and then stir until all of the chocolate is melted. See below for different ways you can use this ganache and how the recipe may change slightly, depending on it’s purpose.

CHOCOLATE CHAI GANACHE AS A GLAZE
If you are tired of the overly sweet American buttercream usually used on the outside of cakes, try making this ganache and pouring it over your cake instead. To make this the perfect glaze consistency, use 1 can of coconut milk to 1 cup of chocolate. Once it has cooled, pour it over a cold cake and watch it drip over the sides and coat your cake in a luscious layer of pure YUM.
CHOCOLATE CHAI GANACHE AS A FILLING
Okay, this may be my favourite way to use ganache – INSIDE cakes. Cake layer one goes down, a thick layer of ganache goes on top, cake layer two goes down – perfection! It is important that, if you are making a filling, the texture is thicker so it doesn’t ooze out of the sides of your cake. Therefore, use 1 can of coconut milk to one and a quarter cup of chopped chocolate. After the coconut milk has been poured over the chocolate and stirred completely, the chocolate will begin to firm up. You can even put it in the fridge to speed up the process, but you still want to be able to spread it easily, so keep an eye on it!

DON’T MISS THESE OTHER VEGAN DESSERTS
Vegan Ice Cream Bars (similar to Magnums)
Vegan Mocha Buttercream (fill your cakes with ganache and top them with this perfect buttercream)
Sweet Potato Creme Brulee (perfect for a dinner party)
This post contains affiliate links and I may earn a small commission when purchases are made after clicking the links, at no cost to you. Thank you!
Chocolate Chai Ganache (Vegan, Gluten-Free)
Prep time: 2 minutes
Cook time: 15 minutes
INGREDIENTS
| Purpose | Vegan Chocolate | Coconut Milk | Chai |
|---|---|---|---|
| Glazing cakes | 1 cup, chopped (or chunks) | 1 can (400 ml) | 2 tea bags |
| Filling cakes | 1 1/4 cup, chopped (or chunks) | 1 can (400 ml) | 2 tea bags |
INSTRUCTIONS
- Add coconut milk and tea bags to a small pot and bring to a gentle simmer for 15 minutes, uncovered.
- Place vegan chocolate into a heat-proof bowl, remove the tea bags from the pot, and strain the coconut milk over the chocolate. Let sit for one minute and then whisk until the chocolate is fully melted. Let cool before using.
TIPS:
- If GLAZING – when the ganache has cooled, pour it over an assembled cake that has been elevated and has a baking tray underneath to catch the drips.
- If FILLING – you can place the ganache in the fridge to help cool and firm up, but you want it to be spreadable, so make sure it doesn’t get too firm.
The post Chocolate Chai Ganache (Vegan, Gluten-Free) appeared first on Never. Not. Eating..
]]>The post Vegan Protein Energy Balls appeared first on Never. Not. Eating..
]]>
WHAT ARE PROTEIN BALLS?
Protein Balls are a grab-and-go snack that have enough protein and fibre to fill you up between meals. They are usually vegan (like these ones!) and made with natural ingredients that carry a number of health benefits.
HEALTH BENEFITS
These particular protein balls include a number of healthy ingredients that deliver essential nutrients to the body. Protein helps to repair muscle and improve skin, hair and nails. Fibre, from the Medjool Dates, helps relieve constipation. Dates are also known to be full of antioxidants, can reduce cholesterol and make you feel full, longer.

THE INGREDIENTS
To make this recipe, you will need:
- dates
- your favourite nut butter
- protein powder
- almond flour
- vanilla extract
- maca powder (optional)
- dark, vegan chocolate

TOOLS NEEDED TO MAKE VEGAN PROTEIN ENERGY BALLS
The main tool needed for this recipe is a high-powered food processor. It breaks down the dates and takes minutes to incorporate everything together.
OTHER VEGAN SNACK IDEAS
Are you vegan or going vegan? Check out these other snack ideas that fulfill cravings:
- Vegan Ice Cream Bars
- Dark Chocolate Protein Nuggets
- Vegan Power Muffins
- Vegan Chocolate Bars (my favourite)

This post contains affiliate links and I may earn a small commission when purchases are made after clicking the links, at no cost to you. Thank you for supporting me!
Vegan Protein Energy Balls
Serving size: Makes 15 balls
Prep time: 10 minutes
Soak time: 1 hour
Ingredients
- 10 Medjool dates, pitted and soaked in water for 1 hour
- 1/4 cup almond butter
- 1 cup almond flour
- 1 scoop (28 g) vanilla protein powder
- 1/4 tsp cinnamon
- 1 tsp maca powder (optional)
- 1/2 tbsp vanilla extract
- pinch of salt
- 1 cup vegan chocolate
- 1 tbsp coconut oil
Instructions
- Drain the dates and add them to a food processor with the almond butter, flour, protein powder, cinnamon, maca, vanilla and salt. Pulse until the mixture comes together. Use a 1-tablespoon cookie scoop to scoop the mixture out and roll into balls. Place the protein balls onto a cookie sheet and refrigerate while preparing the chocolate coating.
- Over a double broiler, melt the chocolate and coconut oil until smooth. You can also do this in the microwave in 20 second increments, stirring the chocolate after each session.
- Coat the protein balls in the chocolate and place on a parchment lined baking sheet. Refrigerate until solid, approximately 30 minutes, and then transfer to an airtight container to store in the fridge for up to 10 days.

The post Vegan Protein Energy Balls appeared first on Never. Not. Eating..
]]>The post Easy Chia Pudding Parfait appeared first on Never. Not. Eating..
]]>
WHY CHOOSE CHIA SEEDS?
I love chia pudding as my morning meal because these seeds are full of energy-boosting nutrients to start your day. Firstly, FIBRE. Absolutely essential for a healthy lifestyle, fibre enhances gut health and makes you feel full, longer.
Chia seeds are also high in protein. Protein is needed in the body to help rebuild muscle, strengthen hair, skin and nails, and provide energy. Chia seeds are a great way to incorporate protein into your diet, especially as a vegetarian or vegan!
This superfood is also high in iron. As someone with low iron, I’m always searching for more iron-rich foods to add to my diet. Iron helps carry oxygen throughout the body and develop red blood cells.
If that isn’t convincing enough, chia seeds also contain calcium, good fats, antioxidants and have no sugar. Get yourself a bag of seeds and I’ll show you how to use them in this yummy parfait recipe!
WHAT YOU NEED TO KNOW ABOUT MAKING THIS EASY CHIA PUDDING PARFAIT
Chia seeds are like sponges – any liquid added to them gets sucked up and the seeds expand and become almost gel-like. You can add any kind of milk you prefer, but this recipe is fully vegan and therefore calls for plant-based milk.
HOW TO MAKE EASY CHIA PUDDING PARFAIT
When mixing the seeds with your choice of liquid, I like to whisk them together in a bowl to avoid forming clumps. I set the bowl in the fridge for about 10 minutes and then whisk again. After another 10 minutes, the seeds have usually absorbed their capacity of liquid and are ready to be made into a parfait!
Depending on you, many of the extra ingredients in this recipe can be swapped out for others you prefer.
For example, if maple syrup isn’t your favourite choice of sweetener, feel free to switch it up by adding agave or honey (not vegan). Cinnamon can be taken out completely or swapped with a superfood powder, such as beetroot or spirulina. Maybe you would like to get funky with it and use an almond extract or a hazelnut syrup instead of the vanilla. Be crafty! The possibilities are endless.
STORING YOUR EASY CHIA PUDDING PARFAIT
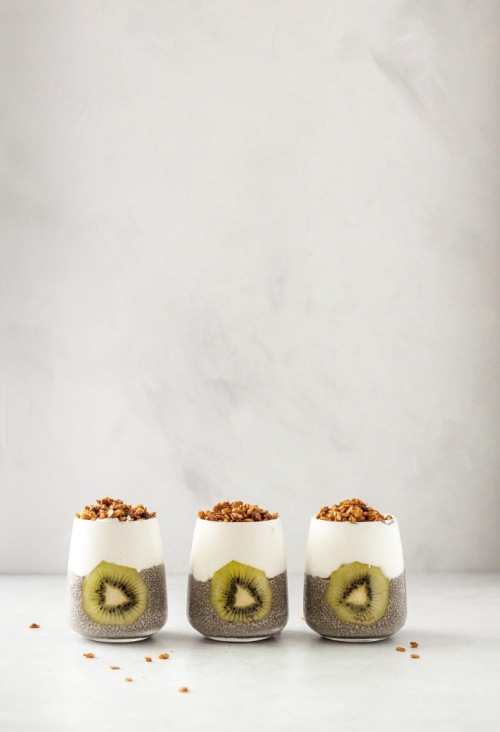
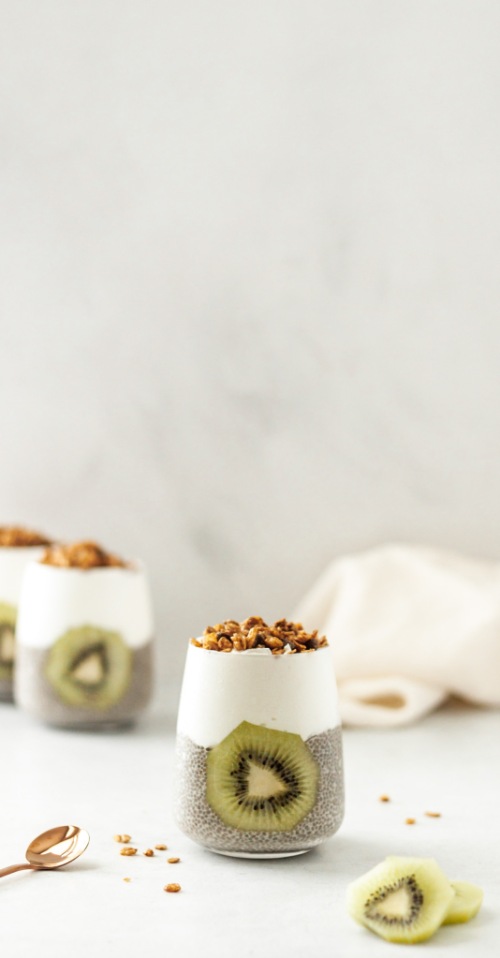
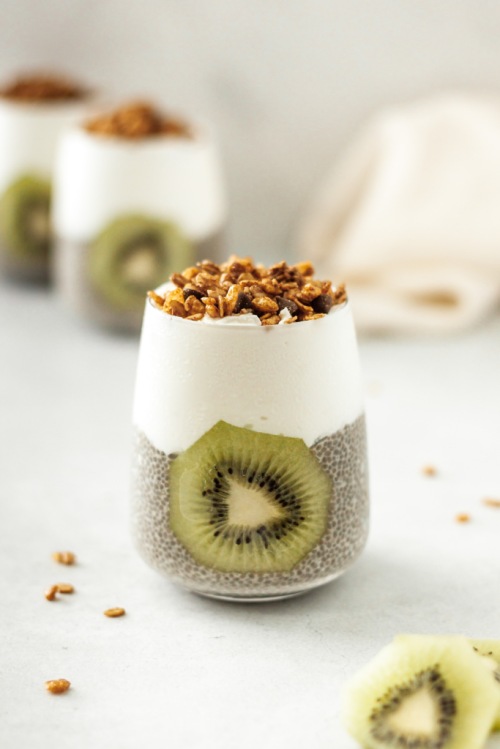
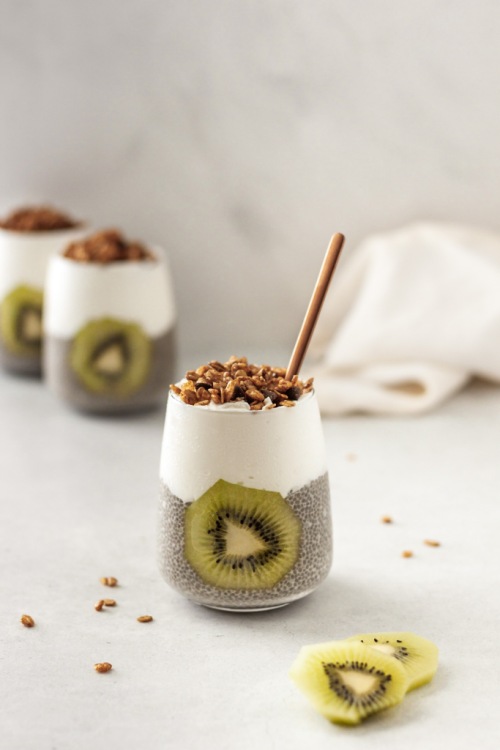
If you are following this recipe to meal prep, it makes four servings. I love using these cute little mason jars to store them in, as they are airtight and keep them fresh in the fridge.
OTHER MEAL PREP IDEAS
Vegan Power Muffins (for a quick energy boost)
Middle Eastern Orzo Pilaf (makes a great side to any meal)
The Fluffiest Gluten-Free Pumpkin Pancakes (perfect for the kiddos – make ahead and pop in the toaster for a quick breakfast)
This post contains affiliate links and I may earn a small commission when purchases are made after clicking the links, at no cost to you. Thank you for supporting me!
Easy Chia Pudding Parfait
Servings: 4
Prep time: 5 minutes
Chill time: 20 minutes
Ingredients:
- 1/2 cup chia seeds
- 1.5 cups plant-based milk
- 2 tbsp pure maple syrup
- 1 tsp pure vanilla extract
- 1/4 tsp cinnamon
- pinch of salt
- 1 cup coconut yogurt
- fresh fruit, for topping
- granola, for topping
Instructions:
- In a medium bowl, whisk together the chia seeds, milk, maple syrup, vanilla, cinnamon and salt. Place in the fridge for 20 minutes, whisking a few times in between.
- Divide the mixture between 4 mason jars, or bowls, if serving immediately. Top with 1/4 cup of yogurt and some of the fruit. Sprinkle with granola before serving!
Store jars in the fridge for up to 4 days.
The post Easy Chia Pudding Parfait appeared first on Never. Not. Eating..
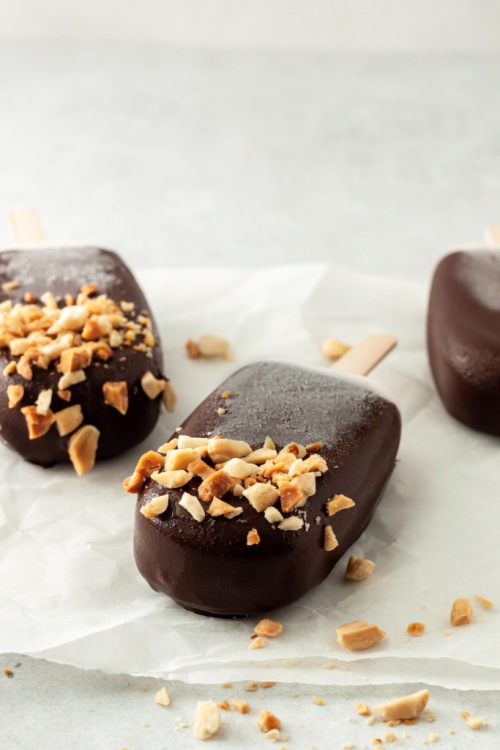
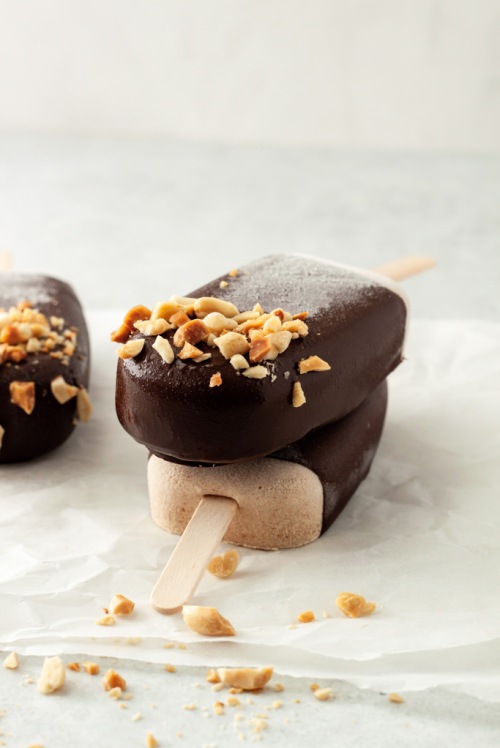
]]>The post Vegan Ice Cream Bars appeared first on Never. Not. Eating..
]]>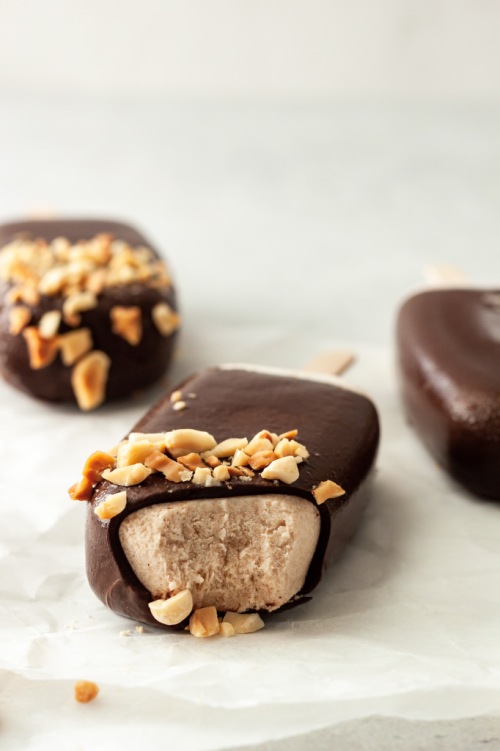
This has been one of the hottest summers on record, and I’m just a bit mad at myself that I developed these ice cream bars now, instead of at the beginning of summer. Then again, it’s not like I’m going to stop eating them when the weather cools down…I’m an ice-cream-all-year-long kinda gal!
HEALTHIER THAN STORE-BOUGHT
So here are a few reasons why you should make these bars, STAT:
- The recipe includes natural sugar from pure maple syrup only, and you can omit it entirely if you wish.
- They are vegan.
- They are made quickly in a blender.
- You like delicious treats.
These remind me of the Magnum bars you can buy at the grocery store. The only difference is you know all of the ingredients going into them, and they are way healthier than anything you would get out of a box.
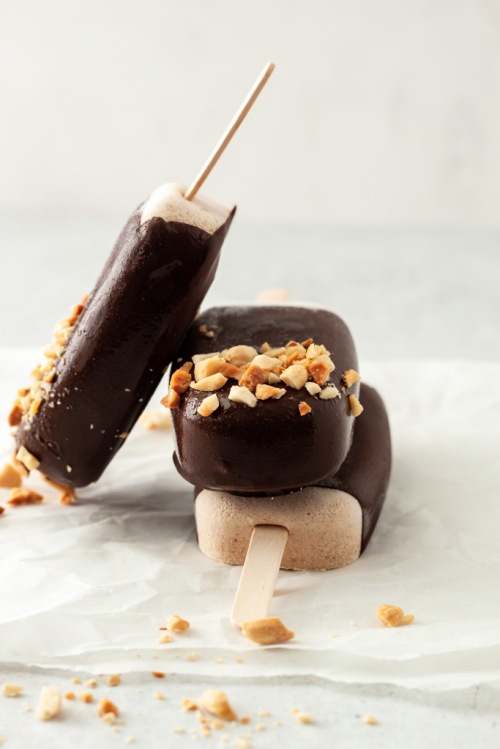
HOW TO MAKE VEGAN ICE CREAM BARS
The recipe for these bars is simple – blend all ingredients together using a high-powered blender. Pour into the cutest popsicle molds. Freeze for a few hours until firm. Dip in chocolate and sprinkle on some crushed peanuts.
When you bite into one of these little babes, you first get the crack of the chocolate, followed by the creaminess of the filling which is made rich by coconut milk and nut butter. It’s beyond good. Ice cream goals!

OTHER VEGAN TREATS TO TRY
Vegan Protein Energy Balls (the perfect pre-workout snack)
Vegan Mocha Buttercream (my favourite cake topping)
Sweet Potato Creme Brulee (a great holiday dessert)
This post contains affiliate links and I may earn a small commission when purchases are made after clicking the links, at no cost to you. Thank you for supporting me!
Vegan Ice Cream Bars
Serving size: Makes 8 bars
Prep time: 10 minutes
Freeze time: 4 hours
Ingredients:
- 1 can full-fat coconut milk (refrigerated for at least 24 hours)
- 1/2 cup nut butter (I love using cashew or peanut butter for this)
- 1/2 cup coconut yogurt
- 2-3 tbsp pure maple syrup
- 1/2 tbsp pure vanilla extract
- 1/4 tsp cinnamon powder (optional)
- 85 g dark vegan chocolate (chopped)
- 1 tbsp coconut oil
- 1/4 cup peanuts, chopped
Instructions:
- Remove coconut milk from the fridge and carefully open the can. Scoop the solid white part out into a high-powered blender. Reserve the coconut water in the bottom of the can for tomorrow’s smoothie!
- Add the nut butter, yogurt, syrup, vanilla and cinnamon to the blender and blend until smooth. Pour into popsicle molds and place in the freezer until firm, about four hours.
- Over a double boiler*, melt the chocolate with the coconut oil, stirring often. Pour into a tall cup wide enough for the popsicles to fit in. Dip each popsicle into the chocolate and lay on a piece of parchment paper. Immediately sprinkle with the chopped peanuts.
- Store in the freezer for up to 10 days.
NOTES:
*For the double boiler – fill a small pot with an inch or two of water. Bring to a gentle simmer and place a larger bowl on top with a wooden spoon in between to let the steam escape. Place the chocolate and coconut oil in the bowl and stir frequently. Alternatively, you can melt the chocolate in the microwave in short, 20-30 second increments, stirring in between.
Tip – Take the ice cream bar out of the freezer and let sit a few minutes before consuming!
The post Vegan Ice Cream Bars appeared first on Never. Not. Eating..
]]>The post Vegan Mocha Buttercream appeared first on Never. Not. Eating..
]]>
This recipe has the word “vegan” in front of it, but if you aren’t vegan or prefer to use dairy-based products, you can make 1:1 swaps at any point!
I love how simple, yet different this recipe is. If you are looking for a change from your normal chocolate and vanilla frostings, this is IT. Trust me, it’s so good.

The Ingredients
Here is what you will need:
- vegetable shortening
- vegan butter
- salt
- vanilla
- cocoa powder
- instant coffee
- powdered sugar
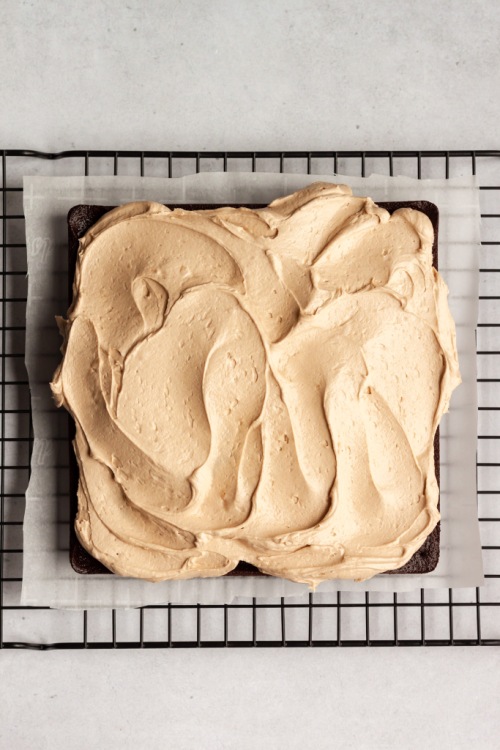
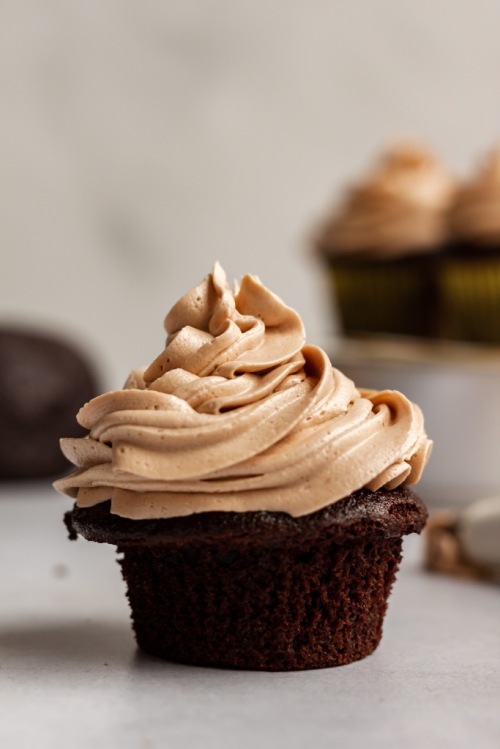
Use a stand mixer to bring all of the ingredients together and you will have a light, fluffy, perfect buttercream. It’s great for frosting cakes or cupcakes with. I love it on a rich chocolate cake!
Check out that swirly swirl!
This post contains affiliate links and I may earn a small commission when purchases are made after clicking the links, at no cost to you. Thank you!
Vegan Mocha Buttercream
Servings: Makes about 4 cups
Prep time: 10 minutes
Ingredients:
- 1/2 tbsp instant coffee
- 1/2 cup vegetable shortening*
- 1/2 cup vegan butter, softened**
- 1/2 tsp vanilla extract
- pinch of salt
- 2 teaspoons cocoa powder, sifted
- 4 cups powdered sugar
- 1-3 tbsp plant-based milk (I prefer oat milk, but you can use almond, cashew, coconut or soy)
Instructions:
- Stir the instant coffee together with three tablespoons of boiling water until dissolved. Set aside.
- Add the shortening and vegan butter to a stand mixer and mix with paddle attachment on medium speed until light and fluffy. Add in the vanilla, salt and cocoa powder and mix until combined.
- Add one cup of powdered sugar and turn the mixer on low. Pour in about half of the coffee and mix until incorporated. Add another cup of powdered sugar, followed by the rest of the coffee and continue mixing. Add the third cup of powdered sugar, followed by one tablespoon of the milk. Finally, incorporate the last cup of sugar and another tablespoon of milk, if needed. Beat until smooth and you have achieved your desired consistency. If the buttercream is too stiff, add the remaining tablespoon of milk and beat to incorporate.
- Use immediately or store in an airtight container in the fridge for up to 5 days.
NOTES:
*You can use all shortening if you do not have vegan butter.
**This can be substituted for regular, softened butter if desired.

The post Vegan Mocha Buttercream appeared first on Never. Not. Eating..
]]>The post Vegan Power Muffins appeared first on Never. Not. Eating..
]]>
I LOVE muffins. Love, love, love them. But I’m always finding myself feeling bad after eating them, which is so silly. A girl can’t eat a muffin in the 21st century anymore without feeling all the sadness of the number of calories she just consumed. Life, eh?!
Luckily, this has inspired me to create some healthier muffins that not only will punch guilt in the face, but will also provide you will that extra energy boost and a protein POP for those slower mornings. Sign. Me. Up.
I love many things about these muffins: they are gluten-free, dairy-free, refined sugar-free and vegan. They are packed with healthy fats, fibre and protein. And, they are easy to make!
Let’s talk substitutions:
The fats: We know fats are important in baking. They keep things moist. Instead of butter, I’m swapping it out with some coconut oil. We all know the research on coconut oil, with its likeliness to improve hair, skin and nails, as well as boost brain health.
The binder: Typically, eggs are used to make everything stick together and to add structure in our baking. Since I wanted to keep this recipe vegan, we are subbing the eggs for chia seeds that have “gelled” in water. They create a gelatinous “paste” that mimics the job of an egg. Not to mention they have tons of fibre, good fats and protein.
The flour: You will rarely catch me eating white flour. Hell naw. Today, we are using coconut flour instead. Coconut flour definitely requires more liquid than your standard AP flour, and can be a bit tricky to work with, but the benefits are worth it. It’s gluten-free and promotes digestion with the ample amounts of fibre it provides.
The sweetness: I have made this recipe in two different ways. One way, I use JUST bananas to add a touch of sweetness, and the other, I add some maple syrup along with the bananas to satisfy that sweet tooth (naturally, of course). You can leave out the syrup if you prefer (just add an extra mashed banana).
Extras: There are a few other ingredients that I like to sneak into these muffins to give that extra little WAHBAM – coffee, maca and protein powder. Coffee brings out the chocolatey flavour, maca is healthy AF, and protein powder, well, I think that’s pretty clear. You can always leave these ingredients out if they are not for you!
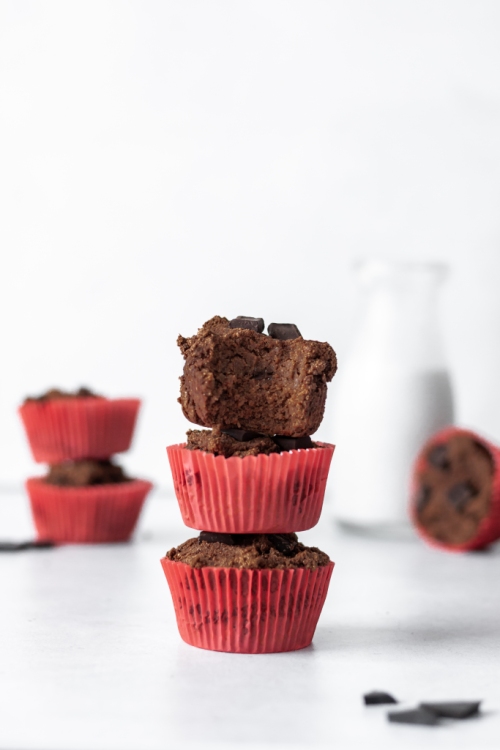
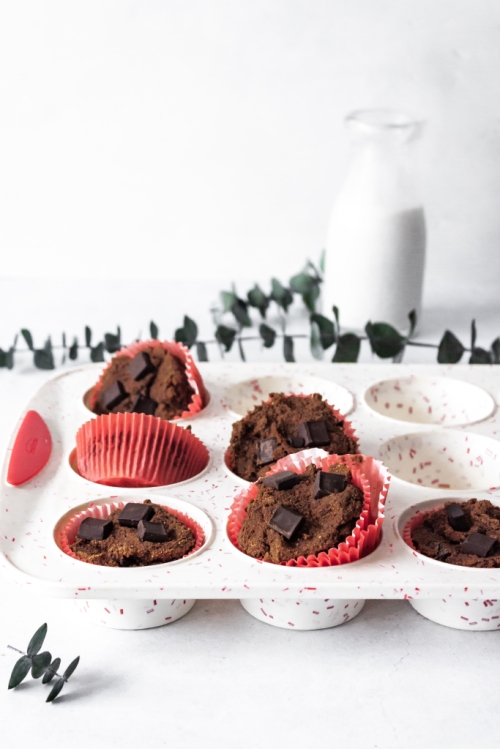
These muffins release nicely from the sides of the muffin liners. I love shopping on Amazon to find liners that go with my mood, or a celebration if I am bringing treats. I love these rose gold ones, or these fun ones that come with cute little toppers. If I am just baking for myself, I like to use my silicone mold to reduce waste and have an easy clean-up.
This post contains affiliate links and I may earn a small commission when purchases are made after clicking the links, at no cost to you. Thank you!
Vegan Power Muffins
Yield: Makes 12 muffins
Prep time: 5 minutes
Bake time: 30 minutes
Ingredients:
- 1/4 cup chia seeds
- 1/2 cup plant-based milk
- 1/2 tbsp apple cider vinegar
- 3 bananas, mashed
- 1/4 cup coconut oil, melted
- 1/2 cup smooth almond butter
- 1/2 tbsp pure vanilla extract
- 1/3 cup maple syrup
- 3/4 cup coconut flour
- 1/3 cup cocoa powder
- 1/2 tsp salt
- 1/2 tsp baking soda
- 1/2 tsp cinnamon
- 1 tbsp instant coffee (optional)
- 1 tsp maca powder (optional)
- 1 scoop (27 g) protein powder (optional)
- 3/4 cup dark chocolate chunks
Instructions:
- Preheat your oven to 350 degrees Fahrenheit. Line a muffin tin with 12 muffin cups.
- Mix the chia seeds with 2/3 cup of water in a small bowl and set aside to “gel,” at least 10 minutes.
- Mix the milk and apple cider vinegar and set aside.
- In a large bowl, use a hand mixer to beat together the bananas, coconut oil, almond butter, vanilla, maple syrup, chia seeds and milk/vinegar mixture, until smooth.
- In a medium bowl, whisk the coconut flour, cocoa powder, salt, baking soda, cinnamon, coffee, maca and protein powder (if using) until combined.
- Add the wet ingredients to the dry ingredients and beat until fully combined (batter will be thick). Fold in the chocolate chunks.
- Scoop the batter into the muffin liners and bake for 30-35 minutes, or until they look dry on the top and a toothpick comes out clean.
- Let cool in pan for 10 minutes before transferring to a wire rack to finish cooling. Store in an airtight container on the counter for up to three days, in the fridge for up to 5 days, or freeze for later.
Best served at room temperature or from the fridge!
The post Vegan Power Muffins appeared first on Never. Not. Eating..
]]>The post Tropical Banana Flambé appeared first on Never. Not. Eating..
]]>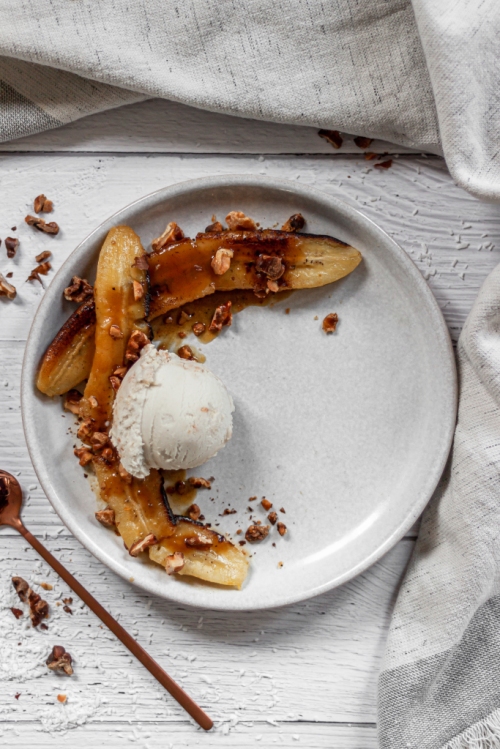
Okay, nevermind, Rona’s still stomping on our parades, so, let’s bring the Caribbean to us. Grab your piñas and your lighters and let’s set fuego to this *****…Whattt?! I meant “house.”
This recipe is inspired by one of my sweet besties. Let me take you back – We were in university. My girl had just got back from a trip down south. She was looking all bronzed and fine while the rest of us had adopted that Canadian winter glow. Girl says she’s going to show us this dessert she learned how to make while on vacay. She starts lighting fire to this pan filled with bananas, butter, orange juice and rum. Coolest thing I had ever seen, hands down. I immediately started making this all the time. I gained the Freshman 15. The end.
Okay, so my recipe isn’t exactly the same as what’s described above. Since I am OBSESSED with Piña Coladas, I decided to use pineapple juice instead of orange juice, to mimic my favourite tropical drink. A pinch of nutmeg also gives it that WAH-BAM that is just so WAH-BAMMY. Know what I’m sayin’?
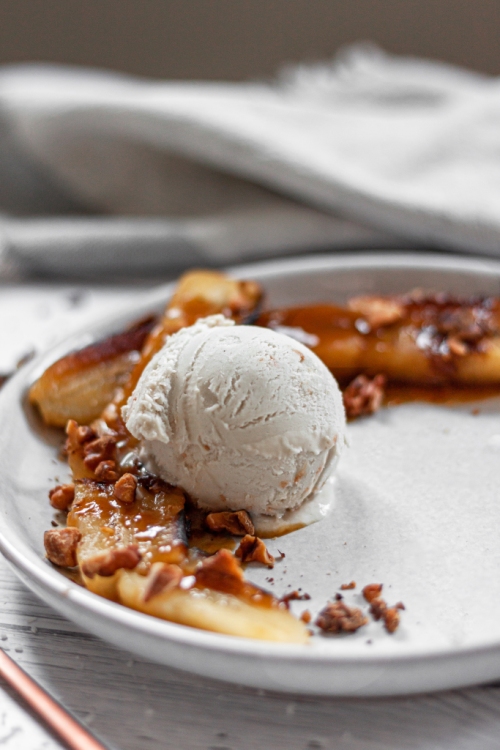
Top your ‘nanas with some toasted walnuts and a scoop of vanilla or coconut ice cream (I prefer Halo Top Toasted Coconut) and it’s a fiesta in your kitchen!
Here are a few tips when it comes to lighting things on fire:
- Don’t wear loose, hangy clothing (we don’t want you catching on fire now, do we?!)
- Remove the pan from the burner before carefully adding the alcohol
- Use a long-reach click lighter to avoid any burns
- Once lit, bask in it for a few seconds and then shake the pan until it extinguishes (and it will)
- Don’t panic! The fire WILL go out
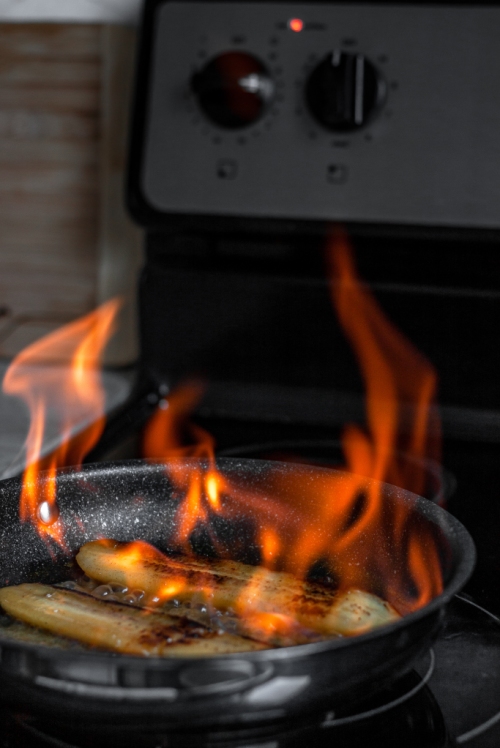
*If for any reason you experience a stovetop fire in your home, place a larger lid on top of the pan and turn off the burner…do not throw water on it
I do realize that now 90% of you will not attempt a flambé. Maybe it’s best we just skip to the recipe…Don’t be scared!
Tropical Banana Flambé
Servings: 1-2
Prep time: 2 minutes
Cook time: 10 minutes
Ingredients:
- 2 tbsp chopped walnuts
- 1 tbsp vegan butter (or regular butter)
- 1 firm banana (not green, but barely ripe), sliced lengthwise down the centre
- 1/3 cup pineapple juice (you can buy or make yourself by putting pineapple through a juicer)
- Pinch of nutmeg (optional)
- 1 oz of spiced dark rum
- dairy-free, vegan vanilla or coconut ice cream (or regular ice cream)
Instructions:
- Preheat oven to 350 degrees Fahrenheit. Spread the walnuts onto a parchment lined baking sheet and bake for 5-10 minutes, watching closely to avoid burning. Set aside.
- Set a pan over medium-high heat and add the butter. When the butter is hot, add the two banana halves, cut side down. Let carmelize in the pan for 3-5 minutes, watching closely as not to burn. Flip and add the pineapple juice to the pan along with the nutmeg, if desired. Let the juice simmer for about 2 minutes, or until reduced by half. Remove pan from heat and carefully add the rum. Ignite a long-range click lighter at the edge of the pan closest to you. The pan should flare up immediately. Give the pan a shake to eliminate the flame and then remove from heat (read above for safety tips).
- Transfer bananas to a plate and drizzle with the remaining sauce in the pan. Top with the toasted walnuts and a scoop of vanilla ice cream, or, my favourite – Halo Top’s Toasted Coconut ice cream. Enjoy!
**Use extreme caution when igniting alcohol.
If you would like to see a video of this recipe in action, check it out on my instagram highlights (@nevernoteatingca)
The post Tropical Banana Flambé appeared first on Never. Not. Eating..
]]>The post Sweet Potato Creme Brulee (Vegan, GF) appeared first on Never. Not. Eating..
]]>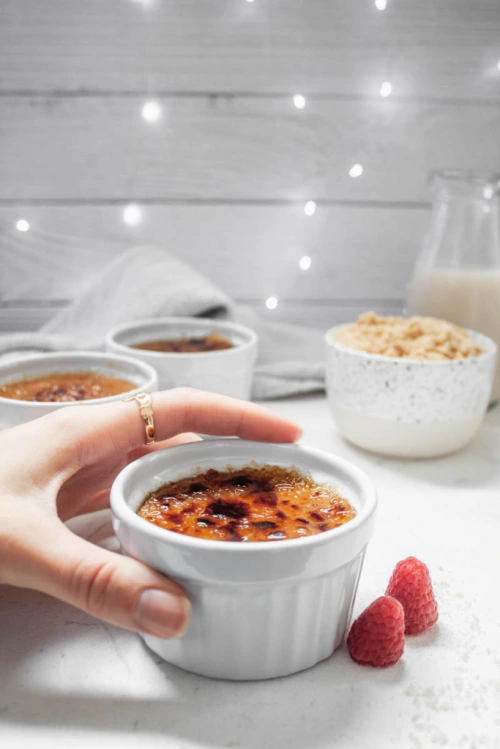
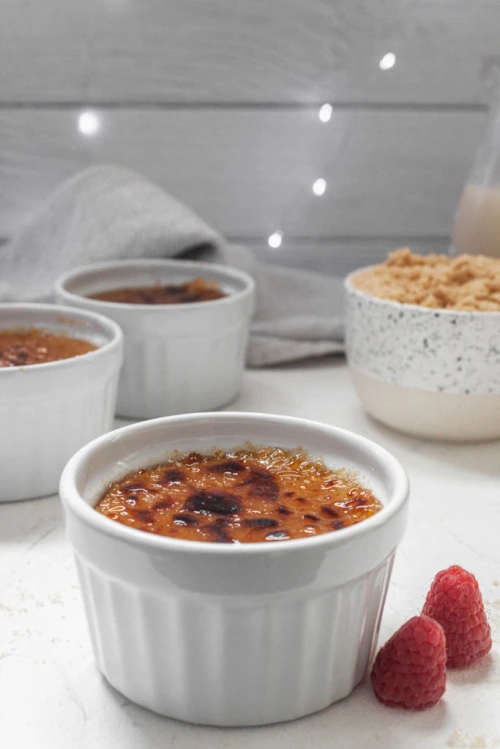
WHAT IS SWEET POTATO CREME BRULEE?
I really love sweet potatoes and I always have them at this time of year. I prefer them to white potatoes and always experiment with different ways of using them. This week, I turned them into the cutest little desserts, that are also dairy-free and gluten-free! ‘Cause who doesn’t love to be free?!

INGREDIENTS
So, real talk: My appreciation for coconut milk grows by the day. Nature seriously did us a solid by serving us coconuts, and I am down for it. You can very likely turn any animal-based recipe into a plant-based one with a simple can of coconut milk, just in case you were wondering!
Coconut milk and sweet potatoes are the two main ingredients in this recipe. You will also need a sweetener, and since sweet potatoes and maple go really well together, I use syrup (that pure Canadian kind)! Some cinnamon and fresh nutmeg bring in the warm, cozy feelings of winter. Finally, the glue that holds it all together is the agar agar. Agar agar is basically a vegan gelatin. You can buy it on Amazon, or if you have any specialty grocery stores in your ‘hood, try that!
HOW TO MAKE SWEET POTATO CREME BRULEE
The first step is to roast the sweet potato. I really hate a mess (and I’m lazy), so I just pierce my potato with a fork a few times and stick it directly on the rack of my oven, place a piece of tin foil on the rack below it (to catch any drippings), set my oven to 400 degrees and walk away for an hour. You will see the potato begin to ooze out (yes, it’s normal) and that’s usually how you know it is ready. Stick a fork in it, just in case.
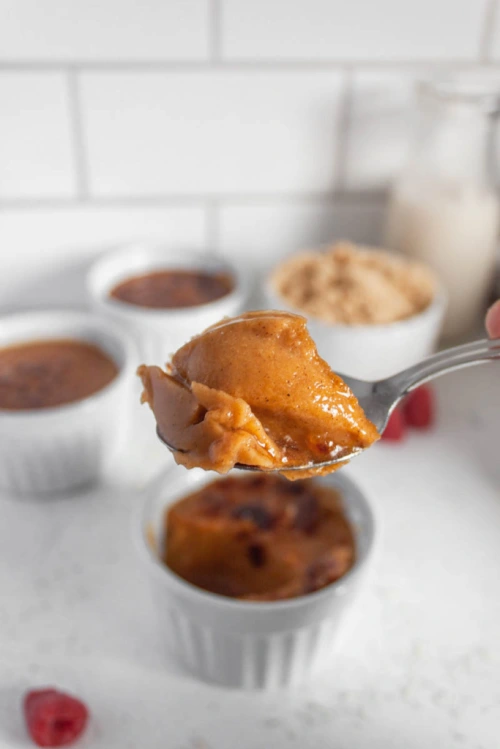
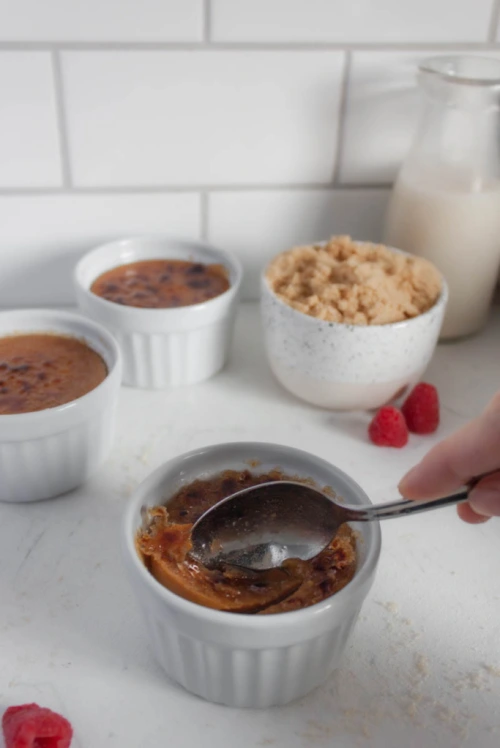
Next, you place the potato, milk and syrup in a blender and blend until smooth. Transfer to a pot with some salt and the spices and bring to a boil. Add the agar agar and reduce heat, whisking for about a minute to ensure the agar is completely combined. Strain the mixture and pour into small ramekins and when ready to serve, top with some sugar (I do a mix of white and brown) and torch!
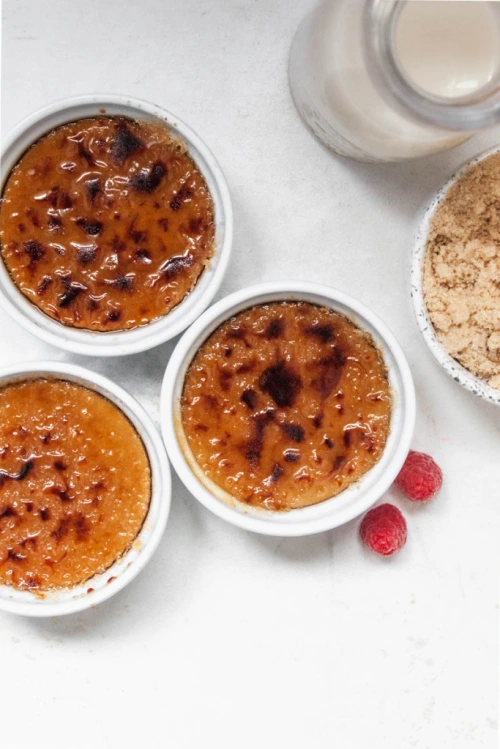
Your holiday guests will love cracking the hardened sugar on top and diving in to this semi-healthy treat!
OTHER VEGAN DESSERTS
Vegan Whipped Cream (the perfect dessert topping)
Vegan Rice Crispy Chocolate Treats (a perfect bite-sized snack)
Chocolate Chai Ganache (amazing for cake decorating)
TOOLS I USED TO MAKE THIS RECIPE


Sweet Potato Creme Brulee (Vegan, GF)
Servings: 4
Prep time: 5 minutes
Cook time: 1 hour 10 minutes
Ingredients:
- 1 medium sweet potato
- 1 can full-fat coconut milk
- 1/2 cup coconut milk (I use Silk brand)
- 2 tbsp maple syrup
- 1 tsp cinnamon
- pinch of fresh nutmeg
- A pinch salt
- 1/2 tsp agar agar
- 1 tsp pure vanilla extract
- 4 tbsp sugar (I mix equal parts white and brown)
Instructions:
- Preheat oven to 400 degrees Fahrenheit. Pierce the sweet potato with a fork a few times. When oven is ready, place potato directly on the middle rack, and put a piece of tin foil on the rack below it, to catch any drippings. Bake for 1 hour, or until fork inserts easily into the centre. Carefully remove skin.
- To your blender, add the sweet potato, both coconut milks and the syrup. Blend until smooth and then transfer to a pot.
- Place the pot on the stove over medium-high heat. Add the salt, cinnamon and nutmeg and bring to a boil, stirring often. Once boiling, add the agar agar, lower the heat to a simmer and whisk continuously for one minute, or until the agar agar is completely dissolved. Remove from heat and whisk in the vanilla.
- Strain the mixture through a fine mesh sieve directly into four small ramekins. Place in the fridge to firm up for at least one hour.
- Right before serving, sprinkle the tops of each ramekin with one tablespoon of the sugar and use a kitchen torch to melt the sugar until it is a deep brown colour. Let it sit for a minute before serving.
- Crack the top with a spoon and enjoy!
The post Sweet Potato Creme Brulee (Vegan, GF) appeared first on Never. Not. Eating..
]]>