The post Flourless Oatmeal Blueberry Cookies appeared first on Never. Not. Eating..
]]>
WHAT ARE FLOURLESS OATMEAL BLUEBERRY COOKIES?
These healthy cookies are a guilt-free, post-dinner or pre-workout snack! They are made in one bowl, with only natural ingredients and no refined sugar. I make them every week because I refuse to allow dinner to be my final meal of the night.

WHY I LIKE THESE COOKIES
I don’t just like these cookies – I am obsessed with them! The blueberries add the juiciest “pop” and a perfect sweetness that is unmatched, in my opinion. I also feel good about eating them (every day), as they only contain natural ingredients, all of which are pantry staples.

THE INGREDIENTS
You only need a few pantry ingredients to make this recipe:
- banana
- peanut butter
- egg
- vanilla
- maple syrup
- cinnamon
- salt
- oats
- blueberries
MAKING FLOURLESS OATMEAL BLUEBERRY COOKIES
You will honestly be amazed with how easy these are to make. Grab a big mixing bowl and add all of the wet ingredients – a mashed banana, peanut butter, egg, vanilla and syrup. Whisk together – that’s right, you don’t even need an electric mixer!
Add in the dry ingredients – the salt, cinnamon and oats. Switch over to a spatula to make sure everything has been mixed fully. Finally, fold in the blueberries and save a few to put on top of the cookies before baking. Scoop the dough onto a parchment lined cookie sheet, using a large cookie scoop and flatten them with the palm of your hand (they will not rise in the oven, so no need to space them too far apart). Bake for 12-14 minutes and enjoy!

TIPS
- Choose an all-natural nut butter to maintain the healthiness of this recipe (look at the ingredient list on the jar – it should only have one ingredient)!
- You can use fresh or frozen blueberries for this recipes, either one works beautifully!
- The cookie dough will be on the wetter side – don’t worry, they will bake up nicely and easily release from the baking sheet when they are fully cooked.
OTHER HEALTHY TREATS YOU NEED TO TRY
Vegan Rice Crispy Chocolate Treats (a fun, bite-sized snack)
No-Measure Oatmeal Almond Butter Cookies (skip the measuring with these perfect failproof cookies)
Healthy Pumpkin Oatmeal Chocolate Chip Cookies (the perfect Fall version of these Flourless Oatmeal Blueberry Cookies)
TOOLS I USED TO MAKE THESE FLOURLESS OATMEAL BLUEBERRY COOKIES
Click on the images below to see what I used for this recipe.


FLOURLESS OATMEAL BLUEBERRY COOKIES
Servings: Makes 8 large cookies
Prep time: 10 minutes
Cook time: 13 minutes
Ingredients
- 1 very ripe banana, mashed
- 1/4 cup peanut butter (or any nut butter)
- 1 tbsp pure vanilla extract
- 2 tbsp pure maple syrup
- 1 large egg
- 1/2 tsp cinnamon
- 1/2 tsp salt
- 2 1/4 – 2 1/2 cups rolled oats
- 1 cup fresh or frozen blueberries
Instructions
- Preheat your oven to 350 degrees Fahrenheit.
- In a large bowl, whisk together the mashed banana, peanut butter, vanilla and maple syrup. Next, add in the egg and whisk until fully combined.
- Add the cinnamon, salt and 2 1/4 cups of oats to the bowl. Mix with a spatula. If the dough is very wet, add in the extra 1/4 cup of oats. The mixture should be slightly on the wetter side.
- Fold in the blueberries and then use a 1.5 tablespoon cookie scoop to form 12 cookies (alternatively, roll into balls using wet hands). Place on a parchment lined baking sheet and use your palm to flatten each cookie. As these will not spread, you don’t need to leave too much space between them.
- Bake for 13 minutes, remove from oven and let cool for a minute on the baking sheet before transferring to a wire rack to cool completely.
- Once they have fully cooled, store in an airtight container for up to four days.

The post Flourless Oatmeal Blueberry Cookies appeared first on Never. Not. Eating..
]]>The post Homemade Tzatziki appeared first on Never. Not. Eating..
]]>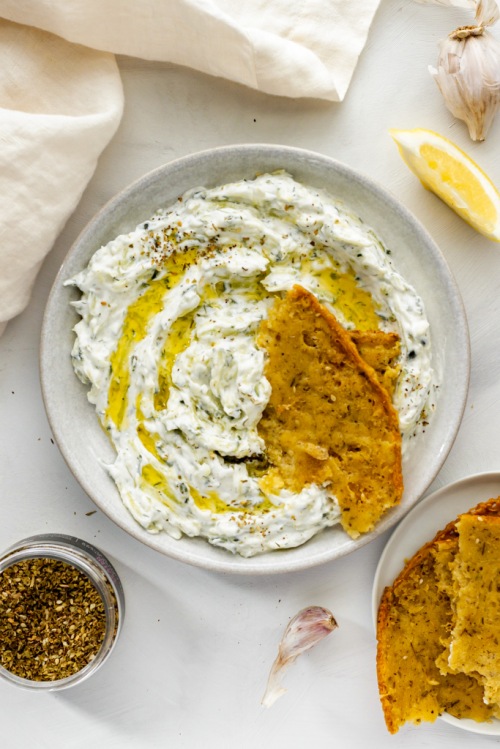
This tzatziki sauce is thick, creamy, refreshing and a great spread for wraps and gyros, or to go with falafel, fries, bread or vegetables. It’s the perfect match for anything that needs a creamy element! I love it with my Easy Za’atar Socca bread.
Tzatziki is popular around the Middle East and the Mediterranean, especially in Greece. It is my dream to travel to Greece one day and learn more about their cuisine, but until then, I will have this recipe on repeat, so I can pretend I’m there.
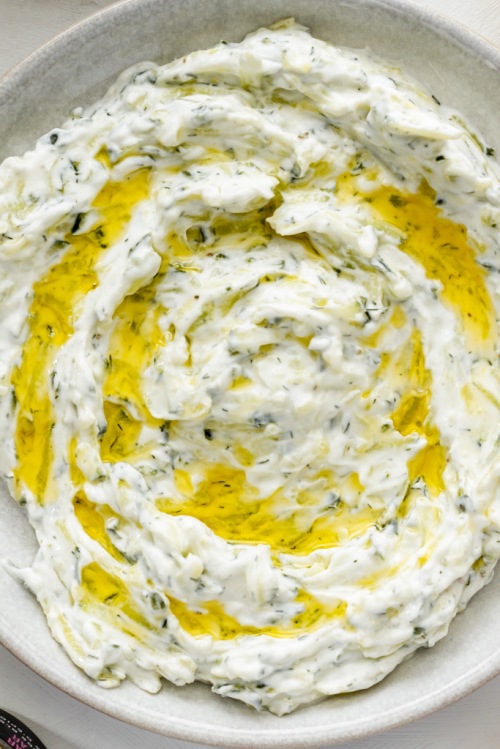
Tzatziki is simply a combination of yogurt, fresh herbs, lemon, cucumber, garlic, olive oil and salt. It’s a perfect summer dip, sauce or spread, as it’s cool and bright!
It is incredibly easy to whip up at home. Follow my recipe below, and feel free to add extras of your favourite ingredients!
Homemade Tzatziki
Serving size: Makes 1 cup
Prep time: 5 minutes
Ingredients:
- 1 cup cucumber, shredded
- 1 cup full-fat Greek yogurt
- 1 clove of garlic, grated
- zest of 1 lemon
- 1 1/2 tbsp freshly squeezed lemon juice
- 1 tbsp chopped dill
- pinch of salt
- olive oil (optional)
Instructions:
- Place cucumber in a clean tea towel or paper towel and squeeze the liquid out over a sink.
- Mix the cucumber, yogurt, garlic, lemon zest and juice, dill and salt in a bowl. Transfer to a small plate and use the back of a spoon to spread it out over the surface. Drizzle with a little bit of olive oil, if desired. Serve immediately.
- Store extra in an airtight container in the fridge for up to three days.

The post Homemade Tzatziki appeared first on Never. Not. Eating..
]]>The post Dark Chocolate Protein Nuggets appeared first on Never. Not. Eating..
]]>
I was in Costco the other day and I found these Keto Nuggets and decided to give them a shot. I’ve been looking for something that I can eat post-dinner that isn’t too terrible for you. I really just can’t get behind the idea that dinner is the last meal that I will eat in a day. I don’t vibe with that. Anyway, back to my story: I purchased them and they were pretty darn good! But, since it’s me and I need to make mostly everything from scratch, I decided that instead of buying them again, I was going to make them. And here we are!

So these “nuggets” are super quick and easy. The nuts and seeds in the recipe can easily be swapped out for your favourite nuts and seeds, as long as you abide by the number of grams listed!
I like to toast the almonds and pecans to get that roasty toasty flavah before dousing them in the melted chocolate. So good!

Note: There isn’t any extra sugar added to these…Just what is in the chocolate. I like things less-sweet, but also because I always use maple syrup, honey or agave to sweeten my food, and their properties could potentially seize the chocolate. Chocolate is super temperamental, and even the tiniest drop of water could ruin an entire bowl. Because all of my preferred sweeteners are in liquid form, I didn’t want to add any and compromise the chocolate.

You can definitely find a lot of the ingredients at Costco or your local bulk food store, but here are some links to the required products if you prefer to shop online:
- Pecans
- Almonds
- Hemp hearts
- Pumpkin seeds
- Chia seeds
- Shredded coconut
- Flaky sea salt
- Dark chocolate
- Coconut oil
Another very helpful item is a kitchen scale. This is so great to have on hand, especially if you do a lot of baking. I used my scale for this recipe as it is the most accurate, especially when you are measuring nuts – their awkward shape always fits differently into measuring cups.
Let’s make some nuggets!

This post contains affiliate links and I may earn a small commission when purchases are made after clicking the links, at no cost to you. Thank you for supporting me!
Dark Chocolate Protein Nuggets
Prep time: 10 minutes
Cook time: 10 minutes
Cool time (inactive): 1 hour
Ingredients:
- 1/2 tsp Flaky sea salt
Instructions:
- Preheat oven to 350 degrees Fahrenheit and line a large baking sheet with parchment paper.
- Spread the pecans out on the parchment paper and bake in oven for 3 minutes.
- Pull out the baking sheet and add the almonds. Bake for another 3-6 minutes, or until just starting to become brown. Watch carefully! They will burn easily.
- To a large bowl, mix together the toasted nuts, hemp hearts, pumpkin seeds, chia seeds, coconut and salt and set aside.
- Add the chocolate and coconut oil to a double boiler*, over low heat. Stir frequently with a spatula until almost completely melted. Remove and continue stirring until the remaining solid pieces melt.
- Pour the chocolate over the nut and seed mixture and use a wooden spoon to mix until all of the nuts and seeds are coated. Spread the mixture out onto a parchment lined baking sheet (you can use the same parchment you used for roasting the nuts). Place in the fridge for at least one hour to set.
- When fully set, remove from fridge and break into bite-size “nuggets.” Store in an airtight container in the fridge for up to 2 weeks!
NOTES:
*For the double boiler, fill a small pot with one – to two-inches of water and place over medium low heat. Add a larger glass, or heatproof bowl on top of the pot with a wooden spoon in between to let the steam escape. Place the chocolate and coconut oil into the glass bowl to melt.
The post Dark Chocolate Protein Nuggets appeared first on Never. Not. Eating..
]]>The post Dark Chocolate Almond Butter Bars appeared first on Never. Not. Eating..
]]>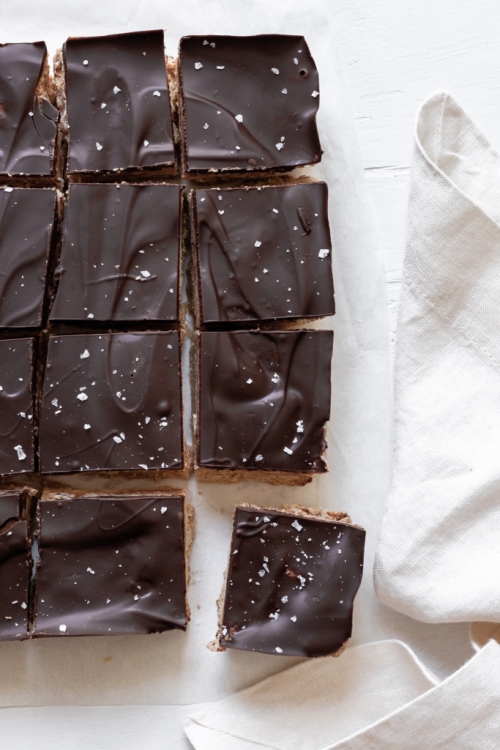
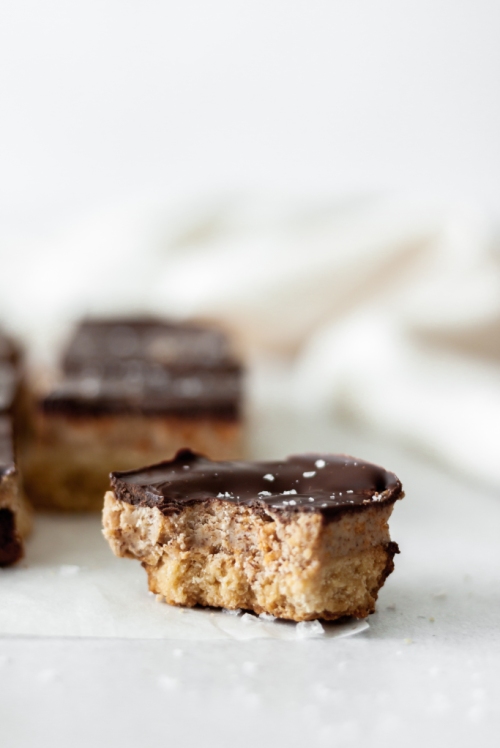
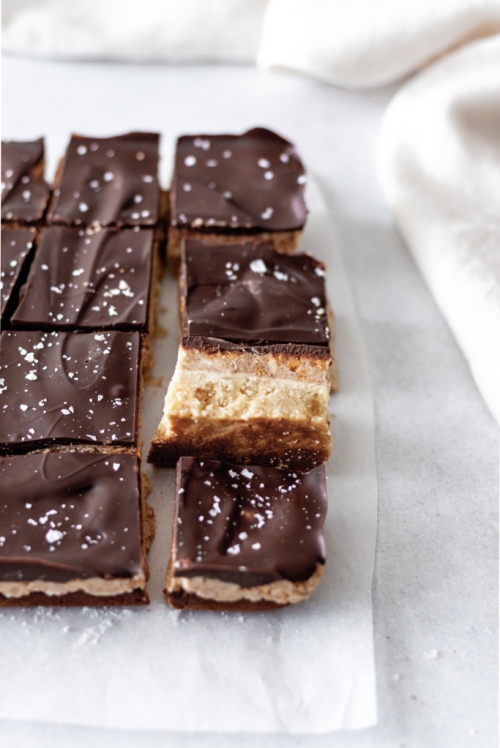
I’m a HUGE choco + peanut butter fan, but I thought I’d switch it up today and choose a slightly healthier nut butter to create a slightly less-healthy dessert. Balance.

These bars have a thick shortbread-type bottom layer, a crunchy and sweet almond butter centre, and a lush dark chocolate top. They are friggin’ delish.
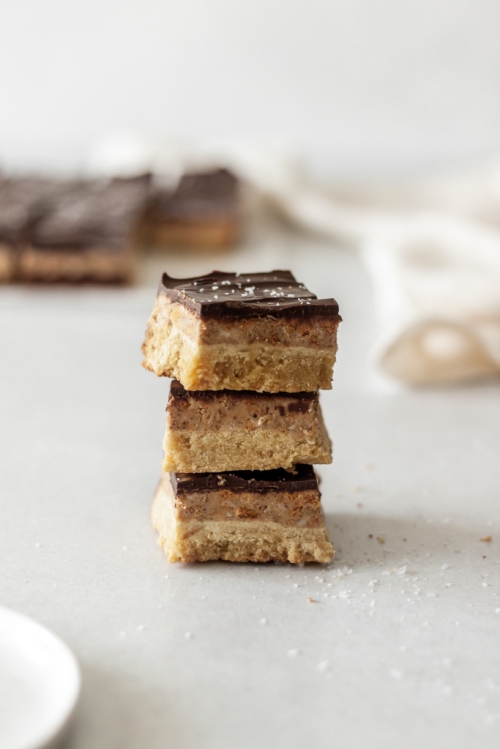
In order to keep these bars gluten-free, I’ve made the crust with a mix of almond flour and Bob’s Red Mill Gluten-Free All Purpose Flour, and I’ve crushed up my favourite gluten-free cereal to add texture to the middle. Feel free to swap for any gluten-filled flour or cereal you wish!
Let’s make them!
Dark Chocolate Almond Butter Bars
Servings: Makes 16 squares
Prep time: 10 minutes
Cook time: 10 minutes
Cool time: 1 hour
Ingredients:
For the bottom layer:
- 1 cup almond flour
- 1 1/2 cups gluten-free flour
- pinch of salt
- 3-4 tbsp agave
- 4 tbsp (1/4 cup) cold coconut oil
For the almond butter layer:
- 1/2 cup smooth almond butter
- 1/3 cup coconut oil, melted
- 1 cup powdered sugar
- 1 cup of your favourite gluten-free cereal, made into crumbs (makes a heaping 1/2 cup)
- pinch of salt
- 1/2 tbsp vanilla
For the chocolate layer:
- 150 g dark chocolate, chopped
- flaky sea salt, for topping (optional)
Instructions:
- Preheat oven to 350 degrees Fahrenheit and line an 8 x 8 inch baking pan with parchment paper.
- For the bottom layer – Combine the flours and salt in a food processor and pulse to combine. Add the coconut oil and three tablespoons of agave and pulse. If the dough does not start coming together, add the fourth tablespoon of agave. Dump into parchment lined pan and use your hands or the bottom of a glass to distribute evenly. Pierce the top a few times with a fork. Bake for 10-15 minutes, or until it turns light brown around the edges. Cool completely.
- For the almond butter layer – Combine all ingredients in a large bowl and stir to combine. Dollop the mixture onto the cooled bottom layer and use your hands to press down and spread evenly. Set aside.
- For the chocolate layer – Add the chocolate to a glass or heatproof bowl set over a double boiler. Melt, watching closely and stirring often. Alternatively, melt the chocolate in the microwave in small increments. Pour melted chocolate over the almond butter layer and place in the fridge to set for at least an hour. Cut into squares and serve!
Store in an airtight container in the fridge for up to 5 days.
The post Dark Chocolate Almond Butter Bars appeared first on Never. Not. Eating..
]]>The post Vegan Power Muffins appeared first on Never. Not. Eating..
]]>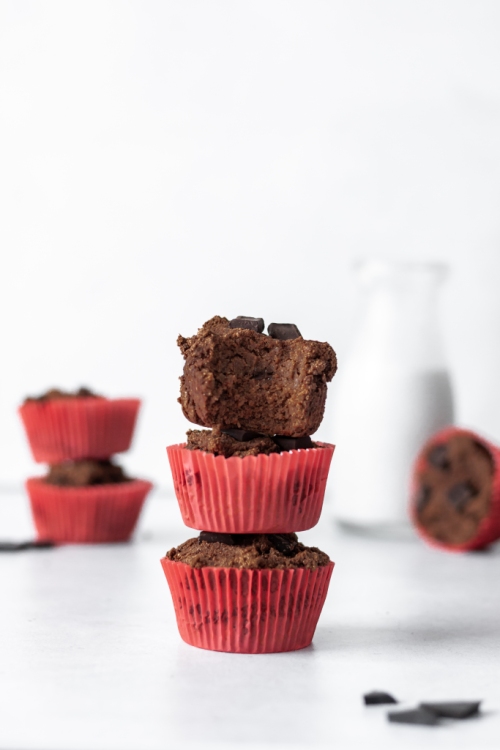
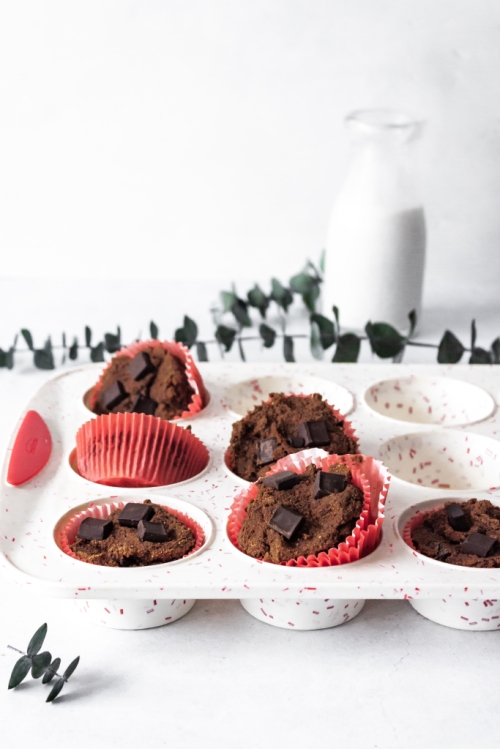
I LOVE muffins. Love, love, love them. But I’m always finding myself feeling bad after eating them, which is so silly. A girl can’t eat a muffin in the 21st century anymore without feeling all the sadness of the number of calories she just consumed. Life, eh?!
Luckily, this has inspired me to create some healthier muffins that not only will punch guilt in the face, but will also provide you will that extra energy boost and a protein POP for those slower mornings. Sign. Me. Up.
I love many things about these muffins: they are gluten-free, dairy-free, refined sugar-free and vegan. They are packed with healthy fats, fibre and protein. And, they are easy to make!
Let’s talk substitutions:
The fats: We know fats are important in baking. They keep things moist. Instead of butter, I’m swapping it out with some coconut oil. We all know the research on coconut oil, with its likeliness to improve hair, skin and nails, as well as boost brain health.
The binder: Typically, eggs are used to make everything stick together and to add structure in our baking. Since I wanted to keep this recipe vegan, we are subbing the eggs for chia seeds that have “gelled” in water. They create a gelatinous “paste” that mimics the job of an egg. Not to mention they have tons of fibre, good fats and protein.
The flour: You will rarely catch me eating white flour. Hell naw. Today, we are using coconut flour instead. Coconut flour definitely requires more liquid than your standard AP flour, and can be a bit tricky to work with, but the benefits are worth it. It’s gluten-free and promotes digestion with the ample amounts of fibre it provides.
The sweetness: I have made this recipe in two different ways. One way, I use JUST bananas to add a touch of sweetness, and the other, I add some maple syrup along with the bananas to satisfy that sweet tooth (naturally, of course). You can leave out the syrup if you prefer (just add an extra mashed banana).
Extras: There are a few other ingredients that I like to sneak into these muffins to give that extra little WAHBAM – coffee, maca and protein powder. Coffee brings out the chocolatey flavour, maca is healthy AF, and protein powder, well, I think that’s pretty clear. You can always leave these ingredients out if they are not for you!
These muffins release nicely from the sides of the muffin liners. I love shopping on Amazon to find liners that go with my mood, or a celebration if I am bringing treats. I love these rose gold ones, or these fun ones that come with cute little toppers. If I am just baking for myself, I like to use my silicone mold to reduce waste and have an easy clean-up.
This post contains affiliate links and I may earn a small commission when purchases are made after clicking the links, at no cost to you. Thank you!
Vegan Power Muffins
Yield: Makes 12 muffins
Prep time: 5 minutes
Bake time: 30 minutes
Ingredients:
- 1/4 cup chia seeds
- 1/2 cup plant-based milk
- 1/2 tbsp apple cider vinegar
- 3 bananas, mashed
- 1/4 cup coconut oil, melted
- 1/2 cup smooth almond butter
- 1/2 tbsp pure vanilla extract
- 1/3 cup maple syrup
- 3/4 cup coconut flour
- 1/3 cup cocoa powder
- 1/2 tsp salt
- 1/2 tsp baking soda
- 1/2 tsp cinnamon
- 1 tbsp instant coffee (optional)
- 1 tsp maca powder (optional)
- 1 scoop (27 g) protein powder (optional)
- 3/4 cup dark chocolate chunks
Instructions:
- Preheat your oven to 350 degrees Fahrenheit. Line a muffin tin with 12 muffin cups.
- Mix the chia seeds with 2/3 cup of water in a small bowl and set aside to “gel,” at least 10 minutes.
- Mix the milk and apple cider vinegar and set aside.
- In a large bowl, use a hand mixer to beat together the bananas, coconut oil, almond butter, vanilla, maple syrup, chia seeds and milk/vinegar mixture, until smooth.
- In a medium bowl, whisk the coconut flour, cocoa powder, salt, baking soda, cinnamon, coffee, maca and protein powder (if using) until combined.
- Add the wet ingredients to the dry ingredients and beat until fully combined (batter will be thick). Fold in the chocolate chunks.
- Scoop the batter into the muffin liners and bake for 30-35 minutes, or until they look dry on the top and a toothpick comes out clean.
- Let cool in pan for 10 minutes before transferring to a wire rack to finish cooling. Store in an airtight container on the counter for up to three days, in the fridge for up to 5 days, or freeze for later.
Best served at room temperature or from the fridge!
The post Vegan Power Muffins appeared first on Never. Not. Eating..
]]>The post Hot and Sweet Cauliflower Wings appeared first on Never. Not. Eating..
]]>
I put a pot of oil on the stove and waited. And waited, and waited, and waited. It didn’t start to boil, so I just kept waiting. Like I said, I knew NOTHING about cooking. All of a sudden, plumes of smoke started emerging from the pot. And, then I couldn’t breathe. The smoke filled the house and my roommates were like, “WTF Mate?!” It was so thick that it coated our lungs as we hacked up a storm. So, I carefully took the pot outside and stuck it in a pile of snow and ran far, far away.
Never have I tried frying again. Until today. Thank goodness for endless episodes of the Food Network that have guided me in my growth as a food fryer.
So, in case you have never fried before, here are my learnings:
- Oil doesn’t boil
- Do not fry food without a thermometer
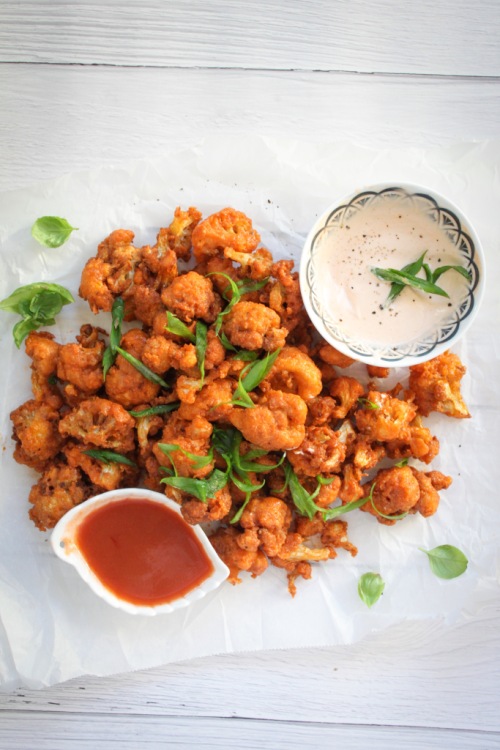
Now that the PSA is out of the way, let me introduce you to my first fry recipe – Cauliflower wings. We all know them. We all love them. But, I can’t tell you how many times I have tested recipes that have you bake these little guys, and they never create the texture that I want. That crispy AF texture. So, we fryin’ today.
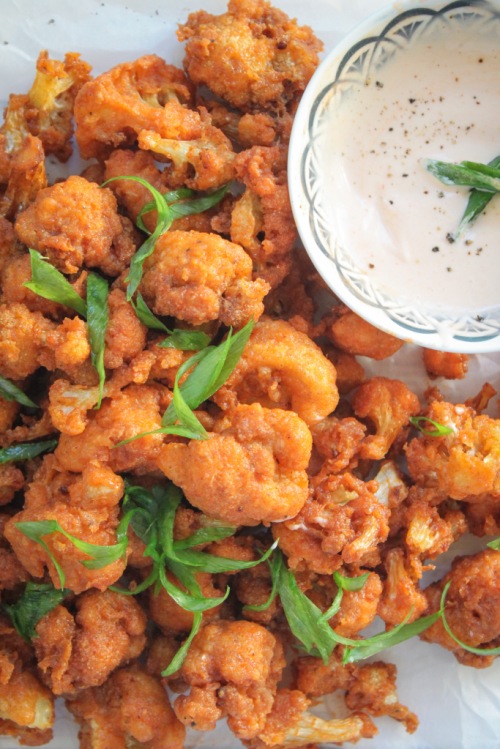
This recipe is really quick and surprisingly easy. You need to break off your cauli into smaller florets – the larger they are, the more water they absorb. Then, get that batter going – add some flour, cornstarch (my favourite “crisping” ingredient), paprika, chili powder, salt and pepper to a bowl and whisk. Next, pour in some canned coconut milk, mixed with another milk of choice – oat, cashew, almond, etc. Whisk it all together and you will get a nice batter. Give those florets a dunk and carefully place them into the pot of oil. Let them cook for about 3-4 minutes, until golden brown.
After you have fried all of the cauliflower, get your sauce ready. Combine a quarter cup of Frank’s Red Hot Sauce with 1 tablespoon of honey and slather over the wings. Give them a toss and they are ready.
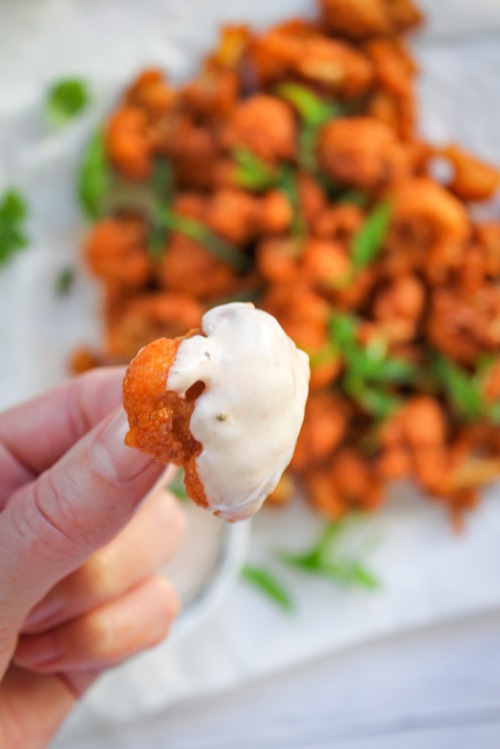
If you are into dipping things into other things, then make my “Frank’s Aioli.” Mix about 1/2 teaspoon of Frank’s Hot Sauce with 2 tablespoons of mayo and give ‘er a few cracks of pepper and you’re Gucci.
I’m very pleased with my personal growth. Let me help you achieve your culinary fry goals with this recipe! Happy frying!
Hot and Sweet Cauliflower Wings
Servings: 4
Prep time: 15 minutes
Cook time: 15-20 minutes
Ingredients:
- Canola or vegetable oil, to fry
- 1 small head of cauliflower, broken into florest
- 1/2 cup whole wheat flour (or all-purpose)
- 1/4 cup cornstarch
- 1 tsp paprika
- 1 tsp chili powder
- 1 tsp salt, plus more for seasoning
- 1/4 tsp pepper
- 1/4 cup canned coconut milk (or skip and add 1 whole cup of ‘other’ milk)
- 3/4 cup milk of choice (cashew, coconut, oat, etc.)
- 1/4 cup plus 1/2 tsp Frank’s Red Hot Sauce (or your favourite hot sauce), separated
- 1 tbsp honey
- 2 tbsp mayonnaise
- Scallions, sliced, for topping (optional)
Instructions:
- Set up your frying station by pouring the oil into a dutch oven, or heavy pot. Have at least 3 inches of oil in your pot. Place a thermometer in the pot and turn the burner on medium-high.
- Whisk together the flour, cornstarch, paprika, chili powder, salt and pepper in a medium bowl.
- Mix together the two milks and pour over the dry ingredients. Whisk until combined and then add the cauliflower, stirring to coat with the batter.
- When your oil temperature reaches 350 degrees F, use metal tongs to carefully drop in a few of the coated cauliflower florets, making sure you don’t crowd the pot as it will significantly bring the temperature down. Fry for 3-4 minutes, or until golden brown. Remove carefully with a stainless steel spider and place on a paper towel lined plate. Immediately season with a pinch of salt. Wait until the oil comes back up to temperature before continuing with the rest of the cauliflower.
- To make the sauce, combine 1/4 cup hot sauce with 1 tablespoon honey. Transfer the cauliflower wings to a large bowl and drizzle the sauce over them. Toss to combine.
- To make the aioli, combine the mayonnaise with 1/2 teaspoon of hot sauce and a pinch of pepper. Stir to combine.
- Top with sliced scallions and serve immediately.
The post Hot and Sweet Cauliflower Wings appeared first on Never. Not. Eating..
]]>The post Simple Corn Salsa appeared first on Never. Not. Eating..
]]>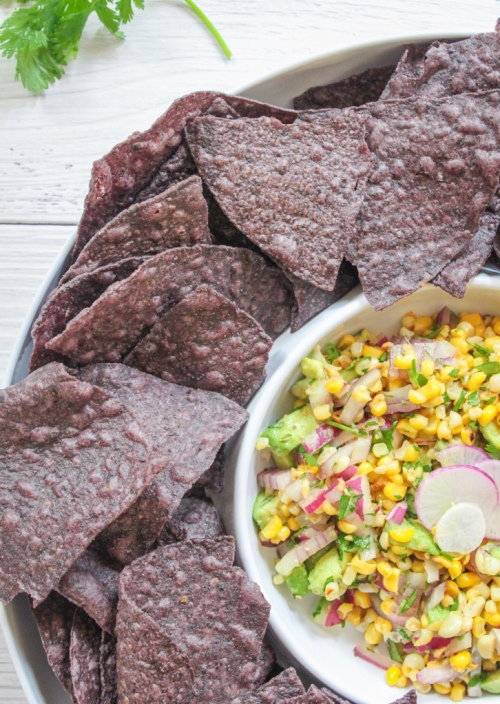
There is nothing untrue about the statement above. Salsa is perfect for leftover corn. It’s also perfect for not-leftover corn. You should use your corn how you want to use your corn. But, make sure you save three cobs for this recipe, because…it’s BOMB!
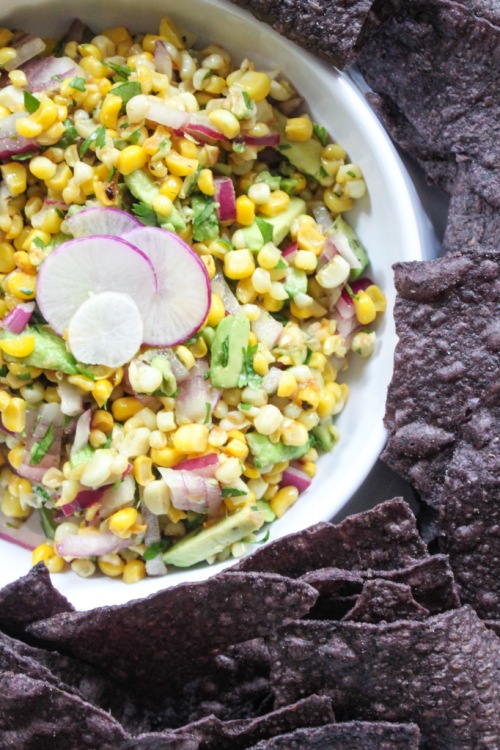
It’s also so simple, hence the title. Sometimes less is more. Here is what you will need:
- Corn
- Red onion
- Cilantro
- Avocado
- Fresh lime juice

That’s it! Unexpected guests coming over tonight? Take five minutes to whip this up, raid your pantry for corn chips and you’re good to go. Taco Tuesday? You have your topper. BBQ’ing hot dogs and hamburgers? Spoon this overtop to add some flair! So easy. So versatile. So summer.

There’s only one more important thing to mention before I get to the recipe – how to cook the corn. There is no one way to do this, it totally depends on preference and what heat source you have access to. You can definitely grill the corn. You can also boil it and then cut it off the cob. I prefer to use my cast iron skillet with some olive oil to get it slightly charred before adding it to the other ingredients. What ever vibe you’re feeling – follow it. This recipe is seriously hard to mess up!
Simple Corn Salsa
Serving size: Makes about 1 cup of salsa
Prep time: 10 minutes
Cook time: 5 minutes
Ingredients:
- 3 cobs of corn, shucked and the corn cut off
- 1/4 of a red onion, finely diced
- 1/2 of a large avocado (or one small avocado), diced
- 2 tbsp cilantro, finely chopped
- 1 tbsp lime juice (about half of a lime)
- salt and pepper to taste
- olive oil
Instructions:
- Add one tablespoon of olive oil to a cast iron skillet over medium-high heat. When the pan is hot, add the corn and a pinch of salt and let cook for about 5 minutes, stirring occasionally.
- Add cooked corn, diced onion, avocado, cilantro, lime juice, salt and pepper to a medium bowl and stir carefully to combine. Best if served immediately, but can keep in the fridge for up to 48 hours.
The post Simple Corn Salsa appeared first on Never. Not. Eating..
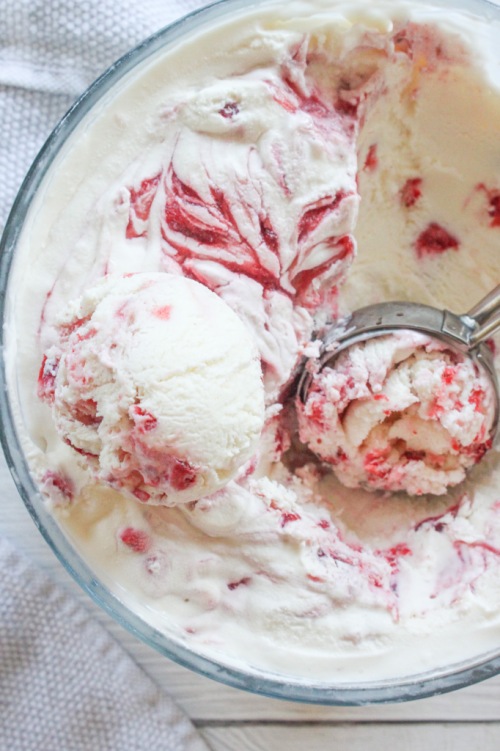
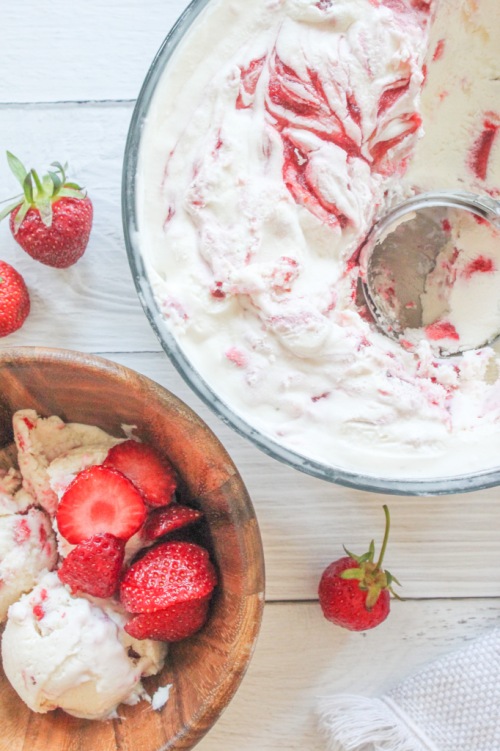
]]>The post No Churn Strawberry Swirl Ice Cream appeared first on Never. Not. Eating..
]]>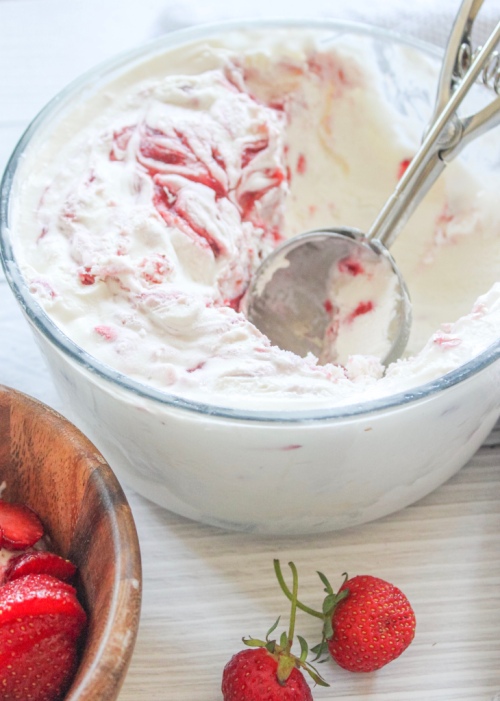
Listen guys – I have no idea why people buy ice cream. Making your own is where it’s at. Don’t have an ice cream machine? You don’t need one! This no churn ice cream only requires 5 ingredients and is so easy to make. The only thing that’s difficult about it is not eating the entire container. #summerbod
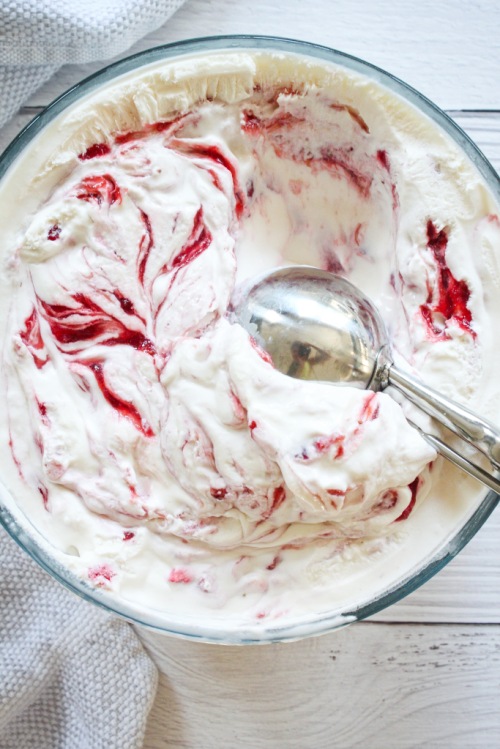
This recipe will give you a solid base that you can change and adapt to whichever flavours you’re feeling. I chose to make this batch with strawberries, because they are in season and I just went strawberry picking and I have a ton to use up. But you can easily omit the strawberries and add something else, whether it be another fruit, chocolate, caramel sauce, nuts…The possibilities are endless!

Here is what you will need:
- Sweetened Condensed Milk
- Greek yogurt
- Whipping cream
- Strawberries
- Jam (optional)
This is a perfect summer treat. Eat it alone, with fresh fruit, sandwiched between two cookies, added to an ice cream cake – whatever you like! It is highly addictive.
No Churn Strawberry Swirl Ice Cream
Yield: Makes approximately 7 cups of ice cream (1.65 L)
Prep time: 6-8 minutes
Chill time: 7 hours
Ingredients:
- 300 ml sweetened condensed milk
- 1/2 cup plain greek yogurt
- pinch of salt
- 500 ml fresh whipping cream (35%)
- 1 tsp pure vanilla extract
- 1 cup strawberries, finely chopped
- 1/4 cup jam (optional), I use my homemade Strawberry Rhubarb Jam
Instructions:
- Place the bowl of your stand mixer in the freezer with the whisk attachment to get cold. If using a hand mixer, do the same but with a large bowl and your beaters.
- Add sweetened condensed milk to a separate, large bowl with yogurt and salt. Whisk until combined and then set aside.
- Remove the bowl and whisk from the freezer and attach to your stand mixer. Add the whipping cream to the bowl with the vanilla. Beat on high until stiff peaks form, approximately 3 minutes.
- Add the strawberries and half of the whipped cream to the sweetened condensed milk mixture and carefully fold in with a spatula. Once mostly combined, add the rest of the whipped cream and fold until fully incorporated. Transfer mixture to a large bowl that has a fitted lid (needs to hold at least 1.65 litres). Dollop spoonfuls of the jam on top and use a knife to swirl the jam around. Freeze for at least 7 hours. Take out about 10 minutes before serving to let soften before scooping.
The post No Churn Strawberry Swirl Ice Cream appeared first on Never. Not. Eating..
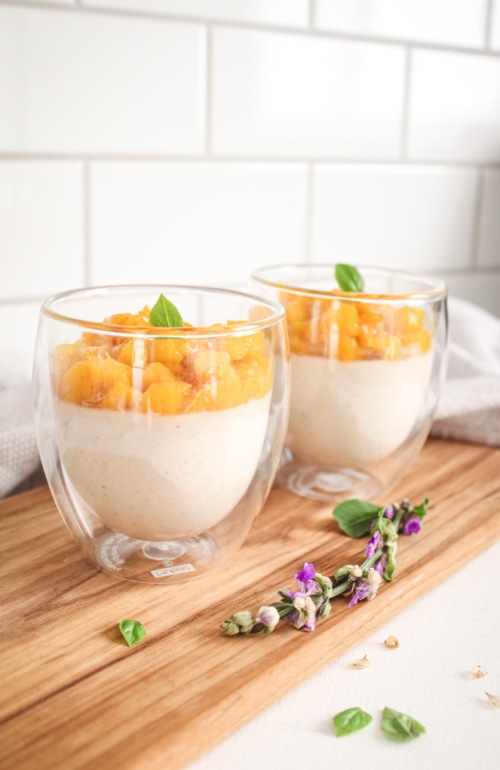
]]>The post Vegan Coconut Panna Cotta with a Mango Compote appeared first on Never. Not. Eating..
]]>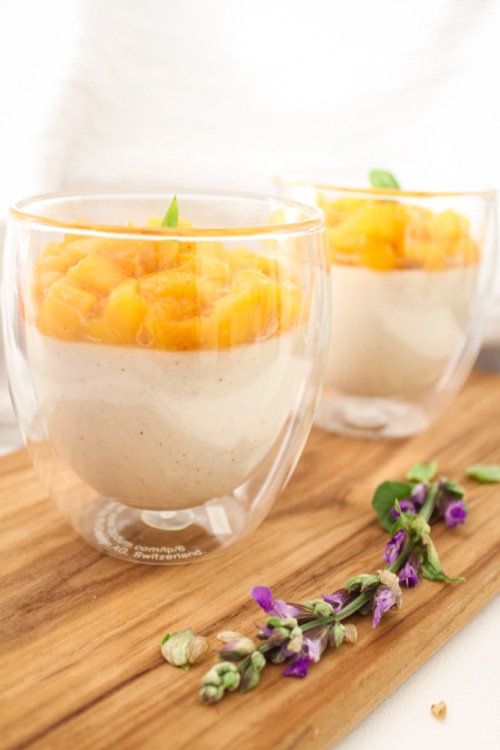
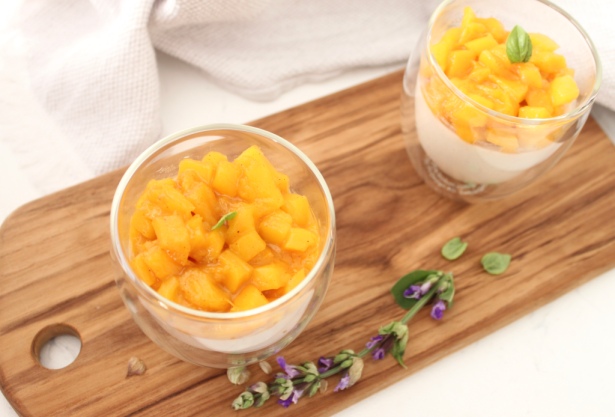
This vegan dessert mimics the OG Italian dessert. “Panna Cotta” means “Cooked Cream” in Italian, and I give you just that! Minus the cream, sub the coconut milk – My fav! It’s smooth, creamy, sweet and fruity. The perfect make-ahead dessert!

This dessert consists of two parts – the panna cotta and the fruit compote on top. For the panna cotta, you are going to need:
- Full-fat coconut milk
- maple syrup (or your choice of sugar)
- agar agar (a vegan gelatin)
- cinnamon
- nutmeg
- salt
For the compote, you will need:
- One mango
- cinnamon
- nutmeg
- salt
- citrus juice (lime or lemon)
- maple syrup
It may seem like a daunting task, but trust me…It’s the simplist dessert imaginable! It takes about 10 minutes to make each part and then all you have to do is wait until it sets up in the fridge! So easy. More delicious. Panna cotta pefection.
Here is the recipe.
Vegan Coconut Panna Cotta with a Mango Compote
Serving size: Makes 3 desserts
Prep time: 10 minutes
Cook time: 20 minutes
Set time: 1 hour
Ingredients:
For the Panna Cotta:
- 1 14-oz can of full-fat coconut milk
- 1/4 tsp cinnamon
- pinch of fresh nutmeg
- 3/4 tsp agar agar
- 1/4 cup maple syrup (or sugar of choice)
- pinch of salt
For the Mango Compote:
- 1 mango, small dice
- 1 tbsp maple syrup
- 2 tbsp freshly squeezed citrus juice (I use half lemon, half lime)
- pinch of cinnamon
- pinch of fresh nutmeg
- pinch of salt
Instructions:
- Bring the coconut milk to a boil in a small saucepan with cinnamon and nutmeg, watching carefully to avoid boiling over. Once boiling, add agar agar and reduce heat. Whisk for one minute and then add the maple syrup and salt. Simmer on low for another two minutes, whisking occasionally. Strain through a fine mesh sieve into a measuring cup with a spout. Divide into three dessert cups or stemless wine glasses and place in the fridge for at least an hour to set up.
- In a small saucepan, add the mango, maple syrup, citrus juice, cinnamon, nutmeg and salt. Let simmer until it takes on a jam-like consistency, about 10 minutes. Let cool about 10 minutes before spooning on top of the set panna cotta. Eat warm, or place back in the fridge and enjoy cold (my favourite).
The post Vegan Coconut Panna Cotta with a Mango Compote appeared first on Never. Not. Eating..
]]>The post Vegan Chocolate Bars appeared first on Never. Not. Eating..
]]>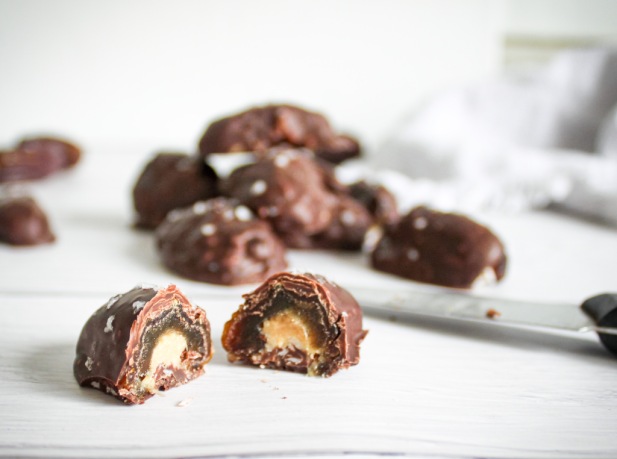
Typically, I just snap off a few squares of dark chocolate and have that as an after-dinner snack, but sometimes, I like to switch it up! There are so many recipes that you can make using chocolate that are healthy, delicious and take only minutes to whip up. Like my Healthy 5 – Ingredient Peanut Butter Cups, for example. Or a 3 – ingredient brownie that I make using cocoa powder, bananas and nut butter. This chocolate bar recipe is no exception. It is quick, vegan and amazingly delicious. It tastes like a “Snickers” bar!
The MVP here is the Medjool Date. It’s caramel-y in texture and taste, and is the perfect vessel for the other ingredients. It’s also what gives these candy bars their sweetness, as there is no refined sugar added to this recipe. Nature’s perfect candy.

The chocolate: It is your choice whether you would like to make these bars completely vegan or not. If so, you can find vegan chocolate chips at the health section of your grocery store, or on Amazon, here. To start, melt your chocolate in a double boiler over simmering water, or carefully in the microwave in 20-30 second intervals, stirring in between. Try not to eat it out of the bowl at this point.
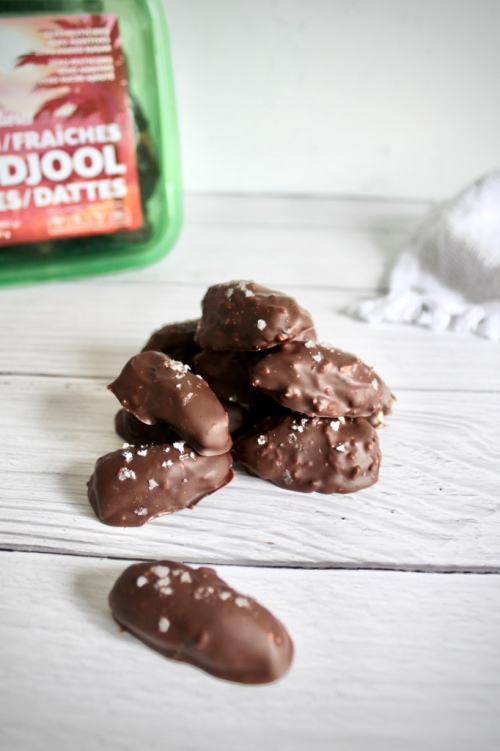
The assembly line: Set up your stations. It should go – dates, nut butter, shredded unsweetened coconut, melted chocolate and flaky sea salt. Now, we begin. Take a date, remove the pit and carefully tear it in half with your fingers. Use a knife to spread some nut butter over the open-side of one half and then dip the nut-buttered side into your coconut. Dip your filled date into the chocolate pool and use a spatula to help you coat the entire date. Scoop up the date with a fork and tap several times on the side of the bowl to let any excess chocolate drip off. Place your chocolate bar on a plate or tray lined with parchment and immediately sprinkle with a few flakes of sea salt. Continue with the rest of the dates and refrigerate for at least 15 minutes before enjoying!
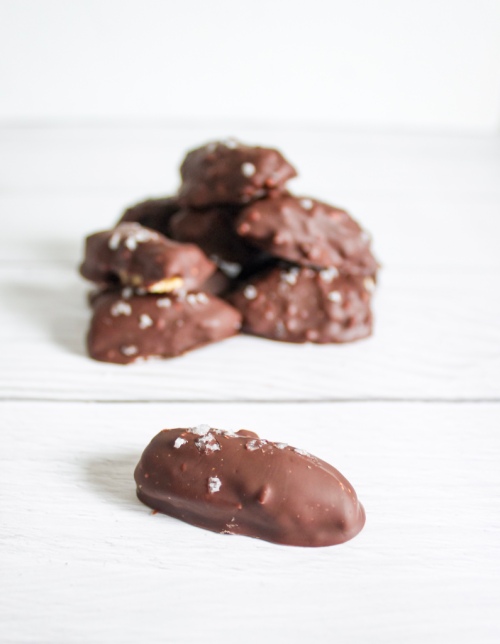
These are the perfect chocolate bar replacement. Chocolatey, caramely, ooey and gooey. And that sea salt just adds that extra hit of love. DROOL.
Vegan Chocolate Bars
Serving size: Makes 20 small bars
Prep time: 10 minutes
Cook time: 5 minutes
Chill time: 15 minutes
Ingredients:
- 140 g vegan dark chocolate
- 10 medjool dates, pitted and halved
- 1/4 cup nut butter (I prefer my Homemade Peanut Butter)
- 3 tbsp shredded unsweetened coconut
- flaky sea salt (optional)
Instructions:
- Fill a small pot with 2 inches of water and bring to a simmer on your stovetop. Place chocolate in a larger, heat-proof bowl and place the bowl on top of the pot, with a wooden spoon in between to let the steam escape. Stir regularly until the chocolate is melted. Remove from heat. Alternatively, you can melt your chocolate in the microwave by placing it in a microwave-safe bowl and melting for 20 – 30 second intervals, stirring in between, until smooth.
- Lay a piece of parchment paper on a small baking tray or a large plate and set aside.
- Take one half of a date and use a knife to spread nut butter on the open side of it. Dip the buttered side into the coconut flakes and then carefully place into the melted chocolate, using a spatula to help coat the entire date. Use a fork to scoop it up and tap on the side of the bowl a few times to allow extra chocolate to drizzle off. Place on prepared tray and sprinkle with a few flakes of sea salt. Repeat for the remainder of the dates.
- Place dates in the refrigerator for at least 15 minutes before serving. When they have cooled completely, transfer to an airtight container and store in the fridge.
The post Vegan Chocolate Bars appeared first on Never. Not. Eating..
]]>