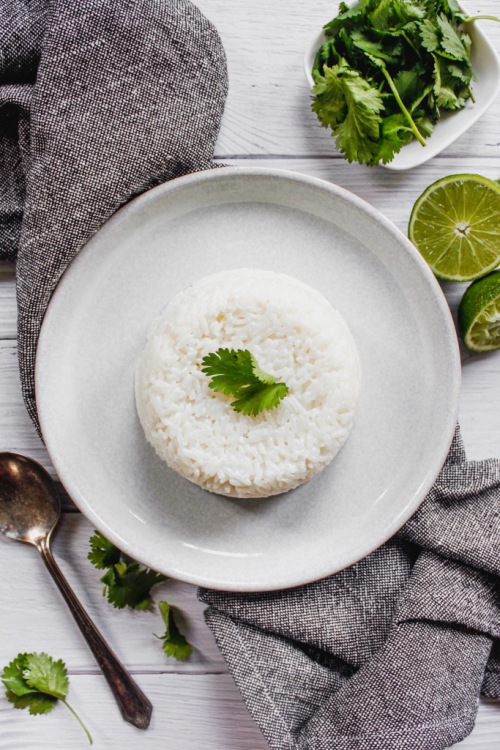
The post Coconut Lime Cilantro Rice appeared first on Never. Not. Eating..
]]>
I traveled to SE Asia during the summer of 2017. Those were the days, man. It was like 6 weeks of pure foodie inspiration. Rice, curries, fresh fruit, toasties from the 7/11…If you know, you know.
The abundance of carbs I ate while there was record-breaking, and the best part is, I didn’t gain a pound…I actually lost weight. Afterall, you step outside and instantly sweat off a few kilos in the 50-degree weather. And now, I have a plethora of different rice dishes under my belt!
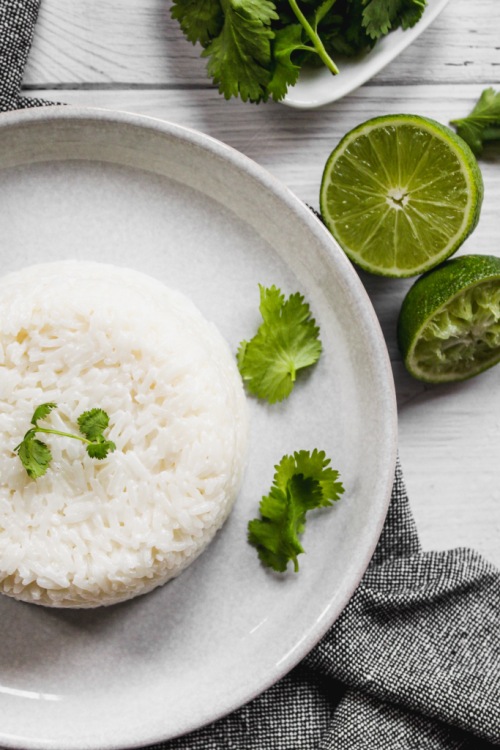
So let’s chat about this coconut rice dish. I just love coconut ‘er-thang! This rice makes for a perfect side dish to any meal – It has a creamy quality to it and it takes minutes to whip up. Here is what you will need:
- jasmine rice
- coconut milk
- salt
- lime
- cilantro
Let’s get started!
Coconut Lime Cilantro Rice
Serving size: 3-4
Prep time: 5 minutes
Cook time: 10 minutes
Ingredients:
- 1 cup jasmine rice
- 1 cup canned coconut milk
- 1 cup water
- salt
- juice of 1/2 lime
- 2 tbsp fresh cilantro, chopped
Instructions:
- Add rice, coconut milk, water and a generous pinch of salt to a saucepan and bring up to a boil. Turn heat to low, cover and simmer for 10 minutes (or according to rice package directions).
- Remove from heat and add the lime juice and cilantro to the rice, fluff with a fork to combine.
- Serve immediately.
NOTES:
*Add a touch of honey to the rice while cooking for a hint of sweetness.
The post Coconut Lime Cilantro Rice appeared first on Never. Not. Eating..
]]>The post Middle Eastern Orzo Pilaf appeared first on Never. Not. Eating..
]]>
Okay, I am in love with all flavours of all regions of the world (literally), but Middle Eastern…AND Italian?! Two heavyweights in the culinary world and I’m here for it! Like a hundo P’s.
Let me break down this fusion for you. We have the following Italian/Mediterannean ingredients:
- Orzo
- Feta
- Basil
And those from the Middle East include:
- Dried fruit (apricots, cherries, currants)
- Pistachios
- Olives
- Pomegranate seeds
- Cilantro
- Spices (Turmeric, Paprika, Cumin, Coriander, etc.)
Together, they are Chrissy and John. Rachel and Ross. Bey and Jay. Me and me.
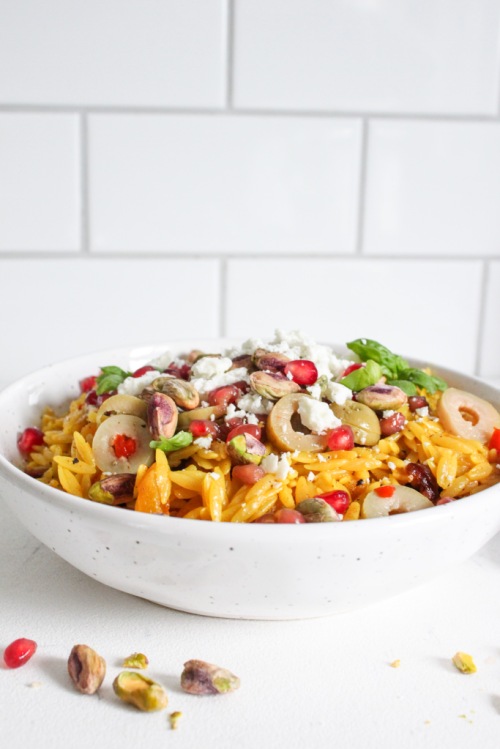
The warm flavours of the spices paired with creamy orzo, sweet fruit and salty olives and feta…hawt damn! I’m drooling.

Oh, one more thing…This makes the perfect lunch the next day. Leftovers for the win!
Middle Eastern Orzo Pilaf
Serving Size: 4
Prep time: 10 minutes
Cook time: 12 minutes
Ingredients:
- 1 tbsp olive oil
- 1 clove garlic, minced
- 1/2 tsp cumin
- 1/4 tsp turmeric
- 1/4 tsp paprika
- 1/4 tsp ground coriander
- pinch of fresh nutmeg
- pinch of black pepper
- 1 cup uncooked orzo, rinsed well
- 1 1/2 cups vegetable broth
- salt
- 1 cup dried fruit (I use cherries, currants and chopped apricots)
- 1 tbsp freshly squeezed lemon juice (optional)
- 4-5 olives, chopped
- 1/4 cup feta, crumbled
- 1/4 cup pomegranate arils
- 1/4 cup pistachios, shelled
- fresh herbs (cilantro and basil) for topping, (optional)
Instructions:
- Heat olive oil in a large pan over medium heat. Add the garlic and cook for 30 seconds or until fragrant. Add the cumin, turmeric, paprika, coriander, nutmeg and pepper and stir until toasted, another 30 seconds to 1 minute. Add the orzo and stir to coat with the spices. Once coated, pour in the broth, add 1/4 tsp salt and bring up to a boil and then reduce heat and let simmer for 8 minutes, with the lid on.
- After the 8 minutes, quickly lift the lid, add the dried fruit, and stir to incorporate with the orzo. Place the lid back on and let stand for 2 more minutes off the heat.
- Squeeze some fresh lemon juice into the pan and stir to combine. Transfer the orzo to a serving dish and top with olives, feta, pomegranate seeds, pistachios and fresh herbs. Serve immediately or let cool and refrigerate in an airtight container for up to three days.
The post Middle Eastern Orzo Pilaf appeared first on Never. Not. Eating..
]]>The post The Best Buttery Sweet Potato Medallions appeared first on Never. Not. Eating..
]]>
Butter. Thyme. Garlic. Just…wow. These potatoes are soft and tender on the inside and perfectly browned and caramelized on the outside. They would be a great crowd-pleaser for any get-together. When’s the next holiday? I need it to be tomorrow.

The process is as follows – Grab your cast iron pan. This is important to get that even heat distribution and stunning colour. Load it up with some butter and olive oil and place your salted and peppered potatoes in a single layer. Let cook until the bottoms have browned. Flip and add in a few more chunks of cold butter (it’s fine), a few sprigs of fresh thyme and a couple cloves of garlic. Pop ‘er in the oven for 10 minutes and just you wait. Perfection.

These babies will make you see potatoes in a whole new way. It will be very difficult to go back to cooking your old potato side dishes after you try these. Sorry not sorry.
The Best Buttery Sweet Potato Medallions
Serving size: 2-3 (as a side)
Prep time: 5 minutes
Cook time: 15-17 minutes
Ingredients:
- 1-2 large sweet potatoes (depending on the size of your cast iron), cut into 3/4 of an inch medallions
- Salt
- Pepper
- 4 tbsp unsalted butter, divided
- 1 tbsp olive oil
- 3 sprigs of thyme
- 2 cloves of garlic, smashed (but not chopped)
Instructions:
- Preheat your oven to 350 degrees Fahrenheit.
- Set a large cast iron pan over medium-high heat and add two tablespoons of the butter as well as the olive oil.
- Sprinkle one side of your potato medallions with salt and pepper and when the pan is hot, place the medallions -seasoned side down – into the pan. Let cook for 4-5 minutes, or until they develop a nice brown colour across their surface (try not to move them around too much during this cook time). While they are cooking, season the exposed side with more salt and pepper. Flip the potatoes and rest the garlic and remaining two tablespoons of butter (cut up into smaller chunks) on top of the potatoes. Pierce the tops of each potato with a fork, add the thyme to the pan, and then transfer to the oven and cook for 9-11 minutes, or until fork-tender. Remove from oven and serve immediately.
- For more of a garlic flavour, carefully take one of the pieces of garlic from the pan and rub it on the exterior of the potatoes.
These work so well as an accompaniment to any dish and are the perfect holiday party side!
The post The Best Buttery Sweet Potato Medallions appeared first on Never. Not. Eating..
]]>The post Jewelled Brussel Sprout Kale Salad with Honey Dijon Dressing appeared first on Never. Not. Eating..
]]>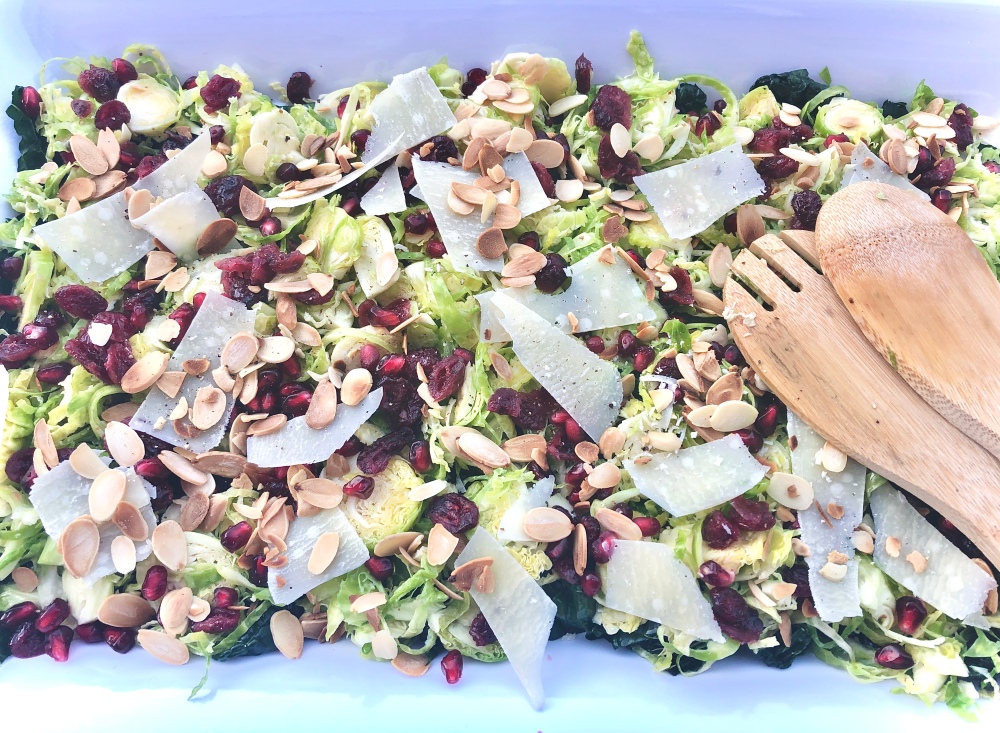
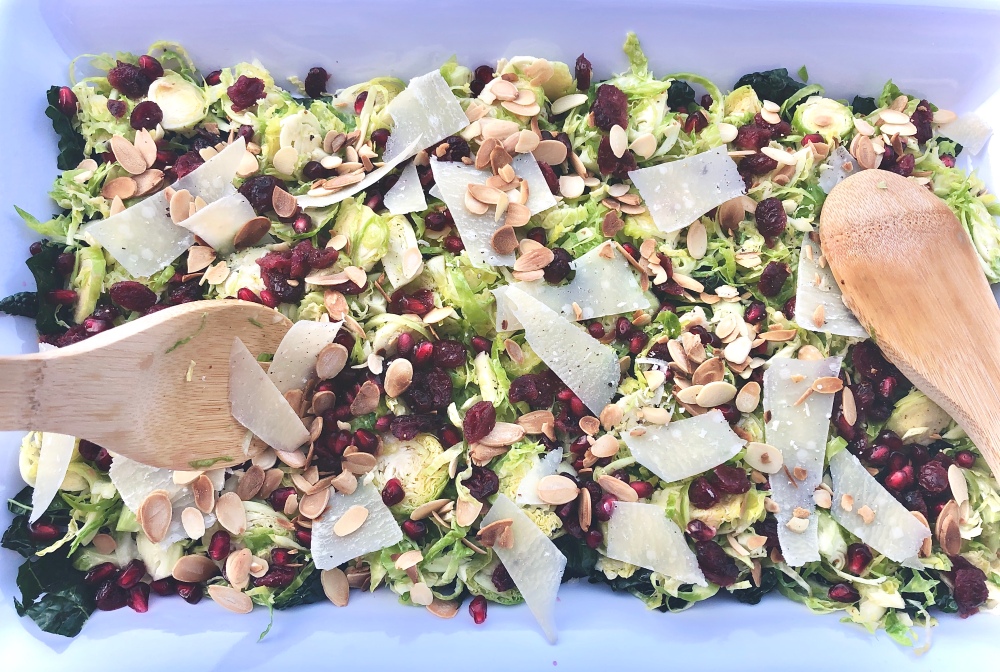
Ahhh the brussel sprout. It looks like a mini cabbage and grows on a thick, weird looking trunk, that could probably be used as a weapon. Nonetheless, they are so yummy. This recipe highlights the sprout in a simple salad that is super easy to make and takes no time at all! Perfect for a side dish or a lunch on it’s own.
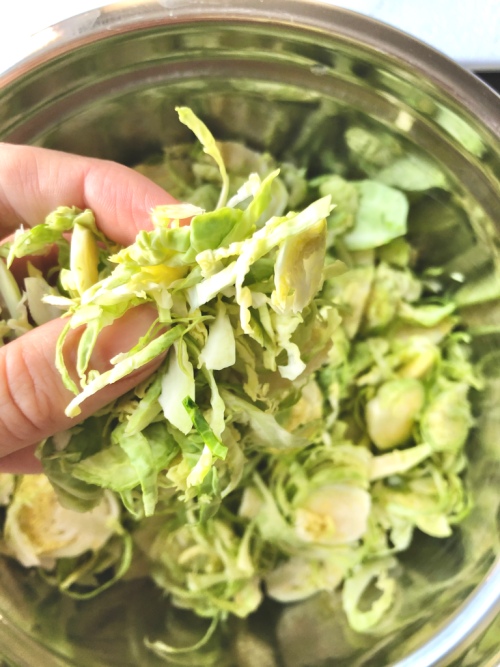
For this recipe, you can thinly slice your sprouts with a sharp knife, shave them on your mandolin, OR buy them pre-shaved at the grocery store. Easy peasy. Cut off the bottom where the stem is, peel off the outer leaves and discard if you are doing it yourself!
Zee jewels – Why do you call it “Jewelled” Brussel Sprout Kale Salad you ask?! Well, lemme tell you! Firstly, nature’s most beautiful jewels are sprinkled on top – the pomegranate seed. So bright and colourful, pomegranate seeds provide a textural element to any dish as well as a crisp “pop” of happiness when bitten down on.
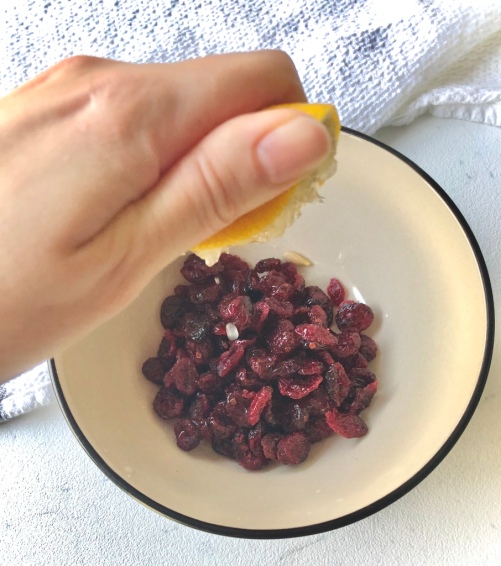
Secondly, dried cranberries that have been brought back to life with a little lemon juice and some hot water. They plump right up and are legitimate gems that are beautiful and wonderful and perfectly tart and sweet and a wanted addition to any salad. You’ll see.
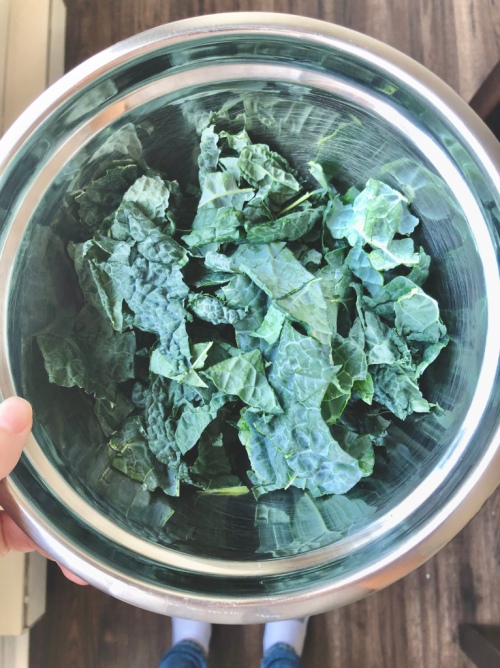
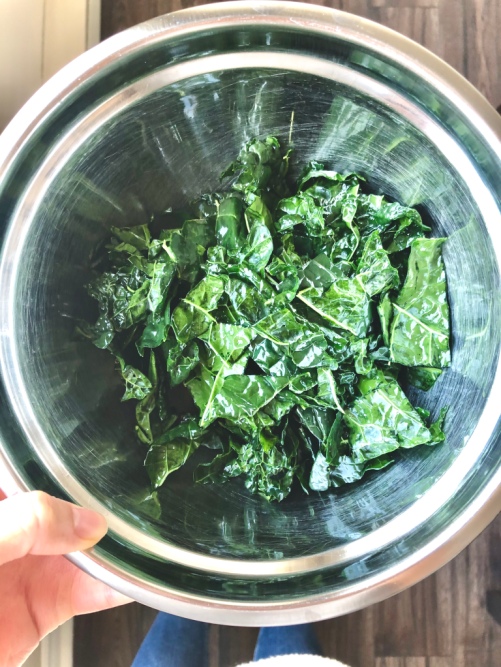
On to the kale. I prefer using Tuscan Kale. It is hearty and after a nice oil massage, the colour is vibrant and provides a perfect accompaniment to the lighter green brussel sprout. It’s also delicious. The massage is important as it helps to tenderize the kale, making it more palatable. And who doesn’t like a good massage? Treat your kale right.
Pre-massage:
Massage:
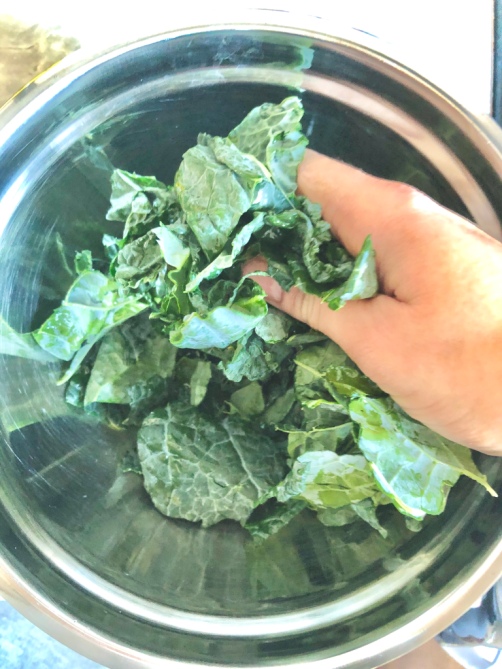
Post massage:
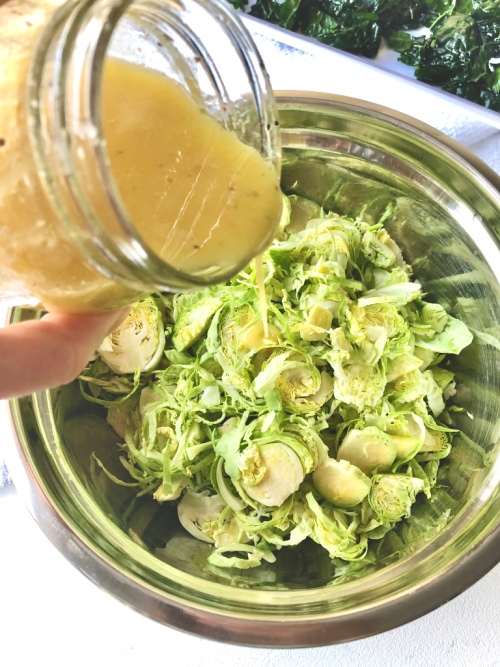
Finally, a few toasted almonds and a couple shavings of fresh parmigiano reggiano bring this whole thing together. Not to mention the yummy honey dijon dressing that takes 2 minutes to whip up from scratch.
Jewelled Brussel Sprout Kale Salad with Honey Dijon Dressing
Serving size: 6
Prep time: 10-15 minutes
Ingredients:
For the Honey Dijon Dressing:
- 2 tbsp apple cider vinegar
- 1 tbsp dijon mustard
- 1.5 tsp honey (or maple syrup, if you are vegan)
- 1/4 tsp salt
- freshly ground black pepper
- 1/3 cup olive oil
For the salad:
- 1/2 cup dried cranberries
- 1 tbsp lemon juice
- 1/3 cup slivered almonds
- 2 cups roughly chopped tuscan kale, stem removed
- olive oil
- 5 cups shaved or thinly sliced brussel sprouts (approximately 20 sprouts)
- parmigiano reggiano (optional)
- 1/3 cup pomegranate seeds
Instructions:
For the dressing:
- Add all ingredients except olive oil to a bowl and whisk together. Slowly drizzle the oil in a steady stream as you whisk to emulsify the dressing. Place in fridge while you prepare the salad.
For the salad:
- Preheat the oven to 350 degrees F.
- Boil water in a kettle and pour over the cranberries that have been placed in a bowl with the lemon juice until just covered. Set aside.
- Line a small baking sheet with parchment paper and lay the almonds on top in a single layer. Toast in the oven for 3-6 minutes, watching carefully. They burn easily, so be careful! Set aside.
- In a bowl, add your kale with 1 teaspoon of olive oil and a pinch of salt. Use your hands to massage the kale. You will notice the colour brightens and the kale begins to tenderize. Set aside.
- Place your brussel sprouts in a bowl and pour half of the dressing on top. Toss gently with two large spoons. Set aside. The dressing will help to soften the sprouts, so let sit for at least 10 minutes before assembling your salad.
- Use a vegetable peeler or the side of a box grater to thinly shave your parmigiano, if using.
- When ready to serve, build the salad – on a long tray (or in a large bowl), layer the kale followed by the brussel sprouts. Drain the cranberries and add them to the top with the toasted almonds, pomegranate seeds and parmigiano shavings. Drizzle with a little more dressing and place the remaining dressing to the side for those that like their salad well-dressed. Bon Appetit!
The post Jewelled Brussel Sprout Kale Salad with Honey Dijon Dressing appeared first on Never. Not. Eating..
]]>The post White Wine Israeli Couscous with Spinach and Mushrooms appeared first on Never. Not. Eating..
]]>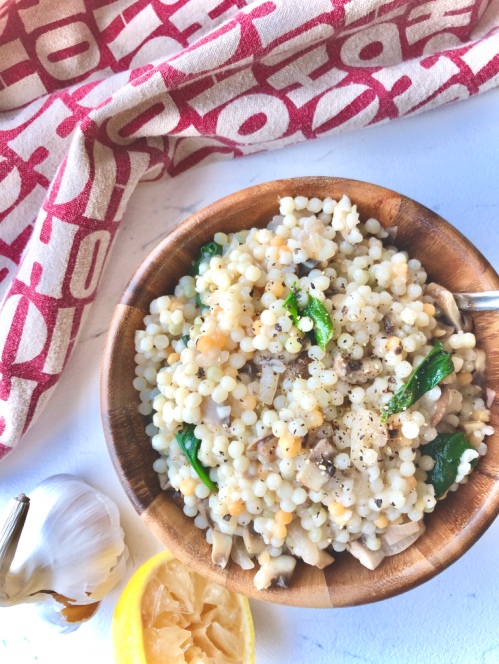
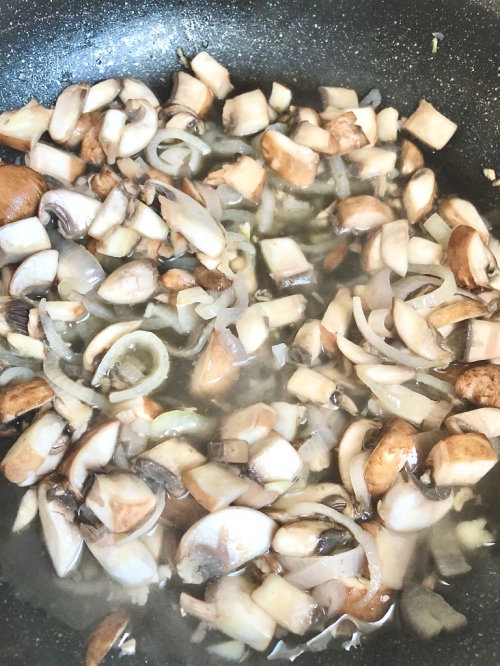
This dish is so simple…sauteed shallots, garlic, mushrooms and spinach deglazed with white wine, mixed into a heaping pile of delicious, brilliant Israeli couscous. Hellllloooo.
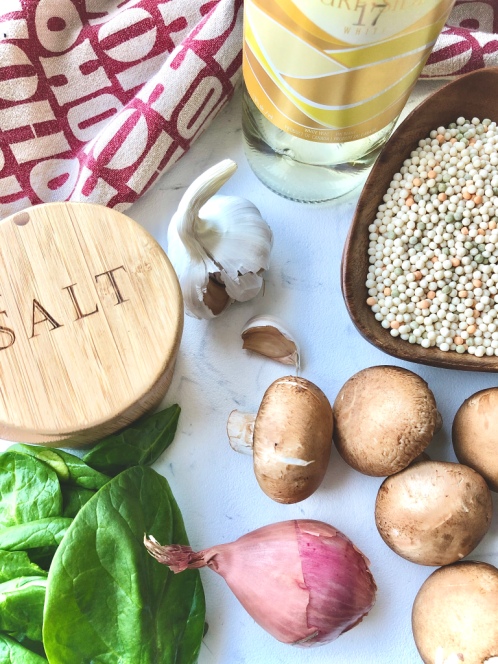
Israeli couscous is much larger than the typical Moroccan style cous. It is a small pasta also known as “pearl couscous.” It cooks super quickly and can be used in a variety of dishes including salads, soups and on it’s own as a side.
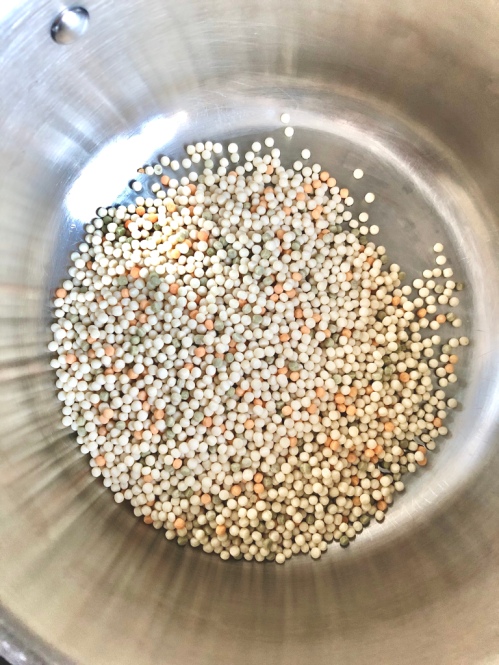
To cook the couscous, add to a pot with some olive oil and toast over medium-high heat for 1-2 minutes. Add water and salt (don’t skip!) and bring to a boil. Reduce heat and simmer for 8-10 minutes.
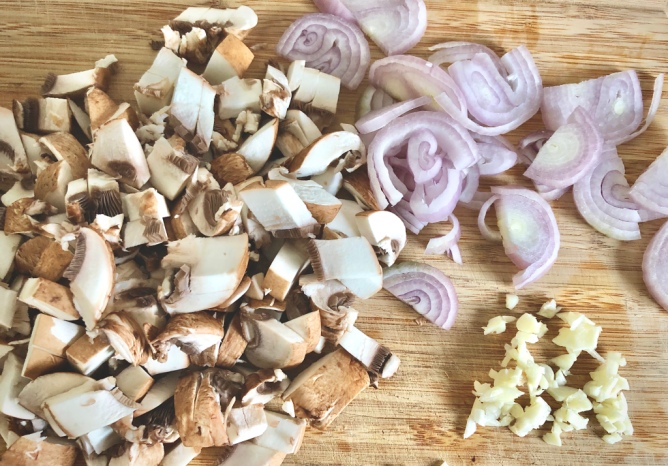
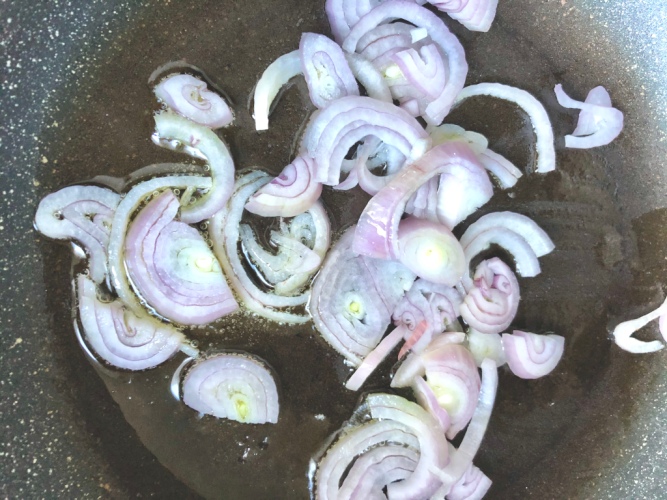
For the vegetables, add sliced shallot to a pan with olive oil over medium-low heat. Cook for a few minutes until it begins to soften and then add the garlic.
Stir for 30 seconds before adding the sliced mushrooms. Let saute for a few minutes and then pour in the white wine.
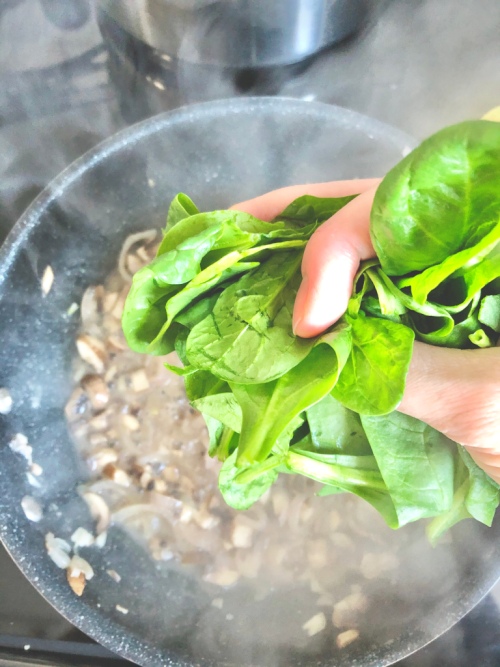
Turn the heat to medium-high and saute until the alcohol has been cooked out, about 5 minutes. Add a few handfuls of spinach and cook down until wilted.
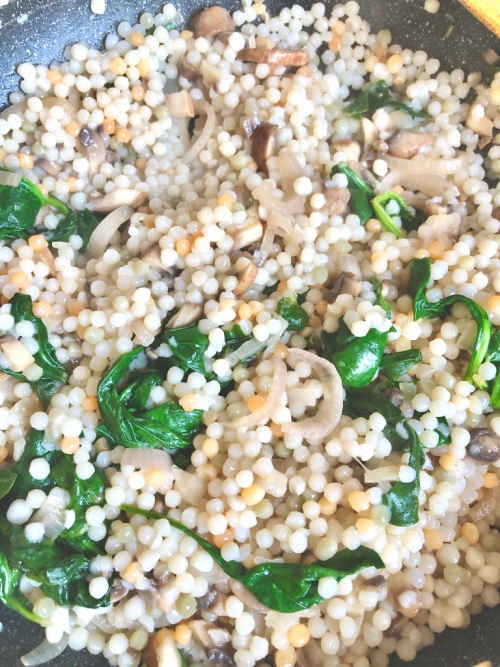
Rinse the couscous under cold water and add to the pan with the vegetables. Stir until combined, turn off heat and add a squeeze of lemon. Side dish perfection.
Serve at your holiday dinner…or bring to someone else’s! Double the recipe if you have a large party to feed.
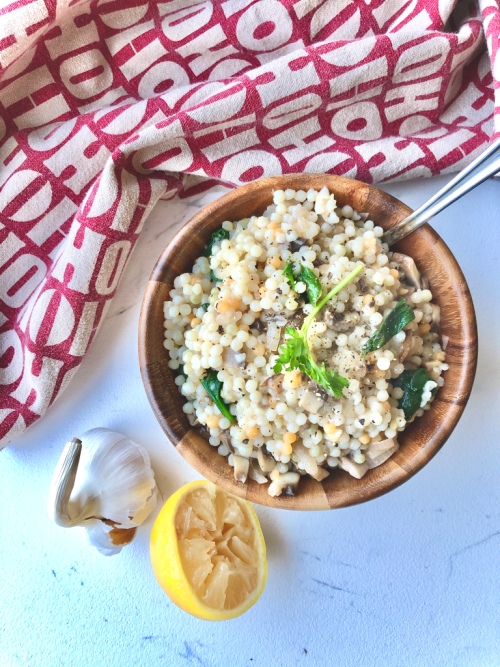
White Wine Israeli Couscous with Spinach and Mushrooms
Serving size: 4
Prep time: 5 minutes
Cook time: 10 minutes
Ingredients:
- 1 cup Israeli couscous
- olive oil
- 2 cups water
- salt
- pepper
- 1 shallot, sliced
- 2 cloves garlic, minced
- 6 cremini mushrooms, sliced
- 1/3 cup good white wine
- 2 handfuls spinach
- squeeze of lemon juice
Instructions:
- In a medium-sized pot, add 1 tablespoon of olive oil and the couscous and toast over medium-high heat for 1-2 minutes. It will become fragrant. Add 1 teaspoon of salt and the water and bring to a boil. Reduce heat and simmer for 8 minutes, or until al dente. Drain in a fine mesh sieve and rinse with cold water. Set aside.
- In a medium-sized saucepan, heat a tablespoon of olive oil over medium-low heat. Add the sliced shallot and let cook for a minute in the oil. Add the garlic and stir for 30 seconds. Add mushrooms, a few grinds of fresh black pepper and a pinch of salt. Saute for another minute and then add the white wine. Turn the heat up to medium-high and cook until the alcohol has been cooked out – about five minutes. Add the spinach and continue to cook until it is wilted down.
- Finally, add the cooked couscous to the pan, tossing with the vegetables. Turn the heat off after a minute, add a squeeze of lemon and a few more grinds of pepper and some salt to taste. Transfer to a bowl and serve immediately.
The post White Wine Israeli Couscous with Spinach and Mushrooms appeared first on Never. Not. Eating..
]]>The post Heirloom Tomato, Pesto and Ricotta Tart appeared first on Never. Not. Eating..
]]>
When I was a kid, I would (regularly) eat an entire tomato, one bite at a time, sprinkling on salt between mouthfuls. I knew what was up. My love for tomatoes hasn’t changed in the least. I honestly don’t even believe in sandwiches without them. That may be why I developed this fresh, juicy, delicious, tomato-forward tart that screams summer and brings me back to my childhood. Try it out if you were anything like me as a child (or adult).

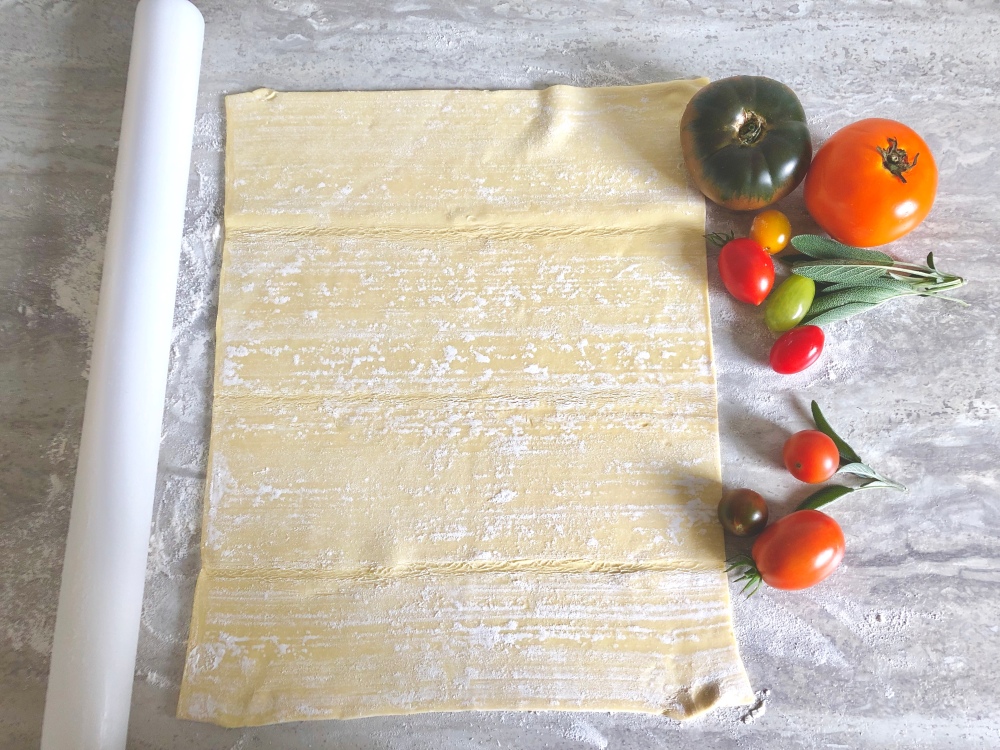
Let’s start with the star of the show – Tomatoes. You really can use any kind for this recipe, however, I really love the colour variance that heirloom tomatoes provide…It makes the tart look stunning. I prefer to use a range of sizes as well…from the large, funny-shaped ones to the teeny, tiny, mini ones. If you make this tart in the summer, heirloom tomatoes are the way to go. If it is past their season though, it would be better to use your regular supermarket hybrid tomato, as heirlooms don’t travel well.

Secondly, pesto. Traditionally, a delicious mix of basil leaves, pine nuts, garlic, lemon juice, olive oil, salt and parmesan cheese. I make a vegan-style pesto that I prefer to use with this recipe (click here for the recipe), but you can use your favourite one. Store bought is a good option throughout the winter.

The Puff – the base of this tart is made with puff pastry. This stuff is magic. A little heat and it rises up, turns golden brown and develops crispy edges that are drool-worthy. You can buy it in the freezer section of any grocery store. Just take one sheet out of the freezer about an hour before making this recipe to allow it to defrost.
Finally – ricotta. An italian triumph and a perfect pair for tomatoes. Spread over the tart at your own will. No one should limit your ricotta intake.

Let’s get to it!

Heirloom Tomato, Pesto and Ricotta Tart
Servings: 6
Prep time: 15 minutes
Cook time: 30 minutes
Ingredients:
- 1 sheet of puff pastry, thawed
- 1/2 cup ricotta
- 5-7 tbsp my Lemony Vegan Basil Pesto (or store-bought)
- tomatoes (3 large, 1 medium, 10-15 cherry tomatoes)
- flaky sea salt
- fresh basil
Instructions:
- Preheat oven to 400 degrees F.
- On a lightly floured surface, roll the puff pastry out until it is about 1/4 of an inch thick and in a rectangular shape. Transfer dough to a parchment lined baking sheet.
- Spread the ricotta evenly over the pastry.
- Spoon 2-3 tablespoons of basil pesto over the ricotta layer.
- Begin placing your tomatoes, filling in the gaps with the smaller cherry tomatoes, and leaving a 1-inch border all the way around.
- Drizzle another 2-3 tablespoons of pesto overtop of the tomato layer.
- Fold the border of the pastry overtop of the tomatoes and pinch at the corners. Brush another tablespoon or two of pesto onto the edges of the puff pastry.
- Bake in the oven for 30 minutes, or until pastry has puffed up and is golden brown in colour.
- Remove from oven and sprinkle some flaky sea salt over top.
- Let cool for 5 minutes before slicing with a pizza cutter. Top with fresh basil and a few more drizzles of pesto (optional).
The post Heirloom Tomato, Pesto and Ricotta Tart appeared first on Never. Not. Eating..
]]>