The post Gluten-Free Zucchini Galette appeared first on Never. Not. Eating..
]]>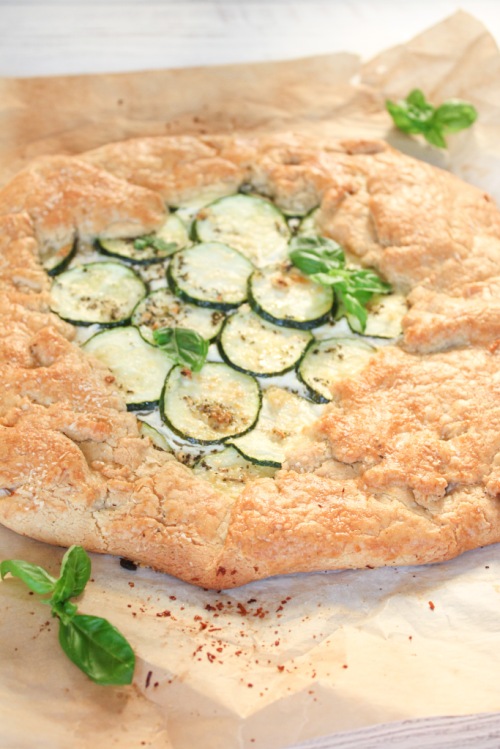
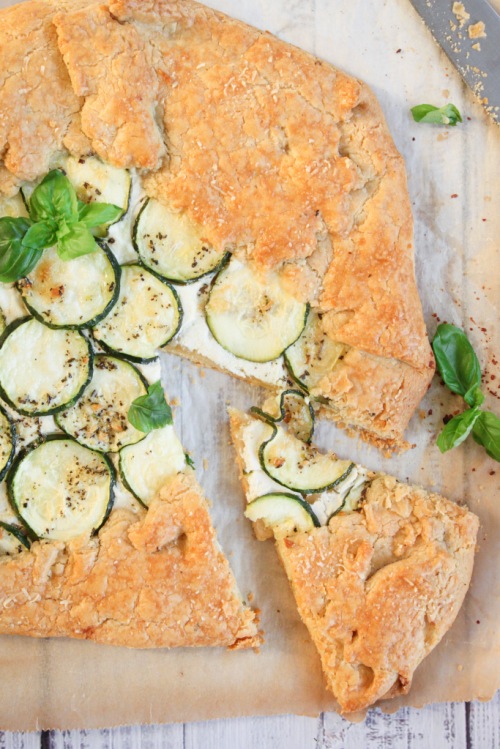
If you know me, you know I love a good galette. And I love mixing it up and creating both sweet and savoury galettes. I’ve tried everything from stone fruit to tomato to apple, and now, zucchini! You can literally wrap any produce in flaky pastry and 90% of the time it will be tasty. WORD.
I decided to make this galette gluten-free, mostly because I avoid gluten as much as I can, but also because I just bought an All-Purpose Gluten-Free Flour by Bob’s Red Mill that I was really excited to try. Of course, anything made with gluten-free flour has a different taste than that made with regular, wheat flour, but I must say, I was impressed with how this crust held together and how flaky it was. If you eat regular wheat flour, feel free to swap in some all-purpose in it’s place!
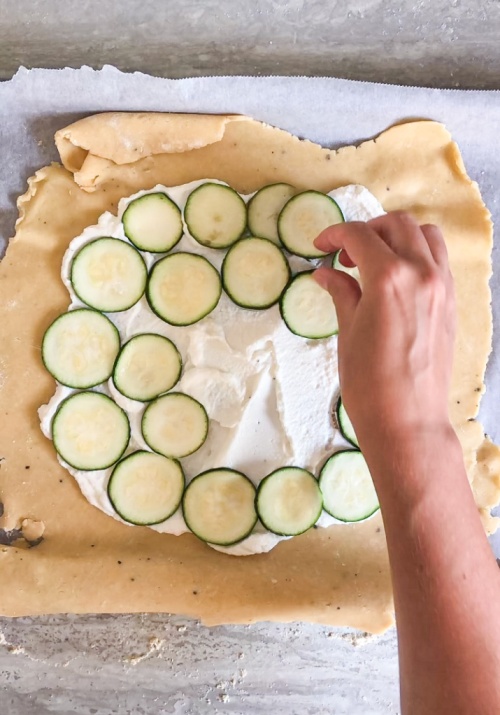
Let’s talk filling – Smooth, lemony ricotta. This is my favourite part. Extra creamy ricotta with lemon juice and zest, salt and pepper whipped together to make the dreamiest of beds for the lucky zucchini. Smear the crust with as little or as much as you want. The addition of lemon brings a brightness to the dish that makes it perfect for Spring or Summer.
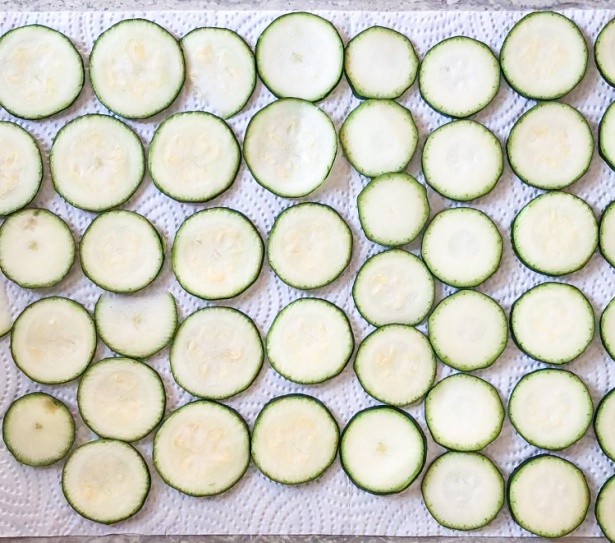
The leading actress here is the zucchini. A few important tips that will help you achieve the ideal galette would be to slice the zucchini about a quarter of an inch thick, making sure they are all the same thickness, place the slices onto paper towels for 30 minutes before assembling your tart and salt them well. This allows the (abundant) excess water to be pulled out, avoiding a soggy mess.

The dough – Finally, let’s talk about the dough. I used to be intimidated when making pastry dough, but it’s actually quite an easy skill to master. The most important part of pastry is to use very cold butter. If the butter is cold, it melts down slower into the flour and, in turn, creates air pockets, which make for flaky pastry. To ensure your butter is perfect, cut it into cubes and store it in the fridge up until you need to use it. After combining it with the flour and forming a disc shape, wrap it in plastic wrap and return it to the fridge to firm up again. After I roll out the dough and assemble the galette, I like to pop it in the fridge yet again for ten minutes. Tip: Assemble your galette, put it in the fridge and set your oven. When your oven is ready, the galette can go right from your fridge to that 400 degree heat!
That’s it…Not too complicated, right?!
Gluten-Free Zucchini Galette
Serving size: 4
Prep time: 15 minutes
Chill time: 30 minutes
Cook time: 30 minutes
Ingredients:
For the crust:
- 1 1/2 cups gluten-free flour
- 1/2 tsp salt
- 1/4 tsp black pepper
- 1/3 cup parmesan cheese, grated, plus more for topping
- 3/4 cup cold butter, cubed
- 1 tbsp white vinegar
- 3-5 tbsp ice-cold water
For the ricotta filling:
- 1 cup ricotta cheese (I use extra creamy)
- zest of one lemon
- 1 tbsp lemon juice
- a few grinds black pepper
- pinch of salt
- 1 small zucchini, sliced into 1/8-inch rounds
- 2 tbsp olive oil
- 1/2 tsp dried basil
- 1 clove garlic, minced
- 1 egg, beaten
Instructions:
For the crust:
- To a food processor, add the flour, salt and pepper and pulse a few times to combine. Add parmesan cheese and the cold butter and pulse again until dough resembles small pea shape crumbs (see photo). Add vinegar and two tablespoons of ice cold water and pulse. Continue to add water, one tablespoon at a time, until dough begins to come together. Typically, I use around four tablespoons in total. Dump the dough onto a piece of plastic wrap, form into a disc and then wrap and place in fridge to chill for 30 minutes.
- Prepare the zucchini by laying the rounds onto paper towels and sprinkling salt on the tops to draw out any excess water. Let sit for at least 30 minutes.
For the ricotta filling:
- To a small bowl, add the ricotta, zest, lemon juice, pepper and salt and mix to combine. Place in the fridge until ready to assemble.
For the rest of the galette:
- Combine olive oil, basil and garlic in a small bowl. Set aside.
- Flour your work surface and remove the dough from the fridge. Roll out into a circle about 1/4-inch thick. Carefully transfer the dough to a parchment lined baking sheet.
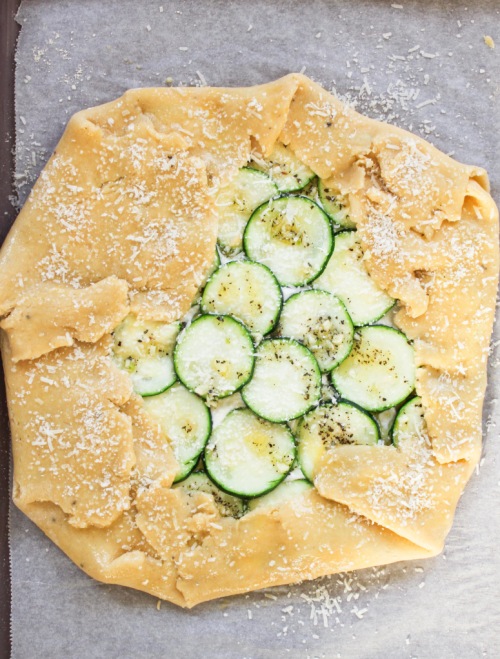
- Spread the ricotta mixture onto the dough, leaving a 2-inch border all the way around. Arrange the zucchini slices on top of the ricotta. Drizzle the olive oil mixture on top of the zucchini. Fold over the edges of the pastry. Preheat your oven to 400 degrees Fahrenheit and transfer the galette to the fridge for 10 minutes, or until the oven is ready. Right before placing the galette into the oven, brush the exposed pastry edges with the egg wash and sprinkle on some extra parmesan cheese, if desired. Bake for 25-30 minutes, or until galette is golden brown in colour.
The post Gluten-Free Zucchini Galette appeared first on Never. Not. Eating..
]]>The post Butternut Squash and Kale Lasagne Roll-Ups appeared first on Never. Not. Eating..
]]>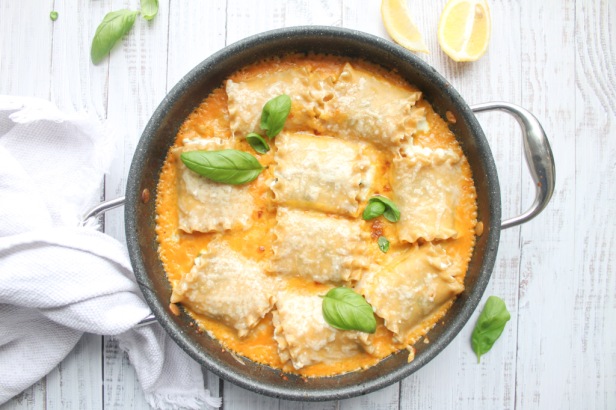
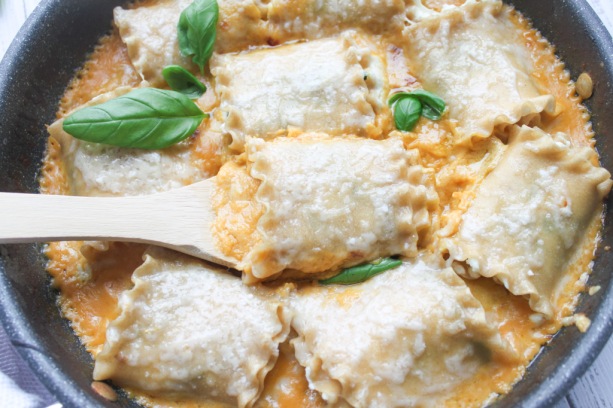
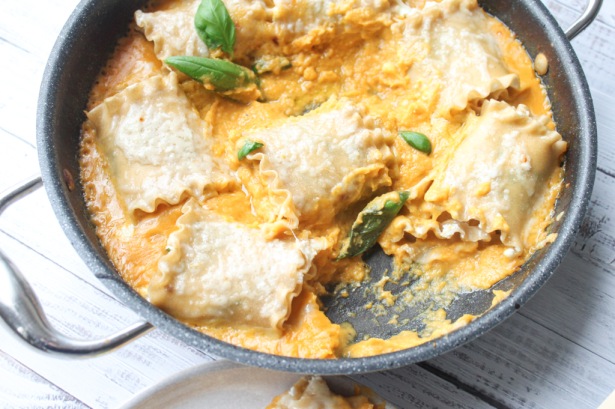
Thaz right. The layers in this lasagne aren’t lookin’ like a sedimentary rock, nuh uh. They are more like a snail shell. Yah feel me?!
This is a lasagne revolution – the pasta sheet laid out, smothered with the toppings and then rolled up into a cute little present that takes a bath in squash. I mean sauce. I mean squash sauce. And, although I love the standard tomato sauce with all of my heart, squash sauce is my side piece and needs attention, too.
Okay, for reals – this lasagne dish is everything. It starts with the creamy sauce. Roasted butternut squash, pureed and then hit with some garlic, coconut milk and flavourful pasta water – an important ingredient for any great sauce. Nutritious kale and fluffy, whipped ricotta cheese on top of a perfectly cooked lasagne noodle, rolled up and finished off together in the oven with some extra parm on top for that nuttiness. DROOL.
This should be your next pasta night recipe.
Butternut Squash and Kale Lasagne Roll-Ups
Servings: Makes 10 rolls (feeds about 3 people)
Prep time: 20 minutes
Cook time: 50 minutes
Ingredients:
- 1 large butternut squash, diced into 1/2 inch cubes
- olive oil
- salt
- pepper
- 5 large kale leaves, thick stem removed (I prefer Tuscan Kale)
- 2 cups ricotta cheese
- 1 tbsp fresh lemon juice + more for serving (optional)
- 1 cup vegetable stock
- 1/4 tsp fresh (or packaged) nutmeg
- 10 lasagne sheets
- 2 cloves garlic, minced
- 1 cup canned coconut milk
- 1 cup fresh parmesan or mozzarella cheese, shredded
- fresh basil for topping (optional)
Instructions:
- Preheat your oven to 400 degrees Fahrenheit.
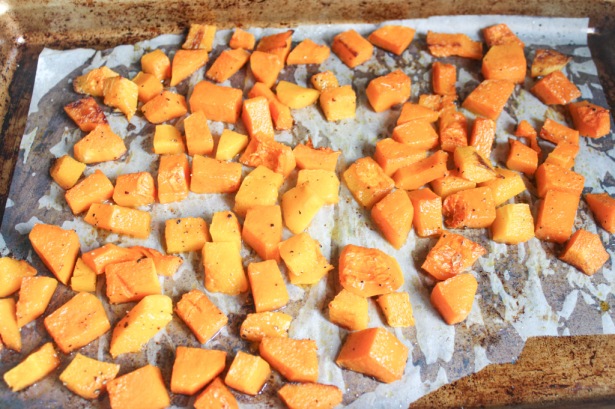
- Place the squash onto a parchment lined baking sheet. Drizzle with 1-2 tbsp olive oil and add a generous pinch of salt and a few grinds of fresh black pepper. Toss with your hands until coated and roast in the oven for 25-30 minutes, flipping once throughout the cooking time. Squash should be tender throughout.
- Lower the oven to 350 degrees Fahrenheit.
- While the squash is cooking, prepare your other ingredients. Chop the kale into small, bite-size pieces and massage with a little bit of olive oil. This helps to tenderize the kale.
- Use an electric mixer to beat the ricotta with 1 tbsp of lemon juice and a pinch of salt and pepper. Whip until smooth.
- Add the cooked squash to a food processor with the vegetable stock, nutmeg, 1/2 tsp salt and 1/4 tsp pepper. Blend until smooth.
- In the meantime, bring a large pot of heavily salted water to a boil and add the lasagne sheets. Cook according to package directions. Reserve 1/4 cup of the pasta water before draining.
- Set a large, oven-safe saucepan over medium-low heat and add 2 tbsp olive oil. Add the garlic and cook for 30 seconds, or until fragrant. Immediately add the squash puree from your food processor as well as the reserved pasta water and let simmer for 5 minutes, stirring frequently. Pour in the coconut milk and stir until smooth.
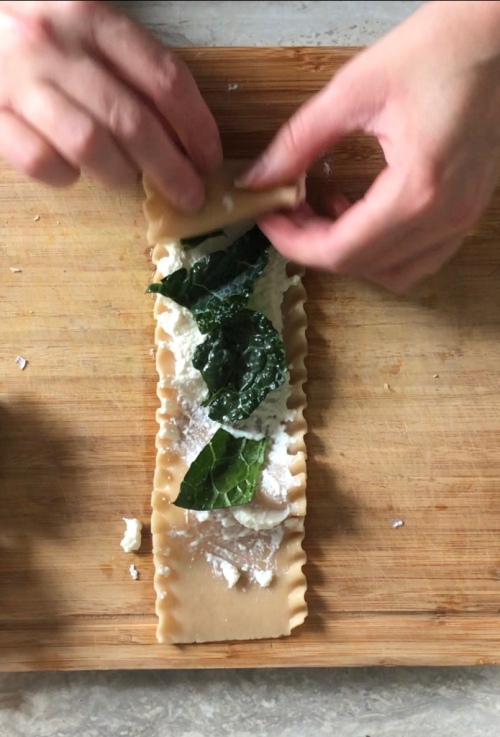
- Make the rolls by taking a sheet of the cooked lasagne, spreading the ricotta mixture on it, topping with a few pieces of kale and then rolling it up, starting at one end and working your way to the other. Tuck the roll into the squash sauce, placing the side with the seam down. Do this for all of the rolls.
- Evenly distribute the cheese overtop of the rolls and sauce. Bake in the oven for 10 minutes, or until the cheese is fully melted. Remove and let cool a few minutes before serving. Top with fresh basil and a squeeze of lemon!
The post Butternut Squash and Kale Lasagne Roll-Ups appeared first on Never. Not. Eating..
]]>The post Easy Butternut Squash Fettuccine “Alfredo” with Whipped Ricotta appeared first on Never. Not. Eating..
]]>- Smooth and rich like an alfredo but without the dairy and calorie count
- Vegetable bonus blended right into the sauce
- A lot less fat content than regular alfredo
- Cloud-like whipped ricotta (okay, it’s dairy, but some things are just worth it)
That is all. Hopefully you are convinced.

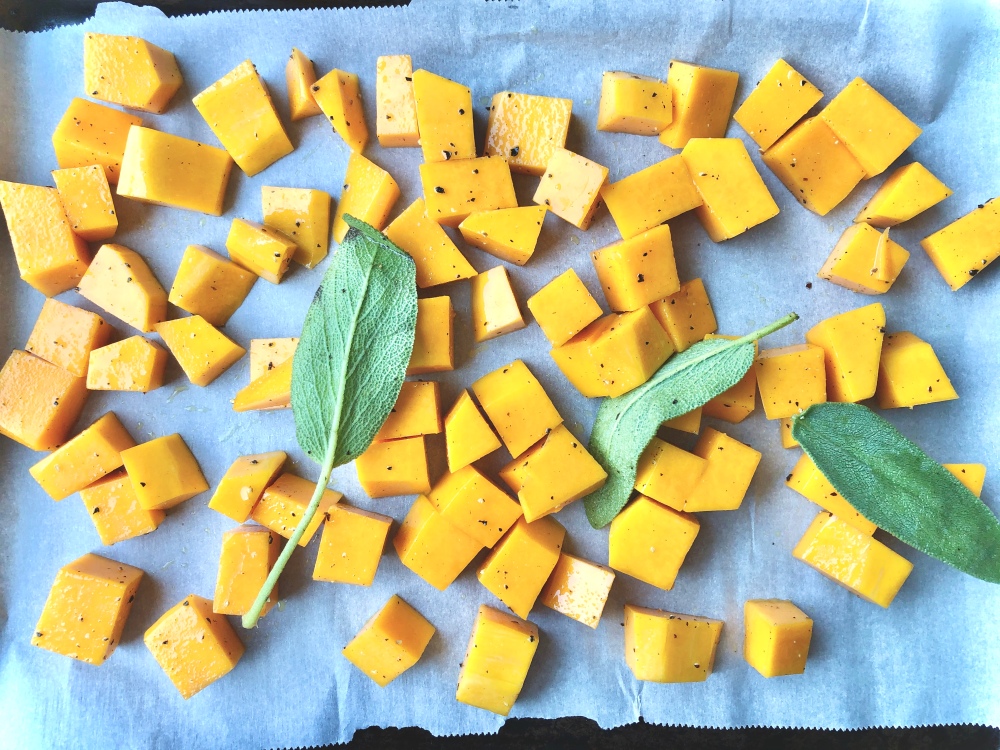
This recipe starts like any good vegetarian recipe – with a few cups of roasted vegetables. So sharpen your knife and start cubin’ up that butternut squash, add a few sage leaves, do the drizzy with some EVOO and season with S & P! Pop it in the oven and forget about it (well, for 20 minutes, until you have to give ’em a toss)!
In the meantime, throw some fettuccine into a pot of heavily salted boiling water and cook until al dente.
When the squash is slightly caramelized and tender, remove from oven and let’s start the transformation from solid –> liquid(ish). Grab your blender – I use my Ninja for everything…it is A.M.A.Z.I.N.G. – transfer the squash and some veggie stock and blend until smooth.
On the same sheet tray that you had the squash on, add two tablespoons of breadcrumbs and a quarter cup of chopped walnuts and put back into the oven to toast up. This only takes a few minutes, so watch carefully! When browned, remove from oven and toss in a few finely chopped sage leaves and some melted butter and set aside…YUM.
Let’s continue shall we…I’m drooling. Okay – grab a pan, heat some olive oil and saute some diced shallots until transparent. Add in a few cloves of minced garlic and it’s ready for the sauce. Pour in the butternut squash puree and add some more stock to the pan, cooking and stirring until smooth and combined.
Next, add half of a cup of canned coconut milk and simmer for a few minutes until sauce has thickened.
While the sauce is finishing, grab your ricotta from the fridge and beat with a hand mixer with 1 tablespoon of freshly squeezed lemon juice, a pinch of salt and a few grinds of pepper. Whip until it is smooth and creamy and spreadable and marvelous.

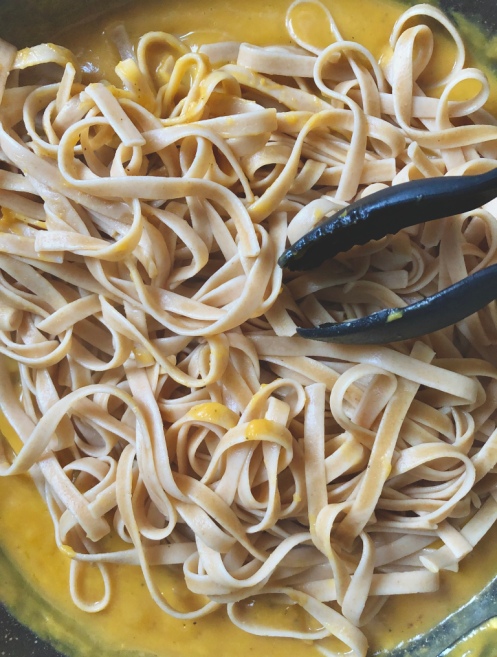
The Grand Finale: When the sauce coats the back of a spoon, it’s ready for it’s best friend – pasta – to join it in the pan. Toss the pasta around with a pair of tongs and be sure to coat every last strand with that velvety sauce. Turn the heat off and add a squeeze of lemon juice to bring it altogether.
Plating: Start with the whipped ricotta. Maybe even be fancy and make a little “swoop” on your plate!

Next, add the fettuccine, and then top with the bread crumb/walnut mixture. And now it’s time to manger, manger (that’s French, mmmm kay?!)!

One question – Are you a “use a spoon to assist in the delicate twirling of the noodles around your fork” kind of person, or a “shove noodles in mouth as quickly as possible, I’m not worried about whether they are hanging from my mouth” kind of person? Because I’m definitely number two.

^ A twirling attempt…strictly for pictures.
Easy Butternut Squash Fettuccine “Alfredo” with Whipped Ricotta
Servings: 4
Prep time: 15 minutes
Cook time: 40 minutes
Ingredients:
- Olive oil
- 3 cups of butternut squash, cubed
- 6-8 sage leaves, separated
- 325 g fettuccine (or 4 serving sizes)
- 1/2 cup ricotta cheese
- 1.5 tablespoons fresh lemon juice, separated
- 2 tbsp bread crumbs
- 1/4 cup walnuts, finely chopped
- 1 tbsp butter, melted
- 1 cup vegetable stock, separated
- 1 shallot, finely diced
- 2 cloves garlic, minced
- 1/2 cup canned coconut milk
- salt and pepper to taste
Instructions:
- Preheat oven to 375 degrees F.
- Line a baking sheet with parchment paper and add squash, 1 tbsp olive oil, 3-4 sage leaves, a few pinches of salt and some fresh black pepper and toss to coat. Place in the oven and roast for 30-40 minutes or until you see slightly caramelized edges and squash is fork-tender.
- Meanwhile, bring a pot of heavily salted water to a boil and add fettuccine. Cook until the pasta is al dente (according to package directions…or taste one)! Reserve one quarter cup of the pasta water and then drain the fettuccine and set aside.
- For the whipped ricotta: Add ricotta, 1 tablespoon of lemon juice and a pinch of salt and pepper to a medium bowl. Use a hand mixer and whip on medium speed until ricotta is smooth and fluffy – about 3-4 minutes. Place in fridge to keep cool.
- For the crumb topping: On a baking sheet lined with parchment paper, toast the bread crumbs and walnuts in the oven for about 5-8 minutes, or until golden brown. Watch carefully so they don’t burn. Remove from oven and add 3-4 finely chopped sage leaves and the melted butter. Toss and set aside.
- When the squash is done cooking transfer to a blender (don’t discard the sage leaves, transfer to blender as well) and add 1/2 cup of vegetable stock. Blend until smooth.
- Heat a tablespoon of olive oil in a large pan over medium-low heat. Add the shallot and saute for a few minutes until it starts to turn translucent. Add the garlic and cook for 30 seconds, or until fragrant. Pour the blended squash into the pan and add the quarter cup of pasta water and the other 1/2 cup of stock, stirring for a few minutes until smooth. Add the coconut milk and simmer until it thickens and coats the back of a metal spoon. Squeeze a bit of lemon juice overtop of the sauce and then add the pasta. Turn the heat off and toss the pasta around until coated with the sauce.
- To plate, spread some whipped ricotta on the bottom of your plate. Add the pasta on top and then sprinkle with the bread crumb/walnut crumble. Bravo!
The post Easy Butternut Squash Fettuccine “Alfredo” with Whipped Ricotta appeared first on Never. Not. Eating..
]]>The post Heirloom Tomato, Pesto and Ricotta Tart appeared first on Never. Not. Eating..
]]>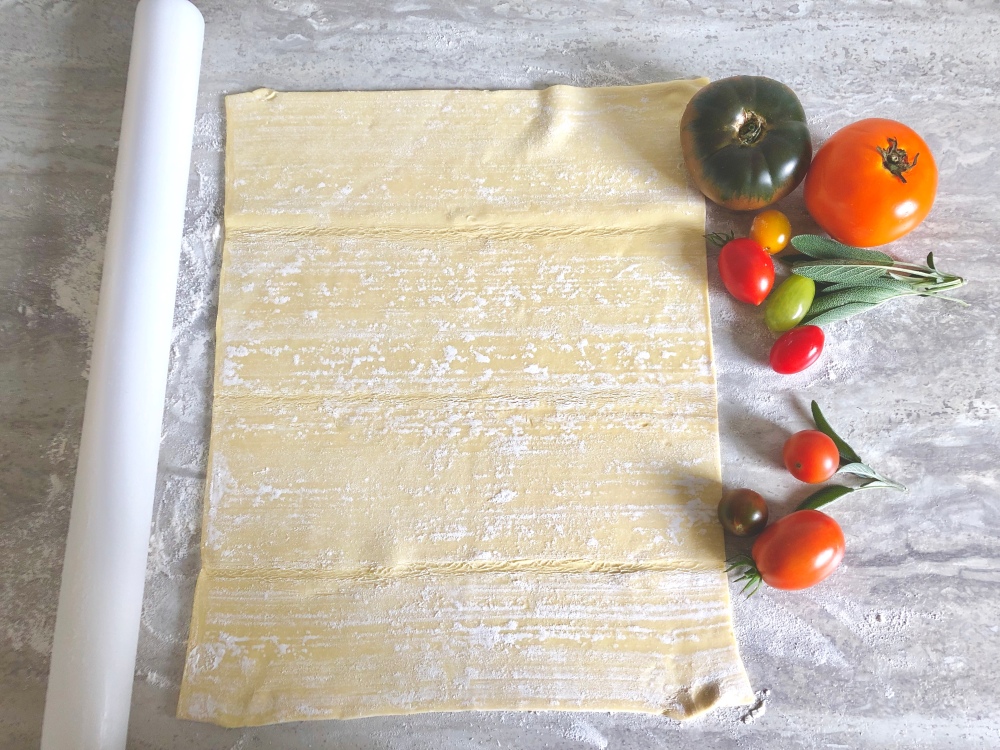
When I was a kid, I would (regularly) eat an entire tomato, one bite at a time, sprinkling on salt between mouthfuls. I knew what was up. My love for tomatoes hasn’t changed in the least. I honestly don’t even believe in sandwiches without them. That may be why I developed this fresh, juicy, delicious, tomato-forward tart that screams summer and brings me back to my childhood. Try it out if you were anything like me as a child (or adult).

Let’s start with the star of the show – Tomatoes. You really can use any kind for this recipe, however, I really love the colour variance that heirloom tomatoes provide…It makes the tart look stunning. I prefer to use a range of sizes as well…from the large, funny-shaped ones to the teeny, tiny, mini ones. If you make this tart in the summer, heirloom tomatoes are the way to go. If it is past their season though, it would be better to use your regular supermarket hybrid tomato, as heirlooms don’t travel well.

Secondly, pesto. Traditionally, a delicious mix of basil leaves, pine nuts, garlic, lemon juice, olive oil, salt and parmesan cheese. I make a vegan-style pesto that I prefer to use with this recipe (click here for the recipe), but you can use your favourite one. Store bought is a good option throughout the winter.

The Puff – the base of this tart is made with puff pastry. This stuff is magic. A little heat and it rises up, turns golden brown and develops crispy edges that are drool-worthy. You can buy it in the freezer section of any grocery store. Just take one sheet out of the freezer about an hour before making this recipe to allow it to defrost.
Finally – ricotta. An italian triumph and a perfect pair for tomatoes. Spread over the tart at your own will. No one should limit your ricotta intake.

Let’s get to it!

Heirloom Tomato, Pesto and Ricotta Tart
Servings: 6
Prep time: 15 minutes
Cook time: 30 minutes
Ingredients:
- 1 sheet of puff pastry, thawed
- 1/2 cup ricotta
- 5-7 tbsp my Lemony Vegan Basil Pesto (or store-bought)
- tomatoes (3 large, 1 medium, 10-15 cherry tomatoes)
- flaky sea salt
- fresh basil
Instructions:
- Preheat oven to 400 degrees F.
- On a lightly floured surface, roll the puff pastry out until it is about 1/4 of an inch thick and in a rectangular shape. Transfer dough to a parchment lined baking sheet.
- Spread the ricotta evenly over the pastry.
- Spoon 2-3 tablespoons of basil pesto over the ricotta layer.
- Begin placing your tomatoes, filling in the gaps with the smaller cherry tomatoes, and leaving a 1-inch border all the way around.
- Drizzle another 2-3 tablespoons of pesto overtop of the tomato layer.
- Fold the border of the pastry overtop of the tomatoes and pinch at the corners. Brush another tablespoon or two of pesto onto the edges of the puff pastry.
- Bake in the oven for 30 minutes, or until pastry has puffed up and is golden brown in colour.
- Remove from oven and sprinkle some flaky sea salt over top.
- Let cool for 5 minutes before slicing with a pizza cutter. Top with fresh basil and a few more drizzles of pesto (optional).
The post Heirloom Tomato, Pesto and Ricotta Tart appeared first on Never. Not. Eating..
]]>