The post Gluten Free Stone Fruit Galette appeared first on Never. Not. Eating..
]]>
I’m sadly shedding a tear over here as stone fruit season is slipping away. It feels like peaches have only been around for a few weeks, so I’m not sorry that I am bombarding you with a million recipes. And, you need to make this one NOW, before the peaches are gone and it’s too late – get on it!
WHAT IS A GLUTEN FREE STONE FRUIT GALETTE?
If you’ve been following my blog for a while, first of all thank you, I love you, secondly, you know I do a lot of gluten-free stuff and this galette is no exception. Sometimes people think things that are gluten-free don’t taste as good as the glutinous stuff, but I’m here to tell them they’re wrong – WRONG! This crust is still flaky and delicious. So, if taste isn’t compromised, and you had to choose between a gluten-free dessert or a wheat flour dessert…Which one are you going for? I thought so.
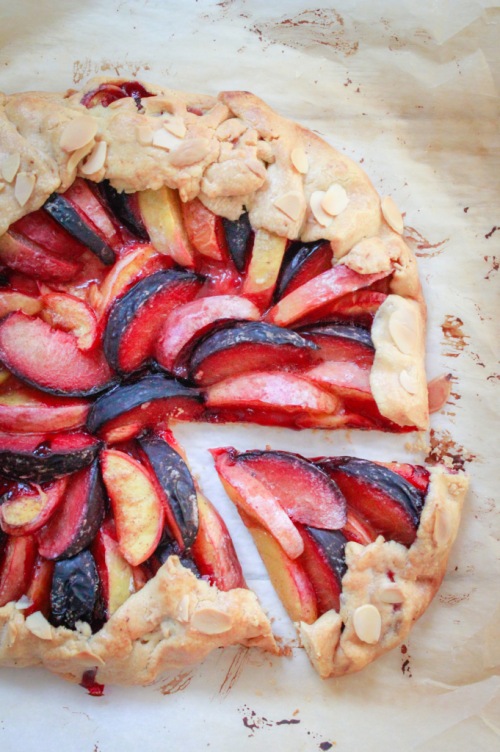
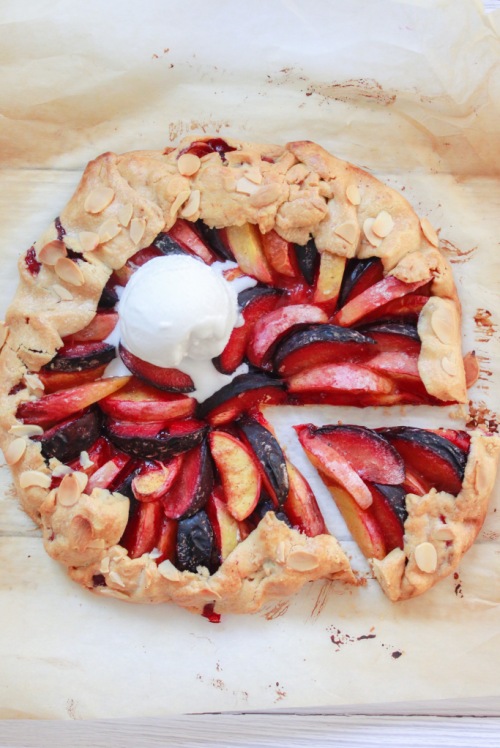
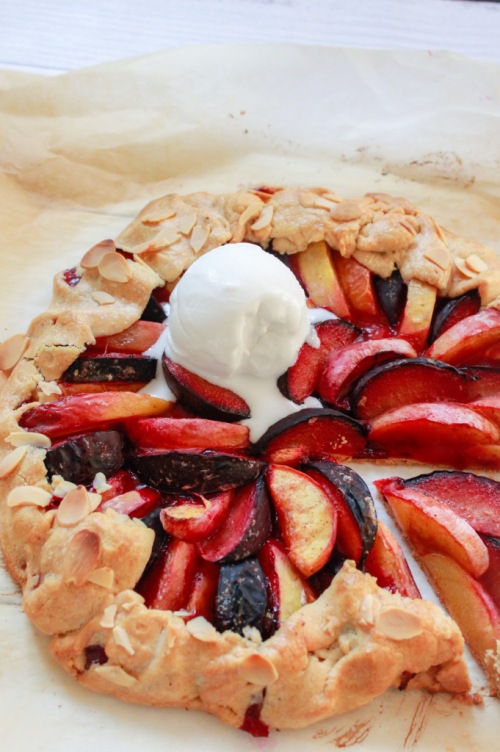
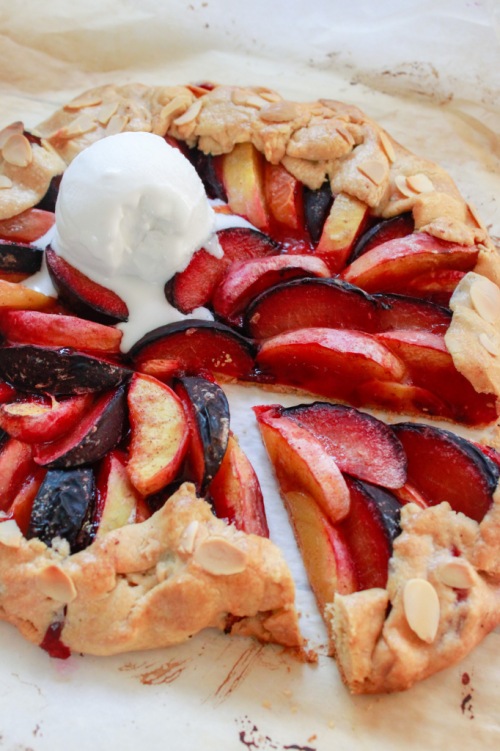
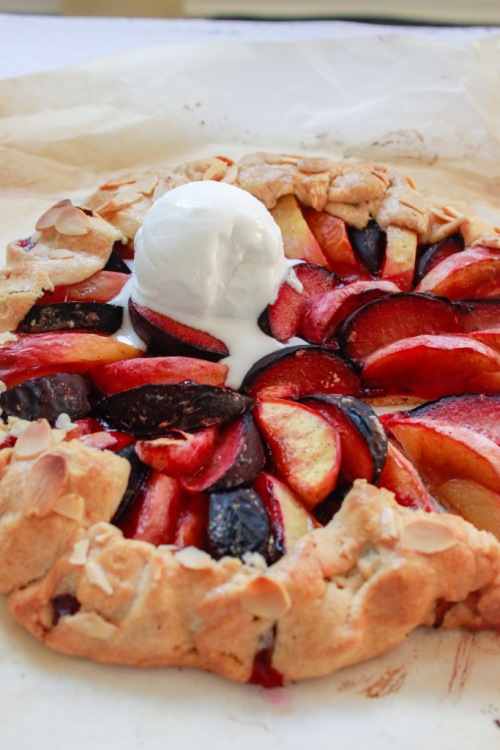
Let’s start by talking about stone fruit. If you are unsure, stone fruit is any fruit with a stone in it. We’re talkin’ peaches, nectarines, plums, cherries, apricots, etc. – you can literally use any of those for this galette. My only recommendation is, if you choose to use apricots, you should add a tablespoon or two of sugar to the fruit as fresh apricots can be very tart. I chose to use peaches, nectarines and plums as those fruits are currently at their peak where I live.
THE PASTRY DOUGH
I think making pastry intimidates people. It intimidates me sometimes, which is why I am always stunned when it turns out so well. Despite being gluten-free, this crust is still everything a great crust should be – flaky, buttery, light, golden. It also rolls out so easily. It’s worth a shot, gluten-free or not – did you catch the rhyme?
WHY SHOULD YOU MAKE THIS GLUTEN FREE STONE FRUIT GALETTE?
If you aren’t convinced to make this yet, I have one further piece of information that may help – TIME. It takes hardly any of it. Seriously, I can understand looking at something like a galette and thinking, “that looks too intense for me,” but this isn’t like that – I promise. The dough takes about 5 minutes to put together, and then it chills in the fridge for 30 minutes. The fruit just needs to be chopped and mixed with a few simple ingredients and also needs to sit for a bit. After that, all you need to do is roll out the dough, place the fruit on top and bake – easy peasy.
THE INGREDIENTS
Like I said, this galette is so easy to make. Moreover, it requires minimal ingredients that come together quickly. Here’s what you need to pick up from your grocery store (like, today!):
For the crust:
- Gluten-Free All Purpose Flour (I prefer Bob’s Red Mill)
- Salt
- Butter
For the Filling:
- Stone fruit of your choice (peaches, plums, nectarines, etc.)
- Cornstarch
- A lemon
- Cinnamon
- Nutmeg
- Salt
- An egg (for the egg wash)
- Sliced almonds (to top, optional)
OTHER MUST-TRY GALETTE RECIPES
Strawberry Honey Ginger Galette (for a unique dessert when you’re feeling sassy)
Gluten Free Zucchini Galette (another fun option, but this time – savoury)
TOOLS NEEDED TO MAKE THIS GLUTEN FREE STONE FRUIT GALETTE
Click on the images below to see what I use for this recipe.


This post contains affiliate links and I may earn a small commission when purchases are made after clicking the links, at no cost to you – Thank you!
GLUTEN FREE STONE FRUIT GALETTE
Serving size: 8-10
Prep time: 15 minutes
Chill time: 30 minutes
Cook time: 30 minutes
Ingredients
For the crust:
- 1 1/4 cup gluten-free flour
- 1/2 tsp salt
- 3/4 cup cold unsalted butter, cubed
- 1 tbsp vinegar
- ice-cold water
For the filling:
- 4 cups of stone fruit (approximately 5-6 medium-sized fruits, I used 2 peaches, 1 nectarine and 2 plums)
- 1 tbsp cornstarch
- 1 tbsp lemon juice
- 1/2 tsp cinnamon
- pinch of nutmeg
- pinch of salt
- 1 egg, beaten
- 2 tbsp slivered almonds (optional)
Instructions
For the crust:
- Add the flour and salt to a food processor and pulse a few times to combine. Toss in the cold cubed butter and pulse again until dough resembles small peas. Add the vinegar and one tablespoon of ice-cold water and pulse. If needed, add more water, half tablespoon at a time until larger pieces of dough come together – this usually takes me 1.5 to 2 tablespoons of water to achieve. Be careful not to add too much water or dough will be too sticky.
- Turn dough out onto a piece of plastic wrap and use your hands to form dough into a disc. Wrap and place in fridge to chill for 30 minutes.
For the filling:
- Add all of the filling ingredients to a bowl and stir to combine. Set aside while the dough finishes chilling.
Assembling:
- Firstly, make sure you flour your work surface well. Place the dough on floured surface and sprinkle more flour on top of the dough, as well as on your rolling pin. Roll out dough to about 1/4-inch thick. Carefully transfer it to a parchment lined baking sheet and arrange the stone fruit slices on top, in a circular formation, leaving a one-inch border all the way around. Fold the edges over the fruit and place the baking sheet back into the fridge, setting the oven to 400 degrees Fahrenheit to preheat.
- When the oven is ready, remove the galette from the fridge and brush the beaten egg over the exposed pastry edges and top with a few sliced almonds, if desired. Bake the galette for 25-35 minutes, or until crust is golden brown. Be sure to let it cool for 5 minutes before serving, as the fruit can be very hot.
NOTES
This galette is best when eaten immediately, but can be stored in an airtight container in the fridge for up to 3 days.
This recipe is less-sweet, so add a tablespoon or two of sugar to the fruit when combining with the other ingredients if you would like a sweeter dessert.
Try with a scoop of vanilla bean ice cream!
The post Gluten Free Stone Fruit Galette appeared first on Never. Not. Eating..
]]>The post Grilled Peaches with Cinnamon Coconut Whipped Cream and a Balsamic Reduction (Vegan & GF) appeared first on Never. Not. Eating..
]]>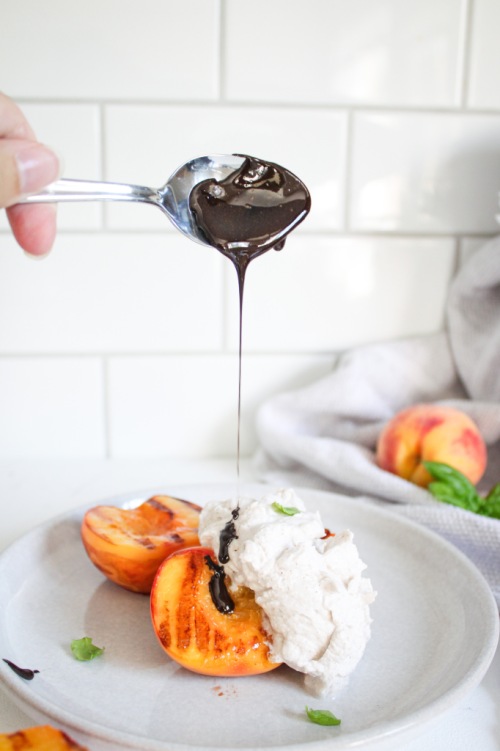
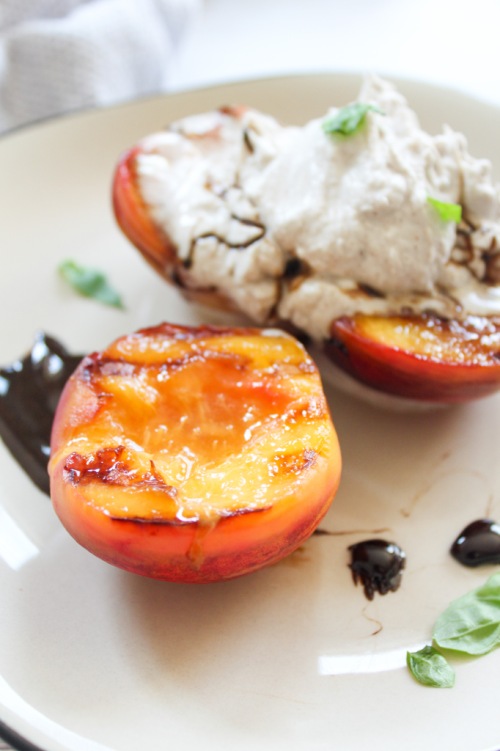
Okay, picture this – you are watching the abnormally late NBA playoffs (thanks, Covid), and you’re eating your wings, nachos and burgs. Halftime comes and you need something sweet. Why not fire up the BBQ and throw on some peaches? Dress them up with some coconut whip cream? A little sweet balsamic reduction? Yes, yes and yes. I vote yes.
Even easier, you can use a cast iron grill pan on your stovetop. I use the one found here, and I love it! It’s perfect for those without a barbeque, or anyone who just wants an easier clean-up. All you need to do is set it over medium-high heat and brush the peaches with olive oil before cooking them for about 2-3 minutes per side. They will still develop those beautiful grill marks that you get on the Q, just with less hassle.
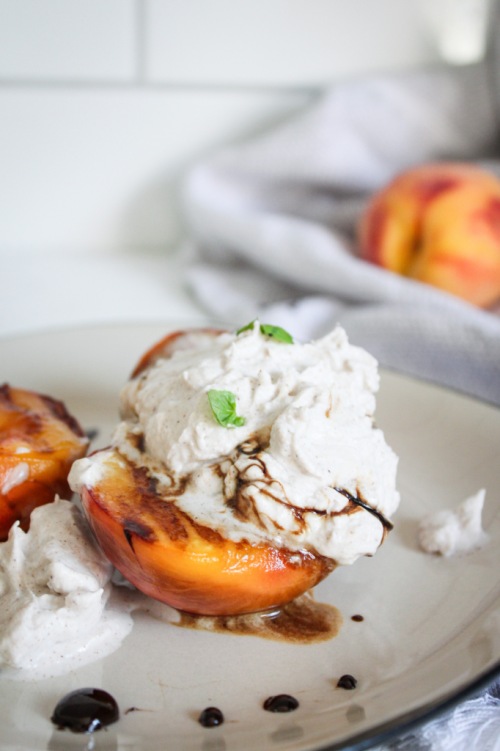
The coconut whip cream is my favourite. As a traditional whip cream lover, finding a vegan alternative was super exciting. This part is a bit tricky, as you need to find a can that solidifies properly when you store it in the fridge. I have found that 365 Everyday Value and Aroy-D are the best for this. To make the whipped cream, place a can of coconut milk in the fridge for at LEAST 24 hours. The longer, the better. Also, try not to shake the can too much before placing it in the fridge. The coconut milk and water will naturally separate, and we want to keep it that way, so shaking it before refrigerating it will slow the process of separation and then solidification.
When it is time to make the whipped cream, place your mixing bowl and mixers into the freezer to get super cold, about 15 minutes before you plan on beginning. Carefully open the can (without shaking) and scoop out the firm top part into your bowl. You will notice a clearer liquid at the bottom of the can (the water) – do not add this to the bowl. Save this and add to a morning smoothie! Add some cinnamon and vanilla to the coconut milk and whip until soft peaks form. Next, add in your sugar – I like to use maple syrup, but you can use powdered sugar as well. Continue beating until stiff peaks form. It is unlikely that they will become as stiff as regular whip cream, but sometimes I put the bowl in the freezer for ten minutes and re-whip for a few more seconds before serving. This usually does the trick!
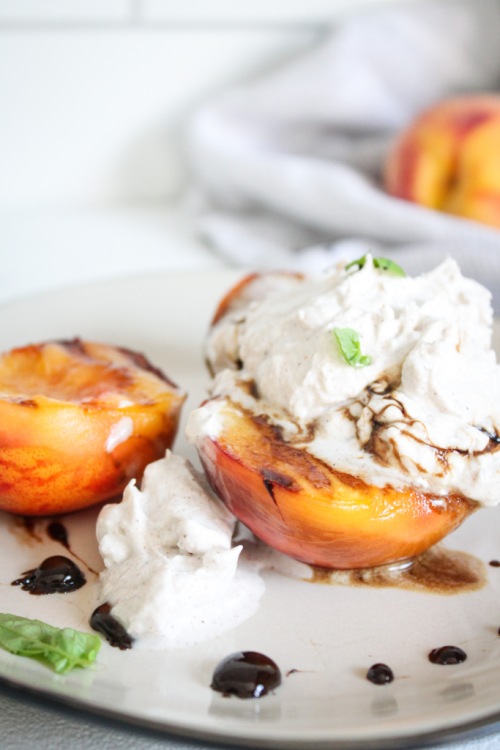
For the balsamic glaze, place some balsamic vinegar with a dash of maple syrup into a small pot and bring to a gentle simmer. Let it reduce for about eight minutes. TIP: Keep the pot over the lowest heat up until you use the reduction, as it cools quickly and becomes very sticky.
Now, grab a plate, put the peaches down, scoop on some whipped cream and drizzle with that lush reduction! It’s the freshest summer dessert one could ask for!
Grilled Peaches with Cinnamon Coconut Whipped Cream and a Balsamic Reduction (Vegan & GF)
Servings: 4
Prep time: 15 minutes
Cook time: 10 minutes
Ingredients:
- 1 14 oz can of full-fat coconut milk (I like Aroy-D and 365 Everyday Value), refrigerated for at LEAST 24 hours
- 1/2 tsp cinnamon powder
- 1/2 tsp pure vanilla extract
- 2 tbsp pure maple syrup (or confectioner’s sugar), divided
- 1/2 cup balsamic vinegar
- 4 peaches, halved and pits removed
- olive oil
Instructions:
- Place a medium bowl and your beaters into the freezer for at least 15 minutes.
- Remove the coconut milk from the fridge and carefully open it, without shaking. Scoop the top, white part into the cold bowl. You will see a clearer liquid at the bottom (the water), DO NOT add this to the bowl (save for morning smoothies). Add the cinnamon and vanilla to the coconut milk and whip on high until soft peaks. Add one tablespoon of syrup (or sugar) and whip again until stiff peaks form.* Place in the fridge while preparing the rest of the recipe.
- To a small pot over medium heat, add the balsamic and the remaining tablespoon of maple syrup. Bring to a gentle simmer and let cook down for about 8 minutes, stirring frequently. Turn the heat to the lowest setting to keep the reduction loose and drizzle-able. It cools quickly and becomes very sticky, so keeping it on the lowest heat prevents it from becoming taffy-like.
- Set your grill to medium-high heat and brush the peach halves with olive oil (I like to use my cast iron grill pan for this). Place the peaches cut side down onto your grill and cook for about 2 minutes, without touching them. Flip and cook for another three to four minutes, or until tender but not too soft.
- Place your peaches on a plate, top with the coconut whipped cream and drizzle with the balsamic reduction!
NOTES:
*Coconut whipped cream will not always create stiff peaks, as regular whipped cream does. It depends on how hot your kitchen is. If your whipped cream is looser, place the bowl back in the freezer for 10 minutes and re-whip for a few seconds when ready to plate.
The post Grilled Peaches with Cinnamon Coconut Whipped Cream and a Balsamic Reduction (Vegan & GF) appeared first on Never. Not. Eating..
]]>The post The Fluffiest Gluten-Free Pumpkin Pancakes appeared first on Never. Not. Eating..
]]>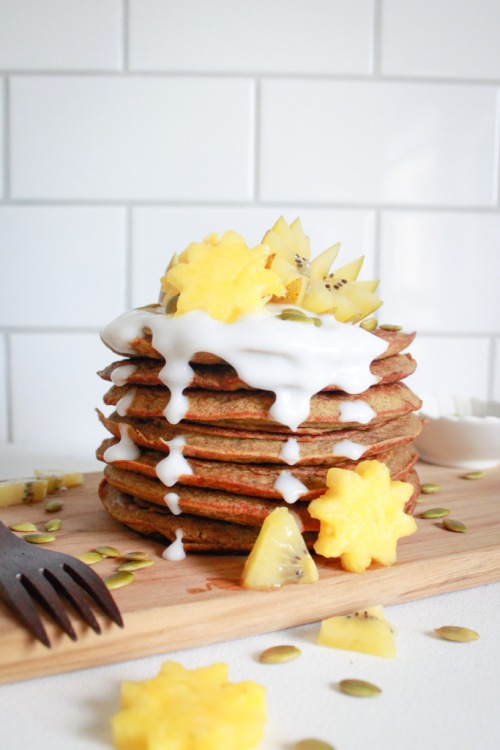
Not only are these pancakes gluten-free, they are also dairy-free and refined sugar-free. You. Are. Welcome.
This recipe was inspired by the extra pumpkin puree that I had after making my favourite pumpkin pasta dish. I hate waste and when I was thinking about what I could use the leftovers for, my brain immediately went to pancakes. Usually when I try recipes for pancakes that are gluten-, dairy- and refined sugar-free, they often turn out flat. It was my goal to create healthy pancakes that taste and look like normal pancakes. I think these are it. And, by “think” I mean “know.” I just didn’t want to sound cocky.

Because these pancakes are refined sugar-free, they are on the less-sweet side. They include the natural sweetness from a banana, but feel free to add some brown or white sugar to the wet ingredients. I, personally like to aggressively drizzle them with maple syrup after they are made and ready-to-eat, and this covers the necessary sweetness!

To start, whisk up all of your dry ingredients. Buckwheat flour, baking powder, baking soda, cinnamon, nutmeg and salt. The use of buckwheat is what makes these pancakes gluten-free. Buckwheat is actually a seed, not a wheat, as the name suggests. The seeds are ground up into a flour. It is my preferred ingredient for pancakes as I have found it to have a similar outcome as regular wheat flour, unlike other gluten-free flours, like almond and coconut.

The wet ingredients include: pumpkin (of course), canned coconut milk, a mashed banana, an egg and some vanilla. These all get whisked together. When combined, add in the dry ingredients and stir until everything has been incorporated. The batter will be thick. Set it aside to allow the ingredients to get to know one another.

When ready, add the batter to a hot pan. I find it easiest to use two spoons to help shape your pancakes the way you would like them. They only need a minute or two on each side until they are ready.

Serve with your toppings of choice. I love fresh fruit on these, cinnamon, and some yogurt. Oh, and pools of maple syrup, of course!
The Fluffiest Gluten-Free Pumpkin Pancakes
Servings: Makes 8 pancakes
Prep time: 5 minutes
Cook time: 10-15 minutes
Ingredients:
- 1 cup buckwheat flour
- 1 tsp baking powder
- 1/2 tsp baking soda
- 1/2 tsp cinnamon
- 1/4 tsp freshly grated nutmeg (or the packaged powder)
- 1/2 tsp salt
- 1/2 cup pure pumpkin puree (not pie filling)
- 1 very ripe banana, mashed
- 1 egg, beaten
- 1 cup canned coconut milk
- 1/2 tsp pure vanilla extract
- Coconut oil
Instructions:
- In a small bowl, whisk the buckwheat flour, baking powder, baking soda, cinnamon, nutmeg and salt together. Set aside.
- In a large bowl, whisk the pumpkin, banana, beaten egg, coconut milk and vanilla together until smooth. Add the dry ingredients and stir until everything has been combined. Batter will be thick. Set aside for a few minutes to allow the flavours to meld.
- Preheat a pan over medium-high heat. Add a tablespoon of coconut oil to grease the pan. Use two spoons to dollop the batter into the pan and to help spread and shape the pancakes. Cook for 1-2 minutes – you will notice the edges begin to set and bubbles begin to form on top – and flip, cooking another minute. Remove from pan and continue with the rest of the batter.
- Serve with your choice of topping – I recommend pure maple syrup, fresh fruit and dairy-free yogurt!
The post The Fluffiest Gluten-Free Pumpkin Pancakes appeared first on Never. Not. Eating..
]]>