The post Pumpkin and Kale Pizza appeared first on Never. Not. Eating..
]]>
When an ingredient comes into season, you better believe I overdo it. Every. Single. Time. But seriously, that’s what we are supposed to do, right?! Eat local, eat seasonal. For our country, for our health.
The greatest part of this pizza is the pumpkin cream sauce. AKA the replacement tomato sauce. Garlic, thyme, homemade pumpkin puree, veggie stock, coconut milk. Simmer, simmer. Yes, please!
The crust – You can definitely buy store bought pizza dough and use that, but making your own dough is SO easy! You can find a recipe for flatbread in my blog post, found here.
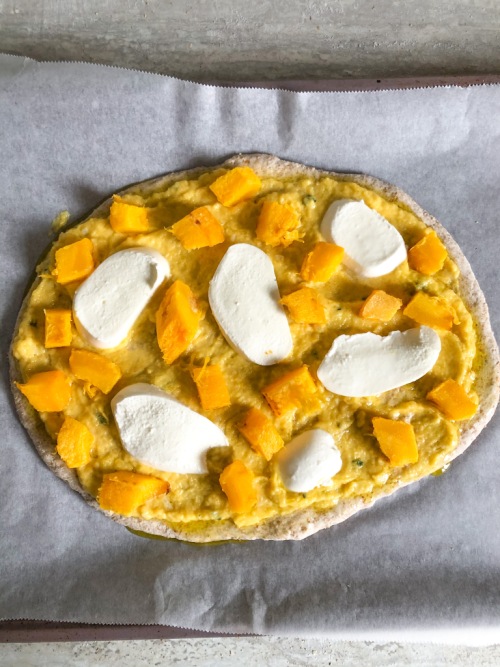
The toppings – Originally, I made this pizza vegan, and I think I preferred it to the next one I made with mozzarella. The option is yours – leave out the cheese to have a completely vegan option (as seen below)!
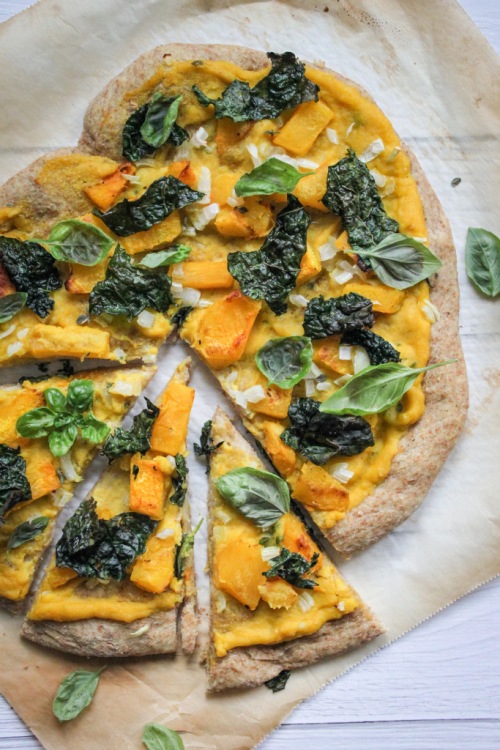
Kale is another key topping here. As I always say, it is important to massage your kale before eating, and that applies to this recipe as well. Sprinkle it with some salt, drizzle with some olive oil and get in there with your fingers! It really helps to tenderize it and make it more pleasing to the palate.
Pumpkin – Along with the pumpkin cream sauce, I have also included roasted pumpkin chunks as a topping in this recipe. They add another layer and texture that does not disappoint and help give this ‘za it’s name!

This may just be a pizza recipe that you aren’t afraid to serve the kids!
Pumpkin and Kale Pizza
Serving Size: Makes 1 large pizza
Prep time: 20 minutes
Cook time: 45 minutes
Ingredients:
- 300 g homemade or store bought pizza dough
- 1 pie pumpkin, seeds removed and sliced into 3/4-inch wedges (or 1/2 cup pumpkin puree and 3/4 cup sliced and cooked pumpkin chunks)
- 2 cloves garlic, minced
- 2 sprigs of thyme, stem removed
- 1/4 cup vegetable stock
- 1/4 cup full-fat canned coconut milk
- 2 leaves of kale, washed, dried and chopped roughly
- 125 g fresh mozzarella, sliced (optional)
- salt
- olive oil
- fresh basil for topping (optional)
Instructions:
- Preheat your oven to 400 degrees Fahrenheit.
- Place your pumpkin wedges onto a baking sheet lined with parchment paper and drizzle with one tablespoon of olive oil and a few pinches of salt. Toss to coat. Roast in the oven for 30 minutes or until fork-tender, flipping halfway. Remove from oven and let cool for a few minutes. Peel the skin off and discard. Increase the oven temperature to 450 degrees.
- Place half of your roasted pumpkin pieces into a food processor or blender and blend until smooth. Slice the other half of the wedges into 1/2 inch pieces and set aside.
- Preheat a medium-sized saucepan over medium-low heat. Add one tablespoon olive oil followed by the minced garlic and thyme. Stir and let cook until fragrant (about 30 seconds). Add in 1/2 cup of the pumpkin puree and the vegetable stock. Stir until combined and let simmer for 2 minutes. Add the coconut milk and a pinch of salt and stir to combine. Let simmer on a low heat until the cream sauce thickens and coats the back of a spoon. Remove from heat.
- Place your kale into a bowl with one teaspoon of olive oil and a pinch of salt. Use your fingers to ‘massage’ the kale for one to two minutes. This helps to tenderize it. Set aside.
- Flour your work surface and roll out your pizza dough. Spoon on the cream sauce and spread it onto the dough until fully covered, leaving a 1/2-inch border all the way around. Distribute your cooked pumpkin pieces and your mozzarella slices (if using) on top of your pizza. Bake in the oven for 5 minutes, remove and add the massaged kale, and return to the oven for another 7-10 minutes or until crust begins to brown on the edges. Remove from oven and let cool for a few minutes before slicing.
- Top with fresh basil, if desired!
The post Pumpkin and Kale Pizza appeared first on Never. Not. Eating..
]]>The post Homemade Peanut Butter appeared first on Never. Not. Eating..
]]>Do you, like me, eat PB by the spoonful?! After work, before the gym, as a snack, in bed…you know, whenever there’s an opportunity? Well then, keep reading!!
I used to go to the grocery store and peruse the health food section, desperately looking for a decent-priced nut butter, but was always disappointed. It’s SO expensive to buy any sort of spread, from peanut to tree nut. I would then be stuck purchasing the normal brand name butters (which are delicious, but who knows what goes into them)?! And then I thought, I should just make my own! How have I never thought of this before??? “How hard could it be?” I asked myself. Not hard. Not hard at all. It’s actually the opposite of hard. And the best part is I know everything that I am putting into my body. Amazing. Sometimes I have good ideas.
So here’s what you need:
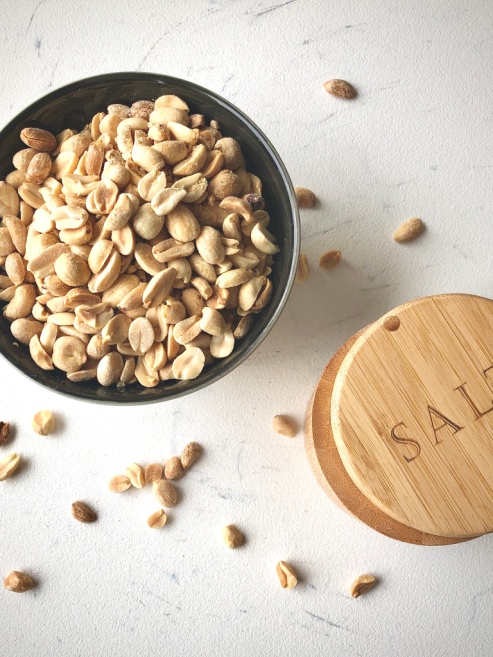
- Peanuts
- Salt
That’s it! Two ingredients. It’s really too good to be true.
So here we go: Put the peanuts in a food processor with the salt and blend. Seven and a half minutes later…DONE. You made peanut butter. No sugars, no stabilizers, no other additives. Just pure legume-y goodness. Yay!
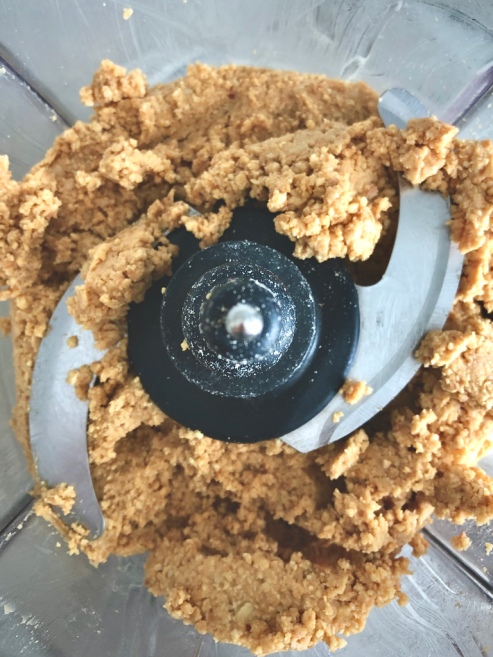
Okay. I’ll break it down a bit more for the non-believers. Step 1: Add about 4 cups of dry-roasted peanuts to a food processor with 1 teaspoon of salt. Pulse a couple of times to break up the peanuts and mix in the salt. It should look something like this:

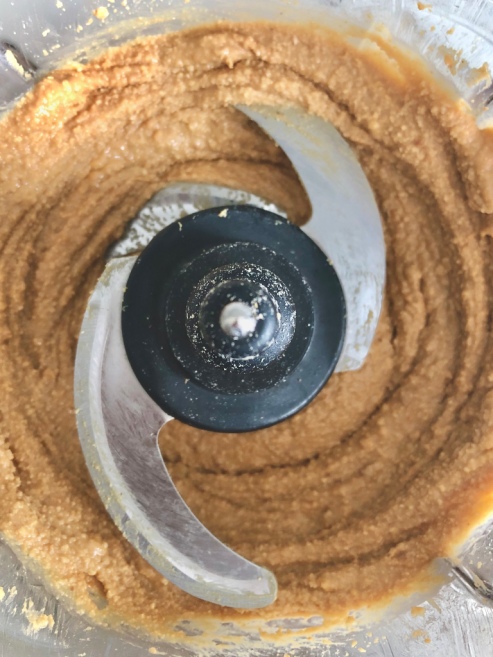
Step 2: Set your food processor to “blend” and watch the magic happen. Blend for 2-3 minutes and stop to scrape down the sides with a spatula and give the motor a break.
Step 3: Blend again for another 2-3 minutes, stopping once more to scrape and rest. You will see the consistency begin to change. The peanuts start to release their oils and the mixture becomes creamier and creamier.
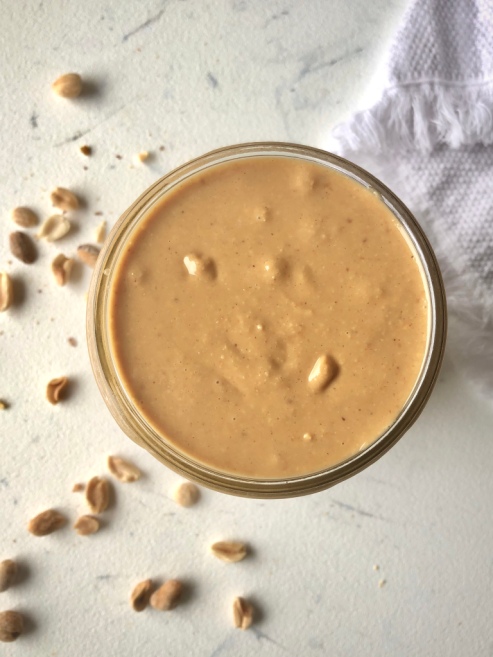
Step 4: Alright, now we blend until happy with the texture. I like my peanut butter pretty smooth, so usually I blend for a total of 8 minutes or so. You be the judge. Stop the food processor every so often to check the consistency. I like mine to look like this when done:
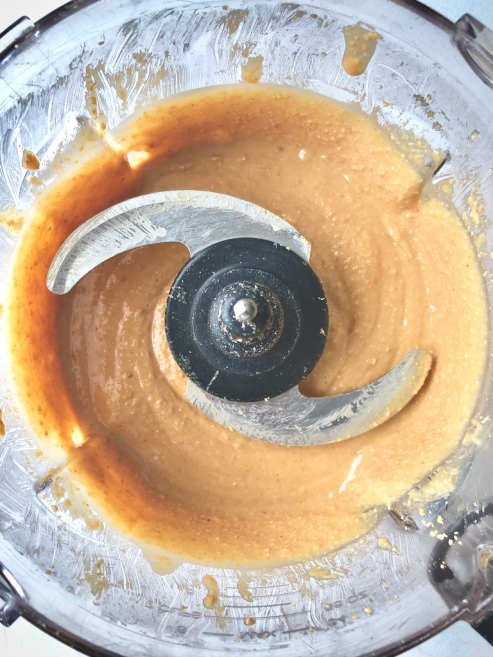
A few teeny, tiny pieces. But mostly smooth!
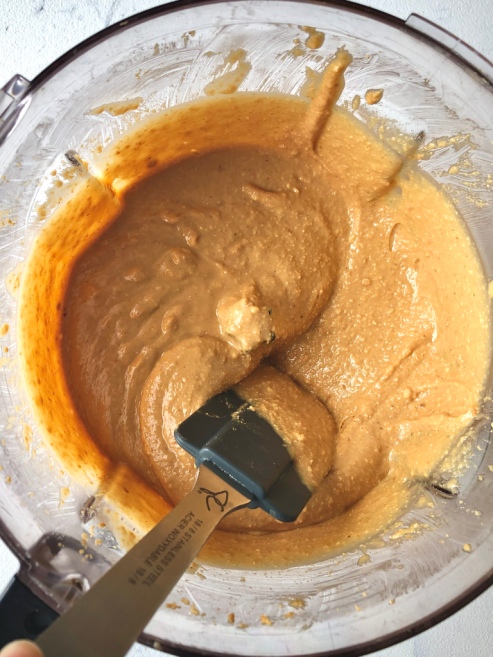
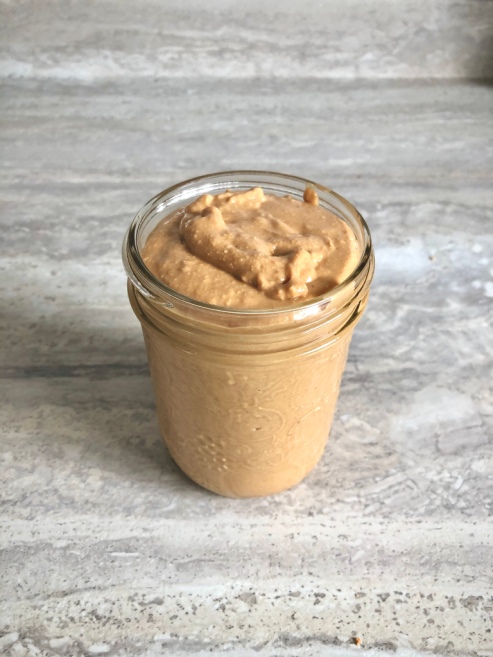
Drool! So yum. Pour this deliciousness into a mason jar and pop it into your fridge to stay fresh.
Homemade Peanut Butter
Servings: 2
Prep time: 1 minute
Cook time: 8 minutes
Ingredients:
- 4 cups dry-roasted peanuts*
- 1 tsp salt
Instructions:
- Place peanuts into a food processor with the salt and pulse a few times.
- Blend for about 7-10 minutes (depending on how smooth you want it), stopping the processor every few minutes to scrape the sides and give the motor a break.
- Pour into an air tight jar and store in the fridge.
Notes:
*You can buy peanuts already dry-roasted (unsalted), but it is always better to do this step yourself from raw peanuts in a 350 degree oven for about 15 minutes, checking every so often to avoid burning.
Additions: If you find this peanut butter is not sweet enough for you, you can always adjust by adding honey or sugar to the recipe.
The post Homemade Peanut Butter appeared first on Never. Not. Eating..
]]>The post Cozy Thai Green Curry appeared first on Never. Not. Eating..
]]>
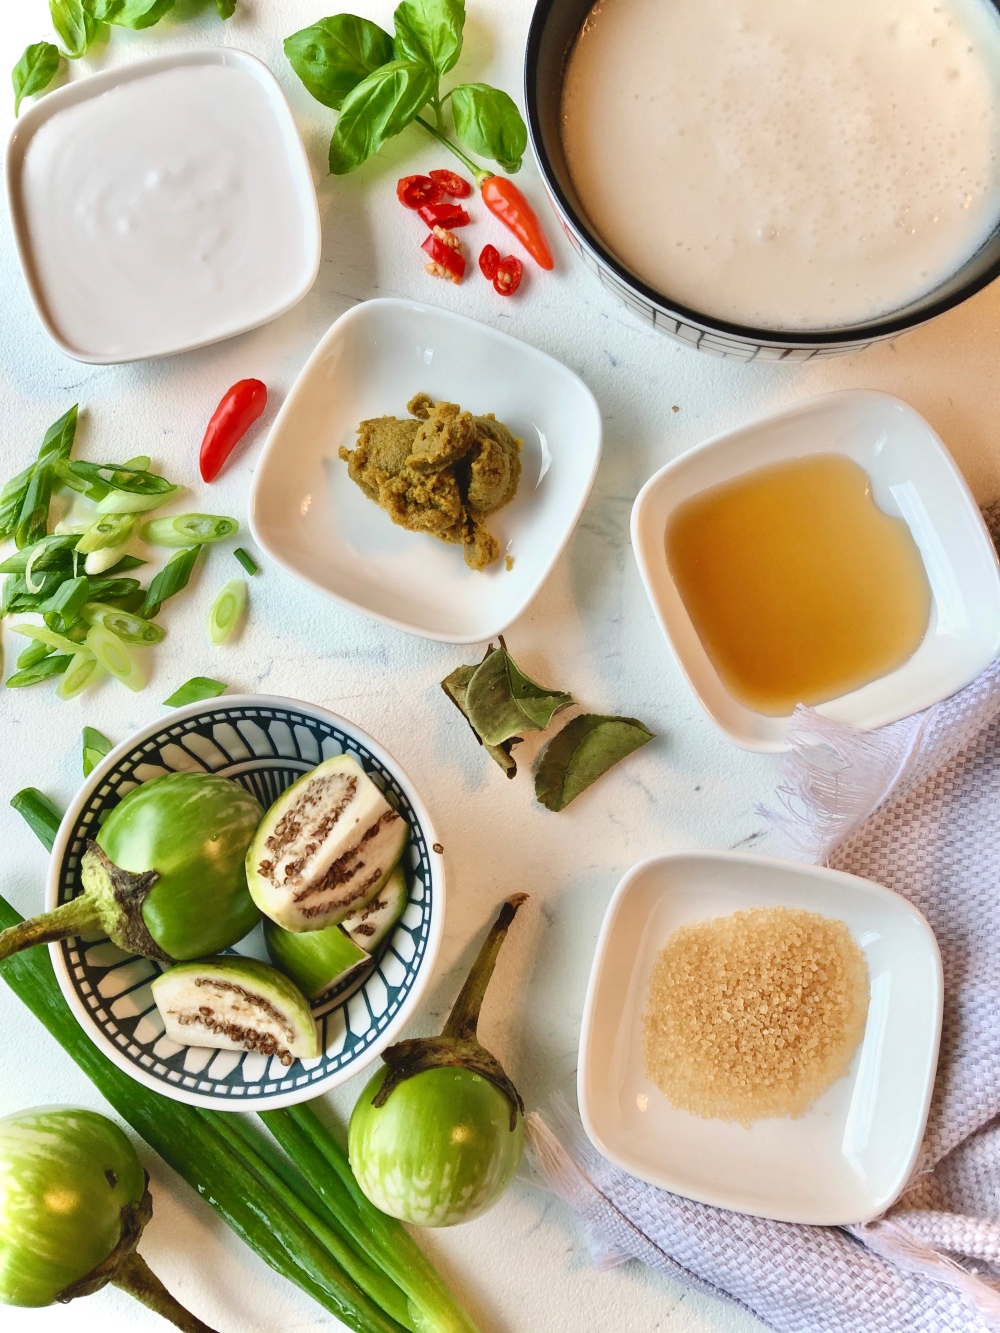
I used to think dishes like this were intimidating. So many ingredients. So many ingredients I didn’t know!? But I quickly realized how very untrue that is. And not to mention, once you prep all of the ingredients, a lot of Thai dishes are really quick to make. Perfect for a fast, post-work meal! This green curry uses a few staples from the Thai kitchen, including:
- Thai (apple) eggplant
- Kaffir lime leaves
- Red chilis
- Thai basil
- Fish sauce, and
- Coconut milk
BUT! I also have added a few (untraditional) twists of my own in this recipe, like:
- White (or sweet) potatoes [Because potatoes make everything better. Also because, when I first tried authentic green curry, I thought I was eating potatoes, but really I was eating delicious little eggplant gems that are native to Thailand. What a great discovery. Luckily, I found these eggplant at a local Asian grocery store (phew!) but I started thinking that potatoes might pair well with the eggplant]
- Spinach (Healthy AF), and
- Scallions (They’re green)
Let’s talk paste. I have made my own curry paste in the past and it’s a lot of work. It’s basically a substitute for arm day at the gym. But like a good gym sesh, I’ve never regretted it. So if you are up for the challenge, and can find all of the ingredients, grab your mortar and pestle and do it up (or just use a food processor). Otherwise, just go store bought. I’ve used Thai Kitchen and it does the trick!
Now let’s get to it!
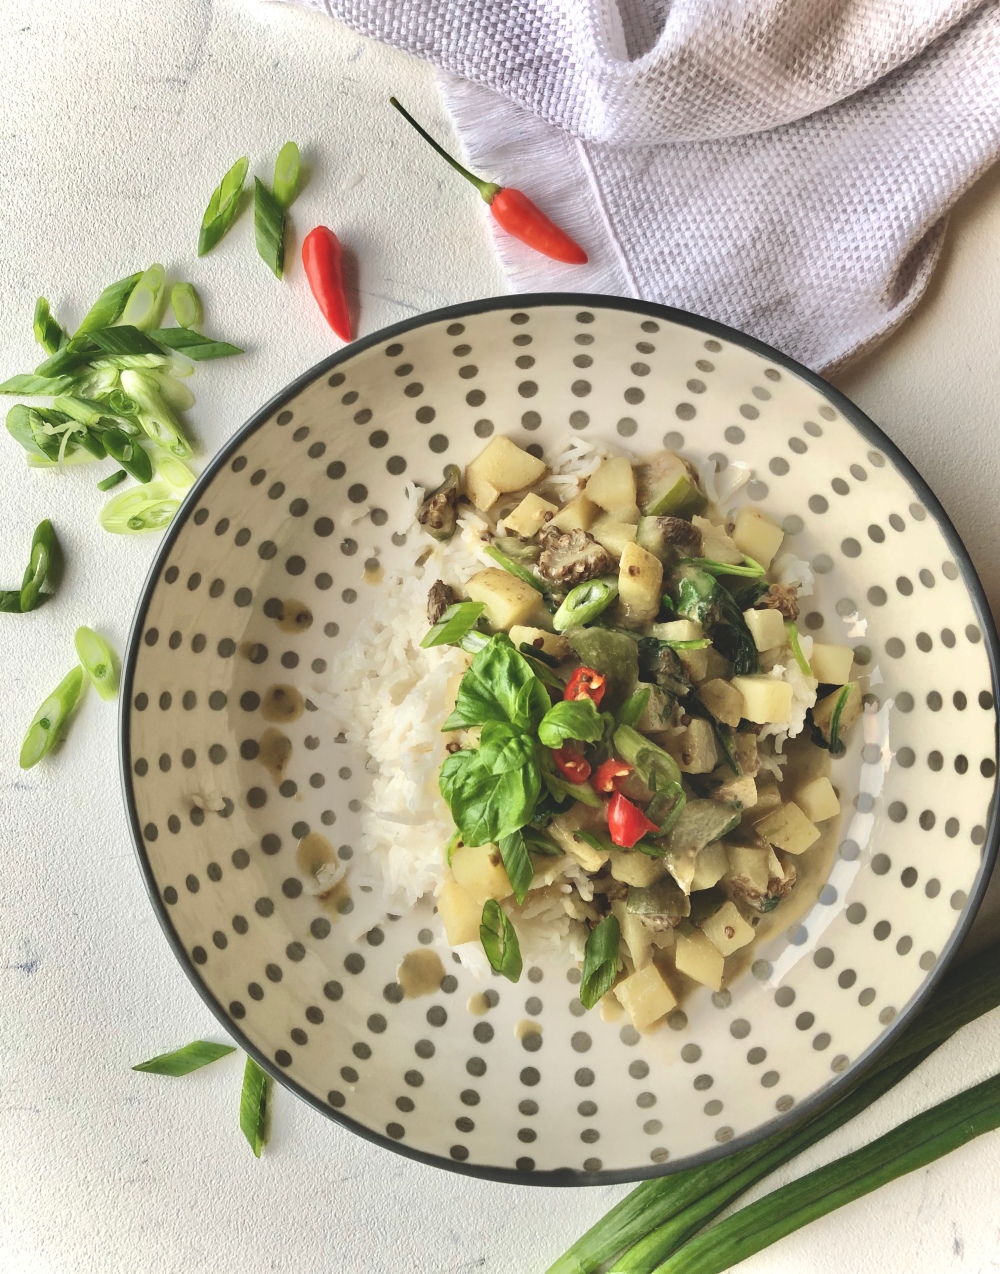
Cozy Green Thai Curry
Servings: 2
Prep Time: 15 minutes
Cook Time: 15 minutes
Ingredients:
- 2 tsp green curry paste (store bought or homemade)
- 3 tbsp coconut cream
- 1 medium white (or sweet) potato, small dice
- 2 Thai eggplant, quartered*
- 1 1/2 cups coconut milk
- 1-2 kaffir lime leaves (dried or fresh if you can find it)
- 2 tsp fish sauce
- 1 tsp raw sugar
- 2 handfuls fresh spinach
- 10-15 Thai basil leaves
- cooked jasmine or basmati rice (about 1/2 cup dry)
- 1 scallion, sliced
- red chilis (optional)
Instructions:
- Preheat a large wok over low heat, and add curry paste and coconut cream. Fry until fragrant, about one minute.
- Add the potato and eggplant, stirring to coat it with the curry paste mixture. Add coconut milk and bring to a boil. Once boiling, add lime leaves, fish sauce and sugar and continue to boil until potato and eggplant are just tender, about 8-10 minutes. Remove lime leaves from wok.
- Add in your handfuls of spinach and cook until wilted. Add the Thai basil, stir and turn the heat off.
- Serve with your favourite rice (I like jasmine).
- Garnish with scallions, red chilis and more basil, if you’re into that.
NOTES:
*I find Thai eggplant at my local Asian supermarket, but if you can’t find it, just stick with whichever type of eggplant you can find, or just the potatoes!
Additions: You can also make this recipe with tofu or a protein of your choice (chicken is popular)! For tofu: Cube and crisp on all sides in a pan with some vegetable oil and then add to the wok with the basil. For chicken: Add sliced, raw chicken to wok after curry paste and coconut cream, and fry until meat turns white (it will continue cooking when the coconut milk is boiling).
The post Cozy Thai Green Curry appeared first on Never. Not. Eating..
]]>