The post Cinnamon Vanilla Cashew Butter Recipe appeared first on Never. Not. Eating..
]]>WHAT IS CINNAMON VANILLA CASHEW BUTTER?
Well, I’m so glad you asked! It’s your regular nut butter with a gorgeous, put-me-in-the-holiday-mood kick! Who doesn’t love warm notes of cinnamon and dreamy vanilla? This nut butter is dressed up and ready for a night on the town. It’s all-natural and all-delicious!

WHY I LIKE THIS CINNAMON VANILLA CASHEW BUTTER
I am someone who is obsessed with nut butters, but ever since groceries have skyrocketed in price, peanut and other nut butters are basically unaffordable. I mean, seven dollars for a jar of peanut butter…are you nuts?! So now, I head to Costco, buy a large bag of cashews for cheap and makes TONS of nut butter with it. It’s much more cost effective, not to mention I can see everything going into it!

THE INGREDIENTS
Another great thing about this recipe is the minimal ingredients. Just three to be exact (not including salt). They are:
- raw cashews
- cinnamon
- vanilla
- pink Himalayan sea salt
HOW TO MAKE CINNAMON VANILLA CASHEW BUTTER
The first, and arguably, the most important step of this recipe is toasting the cashews. With an oven set to 350 degrees Fahrenheit, roast cashews for 5-8 minutes, checking often. Nuts burn easily and quickly, so it’s important that you keep an eye on them. Once they start turning light brown, remove them from the oven.
Now, you just add all of the ingredients to a food processor and blend until smooth, or until it reaches your desired consistency. Make sure you have a high processed blender, like the Vitamix, or the Ninja, and be patient with it! It takes about 15-20 minutes to become “butter,” so just trust the process.

TIPS
- Use 100% real vanilla – it’s much better than the artificial stuff
- Have a spatula while the nut butter is blending and scrape down the sides often
- Give the engine of your blender a break now and again to preserve it’s life
OTHER HEALTHY SPREADS YOU NEED TO TRY
Vegan Cilantro Lime Dressing (I put this stuff on everything)
Pink Hummus (perfect for date night or Valentine’s Day)
3-Ingredient Strawberry Chia Jam (would go perfectly with this cashew butter)
TOOLS I USED TO MAKE CINNAMON VANILLA CASHEW BUTTER
Click below to access the tools I used for this recipe:


Cinnamon Vanilla Cashew Butter
Servings: Makes approximately 1 cup
Prep time: 20 minutes
Cook time: 5 minutes
Ingredients:
- 2.5 cups raw cashews
- 1 tsp cinnamon powder
- 1/2 tbsp pure vanilla extract
- 1/4 – 1/2 tsp pink Himalayan sea salt (or just regular sea salt)
Instructions:
- Preheat your oven to 350 degrees Fahrenheit and place cashews on a baking sheet. Bake for 5-8 minutes, or until they begin turning a light golden brown colour. Watch carefully – they burn quickly!
- Once the cashews are toasted, add them to a food processor with the cinnamon, vanilla and 1/4 teaspoon of salt. Pulse a few times and then blend. Stop the motor every so often and scrap the sides down. It will look very grainy at first, but after about 15 minutes of blending and scraping, it will start to smooth out. The longer you blend, the smoother it becomes.
- Once the cashews have reached the texture you like, taste it and add more salt if desired. Spoon the butter into an airtight container and store in the fridge for up to 5 weeks.

The post Cinnamon Vanilla Cashew Butter Recipe appeared first on Never. Not. Eating..
]]>The post Sumac Roasted Cauliflower appeared first on Never. Not. Eating..
]]>
There’s no easier recipe, I promise you that. This whole-roasted cauliflower head is simple to prepare but complex on the palate! It’s vibe is very Middle Eastern – sumac, currants, pomegranates, pistachios. It’s visually stunning and a perfect side to go along with the rest of your dinner.
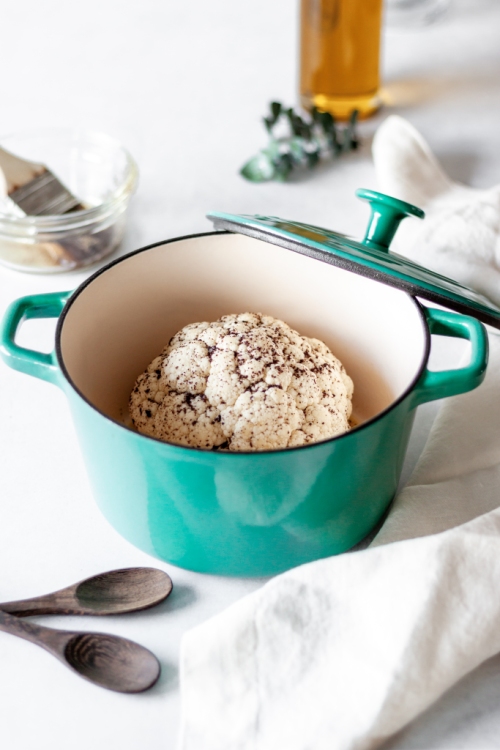
To prepare, combine the sumac, salt and olive oil, and pour over the cauliflower. Roast in a dutch oven (click here to see the one I use) for about 40 minutes until it is tender. Drizzle with the zingy-est chimichurri and top with all the fixings. Chef’s kiss!

Sumac Roasted Cauliflower
Serving size: 4-5 people
Prep time: 10 minutes
Cook time: 40 minutes
Ingredients:
- 1 medium head of cauliflower
- 1/2 cup olive oil
- 1 tsp sumac
- 1/2 tsp salt
- 1/4 cup pomegranate arils, for topping
- 1/4 cup pistachios, shelled and chopped, for topping
- 1/4 cup feta cheese, for topping
- 2 tbsp dried currants, for topping
For the Chimichurri Sauce:
- 1/4 cup olive oil
- 1 tbsp red wine vinegar (or less if you don’t want it as tangy)
- 2 cups packed fresh herbs (I use basil, cilantro and parsley)
- 1-2 cloves of garlic
- pinch of salt
- pinch of red pepper flakes (optional)
Instructions:
- Preheat oven to 400 degrees Fahrenheit.
- Remove the leaves of the cauliflower, rinse the head well and pat completely dry. Cut off the bottom part of the stem to make the cauliflower level and have a flat surface to sit on.
- In a small bowl, combine the olive oil, sumac and salt. Place the cauliflower head upside down into a dutch oven. Pour 1/2 of the olive oil mixture onto the bottom and allow it to drip down into the crevices of the cauliflower. Turn over and pour the rest on the top, using a pastry brush to help coat the sides. Put the lid on and then place in the oven to roast for 40 minutes or until fork-tender. Cook time depends on the size of your cauliflower.
- While the cauliflower is roasting, prepare the chimichurri. Add all ingredients to a blender and blend until smooth. Taste and adjust seasonings as necessary.
- Place currants in a small bowl and cover with boiling water to rehydrate them. Let sit for at least 5 minutes before draining.
- Transfer the cooked cauliflower to a serving platter. Drizzle with the chimichurri and top with the pomegranate arils, pistachios, currants and crumbled feta cheese. Serve immediately!
The post Sumac Roasted Cauliflower appeared first on Never. Not. Eating..
]]>The post Gluten Free Crepes with an Apple Cinnamon Compote appeared first on Never. Not. Eating..
]]>
I’ve used my soup maker to make an abundance of different recipes, such as: soup (duh!), smoothies, juices, pancakes and my favourite, alcoholic beverages. It’s truly simple to use and does all of the cooking and blending for you, allowing time to clean up your kitchen, or do something more fun, like snack while you wait for your food. If you have a soup maker, or are thinking of purchasing one, check out my Instagram account for some more fun recipes to make in it – @nevernoteatingca
So let’s talk about these crepes. Firstly, I struggle to call them “crepes,” because as a kid, my family and I only ever ate “Finnish pancakes,” which were more crepe-like in appearance, but were never referred to as crepes. Those were our style of pancakes. We never ate traditional American pancakes. But you know what?! I’m all about pleasing the people. People see flat pancakes, they say “crepes.” So, this is for you.
Secondly, if you follow my IG account, or have read some of my posts, or even tried some of my recipes (thank you), you know that I like to put a healthier spin on foods that aren’t so healthy. Therefore, I have made these “crepes” with gluten-free flour, plant-based milk and no refined sugar. If you want to indulge a bit more, feel free to sub in the healthy ingredients for the not-so-healthy ones.
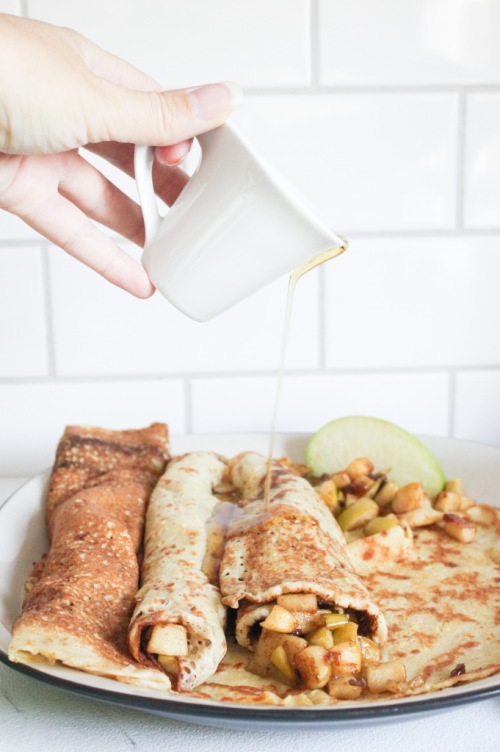
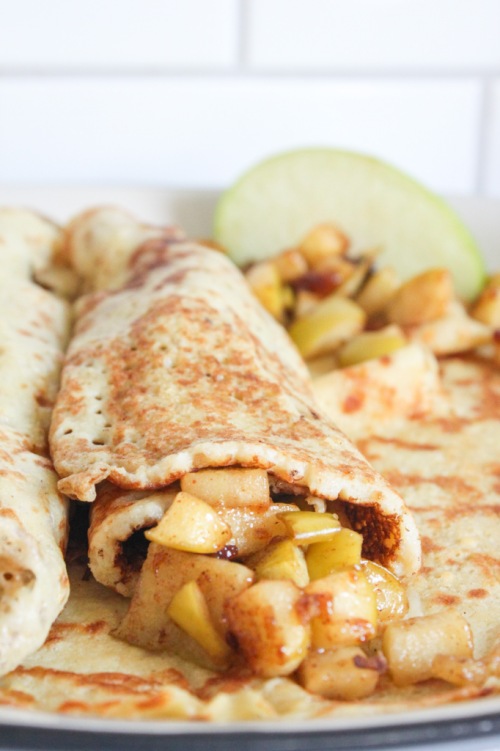
I can’t decided whether my favourite part of this dish is the pancake…I mean crepe…or the filling. It’s apple season right now, and nothing goes better together than apples and cinnamon. And nutmeg. Nutmeg is bomb. The filling is tart and sweet and ooey and gooey. It’s a great addition to these less-sweet crepes. I prefer to use honeycrisp or granny smith apples for this, but you can definitely use whatever you have on hand. I also like to keep the skins on, mostly because I’m lazy, but feel free to peel your apples if that’s your jam.
Below you will find two ways to make this recipe. The first is the easiest way, but you need a soup maker for that! The second is more traditional, but totally yummy just the same.
May your day be enhanced with pancake-crepes and fall fillings!
Gluten Free Crepes with an Apple Cinnamon Compote
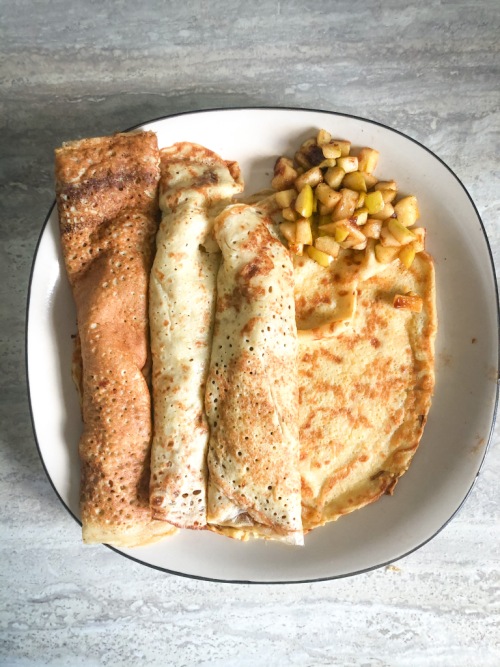
Serving Size: Makes 10 large crepes
Prep time: 5 minutes
Cook time: 20 minutes
Ingredients
- 2.5 cups dairy-free milk
- 2 eggs, beaten
- 2 tbsp maple syrup, plus more for serving
- 1 tsp vanilla extract
- 1.5 cups gluten free flour
- 1/2 tsp salt
- 2 medium apples, finely diced (I use honeycrisp or granny smith)
- 1/2 tsp lemon zest
- 1 tbsp lemon juice
- 1/2 tsp cinnamon
- pinch of fresh nutmeg
- 1/2 tbsp of cornstarch
- 1 tbsp maple syrup or brown sugar
- coconut oil or butter (for the pan)
Instructions
With a soup maker:
- Add the milk, eggs, syrup, vanilla, flour and salt to your soup maker. Set to “juice.” When finished mixing, skip to step 3 below.
Without a soup maker:
- Whisk together milk, eggs, syrup and vanilla and set aside.
- In a medium bowl, whisk flour and salt together. Add the wet ingredients and whisk until combined.
- Place a large pan over medium-high heat and add half a tablespoon of coconut oil (or butter). When the pan is very hot, add about 1/3-1/2 cup of the crepe batter (depending on the size of your pan). Swirl the pan around until the batter coats the entire bottom. There shouldn’t be a lot of batter sitting on top.
- Let the crepe cook until the edges begin to come up from the pan and the bottom is browned. Flip and cook on the other side for about 2 minutes or until darker spots begin to develop on the underside. Remove from pan, place on a plate and store in the oven or microwave to keep warm. Continue with the remainder of the batter.
For the filling:
- While the crepes cook, add the apples, zest, lemon juice, cinnamon, nutmeg, cornstarch and sugar to a bowl and stir to combine. Let sit for at least 5 minutes.
- Preheat a large pan over medium-low heat. Add a half tablespoon of coconut oil or butter to the pan. When melted, add the apples. Let cook until apples are fork tender, about 8-10 minutes, stirring occasionally.
Assembly:
- Top each crepe with a few spoonfuls of the filling and a drizzle of maple syrup. Roll and enjoy!
The post Gluten Free Crepes with an Apple Cinnamon Compote appeared first on Never. Not. Eating..
]]>The post Lemon Caper Pasta appeared first on Never. Not. Eating..
]]>
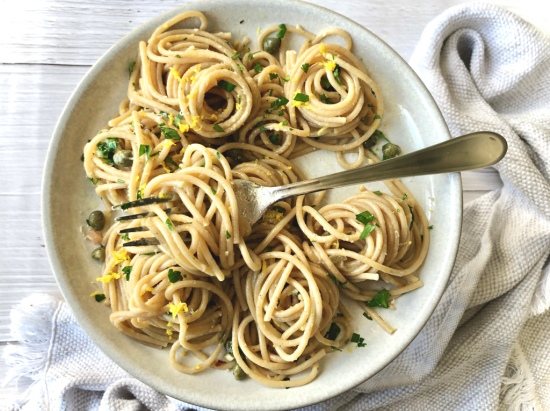
They say you should wake up everyday and still make your bed and get dressed while in self-isolation. They say it helps individuals feel more accomplished and more productive. So I’ve been rising and shining. I get up, straighten out my duvet, pick up all of my little decorative pillows and arrange them at the head of my bed. I put on my yoga pants (better than pajamas?!), slip on a cozy sweater and wash my face. Later, I praise my ambition and appreciate my yoga pant choice because, pasta. THIS pasta. Lemon Caper Pasta. The best pasta in all the lands. And it pairs perfectly with my stretchy pants.
REASONS TO MAKE LEMON CAPER PASTA
This is a perfect dish to make if:
- you want a date night idea
- you need a quick meal
- you like flavour
- you like food
- you are quarantined
- you are a human
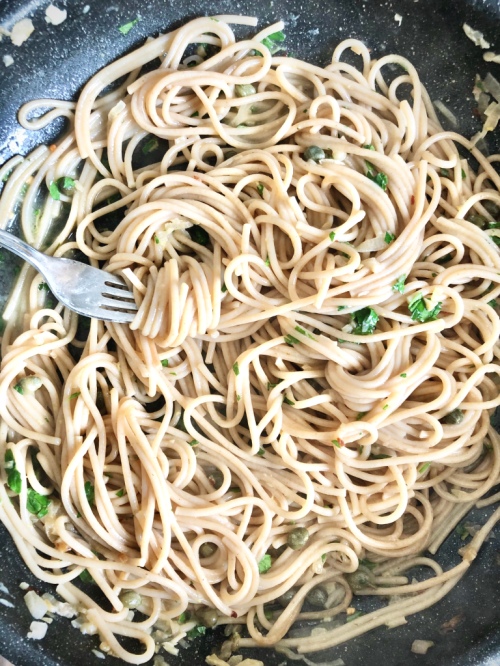
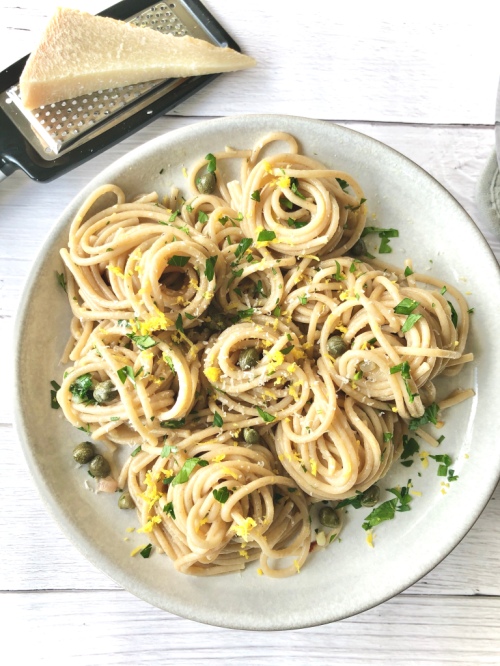
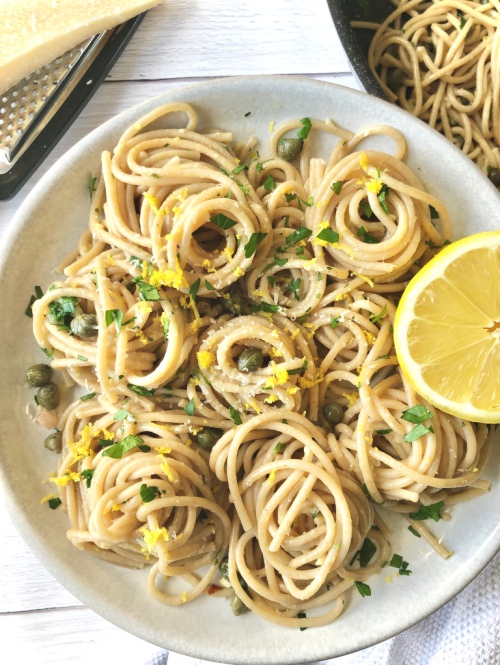
A luscious pasta coated in a white wine-butter sauce with melty parm, briney capers and fresh citrus.
The Pasta
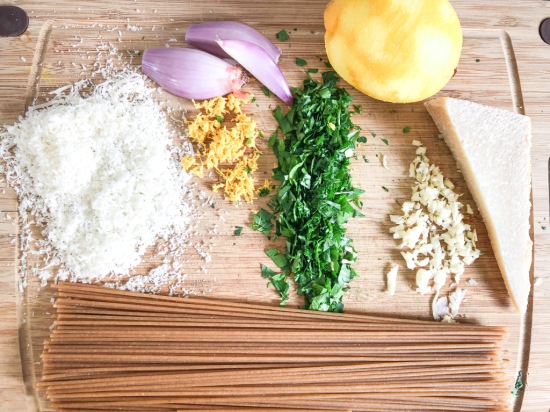
For the pasta, you can really use whatever you have. Here, I’ve used a whole wheat semolina pasta. It’s a bit heartier and nuttier than white pasta. It’s also healthier and is usually my go-to, as well as any spelt pastas.
The capers give this recipe a delicious salty, briney punch. If you don’t want to venture off to the grocery store, you can buy capers here. You can also substitute them for green olives.
It has BOLD flavours. DELICIOUS flavours. CRAVE-WORTHY flavours.
Do you ever meet someone who is really attractive, smart AND kind? Yup. That is this recipe in pasta-form. It’s not impastable. It exists, right here.
Come and spaghet it.
OTHER IDEAS SIMILAR TO LEMON CAPER PASTA:
Simple Beetroot Pasta (for a fun, colourful meal)
Creamy Vegan Mushroom Rigatoni (a wholesome meal)
Butternut Squash and Kale Lasagna Roll-Ups (a great way to hide vegetables for the kids)
Tortiglioni in Roasted Red Pepper Sauce (Nonna will be proud)
Lemon Caper Pasta
Serving size: 2
Prep time: 5 minutes
Cook time: 20 minutes
Ingredients:
- 2 servings of choice pasta (approx. 180 g)
- salt
- 2 tbsp olive oil
- 1 shallot, diced
- 2 cloves garlic
- 1/3 cup white wine
- 1 tbsp butter
- 1/3 cup fresh, grated parmesan, plus more for topping
- 1/4 tsp chili flakes (optional)
- 1/2 tbsp caper brine (optional)
- 2 tbsp capers
- zest of one lemon
- juice of half a lemon (approx. 2 tbsp)
- 1/4 cup chopped parsley
- fresh ground pepper
Instructions:
- Fill a large pot with water and bring to a boil. Salt the water generously and add the pasta. Cook according to package directions, until ‘al dente.’ Reserve about 1/3 cup of the pasta water before draining.
- Meanwhile, add olive oil to a large skillet over low heat. When pan is warm, add the shallot and stir for a few minutes until tender. Add garlic and stir for about 30 seconds until fragrant. Pour the white wine into the pan and increase the heat to medium-high. Let the wine reduce for about 5 minutes, or until you can no longer smell the alcohol. When reduced by about half, add the butter and stir to incorporate. Reduce the heat again to medium-low.
- When the pasta is done, add it right to the pan along with the reserved pasta water. Add the parmesan and chili flakes to the pan and toss everything together.
- Turn the heat off and add the caper brine, capers, lemon zest, lemon juice, parsley and a few grinds of fresh black pepper. Toss to combine, dish onto two plates and top with more parmesan, if you would like.
The post Lemon Caper Pasta appeared first on Never. Not. Eating..
]]>