The post Pear, Mozzarella and Caramelized Onion Flatbread appeared first on Never. Not. Eating..
]]>
Ordering pizza has never really been something that I do very often. I guess because I don’t think about it. I guess because I like to cook. I guess because…I can make it myself?! And it’s SO easy, why wouldn’t I?? You are in full control this way. Healthy toppings or unhealthy toppings. Red sauce or white sauce. Meat or veggies. Cauliflower crust or wheat crust. You choose, babe. You choose.
So I like to call this recipe a “flatbread” because,
1. I don’t know the difference between flatbread and pizza (I won’t lie);
2. It comes across as more refined;
3. It sounds healthier for some reason, and;
4. It’s pretty flat, yo!
I start with just a basic dough recipe. Make this and chill it in a Ziploc bag overnight and the flavours meld together and it’s really quite magical. When you are ready to make some ‘za, pull it out of the fridge, roll it out and load it up with your choice of toppings, cook on high heat and in 10 minutes, you have amazing pizza.
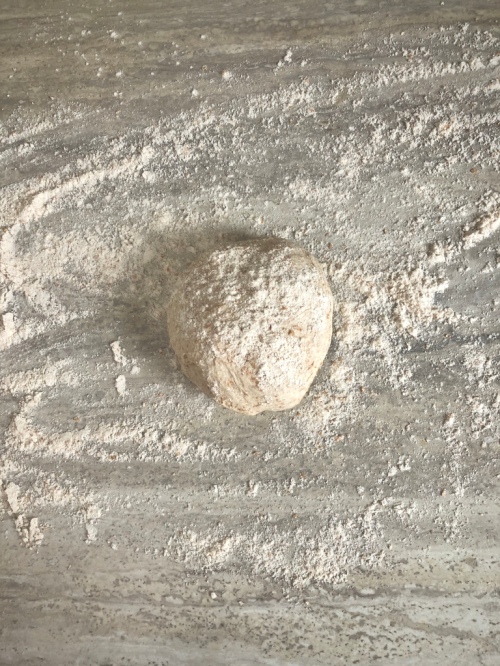
The dough is simple. It is just flour (I use whole wheat), salt, olive oil, warm water and instant yeast. Toss it all into your stand mixer and then let it rise for an hour or two. This recipe will make one giant pizza, or three respectable-sized personal pizzas. I like to make three different types when I make this dough. Keep it interesting.
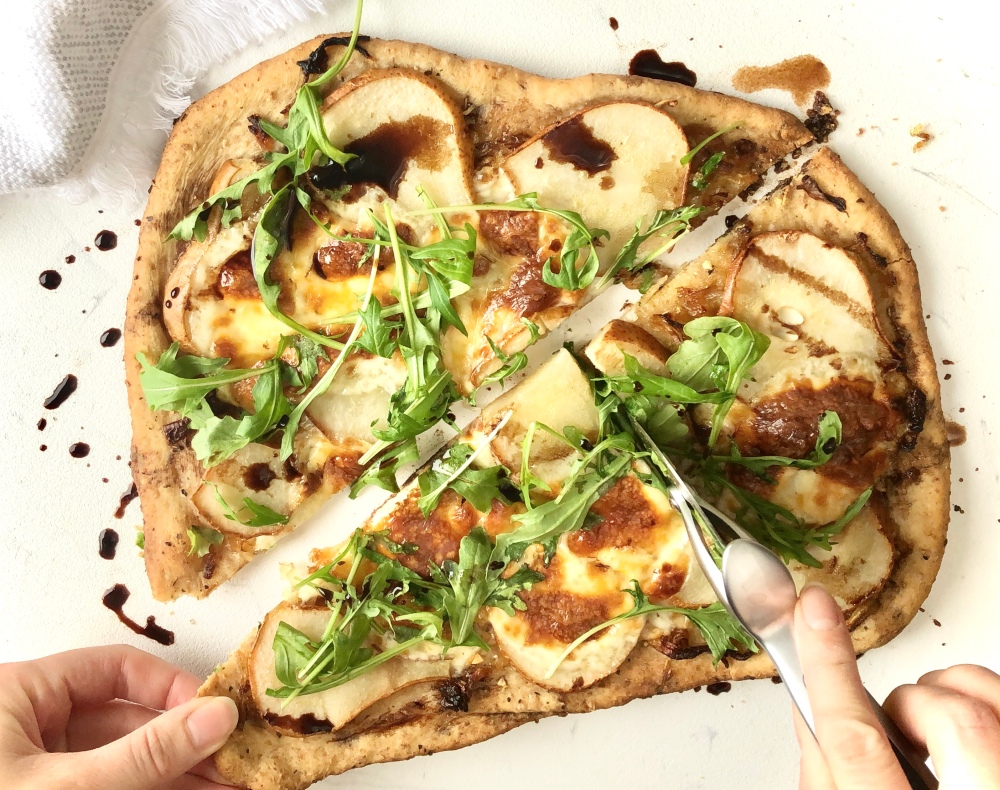
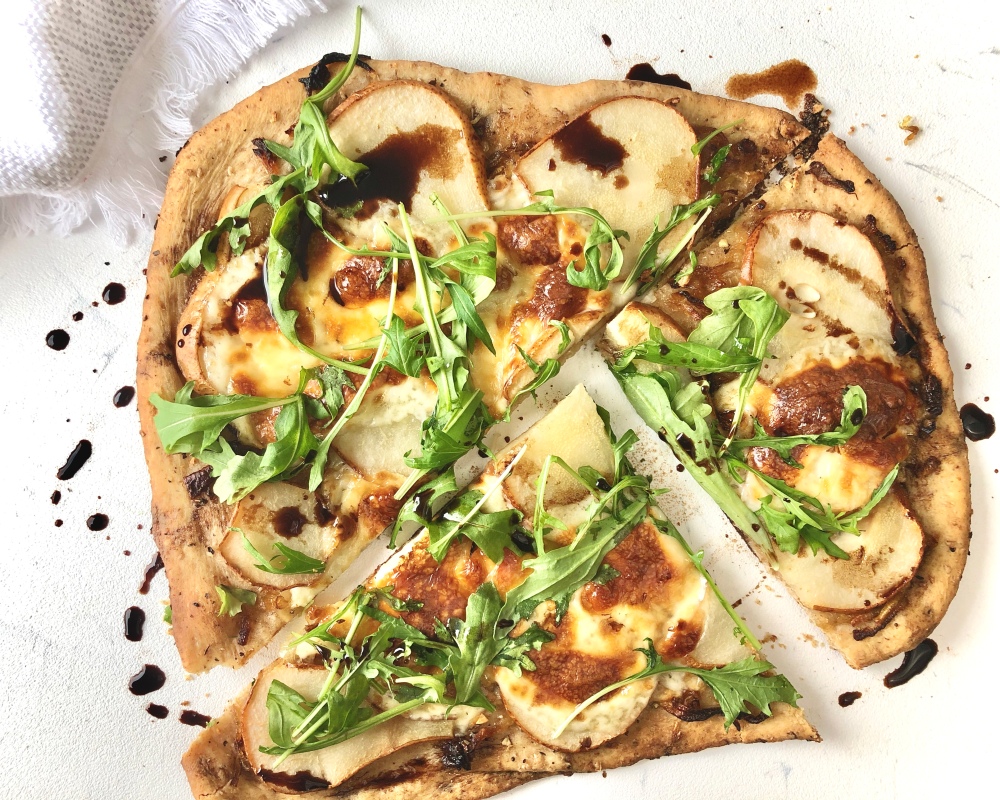
There are numerous combinations of toppings that I’ve tried in the past, and I am quite positive that I will be posting more flatbread recipes in the near future, but this one is in my Top 3. Sweet pears, flavourful caramelized onions, bubbly mozza cheese and peppery arugula. YUM! You literally cannot go wrong. Like, literally.
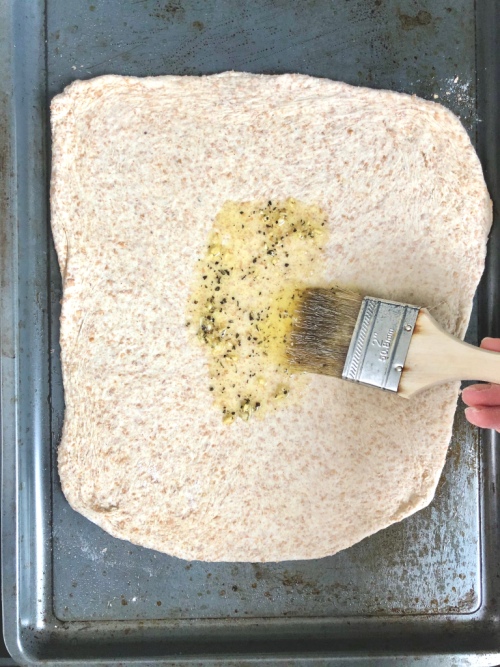
So grab your dough. Roll it out. Add my simple oil base (olive oil, garlic, dried basil, salt, pepper).
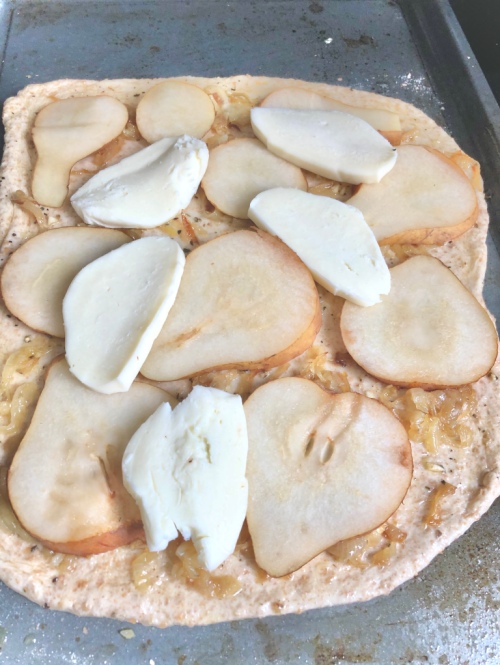
Top with onions, pears and cheese.
Bake at 500 degrees F. Remove. Arugula. Balsamic vinegar drizzle. Eat. Love your life.
Pear, Mozzarella and Caramelized Onion Flatbread
Serving size: 3-5 (Depending on whether you make it as a meal or a side)
Prep time: 12 hours (inactive time)
Cook time: 30 minutes
Ingredients:
Dough:
- 3/4 cup warm water
- 1 tsp active dry yeast
- 2 cups whole wheat flour
- 1/2 tsp salt
- 3 tbsp olive oil
Pizza:
- 4 tbsp olive oil, separated
- 1 large onion, sliced thinly
- 1 garlic clove, minced
- 1/2 tsp dried basil
- pinch of salt
- pinch of fresh pepper
- 2 bosc pears, sliced thinly
- 250 g mozzarella, cut into thin slices (fresh or balled mozzarella is best)
- arugula for topping
- balsamic vinegar for drizzling (optional)
Ingredients:
For the pizza dough:
- Sprinkle the yeast over the warm water and let sit for 10 minutes until the top looks foamy.
- Add flour and salt to a stand mixer bowl attached with the dough hook. Turn the speed on low and in a slow, steady stream, drizzle the olive oil in until fully incorporated. Pour in the water/yeast mixture and mix until fully incorporated. You may need to scrape down the sides to help it come together. Dough will be sticky. Coat a large mixing bowl with olive oil and turn the dough into the bowl. Cover bowl with plastic wrap and let rise in a warm area for two hours.
- After it has risen, you can roll it out and use immediately, but it is much better with more time to let the flavours develop. Place it in a large Ziploc bag and store in the fridge overnight or up to three days. Dough will continue to expand in the fridge.
For the pizza:
- Preheat oven to 500 degrees F.
- In a pan over low heat, add two tablespoons of olive oil and the sliced onion. Let the onion cook and caramelize for about 20 minutes, stirring every so often. If you wish to speed up this process, add small amounts of water to help the onions along.
- In a small bowl, whisk together the remaining two tablespoons of olive oil, the garlic, basil, salt and pepper. Set aside.
- Remove dough from fridge. Flour your surface and turn the dough out onto it. Use your hands to knead the dough for about 1 minute, or until it no longer sticks to your hands. At this point, you can either cut the dough into three even pieces and roll each into a ball, or make one large pizza ball with the entire dough.
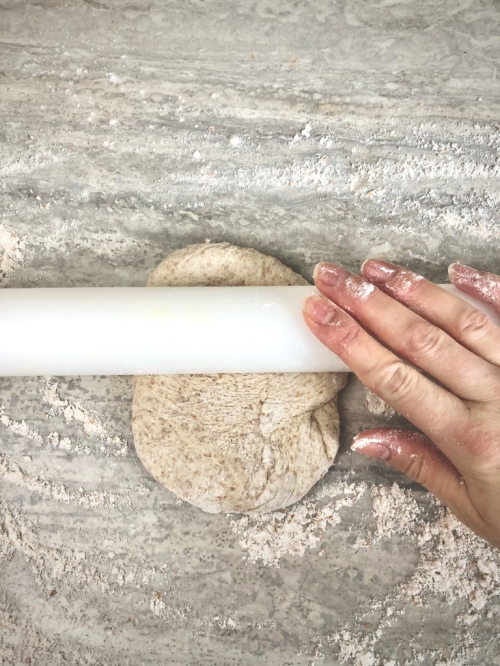
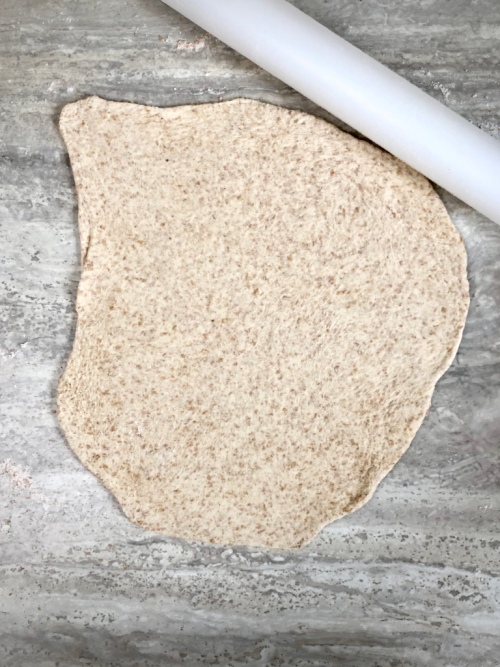
- Using a floured rolling pin, start in the centre of your dough and roll outwards, turning your dough a quarter turn after every few rolls, trying to achieve a rectangular shape. Use your hands to pull and stretch the dough until it is about 1/4 inch thick. Lay the dough on a large baking sheet that has been brushed with olive oil.
- Brush the top of the dough with the olive oil and garlic mixture. Add the caramelized onions, sliced pears and then mozzarella slices. Bake in the oven for 10-14 minutes, or until crust has browned and the cheese bubbles. Top with arugula and a drizzle of balsamic vinegar. Cut with a pizza slicer and enjoy warm!
The post Pear, Mozzarella and Caramelized Onion Flatbread appeared first on Never. Not. Eating..
]]>The post Maple Chai Hasselback Pears with Candied Pecans and Coconut Whip Cream appeared first on Never. Not. Eating..
]]>This is a dessert that you can feel good about. It is paleo, vegan and gluten-free and therefore could just be replaced for tonight’s dinner and you are winning.
To hasselback something means to make a number of thinly-spaced slices which take on the job of sucking up all of the delicious sauces that will be poured on top, and in this case, it’s an aromatic maple syrup and chai spice hybrid. Holy Hannah.
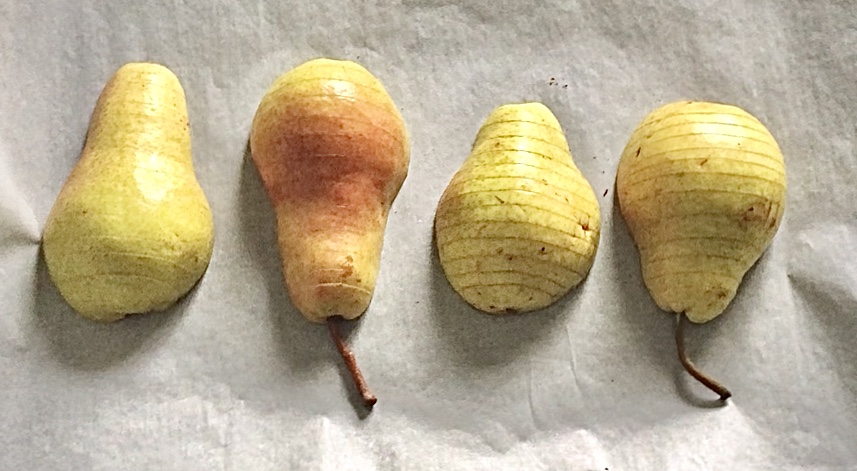
To successfully hasselback your pears for this recipe, cut them in half and remove the core with your knife. Starting with one half at a time, place slice-side down between two chopsticks (or butter knives if you don’t have them) and use a sharp knife to cut slices all the way across the length of the pear. The chopsticks act as a stopper so that your slices don’t go all the way through the fruit.
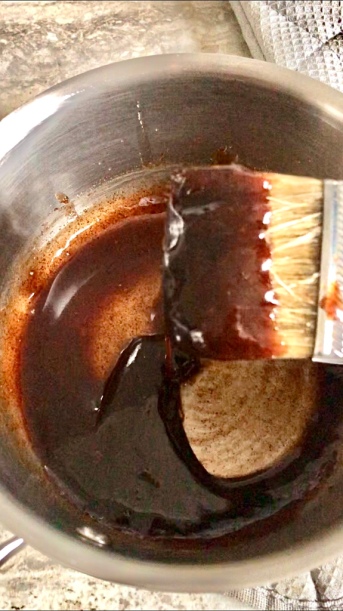
The maple chai glaze starts with maple syrup and coconut oil in a small saucepan, whisked together with cinnamon, cardamom, ground ginger, allspice, cloves, nutmeg and some black pepper. Simmer for just a few minutes. You will see it thicken slightly. Turn off heat and finish off with some vanilla and flaky sea salt and then it’s ready for drizzling.
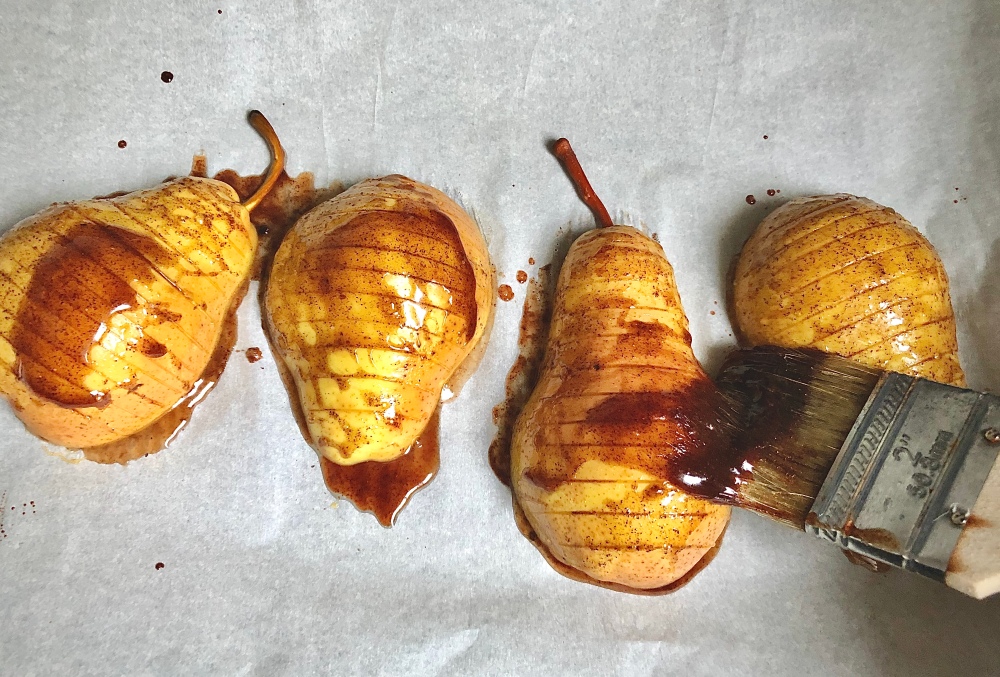
Brush some of the glaze on the pears and pop ’em in the oven to start tenderizing, about 15 minutes. Remove from oven and carefully (they are hot!) use your fingers to separate some of the slices so that you can brush even more glaze onto and into the pears. Bake for another 10-15 minutes until the pears are fork-tender.
Grab some pecans and give them a fine chop. Place them on a baking sheet lined with parchment and pop them in the oven to toast up real quick. Keep watch – you don’t want them to burn! After about 6-7 minutes, pull them out and toss them with a bit of brown sugar and either coconut oil (if you are vegan or paleo), or butter.
To prep for the whip cream, place a metal mixing bowl into the freezer with your wire beaters for at least 15 minutes before making this recipe. Place a can of coconut milk in the fridge overnight or a few days for best results. This allows the full fat “cream” layer to separate from the more transparent “water” layer. We will only be using the cream for this recipe, but don’t throw away that precious coconut water that you find at the bottom of the can! You can blend it into smoothies or use it instead of almond milk in my Power Boosting Smoothie Bowl recipe!

Carefully scoop the cream into the bowl that was in the freezer. With your hand mixer, beat the cream for a minute. You should see it start to thicken. Add your vanilla and maple syrup (or honey) and beat for two more minutes until it resembles regular whip cream. Chill until ready to use.
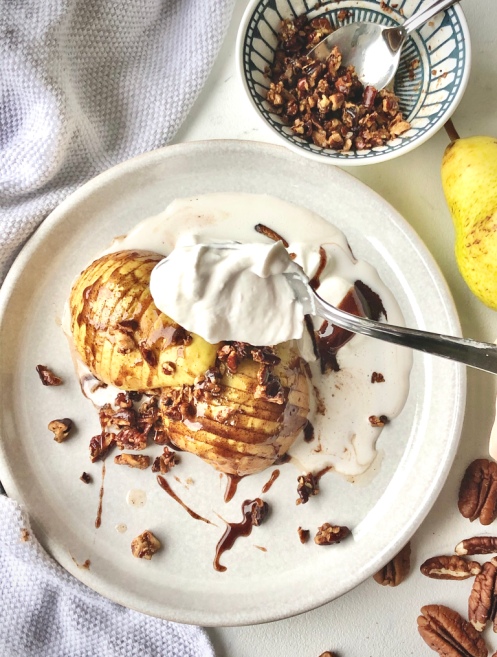
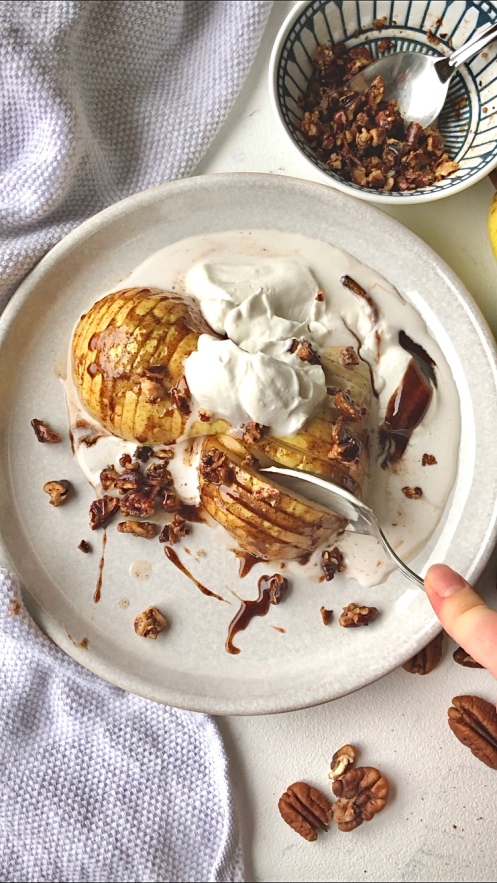
Assembly time – Place your pear halves on a plate and top with pecans and whip cream. Drizzle with the extra maple chai glaze and thank me later.
Maple Chai Hasselback Pears with Candied Pecans and Coconut Whip Cream
Servings: 2
Prep time: 10 minutes
Cook time: 25 minutes
Ingredients:
- 2 ripe pears (Bosc or Bartlett), halved and cores removed
For the maple chai glaze:
- 1/4 cup pure maple syrup
- 1 tbsp coconut oil
- 1 tsp cinnamon
- 1/2 tsp ground cardamom
- 1/4 tsp ground ginger
- pinch of cloves
- pinch of allspice
- pinch of nutmeg
- fresh black pepper
- 1/2 tsp vanilla
- pinch of flaky sea salt
For the candied pecans:
- 1/3 cup finely chopped pecans
- 1 tsp brown sugar
- 1 tbsp coconut oil, melted (or butter, if not vegan)
For the whip cream:
- one can of full fat coconut milk (I find the brand Aroy-d works well), chilled at least overnight
- one tsp pure vanilla extract
- one tbsp pure maple syrup (or honey, if not vegan)
Instructions:
- Preheat oven to 375 degrees F. Place a metal bowl and wire beaters into the freezer.
- Prepare the pears by placing one half at a time, slice-side down, between two chopsticks (or butter knives). Use a sharp knife to cut slices all the way across the length of the pear. The chopsticks act as a stopper so that your slices don’t go all the way through the fruit. Set aside while you prepare the glaze.
For the maple chai glaze:
- Add maple syrup, coconut oil, cinnamon, cardamom, ginger, cloves, allspice, nutmeg and a few grinds of black pepper to a small saucepan and bring to a simmer over medium heat. Simmer for 4 minutes. It will thicken slightly. Remove from heat.
- Brush the glaze over the hasselback pears and place pears into the oven to bake for 15 minutes.
- Remove from oven and use your fingers to separate the slices a little more (careful, it will be hot). Brush over more of the glaze, making sure it seeps into the grooves that you helped separate, and return to oven for another 10-15 minutes, or until fork tender. Remove and let cool for a few minutes.
For the candied pecans:
- Place the pecans on a small baking sheet lined with parchment paper. Toast in the oven alongside the pears for about 6 minutes or until fragrant. Watch carefully to avoid burning.
- Remove from oven and add brown sugar and coconut oil (or butter) to the nuts, tossing together. Set aside.
For the coconut whip cream:
- While the pears are baking, make your whip cream. Remove the can of coconut milk from the fridge. Open carefully and scoop out the solidified cream, placing into the metal bowl that was chilling in the freezer earlier. Do not add the water at the bottom of the can.
- Beat on medium speed for 1-2 minutes, until it has began to noticeably thicken up.
- Add vanilla and maple syrup and beat for another 2 minutes on high, until it resembles regular whip cream. Place back in the fridge to stay cold.
Assemble:
Place the baked pears onto a plate. Add candied pecans and coconut whip cream. Drizzle over the remaining maple chai glaze. Dig in!
The post Maple Chai Hasselback Pears with Candied Pecans and Coconut Whip Cream appeared first on Never. Not. Eating..
]]>