The post Tortiglioni in Homemade Roasted Red Pepper Sauce appeared first on Never. Not. Eating..
]]>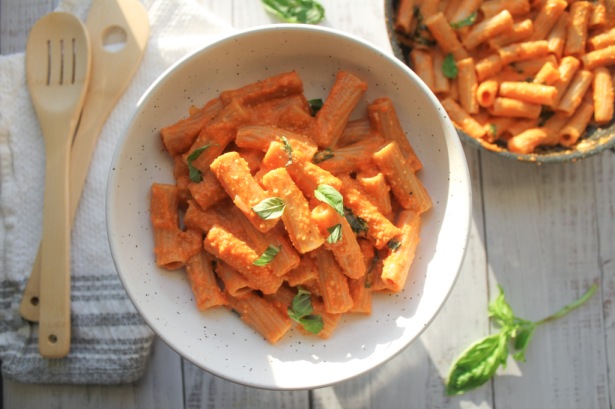
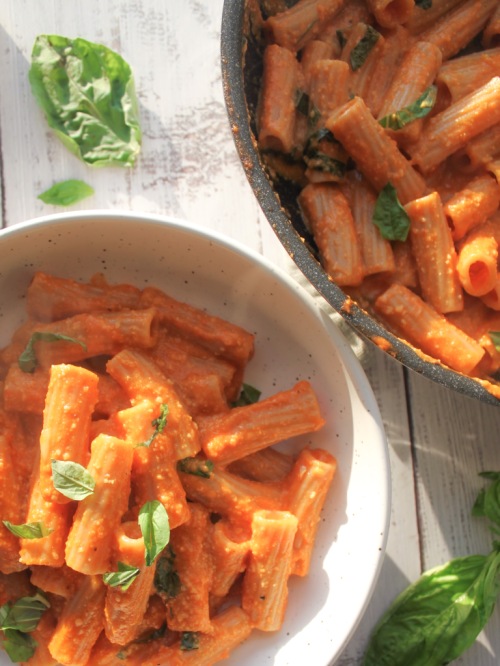
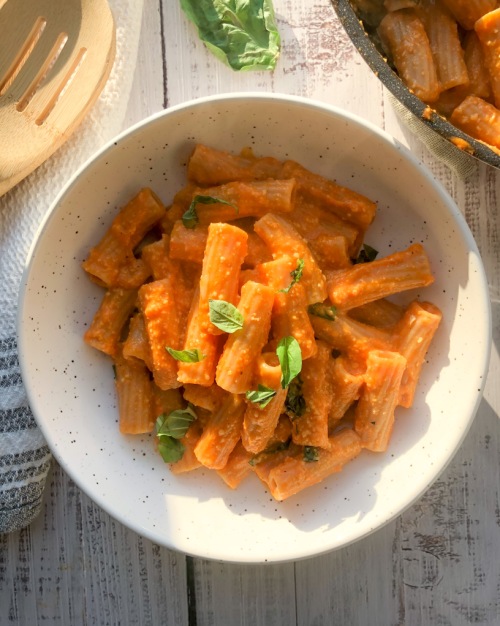
“Tortiglioni” is really hard to say. It looks kind of like rigatoni, so I may just stick with that if I ever have to say it out loud. I use Molisana’s spelt tortiglioni. It’s a brilliant pasta with beautiful grooves meant for soaking up luscious sauces and thus, this roasted red pepper sauce is thick and creamy and suck-up-able. It’s also vegan.
Now, I’m not saying the jarred, store-bought sauces aren’t practical and quick, but they don’t even come close to being as tasty as homemade sauce. And, sometimes you need to treat yo-self! This sauce is not-at-all daunting and all delicious. It may take longer than twisting open a lid and pouring, but it’s worth it. Today’s your day.
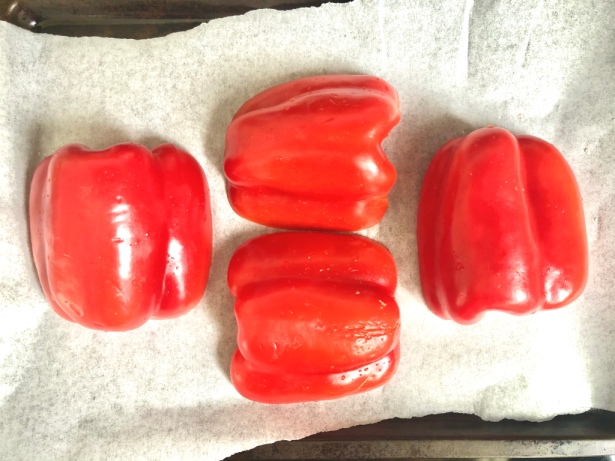
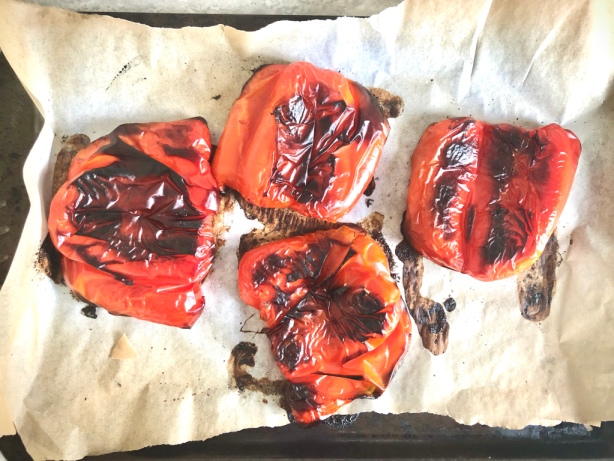
You are going to start with your red peppers – cut them in half, remove the seeds and place them cut side down on a baking sheet lined with parchment paper. Pop them into a 425 degree oven for about 30-40 minutes, flipping once, until their skin begins to blacken and they are completely soft throughout. Carefully peel the skin off and discard. Toss the peppers into your blender with some vegetable stock. To help thicken in a vegan-ified way, add half a cup of raw cashews as well. Season with some salt and pepper and blend up until creamy.
It a saucepan, heat up some olive oil and add a bunch of garlic. Add the creamy pepper sauce and thin it out with some of the water that the pasta has been cooking in. Let this simmer until your tortiglioni is done and then transfer the pasta right to the sauce. Giv’er a toss so that the pasta is completely coated, turn the heat off and add in some fresh basil and a little hit of lemon.
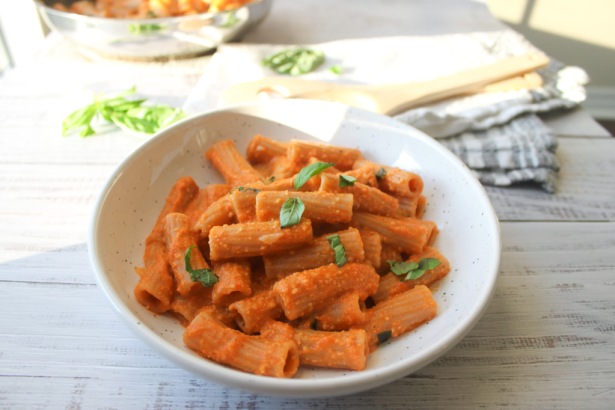
This pasta is so good the next day, too. If you eat dairy, I would also recommend dolloping some fresh ricotta on top while it is still warm. Drool.
I hope this recipe makes it to your kitchen. It is one of my absolute favourites. It’s also great for kids as the veggies aren’t noticeable and are blended right into the sauce. Any feedback is welcomed in the comment section below!
Tortiglioni in Homemade Roasted Red Pepper Sauce
Serving size: 3
Prep time: 5 minutes
Cook time: 50 minutes
Ingredients:
- 2 large bell peppers, cut in half lengthwise and seeds removed
- 3 servings of tortiglioni (about 255 g)
- 1 cup vegetable stock
- 1/2 cup raw cashews
- 1/4 tsp salt
- a few grinds of fresh black pepper
- 2 tbsp olive oil
- 2 cloves garlic, minced
- 9-10 basil leaves, ribboned or sliced
- squeeze of lemon (optional)
Instructions:
- Preheat oven to 425 degrees Fahrenheit.
- Place the four pepper halves onto a baking sheet lined with parchment paper, cut side down, and roast in oven for 30-40 minutes, flipping once. Peppers should have black areas and be soft throughout. Peel the outer skins off and discard.
- Bring a large pot of heavily salted water to a boil and add tortiglioni. Cook according to package directions, until al dente. Reserve 1/4 cup of the pasta water for the sauce before draining.
- Place the roasted peppers, vegetable stock, cashews, salt and pepper into a blender and blend until smooth.
- In a large saucepan, heat the olive oil over medium-low heat. Add the garlic and cook for 30 seconds until fragrant. Pour in the pepper sauce, stir and then add in the reserved pasta water. Let the sauce simmer for a few minutes and then add the cooked pasta, stirring to coat.
- Turn the heat off and add the basil and a squeeze of lemon juice. Serve with more basil on top.
The post Tortiglioni in Homemade Roasted Red Pepper Sauce appeared first on Never. Not. Eating..
]]>The post Lemon Caper Pasta appeared first on Never. Not. Eating..
]]>
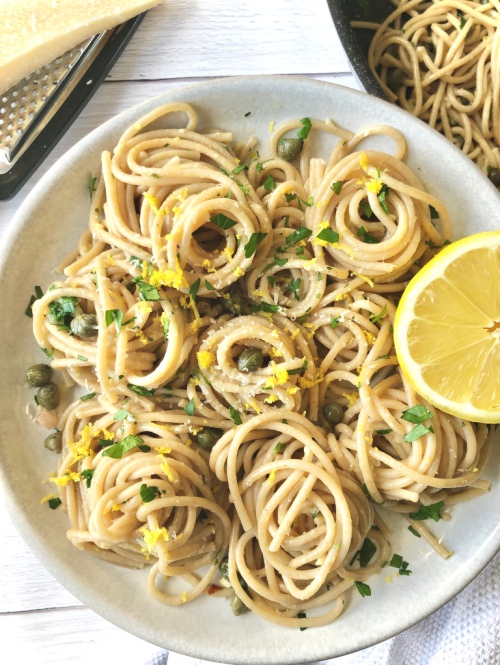
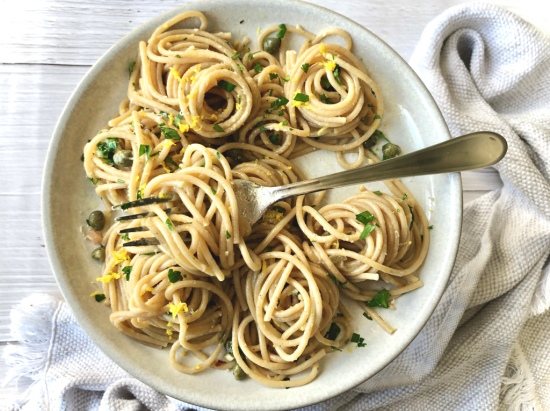
They say you should wake up everyday and still make your bed and get dressed while in self-isolation. They say it helps individuals feel more accomplished and more productive. So I’ve been rising and shining. I get up, straighten out my duvet, pick up all of my little decorative pillows and arrange them at the head of my bed. I put on my yoga pants (better than pajamas?!), slip on a cozy sweater and wash my face. Later, I praise my ambition and appreciate my yoga pant choice because, pasta. THIS pasta. Lemon Caper Pasta. The best pasta in all the lands. And it pairs perfectly with my stretchy pants.
REASONS TO MAKE LEMON CAPER PASTA
This is a perfect dish to make if:
- you want a date night idea
- you need a quick meal
- you like flavour
- you like food
- you are quarantined
- you are a human
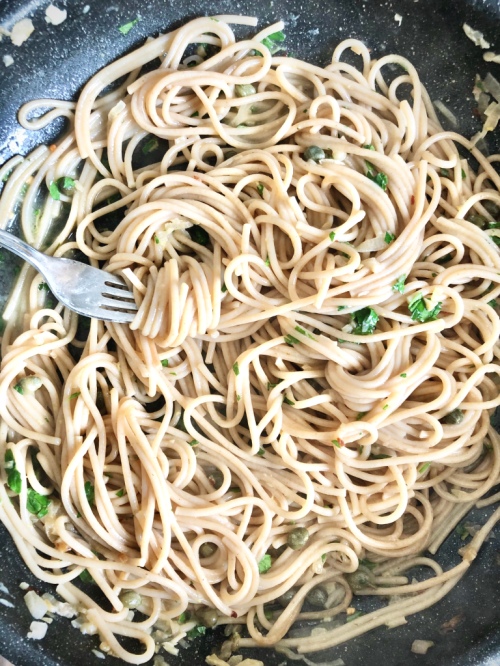
A luscious pasta coated in a white wine-butter sauce with melty parm, briney capers and fresh citrus.
The Pasta
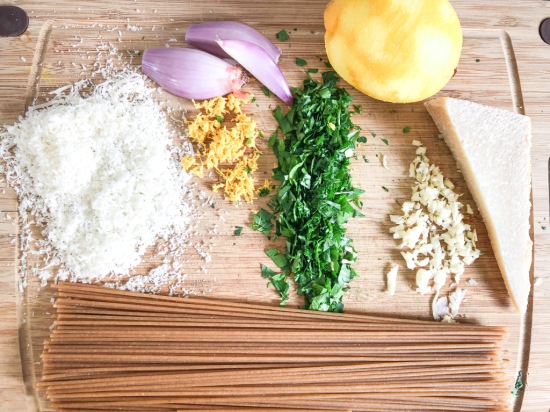
For the pasta, you can really use whatever you have. Here, I’ve used a whole wheat semolina pasta. It’s a bit heartier and nuttier than white pasta. It’s also healthier and is usually my go-to, as well as any spelt pastas.
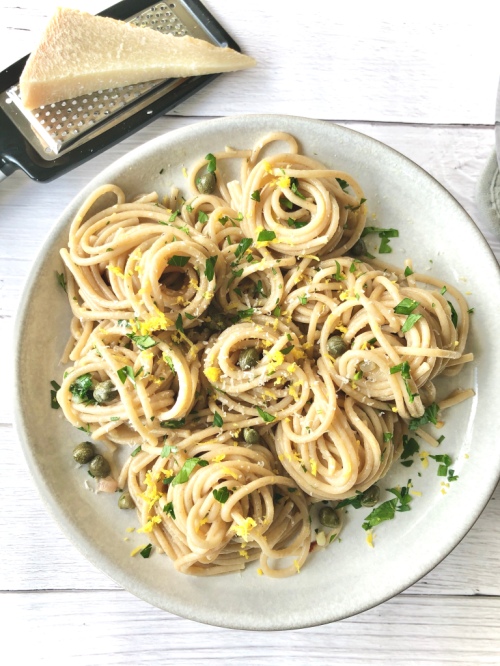
The capers give this recipe a delicious salty, briney punch. If you don’t want to venture off to the grocery store, you can buy capers here. You can also substitute them for green olives.
It has BOLD flavours. DELICIOUS flavours. CRAVE-WORTHY flavours.
Do you ever meet someone who is really attractive, smart AND kind? Yup. That is this recipe in pasta-form. It’s not impastable. It exists, right here.
Come and spaghet it.
OTHER IDEAS SIMILAR TO LEMON CAPER PASTA:
Simple Beetroot Pasta (for a fun, colourful meal)
Creamy Vegan Mushroom Rigatoni (a wholesome meal)
Butternut Squash and Kale Lasagna Roll-Ups (a great way to hide vegetables for the kids)
Tortiglioni in Roasted Red Pepper Sauce (Nonna will be proud)
Lemon Caper Pasta
Serving size: 2
Prep time: 5 minutes
Cook time: 20 minutes
Ingredients:
- 2 servings of choice pasta (approx. 180 g)
- salt
- 2 tbsp olive oil
- 1 shallot, diced
- 2 cloves garlic
- 1/3 cup white wine
- 1 tbsp butter
- 1/3 cup fresh, grated parmesan, plus more for topping
- 1/4 tsp chili flakes (optional)
- 1/2 tbsp caper brine (optional)
- 2 tbsp capers
- zest of one lemon
- juice of half a lemon (approx. 2 tbsp)
- 1/4 cup chopped parsley
- fresh ground pepper
Instructions:
- Fill a large pot with water and bring to a boil. Salt the water generously and add the pasta. Cook according to package directions, until ‘al dente.’ Reserve about 1/3 cup of the pasta water before draining.
- Meanwhile, add olive oil to a large skillet over low heat. When pan is warm, add the shallot and stir for a few minutes until tender. Add garlic and stir for about 30 seconds until fragrant. Pour the white wine into the pan and increase the heat to medium-high. Let the wine reduce for about 5 minutes, or until you can no longer smell the alcohol. When reduced by about half, add the butter and stir to incorporate. Reduce the heat again to medium-low.
- When the pasta is done, add it right to the pan along with the reserved pasta water. Add the parmesan and chili flakes to the pan and toss everything together.
- Turn the heat off and add the caper brine, capers, lemon zest, lemon juice, parsley and a few grinds of fresh black pepper. Toss to combine, dish onto two plates and top with more parmesan, if you would like.
The post Lemon Caper Pasta appeared first on Never. Not. Eating..
]]>The post Orzo, Halloumi and Roasted Grape Salad appeared first on Never. Not. Eating..
]]>
Enter: Orzo. A little rice-shaped pasta that absorbs flavours and makes a perfect side dish or salad.
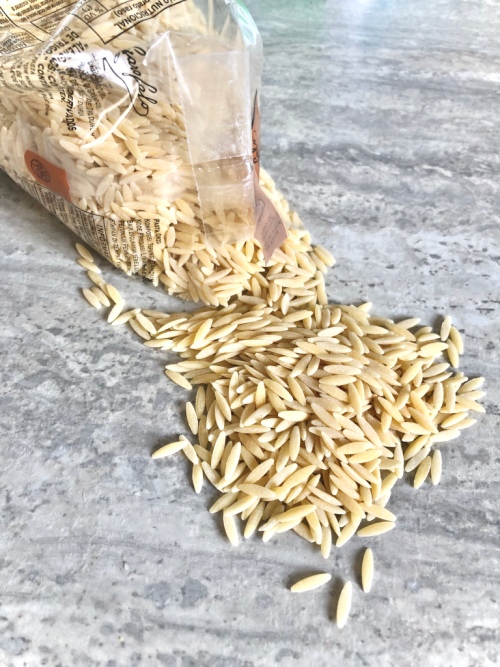
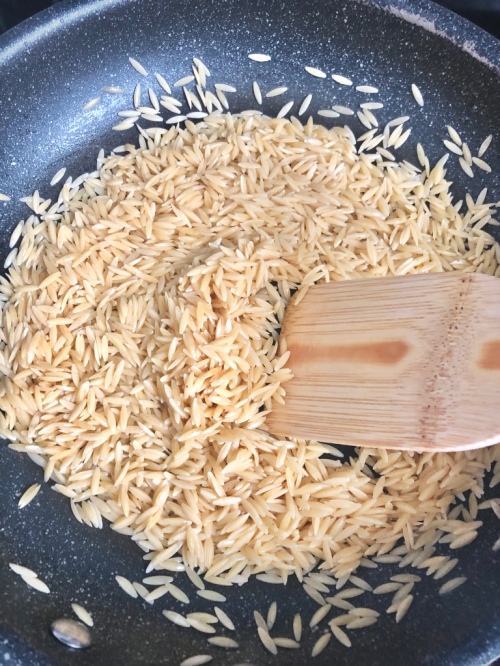
Cooking orzo is easy – Just add some olive oil to a saucepan and toast for a minute or two to help bring out it’s rich flavour. Add some finely minced garlic, salt and bring it to a boil in some water. Reduce and let it sim-simma for about 8 minutes until perfectly al dente. I dare you not to eat it straight out of the pan. Double doggy dare you.
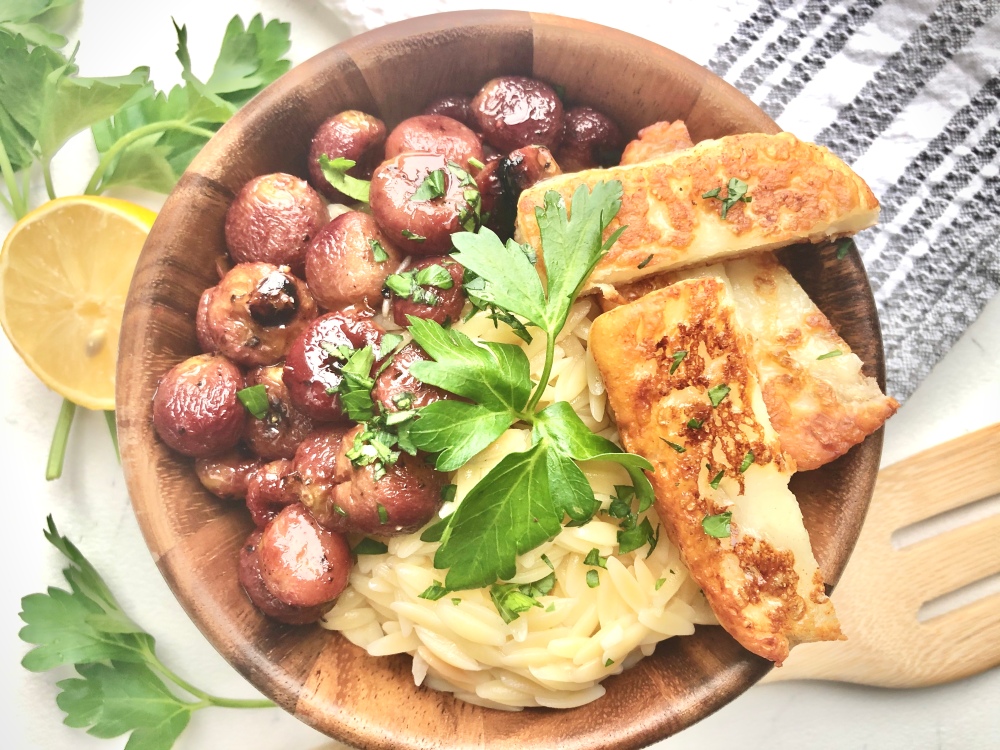
Being a pasta, orzo originated in Italy, but I thought I’d give this dish a Middle Eastern spin by adding some sweet roasted grapes. If you have never roasted grapes, I’m about to change your life. Happy birthday.
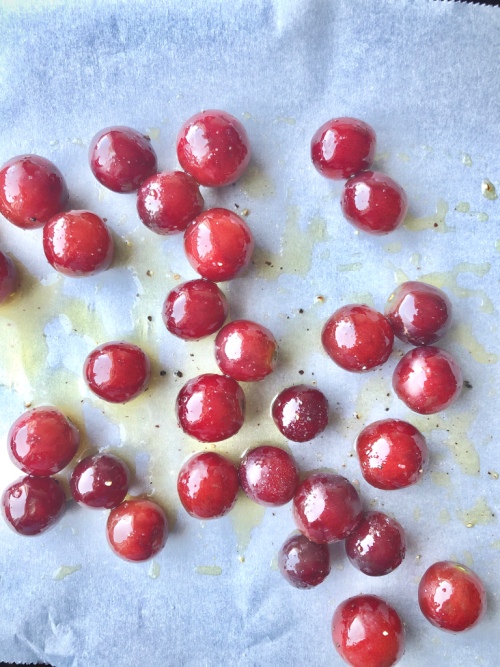
All these seedless red grapes require to bump their flavour up is a bit of olive oil, some salt and pepper and a 375 degree oven. Twenty minutes and their juices begin to release, the grapes blister and caramelize and develop a really rich and sweet flavour. They would make a great snack on their own, as a topping on some crusty bread with a soft cheese, or in any salad that needs a boost.

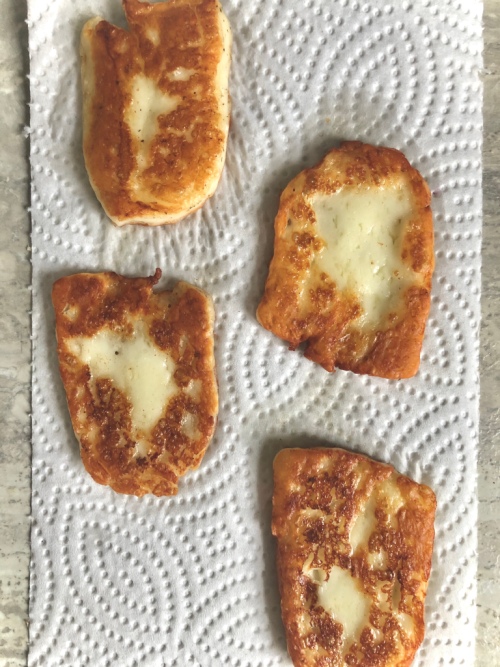
Another Middle Eastern element brought to this dish is the salty, tangy, pan-fried halloumi that pairs perfectly with the sweetness of the grapes and the creamy orzo. It’s difficult to state my favourite cheese, I mean, they are all so life-changing, but halloumi is definitely in the top three. You just put it in a pan set to medium-high heat with some olive oil and fry it up until golden brown on the outside and soft and melty on the inside. Don’t worry – it holds its shape and doesn’t make a mess of your pan! So yum.
To finish off this salad, whip up a vinaigrette with some freshly squeezed lemon, apple cider vinegar, za’atar, olive oil, salt and pepper and a whole bunch of freshly chopped parsley.
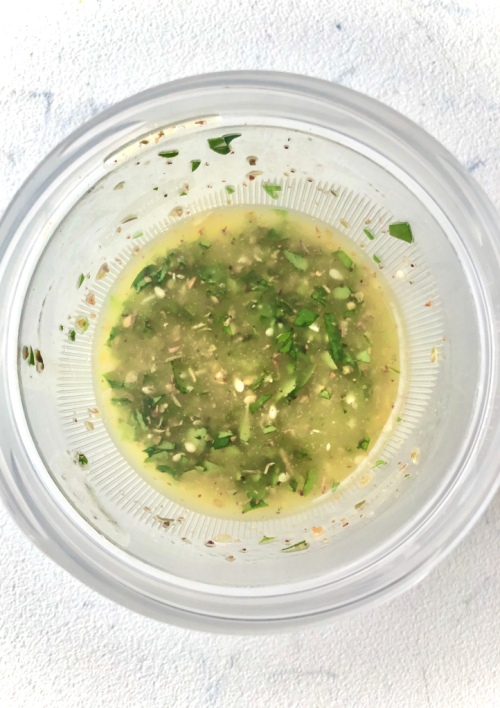
Drizzle it over the orzo, grapes and cheese and go to town. Honestly, I could demolish this salad with or without the dressing, it’s just that great.
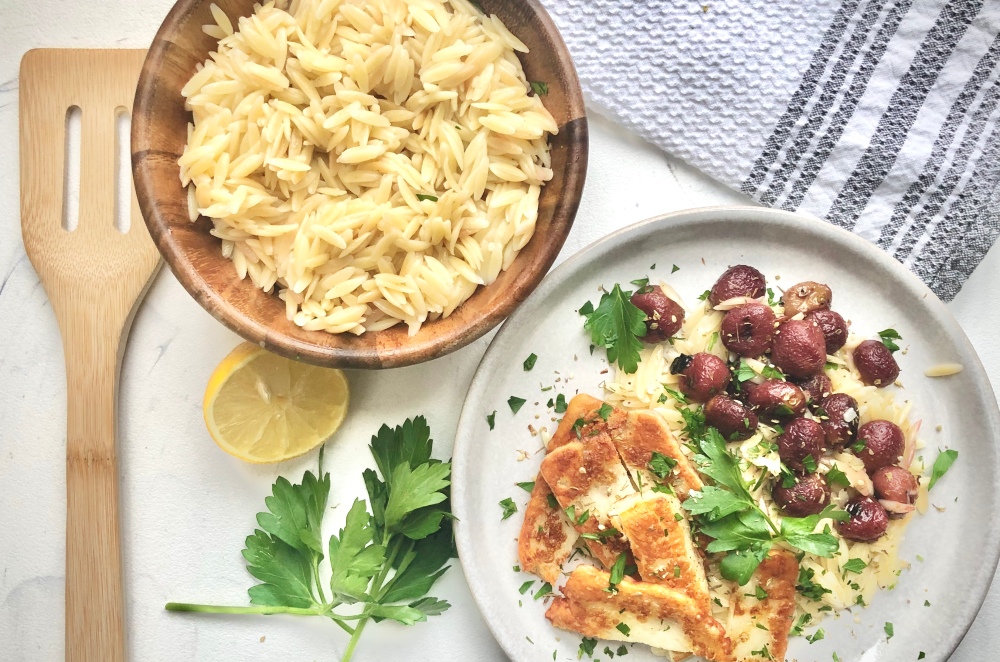
Super simple, super delicious. A perfect salad to pair with a grilled white fish or some buttery shrimp skewers. Also amazing on it’s own.

Orzo, Halloumi and Roasted Grape Salad
Serving size: 3-4 (as a side)
Prep time: 5 minutes
Cook time: 20 minutes
Ingredients:
- 1.5 cups washed seedless grapes
- olive oil
- salt
- pepper
- 1 cup orzo
- 1 garlic clove, minced
- 2 cups water
- 200 g halloumi cheese, sliced 1/4 inch thick
- Fresh parsley (for garnish)
For the dressing:
- 1.5 tbsp freshly squeezed lemon juice
- 1 tsp apple cider vinegar
- 1 tsp za’atar spice
- 2 tbsp finely chopped parsley
- 2 tbsp olive oil
- pinch of salt and pepper
Instructions:
- Preheat oven to 375 degrees F.
- Toss the grapes with one tablespoon of olive oil and sprinkle with a few pinches of salt and three to four grinds of fresh black pepper. Roast in the oven for twenty minutes, tossing halfway through. Grapes will blister and release their juices.
- While the grapes are roasting, add one tablespoon of olive oil to a large saucepan over medium-high heat. When hot, add the halloumi slices to the pan and fry for a few minutes on each side, or until golden brown. Remove and place on a paper towel to drain any extra oil.
- Turn the heat down to low and add the orzo to the same pan you were using for the halloumi. Toast for about two minutes, stirring frequently. Add in the garlic and continue to mix until fragrant, about thirty seconds. Pour in the water and a teaspoon of salt, bring to a boil and then lower heat, cover and simmer for 8-10 minutes, or until the orzo is cooked but still has a bite to it. Drain any excess water and rinse orzo with cold water over a fine mesh sieve.
- For the dressing: Combine all ingredients and shake together in a mason jar or use a whisk to combine.
- Assembly: Scoop the orzo onto a serving platter. Add the roasted grapes and the halloumi and drizzle the dressing over top. Start with a small amount and add more according to your taste. Garnish with more fresh parsley and a sprinkling of za’atar. Great served warm or cold!
The post Orzo, Halloumi and Roasted Grape Salad appeared first on Never. Not. Eating..
]]>The post Easy Butternut Squash Fettuccine “Alfredo” with Whipped Ricotta appeared first on Never. Not. Eating..
]]>- Smooth and rich like an alfredo but without the dairy and calorie count
- Vegetable bonus blended right into the sauce
- A lot less fat content than regular alfredo
- Cloud-like whipped ricotta (okay, it’s dairy, but some things are just worth it)
That is all. Hopefully you are convinced.

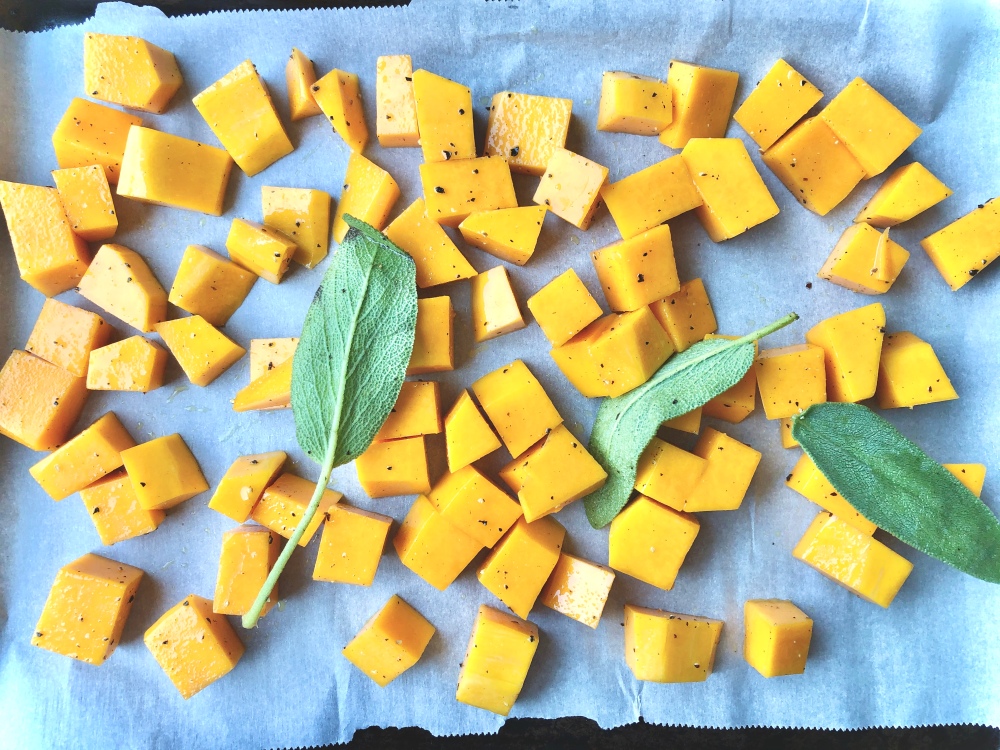
This recipe starts like any good vegetarian recipe – with a few cups of roasted vegetables. So sharpen your knife and start cubin’ up that butternut squash, add a few sage leaves, do the drizzy with some EVOO and season with S & P! Pop it in the oven and forget about it (well, for 20 minutes, until you have to give ’em a toss)!
In the meantime, throw some fettuccine into a pot of heavily salted boiling water and cook until al dente.
When the squash is slightly caramelized and tender, remove from oven and let’s start the transformation from solid –> liquid(ish). Grab your blender – I use my Ninja for everything…it is A.M.A.Z.I.N.G. – transfer the squash and some veggie stock and blend until smooth.
On the same sheet tray that you had the squash on, add two tablespoons of breadcrumbs and a quarter cup of chopped walnuts and put back into the oven to toast up. This only takes a few minutes, so watch carefully! When browned, remove from oven and toss in a few finely chopped sage leaves and some melted butter and set aside…YUM.
Let’s continue shall we…I’m drooling. Okay – grab a pan, heat some olive oil and saute some diced shallots until transparent. Add in a few cloves of minced garlic and it’s ready for the sauce. Pour in the butternut squash puree and add some more stock to the pan, cooking and stirring until smooth and combined.
Next, add half of a cup of canned coconut milk and simmer for a few minutes until sauce has thickened.
While the sauce is finishing, grab your ricotta from the fridge and beat with a hand mixer with 1 tablespoon of freshly squeezed lemon juice, a pinch of salt and a few grinds of pepper. Whip until it is smooth and creamy and spreadable and marvelous.

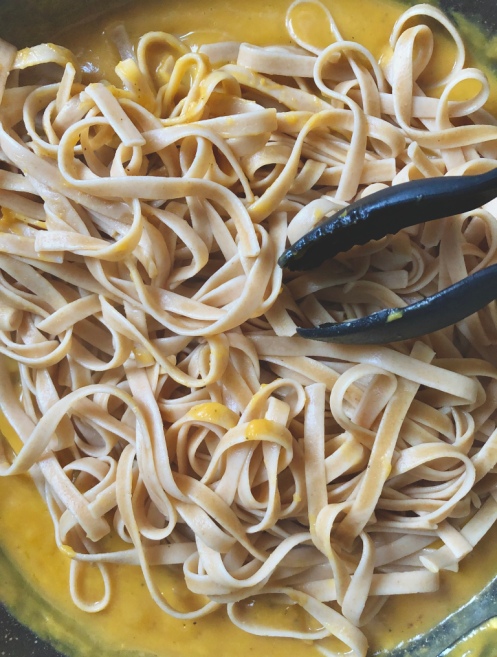
The Grand Finale: When the sauce coats the back of a spoon, it’s ready for it’s best friend – pasta – to join it in the pan. Toss the pasta around with a pair of tongs and be sure to coat every last strand with that velvety sauce. Turn the heat off and add a squeeze of lemon juice to bring it altogether.
Plating: Start with the whipped ricotta. Maybe even be fancy and make a little “swoop” on your plate!

Next, add the fettuccine, and then top with the bread crumb/walnut mixture. And now it’s time to manger, manger (that’s French, mmmm kay?!)!

One question – Are you a “use a spoon to assist in the delicate twirling of the noodles around your fork” kind of person, or a “shove noodles in mouth as quickly as possible, I’m not worried about whether they are hanging from my mouth” kind of person? Because I’m definitely number two.

^ A twirling attempt…strictly for pictures.
Easy Butternut Squash Fettuccine “Alfredo” with Whipped Ricotta
Servings: 4
Prep time: 15 minutes
Cook time: 40 minutes
Ingredients:
- Olive oil
- 3 cups of butternut squash, cubed
- 6-8 sage leaves, separated
- 325 g fettuccine (or 4 serving sizes)
- 1/2 cup ricotta cheese
- 1.5 tablespoons fresh lemon juice, separated
- 2 tbsp bread crumbs
- 1/4 cup walnuts, finely chopped
- 1 tbsp butter, melted
- 1 cup vegetable stock, separated
- 1 shallot, finely diced
- 2 cloves garlic, minced
- 1/2 cup canned coconut milk
- salt and pepper to taste
Instructions:
- Preheat oven to 375 degrees F.
- Line a baking sheet with parchment paper and add squash, 1 tbsp olive oil, 3-4 sage leaves, a few pinches of salt and some fresh black pepper and toss to coat. Place in the oven and roast for 30-40 minutes or until you see slightly caramelized edges and squash is fork-tender.
- Meanwhile, bring a pot of heavily salted water to a boil and add fettuccine. Cook until the pasta is al dente (according to package directions…or taste one)! Reserve one quarter cup of the pasta water and then drain the fettuccine and set aside.
- For the whipped ricotta: Add ricotta, 1 tablespoon of lemon juice and a pinch of salt and pepper to a medium bowl. Use a hand mixer and whip on medium speed until ricotta is smooth and fluffy – about 3-4 minutes. Place in fridge to keep cool.
- For the crumb topping: On a baking sheet lined with parchment paper, toast the bread crumbs and walnuts in the oven for about 5-8 minutes, or until golden brown. Watch carefully so they don’t burn. Remove from oven and add 3-4 finely chopped sage leaves and the melted butter. Toss and set aside.
- When the squash is done cooking transfer to a blender (don’t discard the sage leaves, transfer to blender as well) and add 1/2 cup of vegetable stock. Blend until smooth.
- Heat a tablespoon of olive oil in a large pan over medium-low heat. Add the shallot and saute for a few minutes until it starts to turn translucent. Add the garlic and cook for 30 seconds, or until fragrant. Pour the blended squash into the pan and add the quarter cup of pasta water and the other 1/2 cup of stock, stirring for a few minutes until smooth. Add the coconut milk and simmer until it thickens and coats the back of a metal spoon. Squeeze a bit of lemon juice overtop of the sauce and then add the pasta. Turn the heat off and toss the pasta around until coated with the sauce.
- To plate, spread some whipped ricotta on the bottom of your plate. Add the pasta on top and then sprinkle with the bread crumb/walnut crumble. Bravo!
The post Easy Butternut Squash Fettuccine “Alfredo” with Whipped Ricotta appeared first on Never. Not. Eating..
]]>