The post Cinnamon Vanilla Cashew Butter Recipe appeared first on Never. Not. Eating..
]]>WHAT IS CINNAMON VANILLA CASHEW BUTTER?
Well, I’m so glad you asked! It’s your regular nut butter with a gorgeous, put-me-in-the-holiday-mood kick! Who doesn’t love warm notes of cinnamon and dreamy vanilla? This nut butter is dressed up and ready for a night on the town. It’s all-natural and all-delicious!

WHY I LIKE THIS CINNAMON VANILLA CASHEW BUTTER
I am someone who is obsessed with nut butters, but ever since groceries have skyrocketed in price, peanut and other nut butters are basically unaffordable. I mean, seven dollars for a jar of peanut butter…are you nuts?! So now, I head to Costco, buy a large bag of cashews for cheap and makes TONS of nut butter with it. It’s much more cost effective, not to mention I can see everything going into it!

THE INGREDIENTS
Another great thing about this recipe is the minimal ingredients. Just three to be exact (not including salt). They are:
- raw cashews
- cinnamon
- vanilla
- pink Himalayan sea salt
HOW TO MAKE CINNAMON VANILLA CASHEW BUTTER
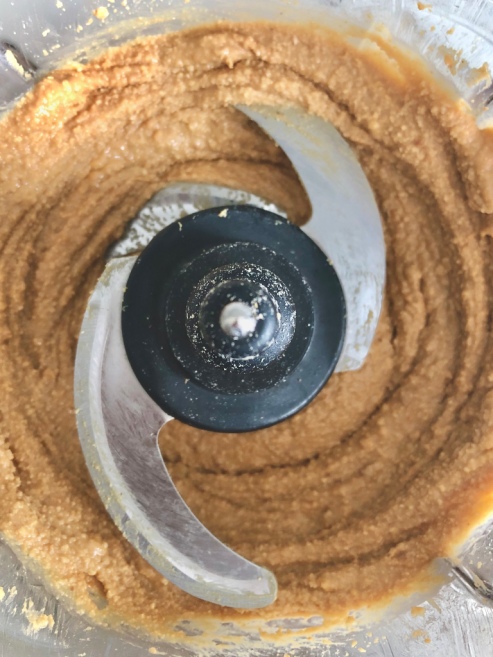
The first, and arguably, the most important step of this recipe is toasting the cashews. With an oven set to 350 degrees Fahrenheit, roast cashews for 5-8 minutes, checking often. Nuts burn easily and quickly, so it’s important that you keep an eye on them. Once they start turning light brown, remove them from the oven.
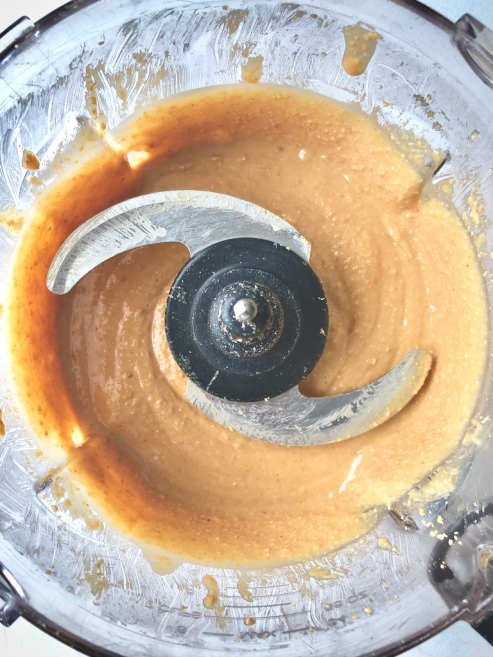
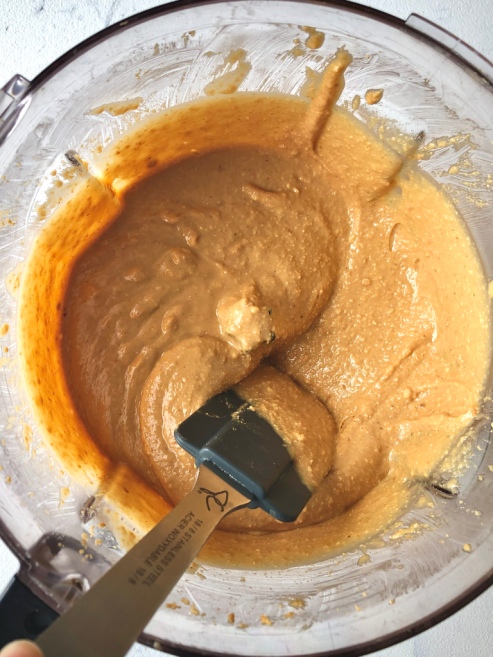
Now, you just add all of the ingredients to a food processor and blend until smooth, or until it reaches your desired consistency. Make sure you have a high processed blender, like the Vitamix, or the Ninja, and be patient with it! It takes about 15-20 minutes to become “butter,” so just trust the process.

TIPS
- Use 100% real vanilla – it’s much better than the artificial stuff
- Have a spatula while the nut butter is blending and scrape down the sides often
- Give the engine of your blender a break now and again to preserve it’s life
OTHER HEALTHY SPREADS YOU NEED TO TRY
Vegan Cilantro Lime Dressing (I put this stuff on everything)
Pink Hummus (perfect for date night or Valentine’s Day)
3-Ingredient Strawberry Chia Jam (would go perfectly with this cashew butter)
TOOLS I USED TO MAKE CINNAMON VANILLA CASHEW BUTTER
Click below to access the tools I used for this recipe:


Cinnamon Vanilla Cashew Butter
Servings: Makes approximately 1 cup
Prep time: 20 minutes
Cook time: 5 minutes
Ingredients:
- 2.5 cups raw cashews
- 1 tsp cinnamon powder
- 1/2 tbsp pure vanilla extract
- 1/4 – 1/2 tsp pink Himalayan sea salt (or just regular sea salt)
Instructions:
- Preheat your oven to 350 degrees Fahrenheit and place cashews on a baking sheet. Bake for 5-8 minutes, or until they begin turning a light golden brown colour. Watch carefully – they burn quickly!
- Once the cashews are toasted, add them to a food processor with the cinnamon, vanilla and 1/4 teaspoon of salt. Pulse a few times and then blend. Stop the motor every so often and scrap the sides down. It will look very grainy at first, but after about 15 minutes of blending and scraping, it will start to smooth out. The longer you blend, the smoother it becomes.
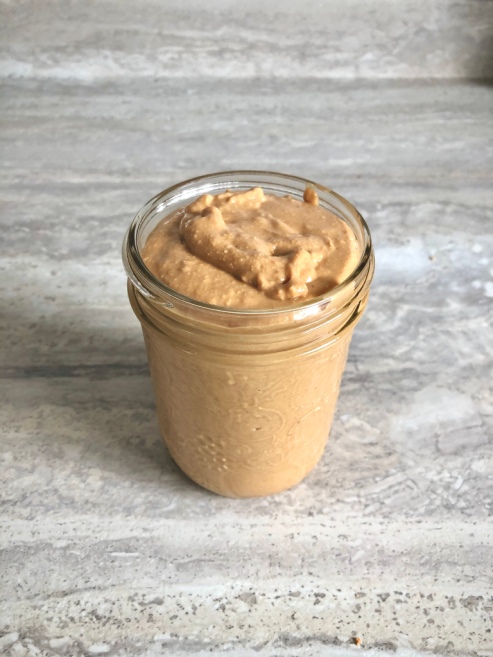
- Once the cashews have reached the texture you like, taste it and add more salt if desired. Spoon the butter into an airtight container and store in the fridge for up to 5 weeks.

The post Cinnamon Vanilla Cashew Butter Recipe appeared first on Never. Not. Eating..
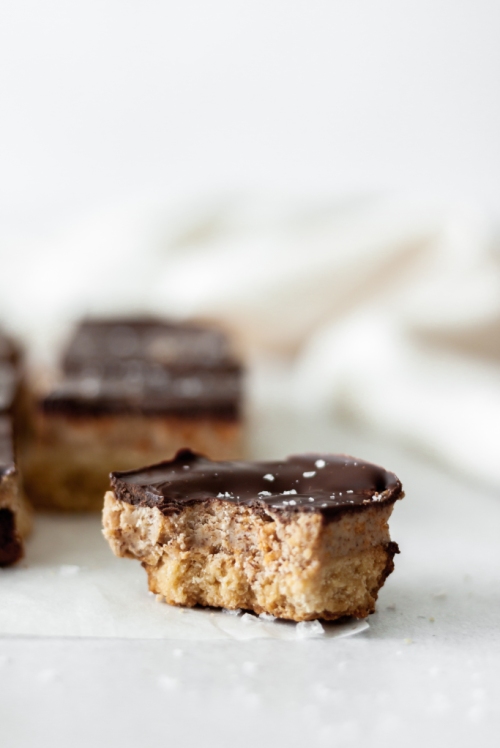
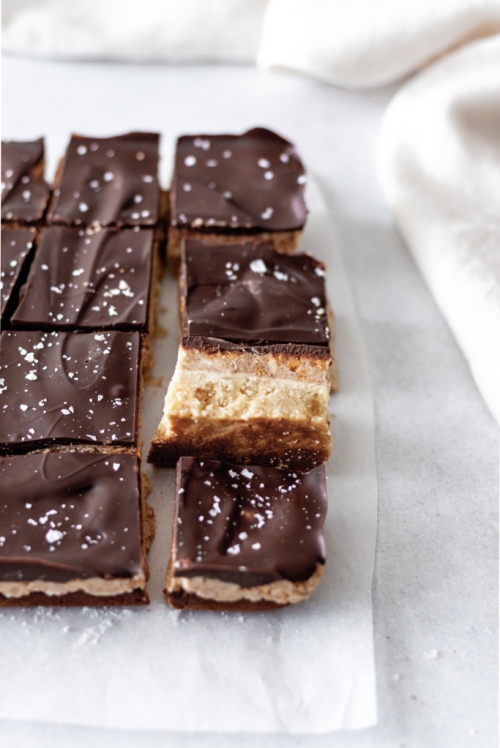
]]>The post Dark Chocolate Almond Butter Bars appeared first on Never. Not. Eating..
]]>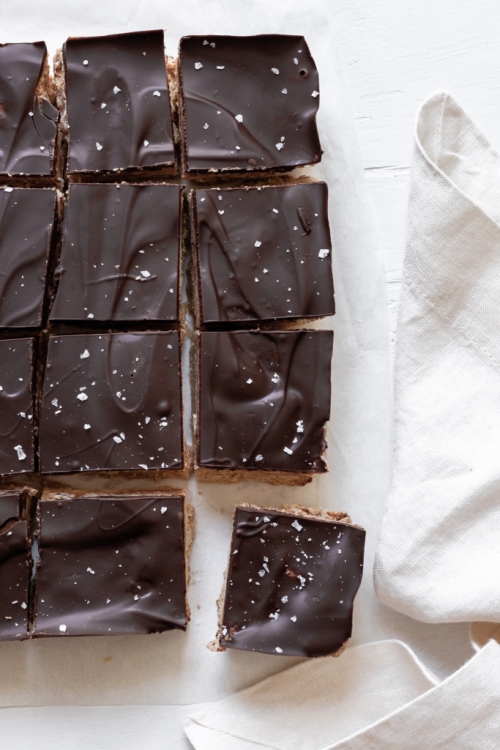
I’m a HUGE choco + peanut butter fan, but I thought I’d switch it up today and choose a slightly healthier nut butter to create a slightly less-healthy dessert. Balance.

These bars have a thick shortbread-type bottom layer, a crunchy and sweet almond butter centre, and a lush dark chocolate top. They are friggin’ delish.
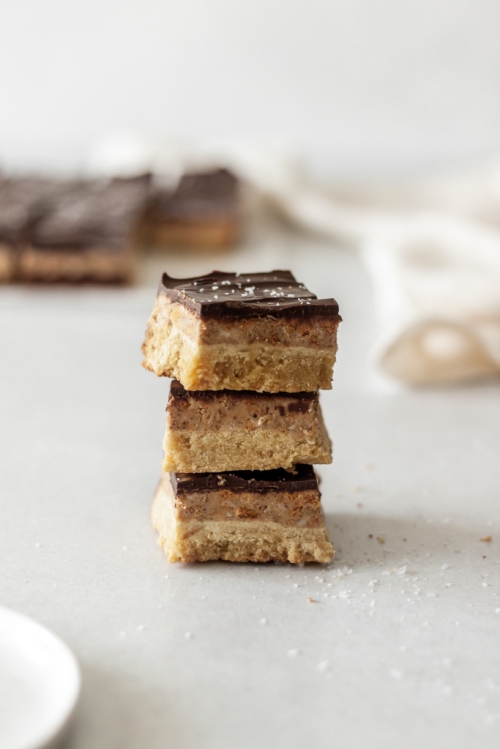
In order to keep these bars gluten-free, I’ve made the crust with a mix of almond flour and Bob’s Red Mill Gluten-Free All Purpose Flour, and I’ve crushed up my favourite gluten-free cereal to add texture to the middle. Feel free to swap for any gluten-filled flour or cereal you wish!
Let’s make them!
Dark Chocolate Almond Butter Bars
Servings: Makes 16 squares
Prep time: 10 minutes
Cook time: 10 minutes
Cool time: 1 hour
Ingredients:
For the bottom layer:
- 1 cup almond flour
- 1 1/2 cups gluten-free flour
- pinch of salt
- 3-4 tbsp agave
- 4 tbsp (1/4 cup) cold coconut oil
For the almond butter layer:
- 1/2 cup smooth almond butter
- 1/3 cup coconut oil, melted
- 1 cup powdered sugar
- 1 cup of your favourite gluten-free cereal, made into crumbs (makes a heaping 1/2 cup)
- pinch of salt
- 1/2 tbsp vanilla
For the chocolate layer:
- 150 g dark chocolate, chopped
- flaky sea salt, for topping (optional)
Instructions:
- Preheat oven to 350 degrees Fahrenheit and line an 8 x 8 inch baking pan with parchment paper.
- For the bottom layer – Combine the flours and salt in a food processor and pulse to combine. Add the coconut oil and three tablespoons of agave and pulse. If the dough does not start coming together, add the fourth tablespoon of agave. Dump into parchment lined pan and use your hands or the bottom of a glass to distribute evenly. Pierce the top a few times with a fork. Bake for 10-15 minutes, or until it turns light brown around the edges. Cool completely.
- For the almond butter layer – Combine all ingredients in a large bowl and stir to combine. Dollop the mixture onto the cooled bottom layer and use your hands to press down and spread evenly. Set aside.
- For the chocolate layer – Add the chocolate to a glass or heatproof bowl set over a double boiler. Melt, watching closely and stirring often. Alternatively, melt the chocolate in the microwave in small increments. Pour melted chocolate over the almond butter layer and place in the fridge to set for at least an hour. Cut into squares and serve!
Store in an airtight container in the fridge for up to 5 days.
The post Dark Chocolate Almond Butter Bars appeared first on Never. Not. Eating..
]]>The post Vegan Chocolate Bars appeared first on Never. Not. Eating..
]]>
Typically, I just snap off a few squares of dark chocolate and have that as an after-dinner snack, but sometimes, I like to switch it up! There are so many recipes that you can make using chocolate that are healthy, delicious and take only minutes to whip up. Like my Healthy 5 – Ingredient Peanut Butter Cups, for example. Or a 3 – ingredient brownie that I make using cocoa powder, bananas and nut butter. This chocolate bar recipe is no exception. It is quick, vegan and amazingly delicious. It tastes like a “Snickers” bar!
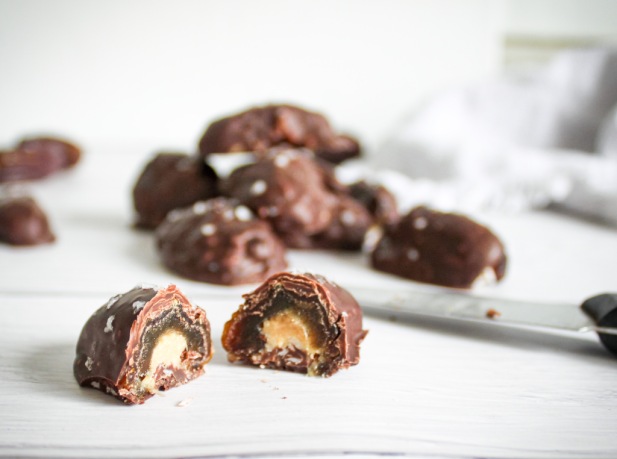
The MVP here is the Medjool Date. It’s caramel-y in texture and taste, and is the perfect vessel for the other ingredients. It’s also what gives these candy bars their sweetness, as there is no refined sugar added to this recipe. Nature’s perfect candy.

The chocolate: It is your choice whether you would like to make these bars completely vegan or not. If so, you can find vegan chocolate chips at the health section of your grocery store, or on Amazon, here. To start, melt your chocolate in a double boiler over simmering water, or carefully in the microwave in 20-30 second intervals, stirring in between. Try not to eat it out of the bowl at this point.
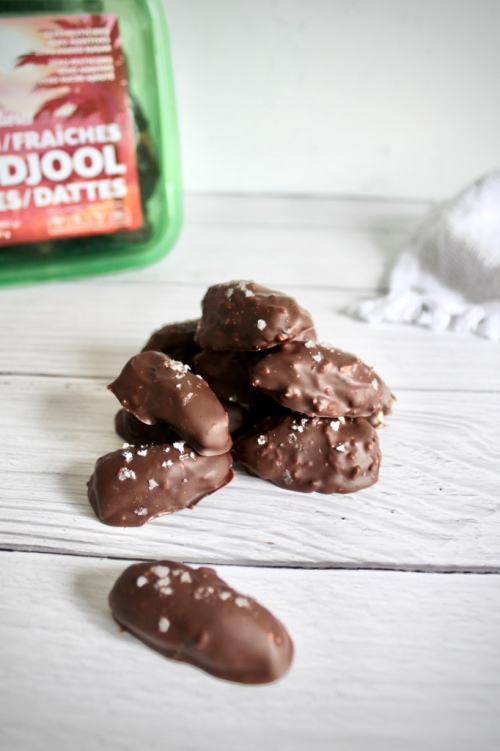
The assembly line: Set up your stations. It should go – dates, nut butter, shredded unsweetened coconut, melted chocolate and flaky sea salt. Now, we begin. Take a date, remove the pit and carefully tear it in half with your fingers. Use a knife to spread some nut butter over the open-side of one half and then dip the nut-buttered side into your coconut. Dip your filled date into the chocolate pool and use a spatula to help you coat the entire date. Scoop up the date with a fork and tap several times on the side of the bowl to let any excess chocolate drip off. Place your chocolate bar on a plate or tray lined with parchment and immediately sprinkle with a few flakes of sea salt. Continue with the rest of the dates and refrigerate for at least 15 minutes before enjoying!
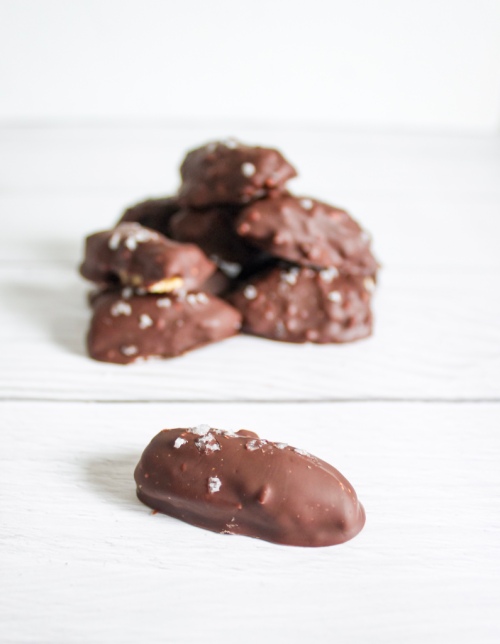
These are the perfect chocolate bar replacement. Chocolatey, caramely, ooey and gooey. And that sea salt just adds that extra hit of love. DROOL.
Vegan Chocolate Bars
Serving size: Makes 20 small bars
Prep time: 10 minutes
Cook time: 5 minutes
Chill time: 15 minutes
Ingredients:
- 140 g vegan dark chocolate
- 10 medjool dates, pitted and halved
- 1/4 cup nut butter (I prefer my Homemade Peanut Butter)
- 3 tbsp shredded unsweetened coconut
- flaky sea salt (optional)
Instructions:
- Fill a small pot with 2 inches of water and bring to a simmer on your stovetop. Place chocolate in a larger, heat-proof bowl and place the bowl on top of the pot, with a wooden spoon in between to let the steam escape. Stir regularly until the chocolate is melted. Remove from heat. Alternatively, you can melt your chocolate in the microwave by placing it in a microwave-safe bowl and melting for 20 – 30 second intervals, stirring in between, until smooth.
- Lay a piece of parchment paper on a small baking tray or a large plate and set aside.
- Take one half of a date and use a knife to spread nut butter on the open side of it. Dip the buttered side into the coconut flakes and then carefully place into the melted chocolate, using a spatula to help coat the entire date. Use a fork to scoop it up and tap on the side of the bowl a few times to allow extra chocolate to drizzle off. Place on prepared tray and sprinkle with a few flakes of sea salt. Repeat for the remainder of the dates.
- Place dates in the refrigerator for at least 15 minutes before serving. When they have cooled completely, transfer to an airtight container and store in the fridge.
The post Vegan Chocolate Bars appeared first on Never. Not. Eating..
]]>The post How to Create the Perfect Smoothie Bowl appeared first on Never. Not. Eating..
]]>
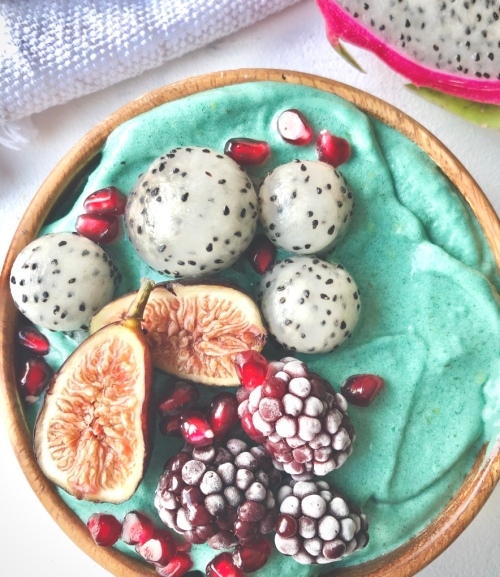
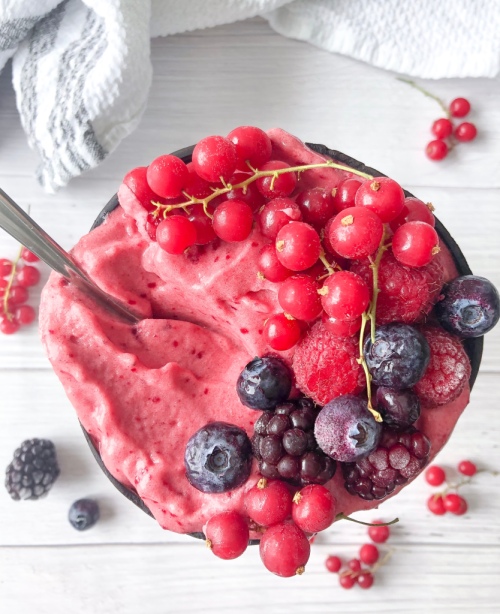
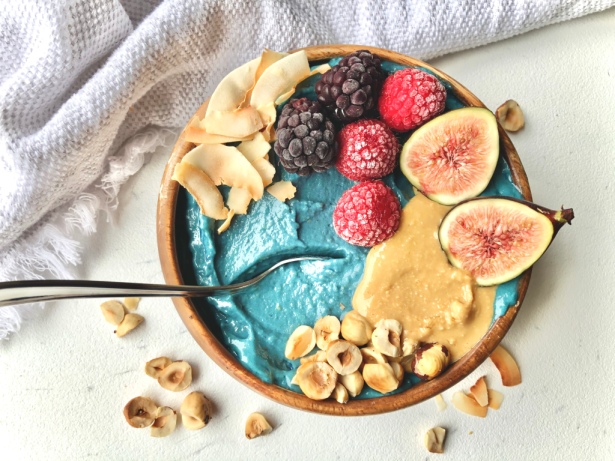
There’s just something about a creamy, texture-perfect bowl in the morning. It’s art, really.
Do you follow any of the most popular smoothie bowl accounts on Instagram? Their dreamy posts show the blending, spooning and topping of amazingly colourful, smooth and creamy bowls. This post is meant to teach you how to achieve a smoothie bowl that mimics that perfect texture and all of the other hacks that go along with creating the ultimate smoothie bowl, including product recommendations and links.
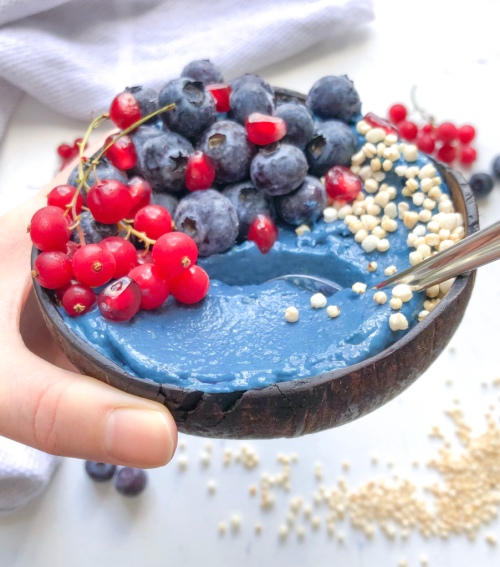
HOW TO CREATE THE PERFECT SMOOTHIE BOWL – TEXTURE
TEXTURE is one of the most important things about a smoothie bowl. Not too soupy so that it doesn’t support all of your delicious topping choices, and not too stiff so that it is “nice cream.” We are looking for that glorious in-between stage.

And here’s how: Choose a high-powered blender. The Vitamix is ah-mazing. I also love the Ninja food processor. This is really important as it needs to be able to pulverize frozen fruit.
CHOOSING THE RIGHT FRUITS
Secondly, choose fruits that “cream-up” well. Bananas (obviously) are the #1 choice. However, if for some reason you can’t have bananas, mangos are an excellent alternative. I buy fresh bananas, wait until they are slightly overripe and brown (but super sweet) and then peel them, cut them in half and freeze them. You can also cut them into rounds, but it’s much easier to know how much you are putting in if they are halved.
THE ADD-INS
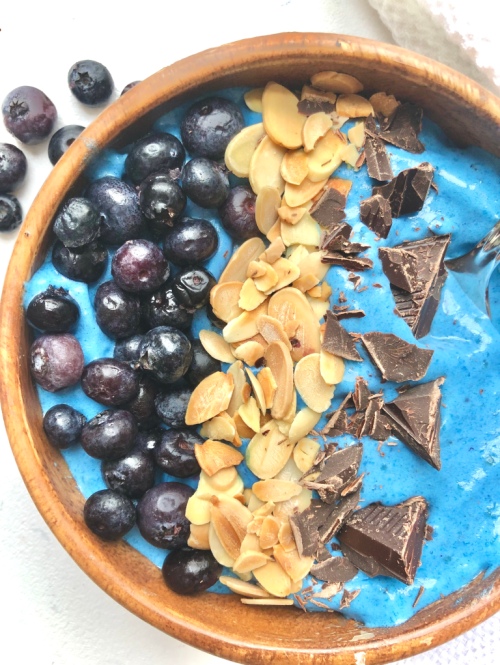
Add your frozen fruit choices to a blender/processor with all of your favourite superfoods. I have tried, tested and loved the following – Purple Sweet Potato Powder, Activated Coconut Charcoal, Maca Powder, Blue Spirulina Powder, and Green Spirulina Powder. Usually I choose two or three of them to add in one smoothie bowl. One colourful powder, one protein powder and Maca. Always.
BLEND IT UP!
Once you have your fruit and superfoods ready to go, pulse the blender a few times to start breaking up the fruit. Afterwards, blend on high, and while blending, slowly pour in the tiniest amount of non-dairy milk. This is the tricky part, as too much milk will make it too loose and none at all will make it nice cream (which is good, too). I would say start with one tablespoon and judge from there!
At this point, you need to continuously stop the blender to scrape down the sides of your bowl. Keep doing this until everything is well combined and smooth. Have faith in your smoothie…it will come together. Just do not over-mix as this will also loosen the texture.

HOW TO CREATE THE PERFECT SMOOTHIE BOWL – TOPPINGS
When you have achieved the ultimate smoothie consistency, pour your art into a beautiful bowl and top with all of your favs. My tried and true recommendations are as follows: Hemp hearts, chia seeds, hazelnuts, frozen berries, homemade peanut butter, slivered almonds, granola and coconut flakes.

THE FROSTED BERRY LOOK
One of the most popular toppings you will see in Instagram photos are frozen berries. They develop this gorgeous pale-white layer on their surface after you remove them from your freezer and let them hang out on the counter for a few minutes. Some tricks to achieving this look that I have found work for me are:
- Not washing your berries before freezing them (either buy organic or wash AFTER you take pictures…hehe)
- Do not stack berries on top of each other in their container in the freezer- just one single layer is best
- Leave them in your freezer for longer than 24 hours to achieve this look
- After a day or two in your freezer, remove them for about 10-15 minutes (don’t use them) and then put them back into your freezer…the next time you pull them out, they will be perfect!
- When plating, use food tweezers to place carefully – the warmth of your fingers will melt the spots you touch

Now take some pictures and grab a spoon!

I hope this post helps you achieve your ideal smoothie bowl. Here is an example of a pretty standard recipe that I use when creating my own. Enjoy!
How to Create the Perfect Smoothie Bowl – Mauve Smoothie Bowl
Servings: 2
Prep time: 5 minutes
Ingredients:
- 2 frozen bananas
- 1/2 cup frozen mango
- 1 tbsp vanilla protein powder
- 1 tsp maca powder
- 2 tsp Purple Sweet Potato Powder, optional (you can replace with your favourite superfood powder)
- splash non-dairy milk
Instructions:
- To a high-speed food processor or blender, add frozen fruit, protein powder, maca and superfood powder. Pulse a few times and then blend. While blending, drizzle in the non-dairy milk. You only need a tiny amount. Blend until everything is combined and smooth, scraping down the sides a few times as it comes together.
- Transfer to a bowl and add toppings of your choice. Enjoy!
The post How to Create the Perfect Smoothie Bowl appeared first on Never. Not. Eating..
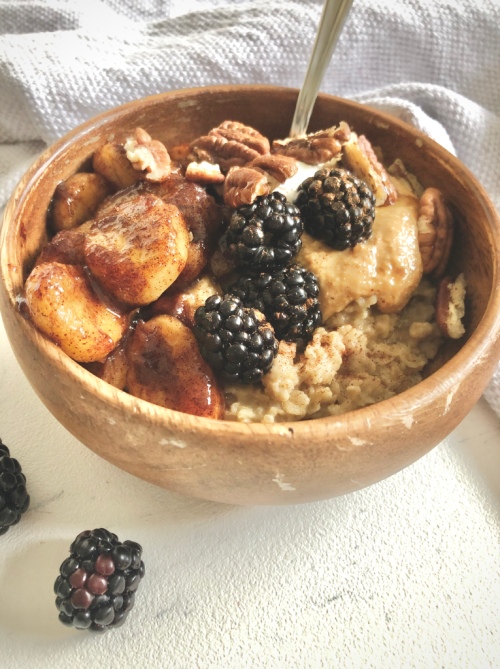
]]>The post Gooey Caramelized Banana Oatmeal appeared first on Never. Not. Eating..
]]>
This oatmeal is a 100% plant-based, animal-friendly, environment-saving bowl of happiness. It has Sunday morning, sit by the window with a blanket and coffee, petting your dog, written all over it.
Unlike the rest of my family growing up, I never was an oatmeal lover. I found it to be bland and texturally challenging to my palate. My brother loved those packaged brands that you pour boiled water over and I just never understood it and I still don’t. My mom loved Cream of Wheat, and when served to me, I swear I’d have to cover the bowl with a thick layer of brown sugar if I was getting it down. I was an oatmeal outcast in my family.
It is time that I fit in. It’s time that oatmeal was revolutionized. I needed to make it enjoyable, so I covered it in cinnamon and maple syrup and dolloped nut butter on top with some fresh fruit and warm bananas and I think I’m part of the fam now. Fingers crossed.
This quest to assimilate with oatmeal lovers began with my understanding that I just didn’t enjoy oats cooked in water, SO, the first thing that changed was the cooking of the oats themselves. Cashew milk is my new fav, and salt is definitely needed to begin the transformation from yuck to yum. I also added some cinnamon right to the pot as well as maca powder for a healthy boost. The oatmeal comes to a boil with double the milk and then simmers for a few minutes until thick and creamy.
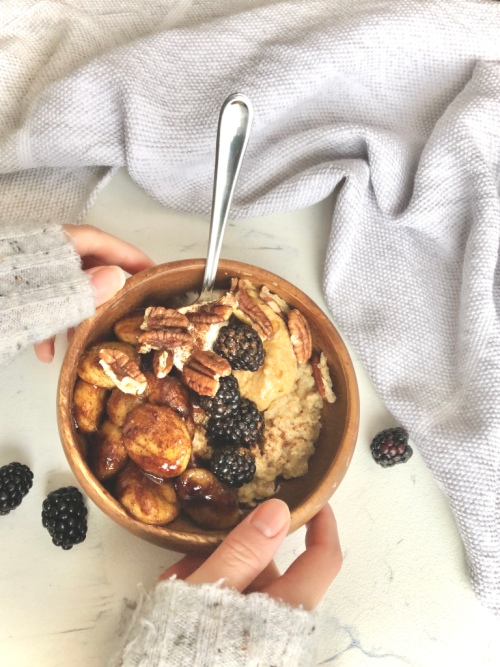
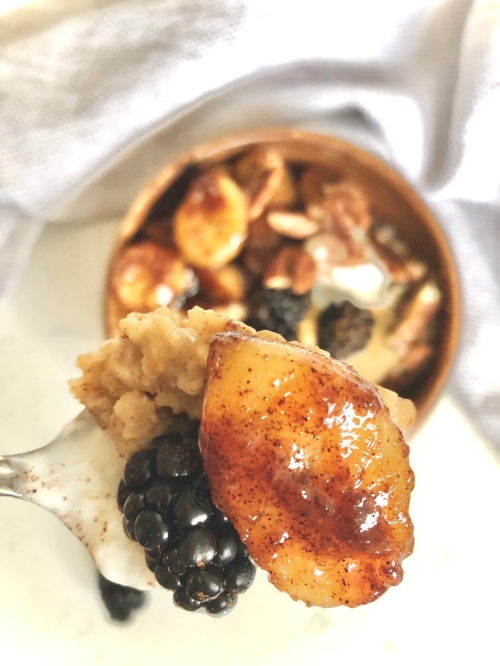
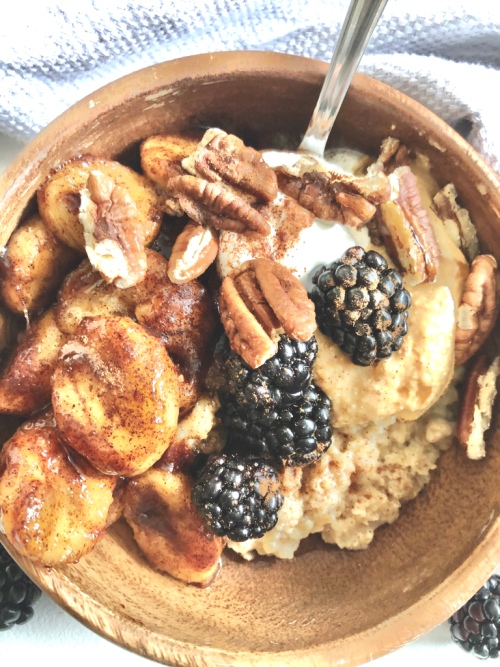
Separately, in a pan, I added coconut oil with maple syrup and some more cinnamon, brought this to a simmer and added my sliced bananas. These cook in the sauce and become sticky, gooey, delicious little bites to slather over to the oatmeal.

Finally, the topping queen works her magic with a creamy nut butter, fresh fruit to lighten things up, toasted pecans and a dollop of coconut yogurt to provide a very welcomed temperature contrast.
Now, that is an oatmeal that I can get behind!
I hope if you were like me and are upset about regular oatmeal, that this recipe inspires you to try again. Oatmeal lovers unite!
Gooey Caramelized Banana Oatmeal
Serving size: 1
Prep time: 2 minutes
Cook time: 6-7 minutes
Ingredients:
- 1/3 cup quick oats
- 2/3 cup non-dairy milk (I prefer cashew)
- 1/4 tsp salt
- 1 tsp cinnamon, separated
- 1/2 tsp maca powder (optional)
- 1/2 tbsp coconut oil
- 3 tbsp maple syrup
- 1 banana, sliced
- Optional toppings: Nut butter, coconut yogurt, toasted pecans*, fresh fruit
Instructions:
- To a small pot, add oats, milk, salt, 1/2 tsp cinnamon and maca powder. Bring to a boil and turn heat on low to simmer for 3-5 minutes, or until creamy.
- While the oats are cooking, add coconut oil, maple syrup and remaining 1/2 tsp cinnamon to a medium saucepan. Bring to a simmer and add the banana. Mix to coat bananas and continue to cook for 3-4 minutes, until bananas are soft and caramelized.
- Spoon the oatmeal into a bowl and top with bananas, nut butter, yogurt, toasted pecans, fresh fruit, a dash of cinnamon and a bit more maple syrup.
NOTES:
*Toast pecans in a 350 degree oven for 5-7 minutes, watching carefully to avoid burning.
The post Gooey Caramelized Banana Oatmeal appeared first on Never. Not. Eating..
]]>The post Homemade Peanut Butter appeared first on Never. Not. Eating..
]]>Do you, like me, eat PB by the spoonful?! After work, before the gym, as a snack, in bed…you know, whenever there’s an opportunity? Well then, keep reading!!
I used to go to the grocery store and peruse the health food section, desperately looking for a decent-priced nut butter, but was always disappointed. It’s SO expensive to buy any sort of spread, from peanut to tree nut. I would then be stuck purchasing the normal brand name butters (which are delicious, but who knows what goes into them)?! And then I thought, I should just make my own! How have I never thought of this before??? “How hard could it be?” I asked myself. Not hard. Not hard at all. It’s actually the opposite of hard. And the best part is I know everything that I am putting into my body. Amazing. Sometimes I have good ideas.
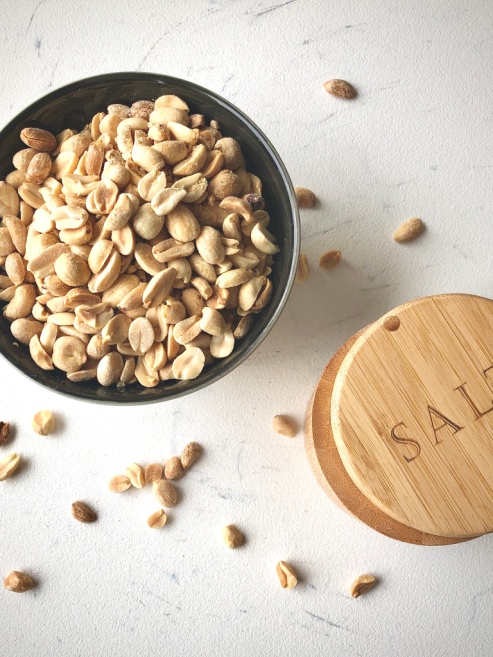
So here’s what you need:
- Peanuts
- Salt
That’s it! Two ingredients. It’s really too good to be true.
So here we go: Put the peanuts in a food processor with the salt and blend. Seven and a half minutes later…DONE. You made peanut butter. No sugars, no stabilizers, no other additives. Just pure legume-y goodness. Yay!
Okay. I’ll break it down a bit more for the non-believers. Step 1: Add about 4 cups of dry-roasted peanuts to a food processor with 1 teaspoon of salt. Pulse a couple of times to break up the peanuts and mix in the salt. It should look something like this:

Step 2: Set your food processor to “blend” and watch the magic happen. Blend for 2-3 minutes and stop to scrape down the sides with a spatula and give the motor a break.
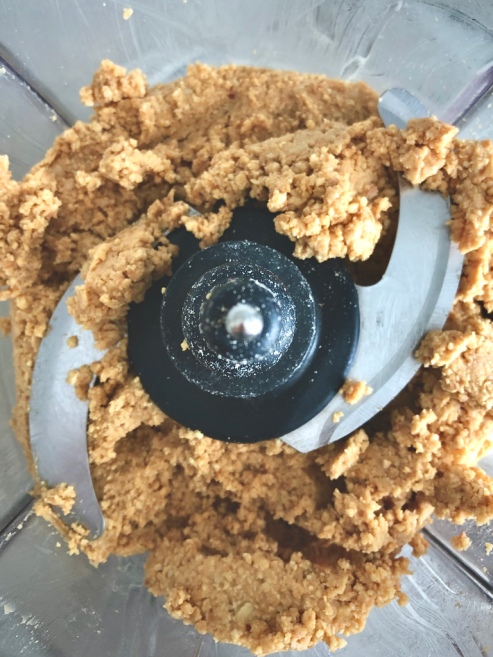
Step 3: Blend again for another 2-3 minutes, stopping once more to scrape and rest. You will see the consistency begin to change. The peanuts start to release their oils and the mixture becomes creamier and creamier.
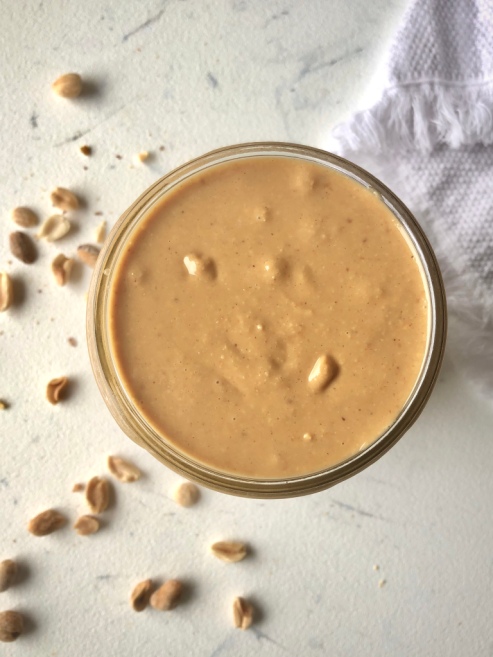
Step 4: Alright, now we blend until happy with the texture. I like my peanut butter pretty smooth, so usually I blend for a total of 8 minutes or so. You be the judge. Stop the food processor every so often to check the consistency. I like mine to look like this when done:
A few teeny, tiny pieces. But mostly smooth!
Drool! So yum. Pour this deliciousness into a mason jar and pop it into your fridge to stay fresh.
Homemade Peanut Butter
Servings: 2
Prep time: 1 minute
Cook time: 8 minutes
Ingredients:
- 4 cups dry-roasted peanuts*
- 1 tsp salt
Instructions:
- Place peanuts into a food processor with the salt and pulse a few times.
- Blend for about 7-10 minutes (depending on how smooth you want it), stopping the processor every few minutes to scrape the sides and give the motor a break.
- Pour into an air tight jar and store in the fridge.
Notes:
*You can buy peanuts already dry-roasted (unsalted), but it is always better to do this step yourself from raw peanuts in a 350 degree oven for about 15 minutes, checking every so often to avoid burning.
Additions: If you find this peanut butter is not sweet enough for you, you can always adjust by adding honey or sugar to the recipe.
The post Homemade Peanut Butter appeared first on Never. Not. Eating..
]]>