The post The Triple P’s – Pink Pitaya Pancakes (Vegan & GF) appeared first on Never. Not. Eating..
]]>
Not only is pink a pretty hue, but it has also made its mark on our planet. Pink ribbons are used to raise awareness for breast cancer, a pink shirt is a symbol for anti-bullying, and pink flowers and hearts are given to express one’s love for another.
Pink food is more enjoyable as well, and that’s a fact. Okay, fine…it’s not a fact, but it’s my very strong opinion and I dare you to challenge me!
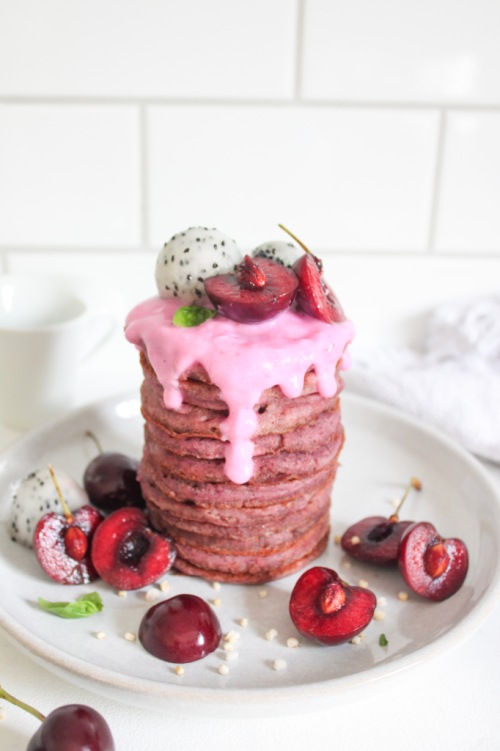
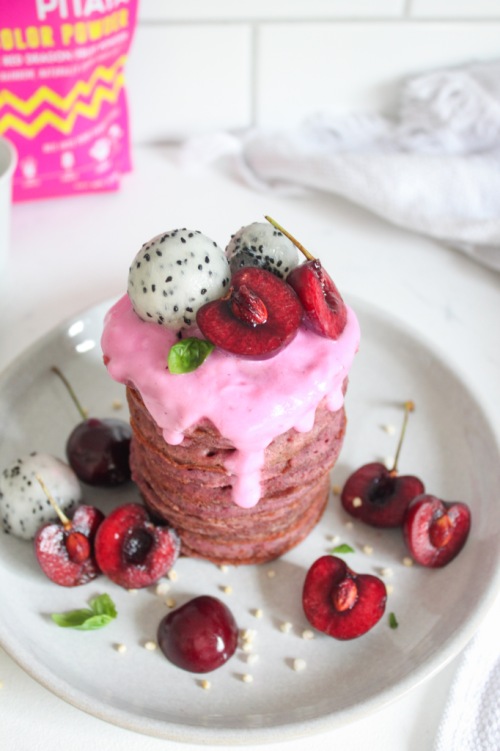
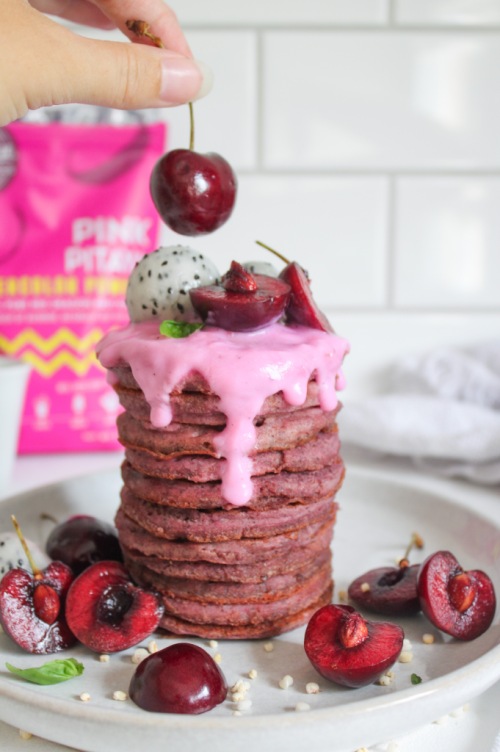
Anywho, since we now agree that pink food is better than non-pink food, I have a pretty sweet recipe for you – The Triple P’s! PINK PITAYA PANCAKES.
Since we’ve already discussed the importance of the colour pink, let’s talk about pitayas. If you don’t know, a pitaya is a fruit, commonly known as “dragonfruit” in North America. It has a pink skin with scale-like spikes shooting out of the exterior. It’s quite unique in appearance, and also quite beautiful. The inside of a pitaya can be white or a bright pink, with little black seeds, similar to that of a kiwi. It has a very mild taste and soft, fleshy texture. The pitaya I am using in this recipe is actually in powder form. The fruit is dried out and then finely ground so it can be used in smoothies, baking, and today – PANCAKES! You can find pink pitaya powder here.
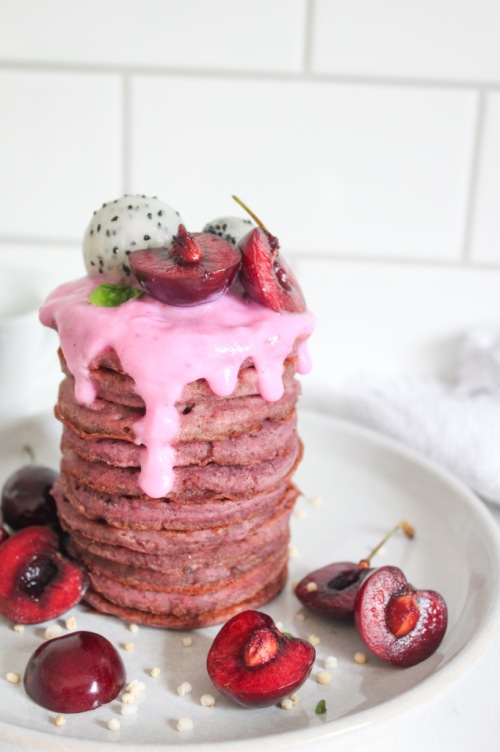
And, these aren’t just any pancakes, peeps. These are gluten-free, vegan, and refined sugar-free! You. Are. Welcome. So, what replaces all of the glutenous, sugary, dairy-forward ingredients, you ask? Well, let’s start with the dry:
Buckwheat flour – I love, love, love using buckwheat flour as a substitute for all-purpose. It is NOT made out of wheat, and therefore is gluten-free. Buckwheat is actually a seed and it is ground up and sold in ‘flour’ form. I consider it to be the best GF flour for pancakes because it holds up and acts the most similar to regular flour. I also really like the nuttier taste.
Flax – Eggs are a typical pancake ingredient, but if I added them to this recipe then the pancakes wouldn’t be vegan. So instead, I use a flax ‘egg,’ which is literally just flax meal and water mixed together and left to sit for a few minutes to thicken up. It’s the perfect vegan binder.
Oat Milk – In any standard flapjack recipe, you will either find milk or buttermilk. And, again, since I’m going for vegan pancakes today, dairy products just don’t cut it. That’s why I have created my vegan ‘buttermilk’ by mixing some organic apple cider vinegar with oat milk instead of the baby cow elixir. You can also use white vinegar for this, if you don’t have ACV. Make sure you are using a certified gluten-free oat milk, as oats themselves do not have gluten in them, but often can be cross-contaminated with other glutenous products. If you can’t find a gluten-free oat milk, you can definitely use almond, cashew or soy milk instead!
Maple Syrup – Finally, the sweet stuff. Obviously white refined sugar is standard, but that shiz is so bad for you, man. I typically could eat these pancakes without any sugar, just because I’m sweet enough, but sometimes I like to add a little maple syrup to bring out the Canadian in me. It’s completely optional, but you do you. You can add more than what is called for if you like a sweeter pancake.
Alright, I think I’ve covered all of the important bases here. Let’s make some flippy flappies!
The Triple P’s – Pink Pitaya Pancakes (Vegan, GF)
Serving size: Makes about 15 small pancakes
Prep time: 10 minutes
Cook time: 15 minutes
Ingredients:
- 1 tbsp flax meal
- 1/2 tsp apple cider vinegar or white vinegar
- 3/4 cup gluten-free oat milk (or your preferred dairy-free milk)
- 1/2 cup buckwheat flour
- 1/2 tsp baking powder
- 1/4 tsp baking soda
- 1/4 tsp salt
- 1 tsp maca powder (optional)
- 1.5 tbsp pink pitaya powder (optional)
- 1-3 tbsp pure maple syrup (according to how sweet you want them, I do 1 tbsp)
- 1/2 tsp pure vanilla extract
- coconut oil
Instructions:
- To a small bowl, add flax meal and 2.5 tablespoons of water. Mix well and place in the fridge for at least 5 minutes.
- Add vinegar and plant-based milk to a measuring cup and stir. Set aside.
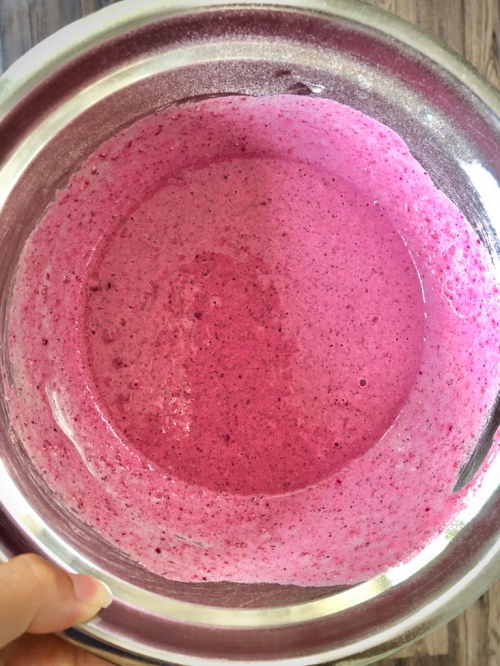
- To a medium bowl, add buckwheat flour, baking powder, baking soda, salt, maca powder and pitaya powder, if using. Whisk to combine and set aside.
- Add the maple syrup and vanilla to the measuring cup with the vinegar and milk. Remove flax mixture from the fridge and add to the milk mixture as well. Stir and then pour into the dry ingredients. Whisk until combined.
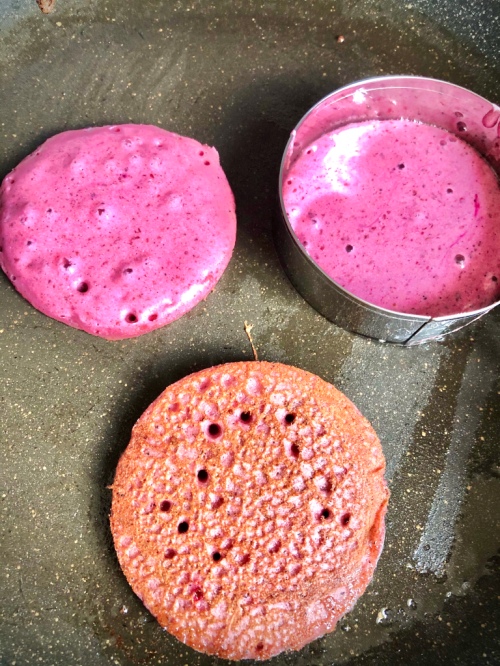
- Add about 1/2 tablespoon of coconut oil to a pan set over medium heat. When the oil is hot, use a ladle to pour some of the pancake batter into the pan. When bubbles begin to appear around the edges (about 1-2 minutes), flip the pancake and cook for 30 seconds to one minute more. Remove from heat and continue with rest of batter, adding more coconut oil as needed.
- Serve immediately or store in an airtight container in the fridge for up to three days.
NOTES:
I love serving these with fresh fruit, yogurt and pure maple syrup.
This recipe feeds approximately two people. You can double the recipe if feeding a larger family.
The post The Triple P’s – Pink Pitaya Pancakes (Vegan & GF) appeared first on Never. Not. Eating..
]]>The post Lemon Blueberry Loaf appeared first on Never. Not. Eating..
]]>
This recipe has two of my loves – gluten and fruit. That’s half healthy!
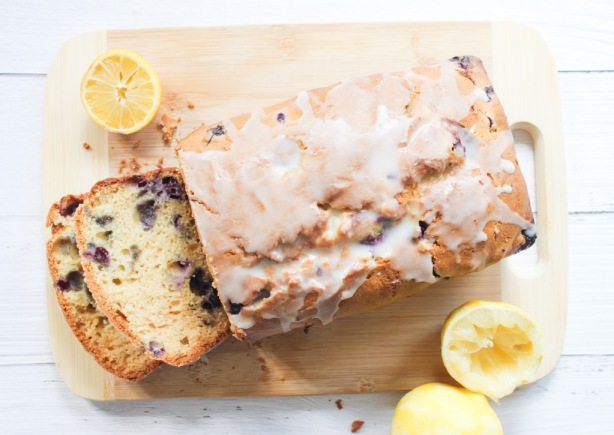
But seriously, this is the perfect morning treat with coffee. It is a great snack between meals. It’s a wonderful end to the day with tea. It’s just good anytime. You can’t put limits on loaves.
When I want to bake something, I always have this idea in my head that I need to set aside a ton of time for it. Then I get started and, every time, I realize that it actually just takes minutes to put together, and even the bake time isn’t too bad. This loaf honestly takes around 10 minutes to prep, and although the oven time is around an hour…It’s passive time. You can do anything while it is in the oven: laundry, work from home, lunges, paint… Whatever, man!

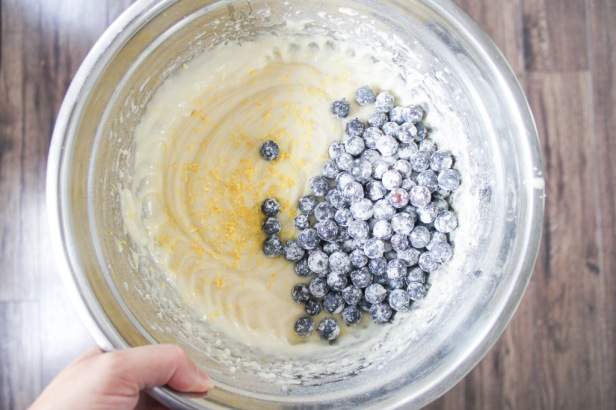
The first thing you need to do is whisk together all of your dry ingredients – flour, baking soda, baking powder and salt. Set this aside and move on to your wet – sugar, eggs, vanilla and oil. Beat this until smooth, and then in a few additions add the dry to the wet, alternating with some buttermilk. Fold in the lemon zest and blueberries and you are done! Easy breezy.
This loaf fills your house with the most delicious aroma. There is nothing more “home-y” than walking into a house that is filled with the smell of fresh baked goods. It let’s guests know that you have it together. You got it goin’ on. You are a successful adult.
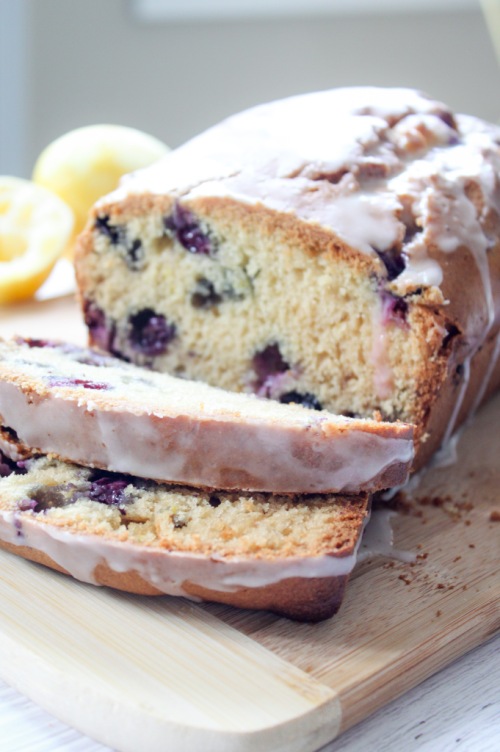
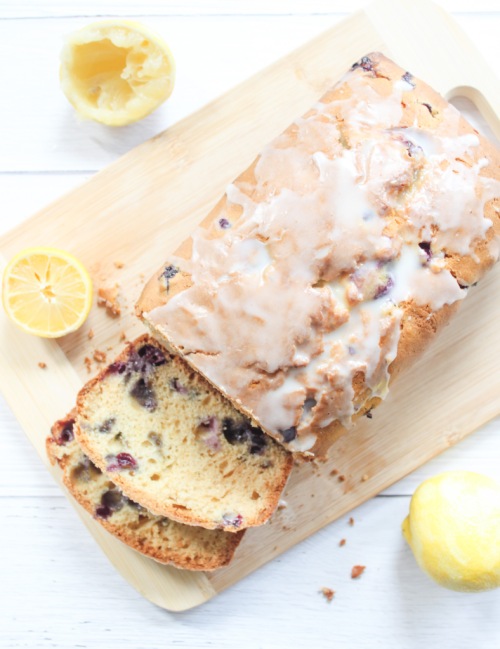
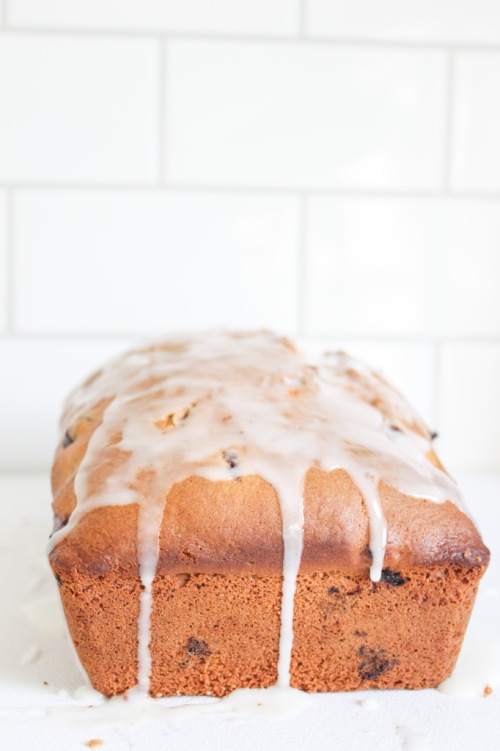
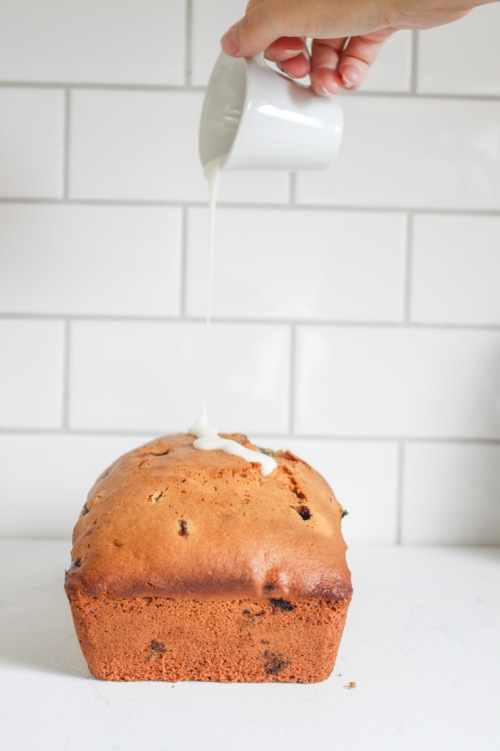
While your creation is forming in the oven, start making the glaze. This is not necessary, but it adds a little bit of sweetness to the loaf and also makes it look really pretty. All it requires is a little bit of powdered sugar and some lemon juice whisked together until smooth. I like to drizzle it over the top when the loaf is still warm so it can absorb all of the goodness throughout.
Loaf drop.
Lemon Blueberry Loaf
Prep time: 10 minutes
Cook time: 50 minutes
Ingredients:
- 2 cups all-purpose flour + 1 tbsp
- 3/4 teaspoon baking soda
- 1/2 teaspoon baking powder
- 3/4 teaspoon salt
- 1 cup sugar
- 1/2 cup canola oil
- 2 large eggs
- 1 teaspoon pure vanilla
- 3/4 cup buttermilk
- zest of one lemon
- 1 heaping cup blueberries, washed and dried
For the lemon glaze:
- 1/3 cup powdered sugar
- 1-2 tbsp freshly squeezed lemon juice
Instructions:
- Preheat the oven to 350 degrees and grease a loaf pan.
- In a medium-sized bowl, whisk together the two cups of flour, baking soda, baking powder and salt. Set aside.
- In a separate, larger bowl, beat the sugar, oil, eggs and vanilla together until smooth and combined.
- Add the dry ingredients and buttermilk alternately in three additions, being careful not to overmix the batter.
- Sprinkle the remaining tablespoon of flour over the blueberries and toss until coated. Shake off any excess flour and then carefully fold the blueberries into the batter along with the zest.
- Pour into prepared pan and bake for 50-60 minutes, or until a toothpick inserted in the middle comes out clean.
- Run a butter knife along the edges of the loaf to loosen and turn out onto a wire rack to cool completely.
- To prepare your glaze – add the powdered sugar to a small bowl and whisk in the lemon juice, a half tablespoon at a time, until you reach your desired consistency. Drizzle over the loaf* and use an offset spatula to evenly distribute over the top.
NOTES:
*I like to drizzle the glaze on the loaf when it is still warm. This way, the loaf absorbs the liquid and it gets distributed throughout. You will not be able to see the glaze on top if you do this. If you are going for more of a “look,” let the loaf cool completely before topping with the glaze.
The post Lemon Blueberry Loaf appeared first on Never. Not. Eating..
]]>The post How to Create the Perfect Smoothie Bowl appeared first on Never. Not. Eating..
]]>
There’s just something about a creamy, texture-perfect bowl in the morning. It’s art, really.
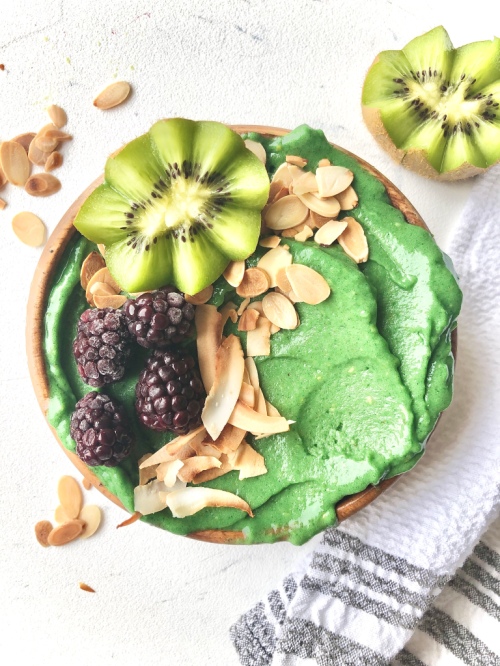
Do you follow any of the most popular smoothie bowl accounts on Instagram? Their dreamy posts show the blending, spooning and topping of amazingly colourful, smooth and creamy bowls. This post is meant to teach you how to achieve a smoothie bowl that mimics that perfect texture and all of the other hacks that go along with creating the ultimate smoothie bowl, including product recommendations and links.
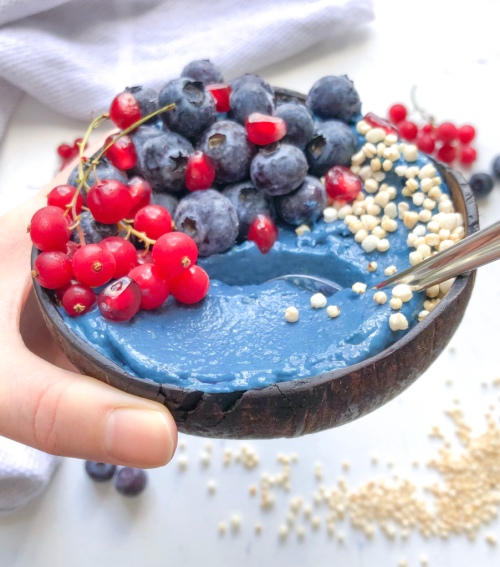
HOW TO CREATE THE PERFECT SMOOTHIE BOWL – TEXTURE
TEXTURE is one of the most important things about a smoothie bowl. Not too soupy so that it doesn’t support all of your delicious topping choices, and not too stiff so that it is “nice cream.” We are looking for that glorious in-between stage.

And here’s how: Choose a high-powered blender. The Vitamix is ah-mazing. I also love the Ninja food processor. This is really important as it needs to be able to pulverize frozen fruit.
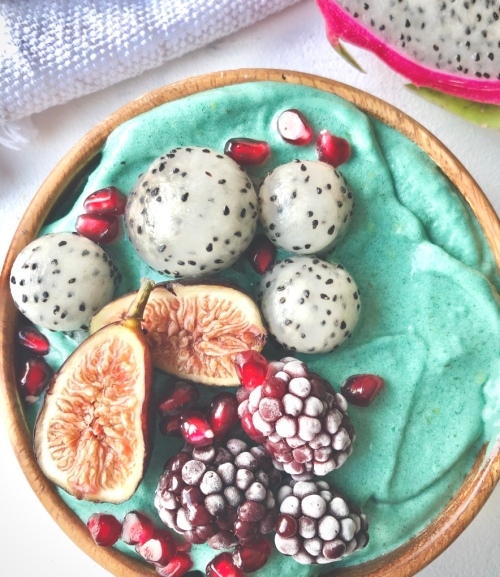
CHOOSING THE RIGHT FRUITS
Secondly, choose fruits that “cream-up” well. Bananas (obviously) are the #1 choice. However, if for some reason you can’t have bananas, mangos are an excellent alternative. I buy fresh bananas, wait until they are slightly overripe and brown (but super sweet) and then peel them, cut them in half and freeze them. You can also cut them into rounds, but it’s much easier to know how much you are putting in if they are halved.
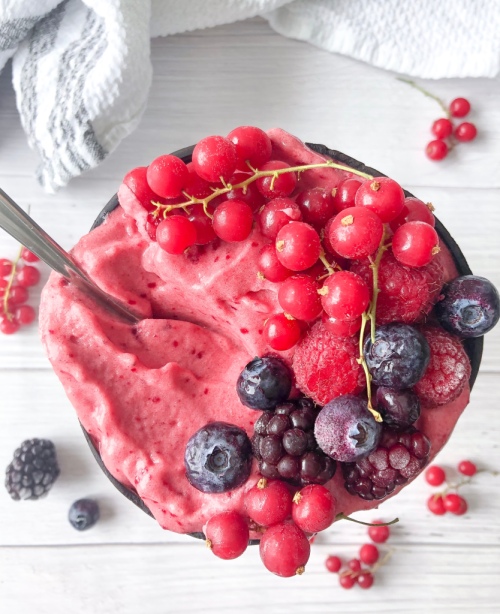
THE ADD-INS
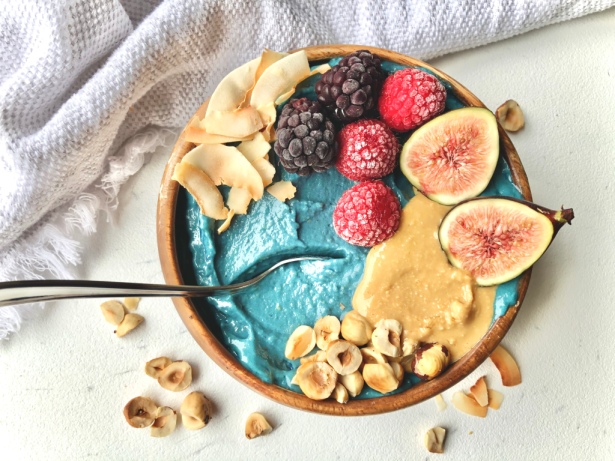
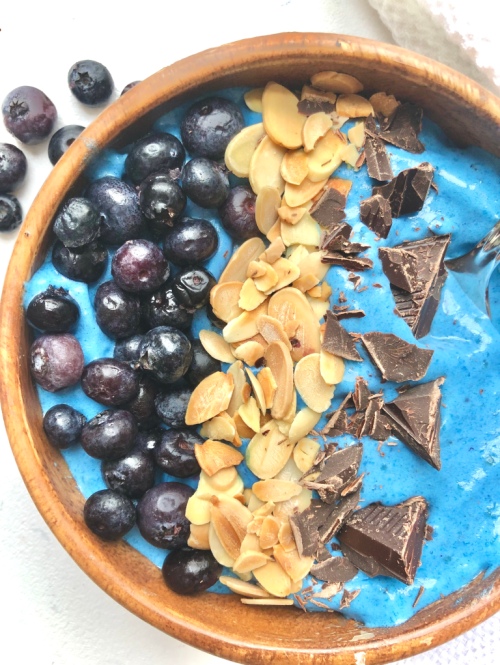
Add your frozen fruit choices to a blender/processor with all of your favourite superfoods. I have tried, tested and loved the following – Purple Sweet Potato Powder, Activated Coconut Charcoal, Maca Powder, Blue Spirulina Powder, and Green Spirulina Powder. Usually I choose two or three of them to add in one smoothie bowl. One colourful powder, one protein powder and Maca. Always.
BLEND IT UP!
Once you have your fruit and superfoods ready to go, pulse the blender a few times to start breaking up the fruit. Afterwards, blend on high, and while blending, slowly pour in the tiniest amount of non-dairy milk. This is the tricky part, as too much milk will make it too loose and none at all will make it nice cream (which is good, too). I would say start with one tablespoon and judge from there!
At this point, you need to continuously stop the blender to scrape down the sides of your bowl. Keep doing this until everything is well combined and smooth. Have faith in your smoothie…it will come together. Just do not over-mix as this will also loosen the texture.

HOW TO CREATE THE PERFECT SMOOTHIE BOWL – TOPPINGS
When you have achieved the ultimate smoothie consistency, pour your art into a beautiful bowl and top with all of your favs. My tried and true recommendations are as follows: Hemp hearts, chia seeds, hazelnuts, frozen berries, homemade peanut butter, slivered almonds, granola and coconut flakes.

THE FROSTED BERRY LOOK
One of the most popular toppings you will see in Instagram photos are frozen berries. They develop this gorgeous pale-white layer on their surface after you remove them from your freezer and let them hang out on the counter for a few minutes. Some tricks to achieving this look that I have found work for me are:
- Not washing your berries before freezing them (either buy organic or wash AFTER you take pictures…hehe)
- Do not stack berries on top of each other in their container in the freezer- just one single layer is best
- Leave them in your freezer for longer than 24 hours to achieve this look
- After a day or two in your freezer, remove them for about 10-15 minutes (don’t use them) and then put them back into your freezer…the next time you pull them out, they will be perfect!
- When plating, use food tweezers to place carefully – the warmth of your fingers will melt the spots you touch

Now take some pictures and grab a spoon!

I hope this post helps you achieve your ideal smoothie bowl. Here is an example of a pretty standard recipe that I use when creating my own. Enjoy!
How to Create the Perfect Smoothie Bowl – Mauve Smoothie Bowl
Servings: 2
Prep time: 5 minutes
Ingredients:
- 2 frozen bananas
- 1/2 cup frozen mango
- 1 tbsp vanilla protein powder
- 1 tsp maca powder
- 2 tsp Purple Sweet Potato Powder, optional (you can replace with your favourite superfood powder)
- splash non-dairy milk
Instructions:
- To a high-speed food processor or blender, add frozen fruit, protein powder, maca and superfood powder. Pulse a few times and then blend. While blending, drizzle in the non-dairy milk. You only need a tiny amount. Blend until everything is combined and smooth, scraping down the sides a few times as it comes together.
- Transfer to a bowl and add toppings of your choice. Enjoy!
The post How to Create the Perfect Smoothie Bowl appeared first on Never. Not. Eating..
]]>