The post Vegan Cilantro Lime Dressing appeared first on Never. Not. Eating..
]]>
WHAT IS VEGAN CILANTRO LIME DRESSING
Okay, I’ve been struggling big time. I love a creamy dressing, more than words can express, but usually they have a dairy base, and I’m just not down for that. Thank goodness I tested out this creamy Vegan Cilantro Lime Dressing using cashews instead, and it worked! It is just as creamy, dairy-free and so delicious. Therefore, you must give it a try!

WHY I LIKE THIS DRESSING
Other than because it is vegan, I love this dressing as it is multi-purpose. It’s not just for salads, but also is great for using as a dip or a drizzle on potatoes, French fries, buddha bowls, and so much more! It is also super healthy, packed with cilantro, which has a plethora of health benefits, including hosting a number of vitamins.
THE INGREDIENTS
This is the simplest dressing to make. It requires:
- Soaked cashews
- Cilantro
- Lime juice
- Salt
- Pepper
- Garlic

MAKING VEGAN CILANTRO LIME DRESSING
To make this dressing, simply pack all of the ingredients into a blender and whip up until smooth – it’s that easy! Add in a tiny bit of water at a time until you reach your desired consistency.
TIPS
- Make sure you soak your cashews for at least three hours. This will allow them to soften up and blend easily, resulting in a smoother, creamier dressing.
- Use the stems and leaves of your cilantro – less prep and more nutrition that way!
- After blending your ingredients, give the dressing a taste and add more salt, pepper, lime juice or cilantro, according to your taste.
SALAD RECIPES TO TRY
Jewelled Brussel Sprout Kale Salad (the perfect Fall side)
Candied Walnut Salad with Pear and Gorgonzola (another Fall favourite)
Beet and Orange Salad with Goat Cheese (fresh for summer)
TOOLS I USED TO MAKE THIS VEGAN CILANTRO LIME DRESSING
Click on the images below to see what I used for this recipe.


Vegan Cilantro Lime Dressing
Serving size: Makes 8oz
Prep time: 5 minutes
Inactive time: 3 hours
Ingredients
- 1/4 cup raw cashews, soaked for 3-4 hours in water
- 1 cup cilantro, packed (leaves and stems)
- juice of 1 lime (approximately 2 tbsp)
- 1 garlic clove
- 1/4 tsp salt
- pinch of pepper
Instructions
- First, drain the cashews from their soaking water and rinse well.
- Add the cashews, cilantro, lime juice, garlic, salt and pepper to a blender with two tablespoons of water and blend until creamy and smooth. If the dressing is too thick, continue to add more water, one tablespoon at a time until you’ve reached your desired consistency.
- Finally, try the dressing and add more salt and pepper to taste.
- Pour into an 8oz mason jar or a small, airtight container and store in the fridge for up to 4 days.

The post Vegan Cilantro Lime Dressing appeared first on Never. Not. Eating..
]]>The post Easy Za’atar Socca appeared first on Never. Not. Eating..
]]>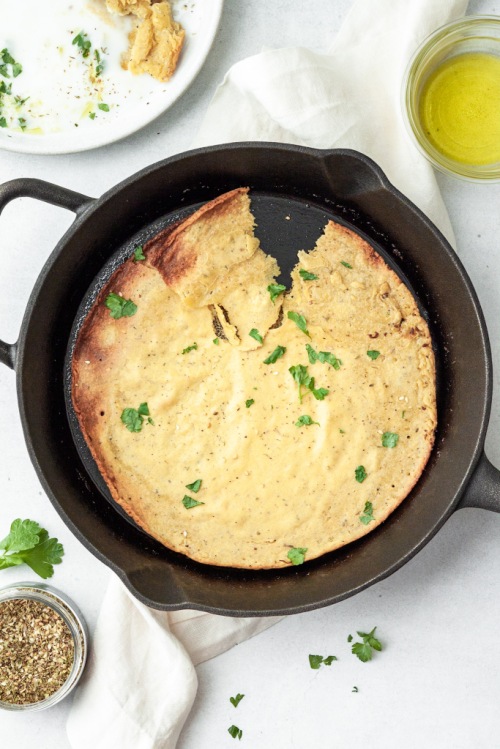
WHAT IS EASY ZA’ATAR SOCCA?
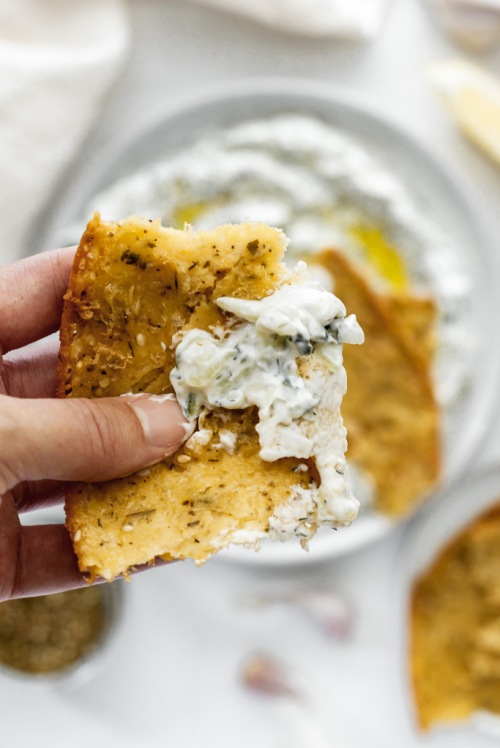
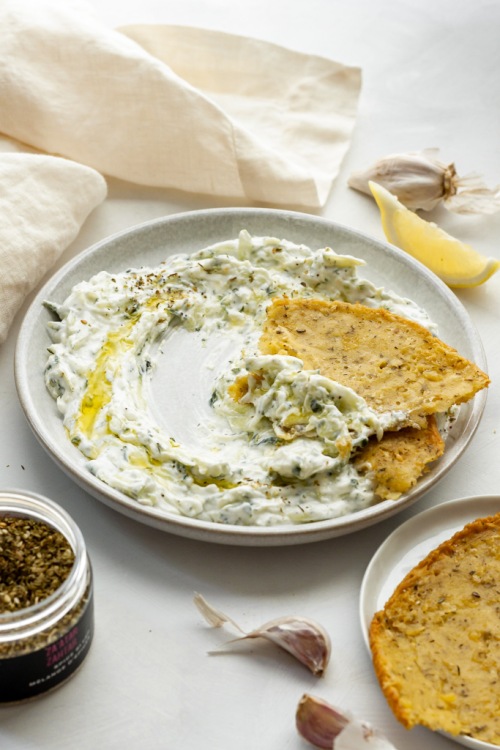
Crispy, gluten-free and the perfect vessel for dipping. I could ask for nothing more in my life. Socca is an Italian-French, crepe-like flatbread that is just so delicious. Try it with my Homemade Tzatziki recipe!
TIPS FOR MAKING SOCCA
The most important tool for perfecting this recipe, in my opinion, is a cast iron pan. It’s crucial to get the pan and oil scorching hot before pouring in the batter the ensure you achieve even heat distribution and crispy socca. Check out this one from Amazon.
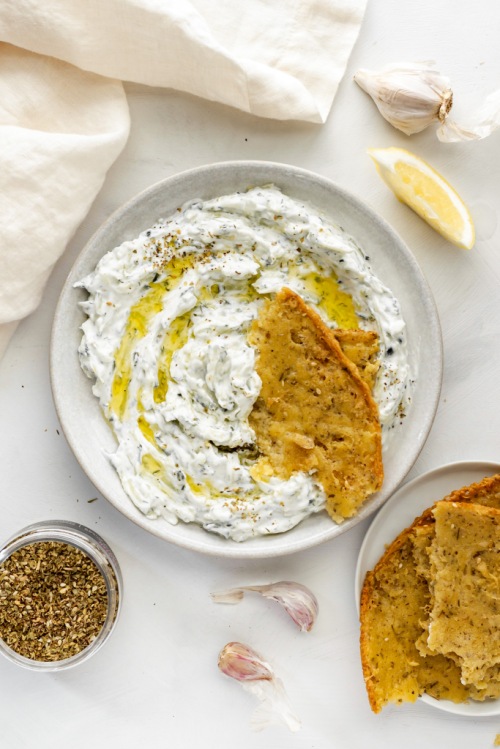
What do you eat Socca with? If not just as is, then try it with your favourite dips, stews or curries. It is great for picking up sauce or just adding that missing piece to a meal!
This recipe only requires these three ingredients (salt and water don’t really count as an ingredient…right?!):
- chickpea flour
- za’atar
- olive oil
The easiest, most delicious gluten-free bread you will ever make!
This post contains affiliate links and I may earn a small commission when purchases are made after clicking the links, at no cost to you. Thank you for supporting me!
Easy Za’atar Socca
Serving size: Makes 2 large flatbreads
Prep time: 5 minutes
Cook time: 10-12 minutes
Ingredients:
- 1 cup chickpea flour
- 1/2 tsp salt
- 1 tsp za’atar
- 1 tbsp olive oil + more for the pan
- 1 cup water
Instructions:
- In a medium bowl, whisk together the flour, salt, za’atar, 1 tablespoon of olive oil and water until smooth. Set aside.
- Preheat oven to 450 degrees Fahrenheit. Coat the bottom of a cast iron pan with olive oil (about 2 tbsp) and place in the oven for 5 minutes to heat the oil. Remove carefully and pour in half of the batter, swirling the pan around to help spread it out. Cook in the oven for 10-12 minutes, or until edges turn brown and bread is cooked through. Remove from oven and repeat this process for the remaining half of the batter.
NOTES:
Socca is best when served immediately after cooking, but you can store in an airtight container in the fridge for a few days, if necessary.
The post Easy Za’atar Socca appeared first on Never. Not. Eating..
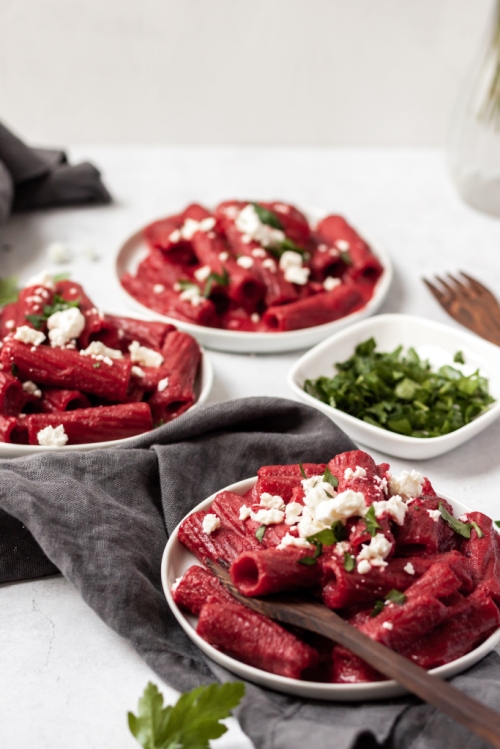
]]>The post Simple Beetroot Pasta appeared first on Never. Not. Eating..
]]>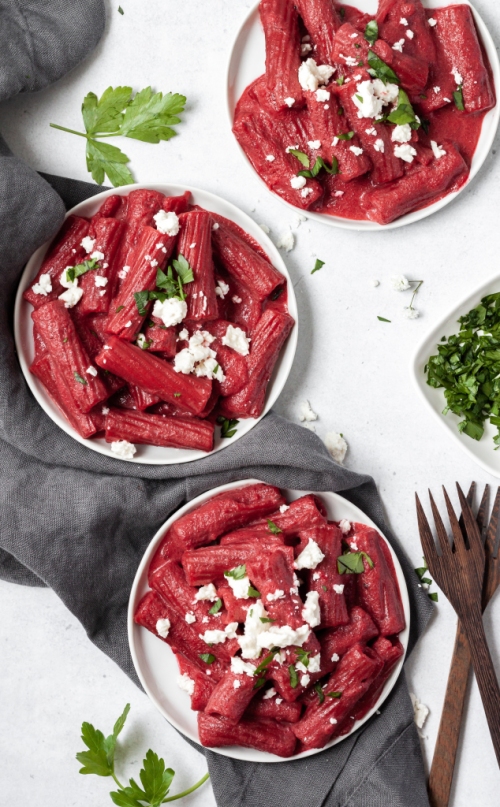
I’m always diverting from traditional pasta sauces because life is too exciting to do boring things. The method this recipe follows is the tried-and-true method I use for most of my pasta sauces, and it’s SO easy.
It requires the cooking of the star ingredient, in this case, beets, followed by the blending, seasoning and simmering. Not to mention the addition of coconut milk to make it extra creamy and delicious. That’s it! So easy. So good!
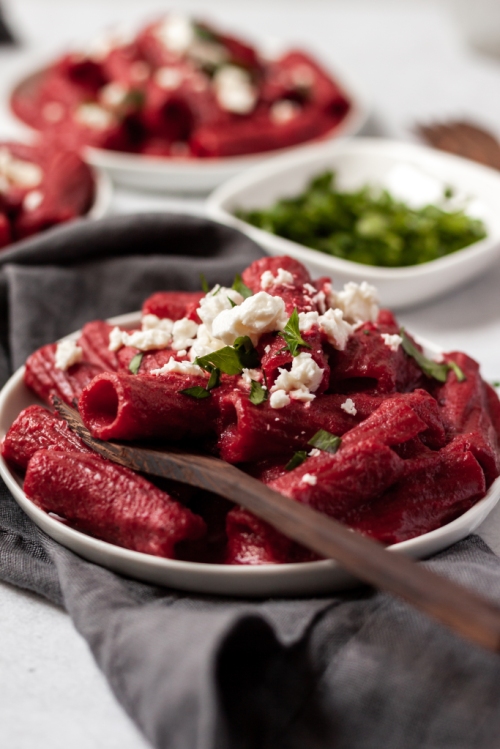
You can use whatever pasta you would like, but I prefer a rigatoni or tortiglioni as they have those gorgeous grooves to suck up and hold onto this vibrant sauce. My most favourite pasta to use can be found here.
It’s tortiglioni time to make this dish!
Simple Beetroot Pasta
Serving size: 4
Prep time: 5 minutes
Cook time: 45 minutes
Ingredients:
- 4 red beets, peeled and quartered
- 450 g pasta (I prefer tortiglioni)
- salt
- pepper
- 1 cup vegetable broth
- 1 tbsp olive oil
- 2 cloves garlic, minced
- 1 cup canned coconut milk
- 1/4 cup crumbled feta or goat’s cheese, for topping (optional)
- 2 tbsp parsley, chopped, for topping (optional)
Instructions:
- Bring a large pot of heavily salted water to a boil and add the beets, cooking until fork-tender (about 25-30 minutes).
- Use a wire spider (or a slotted spoon) to carefully remove the beets from the boiling water and transfer to a high-powered blender. Add the pasta to the same water the beets were cooking in and boil until ‘al dente.’
- Blend the beets with the broth and a pinch of pepper, until smooth.
- Add the olive oil to a large saucepan set over medium-low heat. When hot, add the garlic and saute for 30 seconds or until fragrant, being careful not to burn. Pour in the beet puree and simmer until smooth, stirring often. Pour in the coconut milk and let simmer until sauce thickens, approximately 8-10 minutes.
- Transfer the cooked pasta to the sauce and stir to coat and finish cooking. Add more salt and pepper to taste. *If you salted your pasta water enough, you may not need to add more salt at this point.
- Transfer pasta to a serving dish and top with the cheese and parsley, if using. Bon appetit!
The post Simple Beetroot Pasta appeared first on Never. Not. Eating..
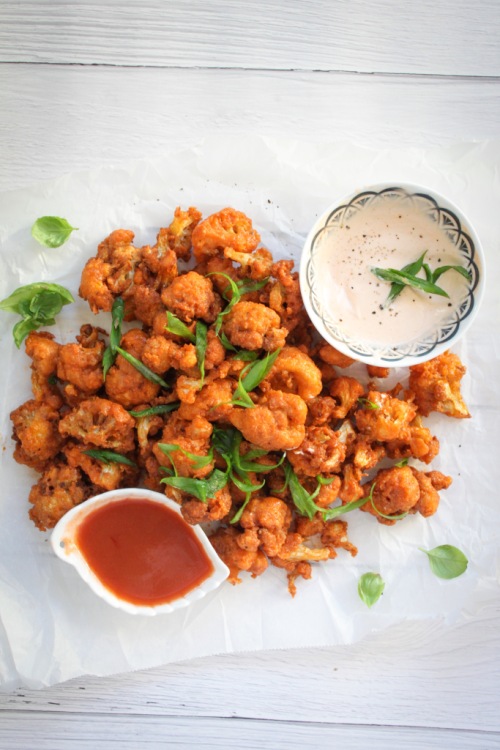
]]>The post Hot and Sweet Cauliflower Wings appeared first on Never. Not. Eating..
]]>
I put a pot of oil on the stove and waited. And waited, and waited, and waited. It didn’t start to boil, so I just kept waiting. Like I said, I knew NOTHING about cooking. All of a sudden, plumes of smoke started emerging from the pot. And, then I couldn’t breathe. The smoke filled the house and my roommates were like, “WTF Mate?!” It was so thick that it coated our lungs as we hacked up a storm. So, I carefully took the pot outside and stuck it in a pile of snow and ran far, far away.
Never have I tried frying again. Until today. Thank goodness for endless episodes of the Food Network that have guided me in my growth as a food fryer.
So, in case you have never fried before, here are my learnings:
- Oil doesn’t boil
- Do not fry food without a thermometer
Now that the PSA is out of the way, let me introduce you to my first fry recipe – Cauliflower wings. We all know them. We all love them. But, I can’t tell you how many times I have tested recipes that have you bake these little guys, and they never create the texture that I want. That crispy AF texture. So, we fryin’ today.
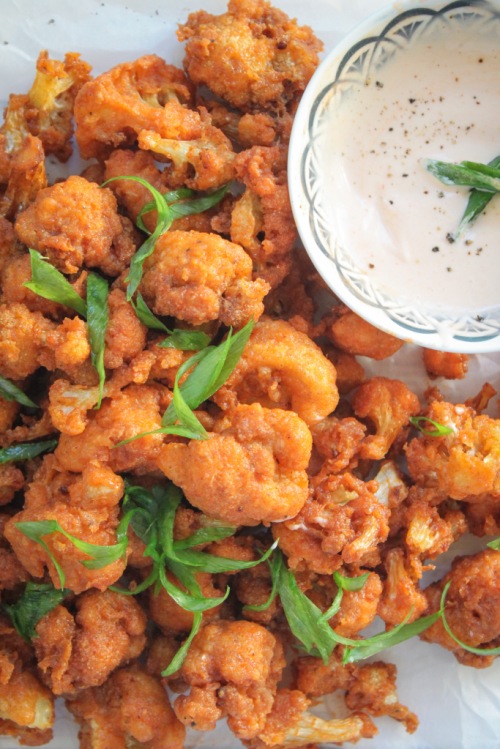
This recipe is really quick and surprisingly easy. You need to break off your cauli into smaller florets – the larger they are, the more water they absorb. Then, get that batter going – add some flour, cornstarch (my favourite “crisping” ingredient), paprika, chili powder, salt and pepper to a bowl and whisk. Next, pour in some canned coconut milk, mixed with another milk of choice – oat, cashew, almond, etc. Whisk it all together and you will get a nice batter. Give those florets a dunk and carefully place them into the pot of oil. Let them cook for about 3-4 minutes, until golden brown.
After you have fried all of the cauliflower, get your sauce ready. Combine a quarter cup of Frank’s Red Hot Sauce with 1 tablespoon of honey and slather over the wings. Give them a toss and they are ready.

If you are into dipping things into other things, then make my “Frank’s Aioli.” Mix about 1/2 teaspoon of Frank’s Hot Sauce with 2 tablespoons of mayo and give ‘er a few cracks of pepper and you’re Gucci.
I’m very pleased with my personal growth. Let me help you achieve your culinary fry goals with this recipe! Happy frying!
Hot and Sweet Cauliflower Wings
Servings: 4
Prep time: 15 minutes
Cook time: 15-20 minutes
Ingredients:
- Canola or vegetable oil, to fry
- 1 small head of cauliflower, broken into florest
- 1/2 cup whole wheat flour (or all-purpose)
- 1/4 cup cornstarch
- 1 tsp paprika
- 1 tsp chili powder
- 1 tsp salt, plus more for seasoning
- 1/4 tsp pepper
- 1/4 cup canned coconut milk (or skip and add 1 whole cup of ‘other’ milk)
- 3/4 cup milk of choice (cashew, coconut, oat, etc.)
- 1/4 cup plus 1/2 tsp Frank’s Red Hot Sauce (or your favourite hot sauce), separated
- 1 tbsp honey
- 2 tbsp mayonnaise
- Scallions, sliced, for topping (optional)
Instructions:
- Set up your frying station by pouring the oil into a dutch oven, or heavy pot. Have at least 3 inches of oil in your pot. Place a thermometer in the pot and turn the burner on medium-high.
- Whisk together the flour, cornstarch, paprika, chili powder, salt and pepper in a medium bowl.
- Mix together the two milks and pour over the dry ingredients. Whisk until combined and then add the cauliflower, stirring to coat with the batter.
- When your oil temperature reaches 350 degrees F, use metal tongs to carefully drop in a few of the coated cauliflower florets, making sure you don’t crowd the pot as it will significantly bring the temperature down. Fry for 3-4 minutes, or until golden brown. Remove carefully with a stainless steel spider and place on a paper towel lined plate. Immediately season with a pinch of salt. Wait until the oil comes back up to temperature before continuing with the rest of the cauliflower.
- To make the sauce, combine 1/4 cup hot sauce with 1 tablespoon honey. Transfer the cauliflower wings to a large bowl and drizzle the sauce over them. Toss to combine.
- To make the aioli, combine the mayonnaise with 1/2 teaspoon of hot sauce and a pinch of pepper. Stir to combine.
- Top with sliced scallions and serve immediately.
The post Hot and Sweet Cauliflower Wings appeared first on Never. Not. Eating..
]]>The post Middle Eastern Orzo Pilaf appeared first on Never. Not. Eating..
]]>
Okay, I am in love with all flavours of all regions of the world (literally), but Middle Eastern…AND Italian?! Two heavyweights in the culinary world and I’m here for it! Like a hundo P’s.
Let me break down this fusion for you. We have the following Italian/Mediterannean ingredients:
- Orzo
- Feta
- Basil
And those from the Middle East include:
- Dried fruit (apricots, cherries, currants)
- Pistachios
- Olives
- Pomegranate seeds
- Cilantro
- Spices (Turmeric, Paprika, Cumin, Coriander, etc.)
Together, they are Chrissy and John. Rachel and Ross. Bey and Jay. Me and me.
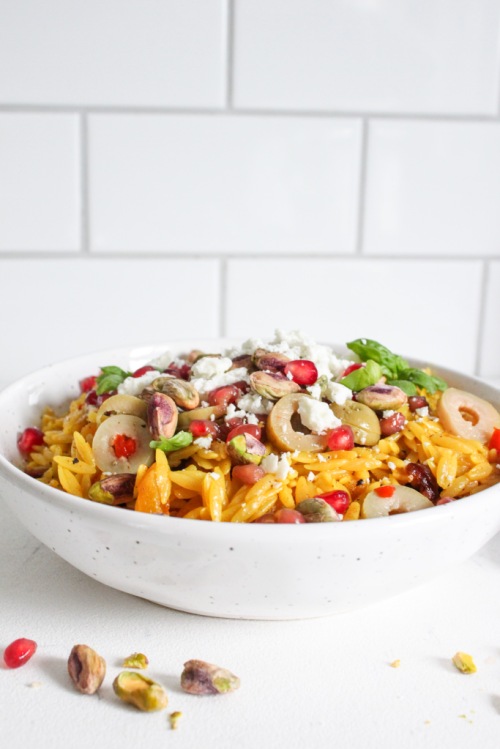
The warm flavours of the spices paired with creamy orzo, sweet fruit and salty olives and feta…hawt damn! I’m drooling.

Oh, one more thing…This makes the perfect lunch the next day. Leftovers for the win!
Middle Eastern Orzo Pilaf
Serving Size: 4
Prep time: 10 minutes
Cook time: 12 minutes
Ingredients:
- 1 tbsp olive oil
- 1 clove garlic, minced
- 1/2 tsp cumin
- 1/4 tsp turmeric
- 1/4 tsp paprika
- 1/4 tsp ground coriander
- pinch of fresh nutmeg
- pinch of black pepper
- 1 cup uncooked orzo, rinsed well
- 1 1/2 cups vegetable broth
- salt
- 1 cup dried fruit (I use cherries, currants and chopped apricots)
- 1 tbsp freshly squeezed lemon juice (optional)
- 4-5 olives, chopped
- 1/4 cup feta, crumbled
- 1/4 cup pomegranate arils
- 1/4 cup pistachios, shelled
- fresh herbs (cilantro and basil) for topping, (optional)
Instructions:
- Heat olive oil in a large pan over medium heat. Add the garlic and cook for 30 seconds or until fragrant. Add the cumin, turmeric, paprika, coriander, nutmeg and pepper and stir until toasted, another 30 seconds to 1 minute. Add the orzo and stir to coat with the spices. Once coated, pour in the broth, add 1/4 tsp salt and bring up to a boil and then reduce heat and let simmer for 8 minutes, with the lid on.
- After the 8 minutes, quickly lift the lid, add the dried fruit, and stir to incorporate with the orzo. Place the lid back on and let stand for 2 more minutes off the heat.
- Squeeze some fresh lemon juice into the pan and stir to combine. Transfer the orzo to a serving dish and top with olives, feta, pomegranate seeds, pistachios and fresh herbs. Serve immediately or let cool and refrigerate in an airtight container for up to three days.
The post Middle Eastern Orzo Pilaf appeared first on Never. Not. Eating..
]]>The post Pumpkin and Kale Pizza appeared first on Never. Not. Eating..
]]>
When an ingredient comes into season, you better believe I overdo it. Every. Single. Time. But seriously, that’s what we are supposed to do, right?! Eat local, eat seasonal. For our country, for our health.
The greatest part of this pizza is the pumpkin cream sauce. AKA the replacement tomato sauce. Garlic, thyme, homemade pumpkin puree, veggie stock, coconut milk. Simmer, simmer. Yes, please!
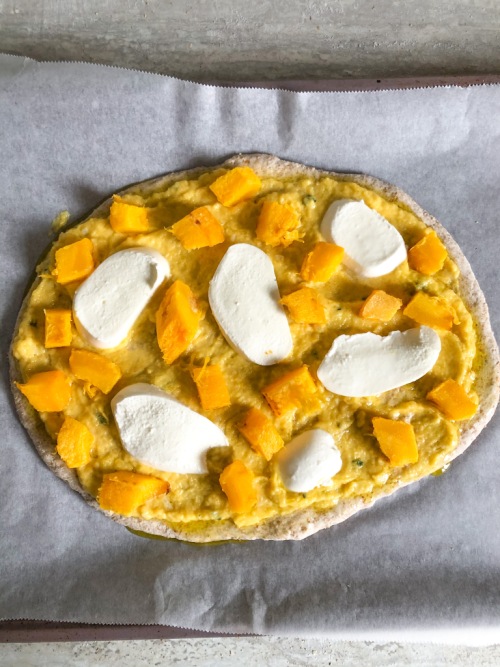
The crust – You can definitely buy store bought pizza dough and use that, but making your own dough is SO easy! You can find a recipe for flatbread in my blog post, found here.
The toppings – Originally, I made this pizza vegan, and I think I preferred it to the next one I made with mozzarella. The option is yours – leave out the cheese to have a completely vegan option (as seen below)!
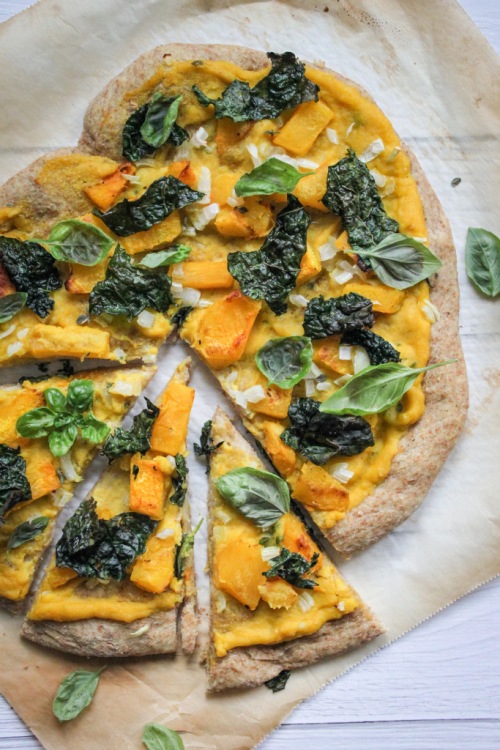
Kale is another key topping here. As I always say, it is important to massage your kale before eating, and that applies to this recipe as well. Sprinkle it with some salt, drizzle with some olive oil and get in there with your fingers! It really helps to tenderize it and make it more pleasing to the palate.
Pumpkin – Along with the pumpkin cream sauce, I have also included roasted pumpkin chunks as a topping in this recipe. They add another layer and texture that does not disappoint and help give this ‘za it’s name!

This may just be a pizza recipe that you aren’t afraid to serve the kids!
Pumpkin and Kale Pizza
Serving Size: Makes 1 large pizza
Prep time: 20 minutes
Cook time: 45 minutes
Ingredients:
- 300 g homemade or store bought pizza dough
- 1 pie pumpkin, seeds removed and sliced into 3/4-inch wedges (or 1/2 cup pumpkin puree and 3/4 cup sliced and cooked pumpkin chunks)
- 2 cloves garlic, minced
- 2 sprigs of thyme, stem removed
- 1/4 cup vegetable stock
- 1/4 cup full-fat canned coconut milk
- 2 leaves of kale, washed, dried and chopped roughly
- 125 g fresh mozzarella, sliced (optional)
- salt
- olive oil
- fresh basil for topping (optional)
Instructions:
- Preheat your oven to 400 degrees Fahrenheit.
- Place your pumpkin wedges onto a baking sheet lined with parchment paper and drizzle with one tablespoon of olive oil and a few pinches of salt. Toss to coat. Roast in the oven for 30 minutes or until fork-tender, flipping halfway. Remove from oven and let cool for a few minutes. Peel the skin off and discard. Increase the oven temperature to 450 degrees.
- Place half of your roasted pumpkin pieces into a food processor or blender and blend until smooth. Slice the other half of the wedges into 1/2 inch pieces and set aside.
- Preheat a medium-sized saucepan over medium-low heat. Add one tablespoon olive oil followed by the minced garlic and thyme. Stir and let cook until fragrant (about 30 seconds). Add in 1/2 cup of the pumpkin puree and the vegetable stock. Stir until combined and let simmer for 2 minutes. Add the coconut milk and a pinch of salt and stir to combine. Let simmer on a low heat until the cream sauce thickens and coats the back of a spoon. Remove from heat.
- Place your kale into a bowl with one teaspoon of olive oil and a pinch of salt. Use your fingers to ‘massage’ the kale for one to two minutes. This helps to tenderize it. Set aside.
- Flour your work surface and roll out your pizza dough. Spoon on the cream sauce and spread it onto the dough until fully covered, leaving a 1/2-inch border all the way around. Distribute your cooked pumpkin pieces and your mozzarella slices (if using) on top of your pizza. Bake in the oven for 5 minutes, remove and add the massaged kale, and return to the oven for another 7-10 minutes or until crust begins to brown on the edges. Remove from oven and let cool for a few minutes before slicing.
- Top with fresh basil, if desired!
The post Pumpkin and Kale Pizza appeared first on Never. Not. Eating..
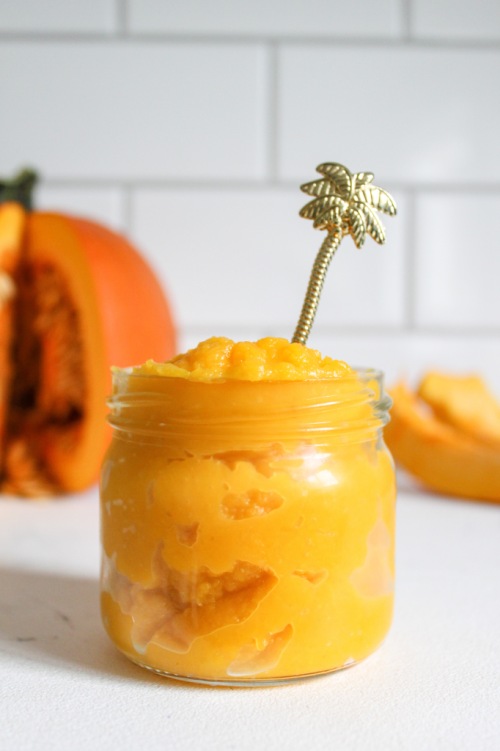
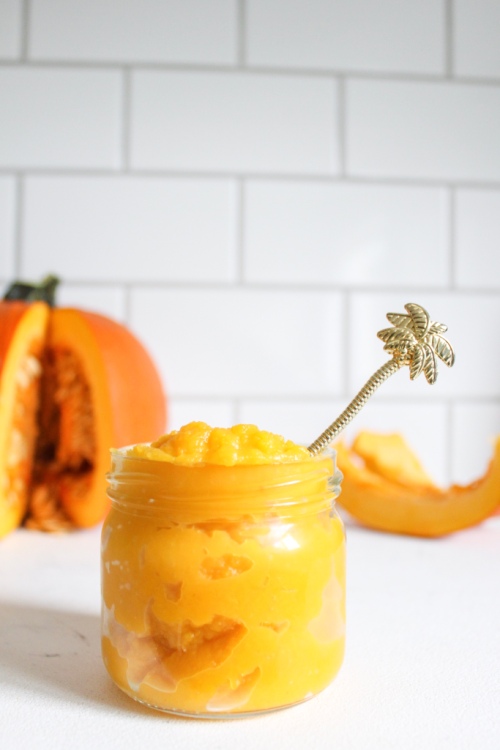
]]>The post Homemade Pumpkin Puree appeared first on Never. Not. Eating..
]]>
WHAT’S THE DIFFERENCE?
The puree from the store often includes preservatives, such as sugar and salt, so I prefer to avoid those additives by making my own. It’s the easiest thing to do, so if you were just thinking “Way too much work,” you’re wrong. Try it!
CHOOSING THE PROPER PUMPKIN
The most important part of this recipe is selecting the appropriate pumpkin variety. Those really big ones that you carve into on Halloween….No bueno. They are really bland in taste, and such a hassle to cut up due to their size. You CAN eat them, but they are not a good choice for pies or any other baked goods that include pumpkin. Your best bet is to find a Pie Pumpkin. They are sweeter and more flavourful and can be used in both sweet and savoury recipes.
I typically hold off on seasoning the pumpkin too much as one pumpkin usually makes a large enough batch to use in both savoury and sweet recipes, and each type of recipe would be seasoned differently. If you are making the puree solely for pie, pancakes, pumpkin spiced lattes, or anything on the sweeter end, you can definitely add some cinnamon and nutmeg to this recipe to jazz it up! On the contrary, you can grind some pepper and add some dried thyme or sage if you plan to use the puree in more savoury-type dishes, like soups or casseroles.
Like I said, pumpkin puree is really easy to make. The most challenging part is just getting your pumpkin cut up! So, grab yourself some sharp knives, and let’s roll!
Homemade Pumpkin Puree
Yield: About 3 cups (depending on the size of your pumpkin)
Prep time: 10 minutes
Cook time: 30 minutes
Ingredients:
- 1 pie pumpkin
- 1 tbsp olive oil
- 1/2 tsp salt
Instructions:
- Preheat oven to 375 degrees Fahrenheit.
- Using a sharp knife, cut your pumpkin into 1-inch wedges and remove the seeds. Lay the wedges flat, on a parchment-lined baking sheet. Drizzle them with the olive oil and sprinkle with salt. Use your hands to coat all of the wedges and then bake in the oven for 30-40 minutes, flipping once halfway through. When you can easily pierce a fork through the pumpkin, they are done.
- Let the wedges cool completely on the baking sheet and then remove the skin and discard. Place pumpkin into a food processor and blend until smooth. Transfer to an airtight container and store in the fridge for up to three days. You can also freeze the puree if you wish to use it later.
The post Homemade Pumpkin Puree appeared first on Never. Not. Eating..
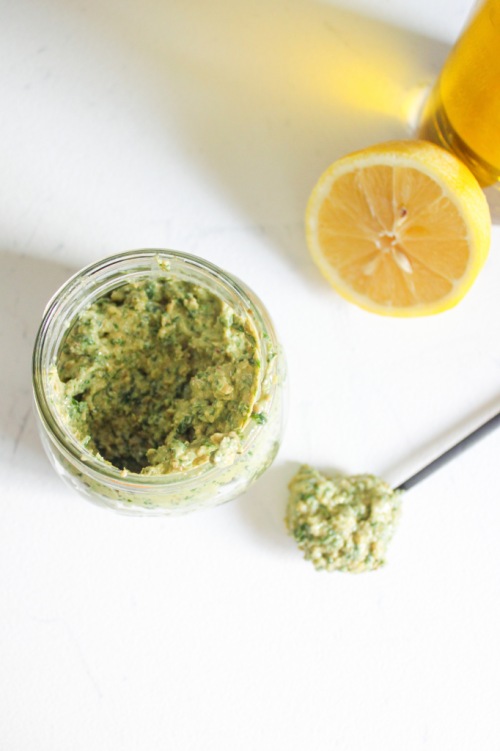
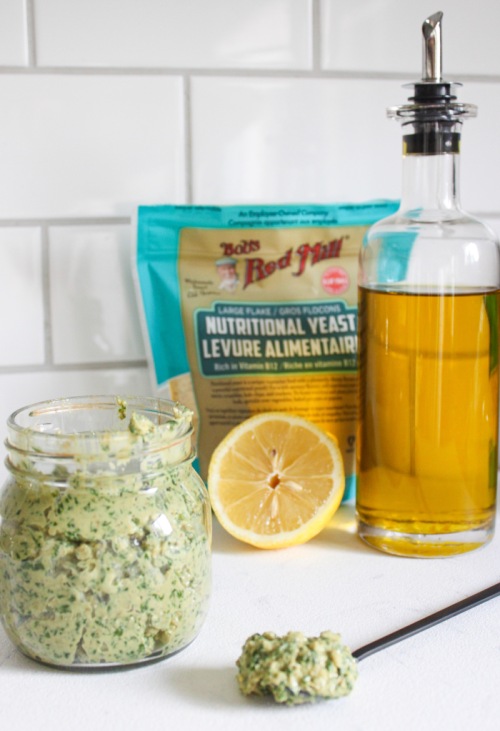
]]>The post Lemony Vegan Basil Pesto appeared first on Never. Not. Eating..
]]>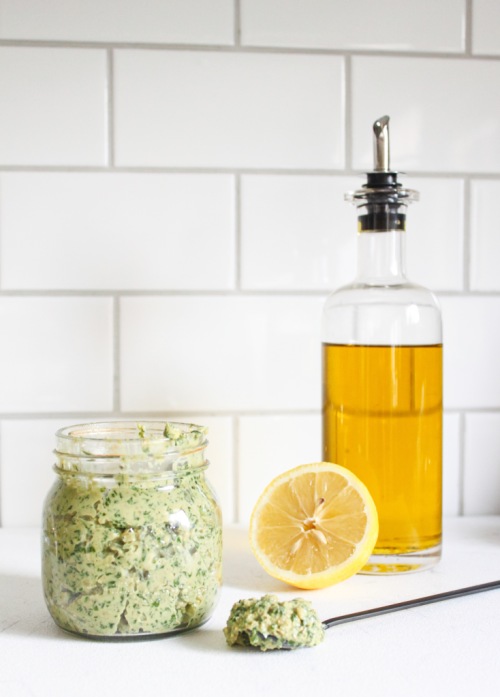
Pesto is a highly underused food, IMO. It is so versatile – from a sauce for pasta or pizza to a simple spread for toast, it is a complete flavour bomb!
Traditionally, pesto is made with five key ingredients: Basil, pine nuts, parmesan, olive oil and garlic (plus salt, but that doesn’t count). And, you want to know the greatest thing about pesto? The ingredients are easily adaptable. That is why turning it vegan is so easy to do.
The herbs – Basil is traditional in pestos, and I stick with it in this recipe as well. However, it can easily be swapped out for any leafy green such as parsley, cilantro, spinach or a combination of these. It depends on what you have, what you like and how adventurous you are!
The nuts – Pine nuts are typically what you find in pesto, but since one bag costs more than my monthly gym membership, I usually switch them for another type of nut. I love walnuts and I chose to use them in this recipe. Pecans would also be good for a sweeter turn-out. Toasting the nuts prior to using them in a pesto also adds another dimension of flavour.
The cheese – Pesto is made with a dry-aged cheese, like parmesan. You can, however, sub it for a cheese of your choice, like romano or even an old sharp cheddar. Since this recipe is vegan, I am using the cheesiest vegan ingredient I know of – Nutritional Yeast. Nutritional Yeast is an inactive yeast that is very cheesy in flavour and is packed with a number of healthy nutrients including: Thiamine, Riboflavin, Niacin, Vitamin B6, Folate and my favourite, Vitamin B12. I am almost positive it is the only vegetarian food you can find that has B12 in it, which makes me love it even more! The one I use can be found here.
The oil – Use extra virgin olive oil. There are no exceptions for this ingredient. Make it a good olive oil, too, like this one.
Garlic – Same.
Acid – I like to put lemon juice as well as the zest into my pesto. It gives it a ‘zip’ of freshness that adds brightness and vibrancy to any dish!
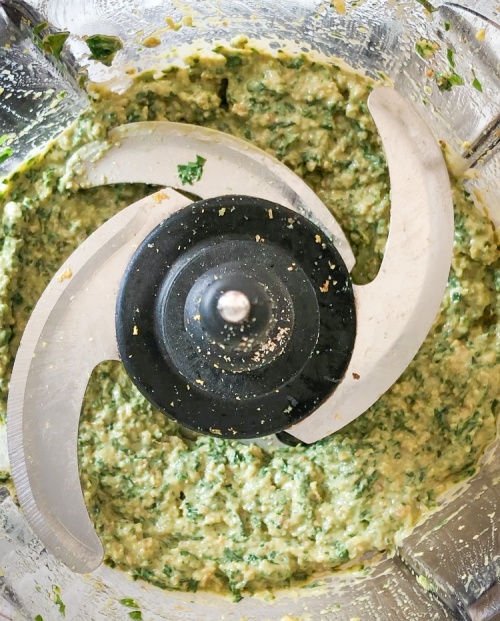
The process of making pesto can be completed in many ways. Traditionally, it is made by cutting all of the ingredients together with a sharp knife and then pouring the olive over them. It could also be made in a mortar and pestle. I like to use my food processor to save on time.
Whichever ingredients you choose to use and whichever method you bring them together in, I hope you get to enjoy pesto this summer. There is nothing better!
Lemony Vegan Basil Pesto
Serving size: Makes about 1/2 cup
Prep time: 10 minutes
Ingredients:
- 2.5 cups packed fresh basil, washed and dried
- 1/2 cup walnuts
- 1 clove garlic
- 1/4 tsp sea salt
- 2 tbsp nutritional yeast
- zest of one lemon
- 1.5 tbsp fresh lemon juice
- 1/4-1/3 cup good extra virgin olive oil
Instructions:
- To your food processor, add the basil, walnuts, garlic, salt, nutritional yeast and lemon zest. Pulse until the mixture has broken down into smaller pieces. Add the lemon juice and set your processor to blend. While blending, drizzle in the olive oil slowly. If you want a thicker pesto, add 1/4 cup of oil. If you are looking for a thinner sauce, continue to add more oil until you have reached your desired consistency. Taste and adjust seasonings (salt, lemon juice) accordingly.
This is best used immediately, but can be stored in an airtight container in the fridge for up to three days.
The post Lemony Vegan Basil Pesto appeared first on Never. Not. Eating..
]]>The post Avocado Croutons appeared first on Never. Not. Eating..
]]>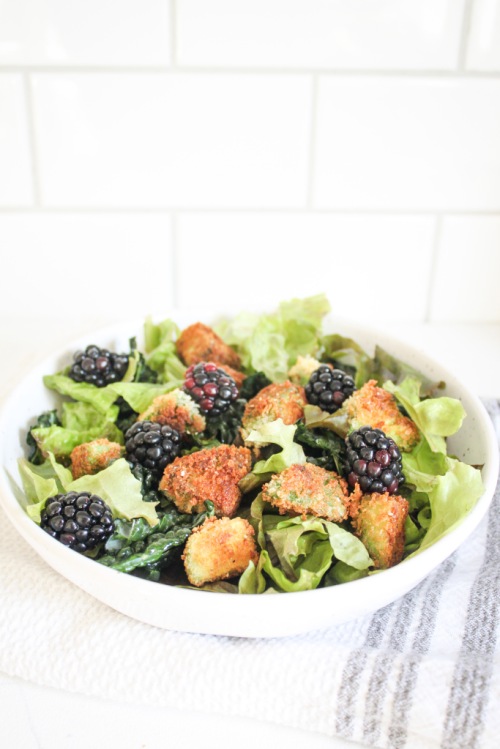
Not sure where this idea came from, but I’m grateful for it. Avocado croutons are my new regular croutons.
If you are tired of waiting for your avo to soften, make croutons! Or, if you just want croutons, make croutons!
All you will need is an unripe avocado, some Panko breadcrumbs, cornstarch, an egg and some salt and pepper to season.
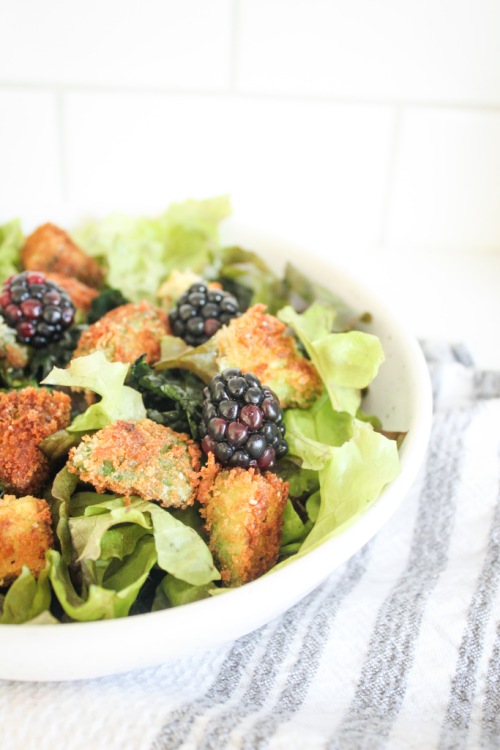
Tip: When dicing your avocado, cut it in half, lengthwise and remove the pit by tapping it carefully with the sharp blade of your knife. Twist and it should pop right out. Place the avocado on your cutting board, cut side down and peel the skin off with your fingers. This will make it easier to achieve equal cubes when cutting! I suggest 9-12 cubes per half.
Tip #2: Season at every step. Season the avocado directly, season the breadcrumbs and season the croutons after they come out of the pan. Avocados are pretty bland, so adding salt turns up the flavour.
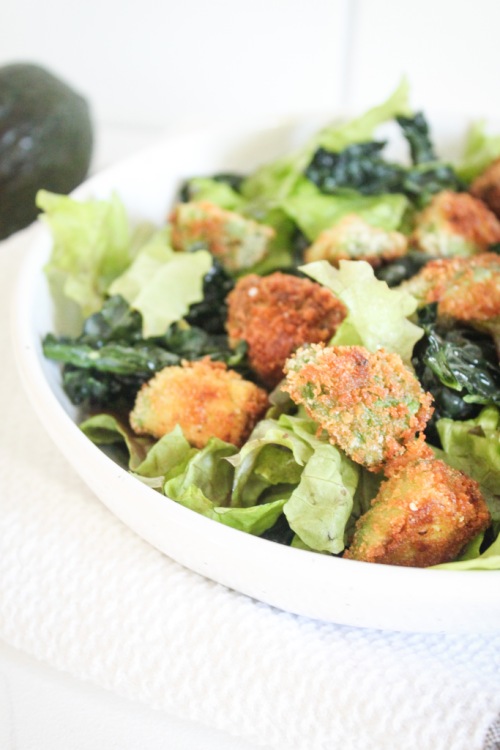
When life gives you avocados, make croutons.
Avocado Croutons
Prep time: 10 minutes
Cook time: 5 minutes
Ingredients:
- 1 unripe avocado (look for mostly darker skin with a few firm, green areas still), pit removed, skin off and diced into 1/2-inch cubes (about 9-12 cubes per half)
- salt
- pepper
- 3 tbsp cornstarch
- 1 egg, beaten
- 1/3 cup Panko breadcrumbs
- olive oil
Instructions:
- Set up your breading stations – have one bowl for the corn starch, the next bowl with the beaten egg and the final bowl with the Panko, mixed with 1/4 teaspoon of salt and a few grinds of fresh black pepper.
- Sprinkle your diced avocado with a pinch of salt and pepper and then toss carefully in the cornstarch. Ensure all sides have a light coating of cornstarch on them and then place into the egg and then into the Panko. Make sure all sides of the avocado are coated in the breadcrumbs.
- Add enough olive oil to generously coat the bottom of a large pan. Turn heat to medium-high, and when oil is hot, carefully drop each avocado piece into the oil, being careful not to crowd the pan. Cook for about 30 seconds-1 minute per side, or until browned. Make sure you turn the avocado to cook each side.
- Remove from pan and drain the croutons on paper towels.
Eat with your favourite salad, or on their own with your favourite creamy dipping sauce (like, ranch or chipotle mayo)!
The post Avocado Croutons appeared first on Never. Not. Eating..
]]>The post 5-Minute Good-on-Everything Green Dressing appeared first on Never. Not. Eating..
]]>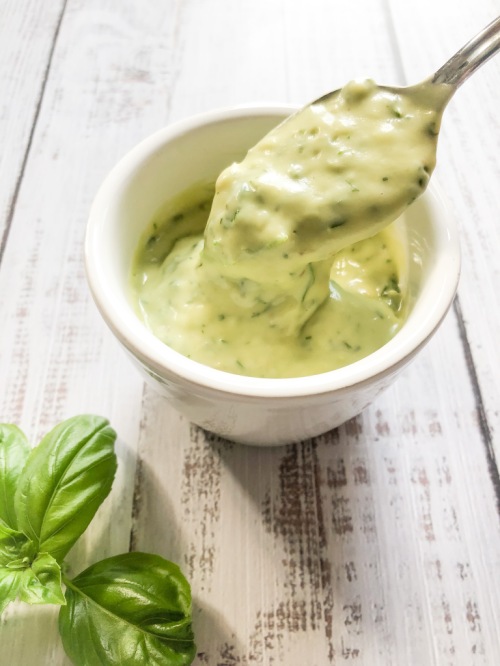
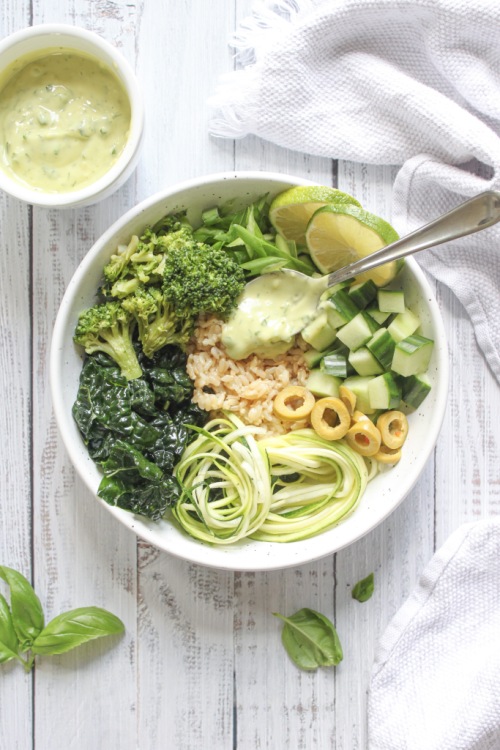
Made with an abundance of fresh herbs, avocado, garlic and yogurt, this dressing is the perfect dipper, topper and drizzler to accompany your meals. Amazing with crispy potatoes, on top of buddha bowls, as a sauce with your favourite pasta or to dip your pizza in – the possibilities are endless, my friends.
All you need are a blender and five minutes. Let’s go!
5-Minute Good-on-Everything Green Dressing
Serving size: Makes about 1/2 cup of dressing
Prep time: 5 minutes
Ingredients:
- 1/2 of an avocado
- 1/2 cup coconut yogurt (or Greek yogurt)
- 1 tbsp lime juice (about 1/2 of a lime)
- 1 clove of garlic
- 1/2 cup (tightly packed) herbs of choice (I use basil, parsley and dill)
- pinch of salt
- a few grinds of fresh black pepper
Instructions:
- Place all ingredients into a food processor and blend until smooth.
NOTES:
Drizzle over salads, pizza, pasta, crispy potatoes or on buddha bowls.
Double the recipe if serving a large crowd.
The post 5-Minute Good-on-Everything Green Dressing appeared first on Never. Not. Eating..
]]>