The post Dark Chocolate Protein Nuggets appeared first on Never. Not. Eating..
]]>
I was in Costco the other day and I found these Keto Nuggets and decided to give them a shot. I’ve been looking for something that I can eat post-dinner that isn’t too terrible for you. I really just can’t get behind the idea that dinner is the last meal that I will eat in a day. I don’t vibe with that. Anyway, back to my story: I purchased them and they were pretty darn good! But, since it’s me and I need to make mostly everything from scratch, I decided that instead of buying them again, I was going to make them. And here we are!

So these “nuggets” are super quick and easy. The nuts and seeds in the recipe can easily be swapped out for your favourite nuts and seeds, as long as you abide by the number of grams listed!
I like to toast the almonds and pecans to get that roasty toasty flavah before dousing them in the melted chocolate. So good!

Note: There isn’t any extra sugar added to these…Just what is in the chocolate. I like things less-sweet, but also because I always use maple syrup, honey or agave to sweeten my food, and their properties could potentially seize the chocolate. Chocolate is super temperamental, and even the tiniest drop of water could ruin an entire bowl. Because all of my preferred sweeteners are in liquid form, I didn’t want to add any and compromise the chocolate.

You can definitely find a lot of the ingredients at Costco or your local bulk food store, but here are some links to the required products if you prefer to shop online:
- Pecans
- Almonds
- Hemp hearts
- Pumpkin seeds
- Chia seeds
- Shredded coconut
- Flaky sea salt
- Dark chocolate
- Coconut oil
Another very helpful item is a kitchen scale. This is so great to have on hand, especially if you do a lot of baking. I used my scale for this recipe as it is the most accurate, especially when you are measuring nuts – their awkward shape always fits differently into measuring cups.
Let’s make some nuggets!

This post contains affiliate links and I may earn a small commission when purchases are made after clicking the links, at no cost to you. Thank you for supporting me!
Dark Chocolate Protein Nuggets
Prep time: 10 minutes
Cook time: 10 minutes
Cool time (inactive): 1 hour
Ingredients:
- 1/2 tsp Flaky sea salt
Instructions:
- Preheat oven to 350 degrees Fahrenheit and line a large baking sheet with parchment paper.
- Spread the pecans out on the parchment paper and bake in oven for 3 minutes.
- Pull out the baking sheet and add the almonds. Bake for another 3-6 minutes, or until just starting to become brown. Watch carefully! They will burn easily.
- To a large bowl, mix together the toasted nuts, hemp hearts, pumpkin seeds, chia seeds, coconut and salt and set aside.
- Add the chocolate and coconut oil to a double boiler*, over low heat. Stir frequently with a spatula until almost completely melted. Remove and continue stirring until the remaining solid pieces melt.
- Pour the chocolate over the nut and seed mixture and use a wooden spoon to mix until all of the nuts and seeds are coated. Spread the mixture out onto a parchment lined baking sheet (you can use the same parchment you used for roasting the nuts). Place in the fridge for at least one hour to set.
- When fully set, remove from fridge and break into bite-size “nuggets.” Store in an airtight container in the fridge for up to 2 weeks!
NOTES:
*For the double boiler, fill a small pot with one – to two-inches of water and place over medium low heat. Add a larger glass, or heatproof bowl on top of the pot with a wooden spoon in between to let the steam escape. Place the chocolate and coconut oil into the glass bowl to melt.
The post Dark Chocolate Protein Nuggets appeared first on Never. Not. Eating..
]]>The post Roasted Garlic Mashed Cauliflower (Low-Carb) appeared first on Never. Not. Eating..
]]>We are officially entering Fall and that means, Thanksgiving. I’m a lover of enjoying seventy-four side dishes and can always forego the main one. I am always on the hunt for new and fun sides to add to any meal…especially those around the holidays!

This Roasted Garlic Mashed Cauliflower is the perfect side for Thanksgiving, Christmas, Easter…you name it! It’s low-carb and will please your keto and vegan family members. Bonus: It tastes just as good as mashed potatoes!
How to Make Vegan Roasted Garlic Mashed Cauliflower
I highly recommend a good food processor or blender. The Ninja Kitchen line is a great product and I use their food processor every single day. I make EVERYTHING in it – smoothie bowls, pestos, pastry doughs and this mashed cauliflower. It is an affordable alternative to the well-known Vitamix.

For this recipe, everything gets precooked, placed in your food processor and then blended until smooth – it’s THAT easy! Here is what you will need:
- One medium-sized head of cauliflower
- A head of garlic
- Vegetable broth
The Roasted Garlic
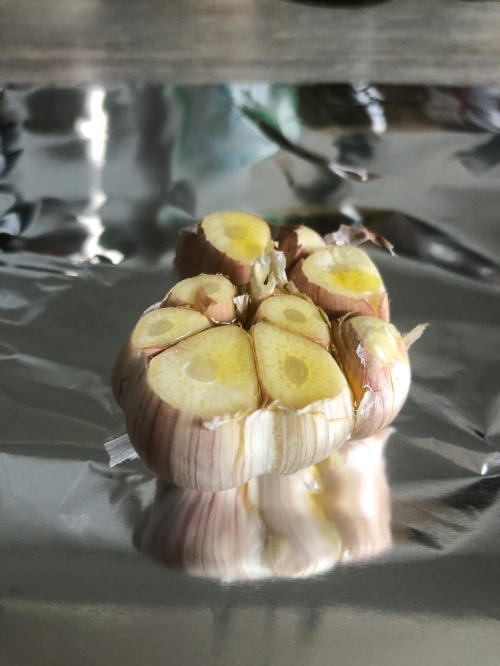
Let’s talk about the garlic – is there anything better?! For this recipe I love using roasted garlic, and although it may take longer, it’s so worth it. In addition, you will also have leftover cloves that you can use in other dishes that you will be serving (or just save them for another day). Roasting a head of garlic is a great move for large dinner parties or holiday gatherings.
To roast, all you have to do is cut off the top of the entire head of garlic, leaving the top of the cloves exposed. Drizzle the head with olive oil, wrap in tin foil and place on a baking sheet and into the oven for 45 minutes. If you want to save on time, you can mince your raw garlic, add to a pan over low heat with some olive oil for about 30 seconds to one minute, and use this in place of the roasted stuff in the recipe. Above all, don’t skimp on the garlic!
Cooking the Cauliflower
To cook the cauliflower, place the florets into a large pot with about a cup and a half of veggie stock. Cover and set your burner to high, and when the liquid starts boiling, turn the burner down slightly and let steam for about 5-10 minutes (depending on how small your florets are). They will be ready when they are fork-tender. Don’t overcook them because you will end up with mushy cauliflower instead of mashed cauliflower!
After you cook the garlic and cauliflower, all that’s left to do is throw it all into your food processor and watch it come together – Pillowy, low-carb clouds of heaven!

More Amazing Cauliflower Sides
Sumac Roasted Cauliflower (a showstopper)
Hot and Sweet Cauliflower Wings (perfect for game day)
East Creamy Cauliflower Soup (a winter hit)
This post contains affiliate links and I may earn a small commission when purchases are made after clicking the links, at no cost to you. Thank you!
Vegan Roasted Garlic Mashed Cauliflower
Servings: 4
Prep time: 10 minutes
Cook time: 45 minutes
Ingredients:
- 1 whole head of garlic
- medium head of cauliflower, broken into florets
- 1 1/2 cups vegetable stock
- salt
- pepper
- olive oil
- fresh thyme, for topping (optional)
Instructions
For the garlic:
- Preheat oven to 375 degrees Fahrenheit.
- Peel the outer layer of skin off of the garlic and slice the top of the head off (see photo above). Place on a piece of tin foil and drizzle the top with about one tablespoon of olive oil. Wrap the garlic up so that there are no holes for the steam to escape and place on a baking sheet and then in the oven for 45-55 minutes.
For the cauliflower:
- When the garlic has been roasting for about half hour, start your cauliflower. Place the florets into a large pot with the vegetable stock, cover and bring to a boil. Once boiling, reduce slightly to a rolling boil and allow the cauliflower to steam for 5-10 minutes, or until just fork tender – do not drain.
- Use a slotted spoon to transfer the cauliflower to a food processor or blender and add one tablespoon of the veggie stock that the cauliflower was cooking in.
- Remove the garlic from the oven and carefully unwrap. Use your fingers to squeeze out two of the cloves (or as many as you want!) and place in the food processor with the cauliflower and stock. Add in 1/4 teaspoon of salt and a few grinds of fresh black pepper and pulse everything to combine and then blend until smooth. Be patient and scrape down the sides often. You can add more of the veggie stock to help loosen it, but don’t add too much or else it will become mushy. Eventually, if you continue to blend and scrape, the mixture will become smooth without the added veggie stock.
- Taste and add more salt and pepper or another clove of garlic, if desired. I like to put more than 1/4 teaspoon of salt, but it is always better to start with less and add more, than to add too much for your taste.
- Transfer the cauliflower to a serving bowl, drizzle with some olive oil and top with fresh thyme, if desired.
The post Roasted Garlic Mashed Cauliflower (Low-Carb) appeared first on Never. Not. Eating..
]]>