The post Cinnamon Vanilla Cashew Butter Recipe appeared first on Never. Not. Eating..
]]>WHAT IS CINNAMON VANILLA CASHEW BUTTER?
Well, I’m so glad you asked! It’s your regular nut butter with a gorgeous, put-me-in-the-holiday-mood kick! Who doesn’t love warm notes of cinnamon and dreamy vanilla? This nut butter is dressed up and ready for a night on the town. It’s all-natural and all-delicious!

WHY I LIKE THIS CINNAMON VANILLA CASHEW BUTTER
I am someone who is obsessed with nut butters, but ever since groceries have skyrocketed in price, peanut and other nut butters are basically unaffordable. I mean, seven dollars for a jar of peanut butter…are you nuts?! So now, I head to Costco, buy a large bag of cashews for cheap and makes TONS of nut butter with it. It’s much more cost effective, not to mention I can see everything going into it!

THE INGREDIENTS
Another great thing about this recipe is the minimal ingredients. Just three to be exact (not including salt). They are:
- raw cashews
- cinnamon
- vanilla
- pink Himalayan sea salt
HOW TO MAKE CINNAMON VANILLA CASHEW BUTTER
The first, and arguably, the most important step of this recipe is toasting the cashews. With an oven set to 350 degrees Fahrenheit, roast cashews for 5-8 minutes, checking often. Nuts burn easily and quickly, so it’s important that you keep an eye on them. Once they start turning light brown, remove them from the oven.
Now, you just add all of the ingredients to a food processor and blend until smooth, or until it reaches your desired consistency. Make sure you have a high processed blender, like the Vitamix, or the Ninja, and be patient with it! It takes about 15-20 minutes to become “butter,” so just trust the process.

TIPS
- Use 100% real vanilla – it’s much better than the artificial stuff
- Have a spatula while the nut butter is blending and scrape down the sides often
- Give the engine of your blender a break now and again to preserve it’s life
OTHER HEALTHY SPREADS YOU NEED TO TRY
Vegan Cilantro Lime Dressing (I put this stuff on everything)
Pink Hummus (perfect for date night or Valentine’s Day)
3-Ingredient Strawberry Chia Jam (would go perfectly with this cashew butter)
TOOLS I USED TO MAKE CINNAMON VANILLA CASHEW BUTTER
Click below to access the tools I used for this recipe:


Cinnamon Vanilla Cashew Butter
Servings: Makes approximately 1 cup
Prep time: 20 minutes
Cook time: 5 minutes
Ingredients:
- 2.5 cups raw cashews
- 1 tsp cinnamon powder
- 1/2 tbsp pure vanilla extract
- 1/4 – 1/2 tsp pink Himalayan sea salt (or just regular sea salt)
Instructions:
- Preheat your oven to 350 degrees Fahrenheit and place cashews on a baking sheet. Bake for 5-8 minutes, or until they begin turning a light golden brown colour. Watch carefully – they burn quickly!
- Once the cashews are toasted, add them to a food processor with the cinnamon, vanilla and 1/4 teaspoon of salt. Pulse a few times and then blend. Stop the motor every so often and scrap the sides down. It will look very grainy at first, but after about 15 minutes of blending and scraping, it will start to smooth out. The longer you blend, the smoother it becomes.
- Once the cashews have reached the texture you like, taste it and add more salt if desired. Spoon the butter into an airtight container and store in the fridge for up to 5 weeks.

The post Cinnamon Vanilla Cashew Butter Recipe appeared first on Never. Not. Eating..
]]>The post Vegan Ice Cream Bars appeared first on Never. Not. Eating..
]]>
This has been one of the hottest summers on record, and I’m just a bit mad at myself that I developed these ice cream bars now, instead of at the beginning of summer. Then again, it’s not like I’m going to stop eating them when the weather cools down…I’m an ice-cream-all-year-long kinda gal!
HEALTHIER THAN STORE-BOUGHT
So here are a few reasons why you should make these bars, STAT:
- The recipe includes natural sugar from pure maple syrup only, and you can omit it entirely if you wish.
- They are vegan.
- They are made quickly in a blender.
- You like delicious treats.
These remind me of the Magnum bars you can buy at the grocery store. The only difference is you know all of the ingredients going into them, and they are way healthier than anything you would get out of a box.
HOW TO MAKE VEGAN ICE CREAM BARS
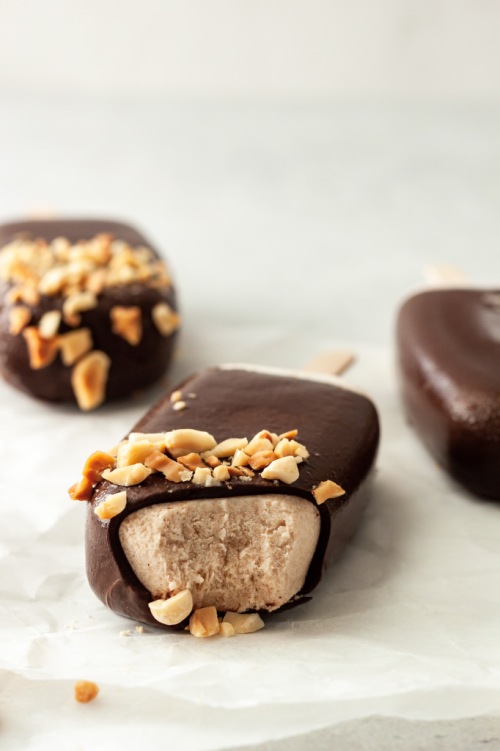
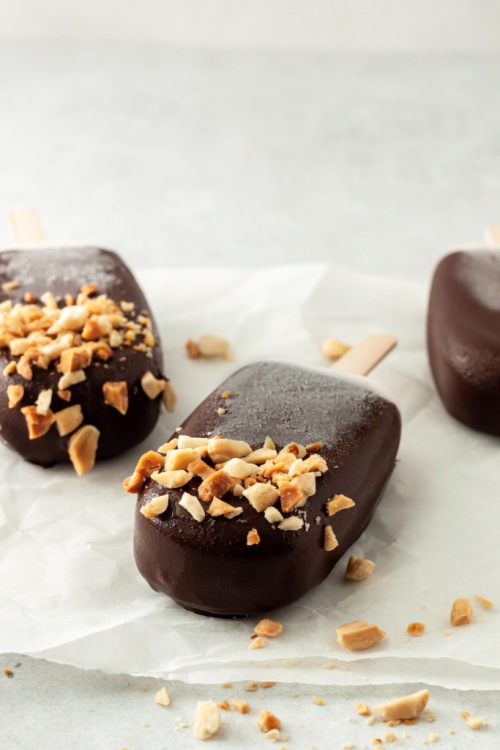
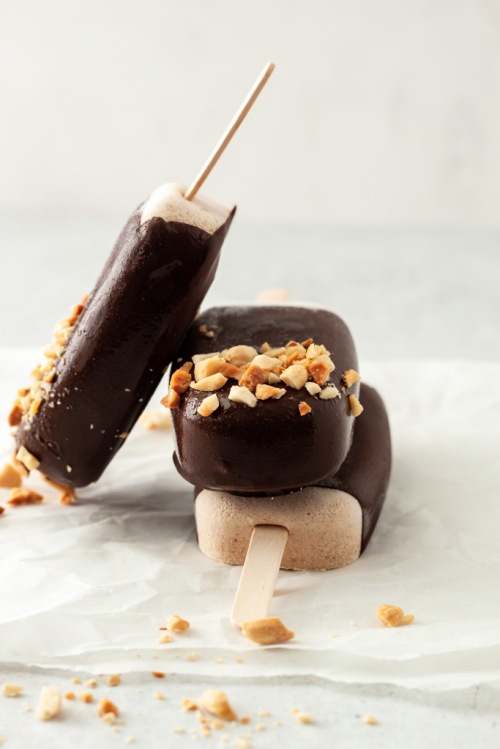
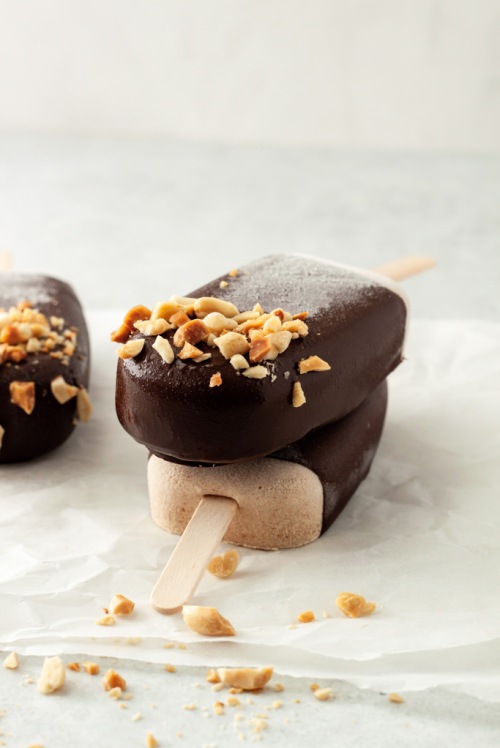
The recipe for these bars is simple – blend all ingredients together using a high-powered blender. Pour into the cutest popsicle molds. Freeze for a few hours until firm. Dip in chocolate and sprinkle on some crushed peanuts.
When you bite into one of these little babes, you first get the crack of the chocolate, followed by the creaminess of the filling which is made rich by coconut milk and nut butter. It’s beyond good. Ice cream goals!

OTHER VEGAN TREATS TO TRY
Vegan Protein Energy Balls (the perfect pre-workout snack)
Vegan Mocha Buttercream (my favourite cake topping)
Sweet Potato Creme Brulee (a great holiday dessert)
This post contains affiliate links and I may earn a small commission when purchases are made after clicking the links, at no cost to you. Thank you for supporting me!
Vegan Ice Cream Bars
Serving size: Makes 8 bars
Prep time: 10 minutes
Freeze time: 4 hours
Ingredients:
- 1 can full-fat coconut milk (refrigerated for at least 24 hours)
- 1/2 cup nut butter (I love using cashew or peanut butter for this)
- 1/2 cup coconut yogurt
- 2-3 tbsp pure maple syrup
- 1/2 tbsp pure vanilla extract
- 1/4 tsp cinnamon powder (optional)
- 85 g dark vegan chocolate (chopped)
- 1 tbsp coconut oil
- 1/4 cup peanuts, chopped
Instructions:
- Remove coconut milk from the fridge and carefully open the can. Scoop the solid white part out into a high-powered blender. Reserve the coconut water in the bottom of the can for tomorrow’s smoothie!
- Add the nut butter, yogurt, syrup, vanilla and cinnamon to the blender and blend until smooth. Pour into popsicle molds and place in the freezer until firm, about four hours.
- Over a double boiler*, melt the chocolate with the coconut oil, stirring often. Pour into a tall cup wide enough for the popsicles to fit in. Dip each popsicle into the chocolate and lay on a piece of parchment paper. Immediately sprinkle with the chopped peanuts.
- Store in the freezer for up to 10 days.
NOTES:
*For the double boiler – fill a small pot with an inch or two of water. Bring to a gentle simmer and place a larger bowl on top with a wooden spoon in between to let the steam escape. Place the chocolate and coconut oil in the bowl and stir frequently. Alternatively, you can melt the chocolate in the microwave in short, 20-30 second increments, stirring in between.
Tip – Take the ice cream bar out of the freezer and let sit a few minutes before consuming!
The post Vegan Ice Cream Bars appeared first on Never. Not. Eating..
]]>The post 5-Ingredient Peach Crisp appeared first on Never. Not. Eating..
]]>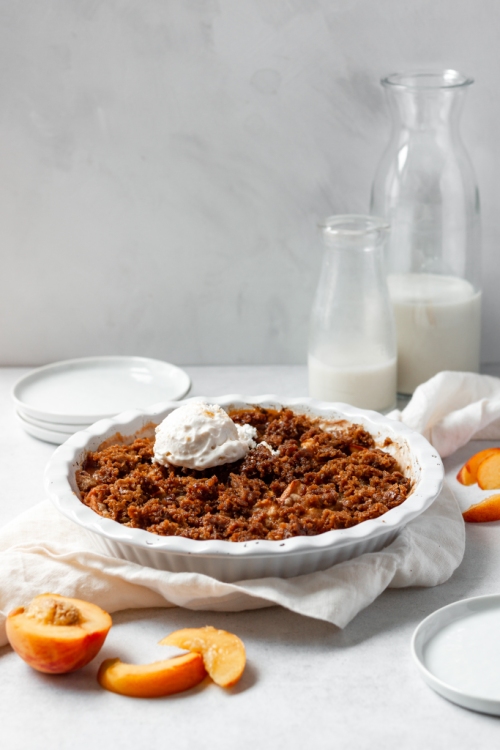
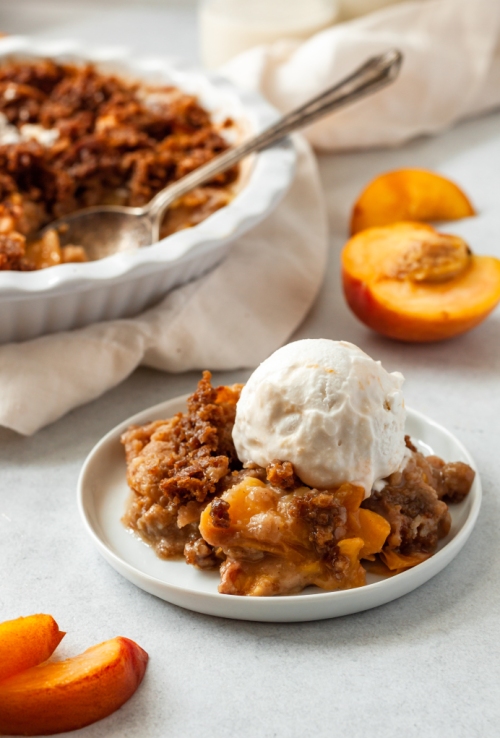
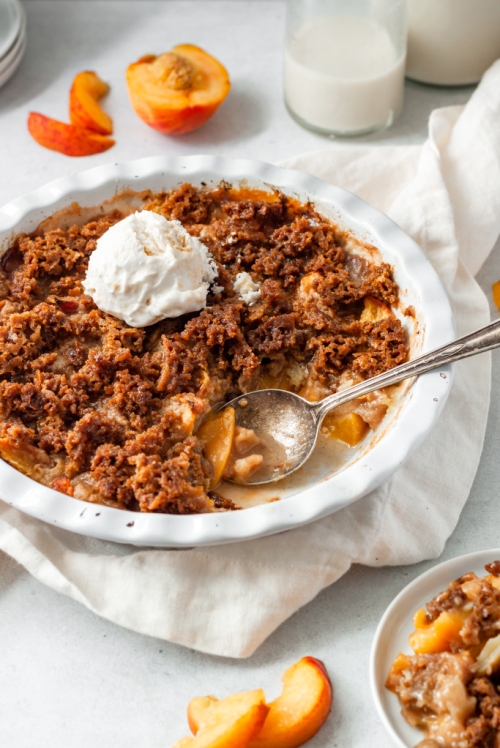
My mom used to make the best apple crisp growing up and it was my absolute favourite post-dinner treat. Since peaches are in season (in Ontario), I decided to make a peach crisp instead, and it did not disappoint. Take your girl up to the north, yeh, for those Canadian peaches! I hope you are a Justin Bieber fan, otherwise this post will make absolutely zero sense to you. And also, we cannot be friends if you aren’t (joking) (not really).
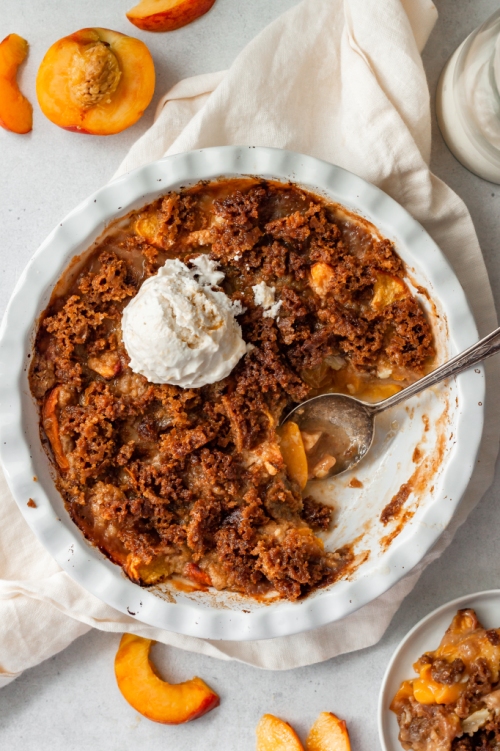
As the name suggests all you need are FIVE simple ingredients:
- Peaches
- Brown sugar
- Flour
- Lemon juice
- Butter
The simplicity of this recipe is insane, making it the easiest, most delicious dessert on the fly. It’s also perfect for a summer BBQ or outdoor gathering. Let’s make some peach crisp!
This post contains affiliate links and I may earn a small commission when purchases are made after clicking the links, at no cost to you. Thank you for supporting me!
5-Ingredient Peach Crisp
Serving size: 5-6 people
Prep time: 10 minutes
Cook time: 35 minutes
Ingredients:
- 3/4 cup brown sugar
- 1/2 cup all-purpose flour
- 1/4 tsp salt
- 1/2 tsp cinnamon powder (optional)
- 6 tbsp cold butter, cubed
- 4 large peaches (approximately 6 cups), washed and cut into 1/2-inch wide slices
- 1.5 tbsp lemon juice
Instructions:
- Preheat oven to 375 degrees Fahrenheit.
- In a medium bowl, combine brown sugar, flour, salt and cinnamon (if using). Use your hands or a pastry cutter to incorporate the cubed butter until it resembles large crumbs. Place the bowl in the freezer while you prepare the peaches.
- Place peaches into an 8-inch baking dish or cast iron pan. Pour the lemon juice over top and use your hands to toss the peaches around.
- Top the peaches with the crumble, making sure it is evenly spread across the top.
- Bake for 30-35 minutes, or until the top begins to turn golden brown and crispy.
Serve warm and with a scoop of vanilla ice cream. Store in an airtight container for up to 2 days.
The post 5-Ingredient Peach Crisp appeared first on Never. Not. Eating..
]]>The post Top 10 Best Amazon Kitchen Must-Haves (2022) appeared first on Never. Not. Eating..
]]>I have included links to both the Canadian and United States Amazon websites for each item. As I live in Canada and purchase on the Canadian Amazon website, I have done my best to find the same, or similar product link on the American site. Click on the name of each item to be directed to the link on Amazon. The links to the Canadian Amazon site are listed under each item’s description!
MY TOP TEN BEST AMAZON KITCHEN GADGETS:
Out of all of my Amazon kitchen must-haves I have purchased to-date, this Ninja Kitchen System is the best. I use it every day. It comes equipped with a high-powered blender, food processor and individual serving size cups for morning smoothies. I am positive that this blender is the next greatest thing, after a Vitamix, and significantly less expensive. It pulverizes ice and makes the best smoothie bowls!
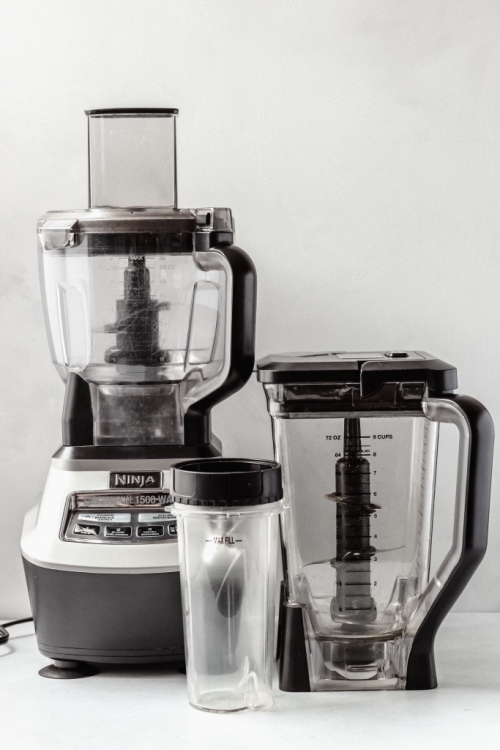
I use this system mostly to make pie doughs, pestos, lattes and (almost) daily smoothie bowls. I have had it for almost six years now and it still works perfectly, so I highly recommend!
Canadian Link: Ninja Blender Set
2. Juicer
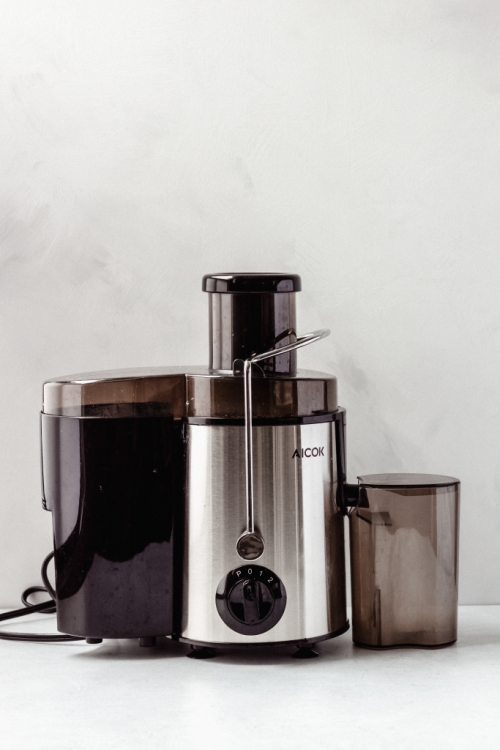
Okay, now for my second favourite purchase. This juicer is friggin’ amazing for the price. Making fresh juice has quite literally changed my life and my health. I swear by it.
This particular juicer is easy to clean and operate. It separates the pulp easily from the juice of any fruit or vegetable, even some of the harder veggies are liquified easily, such as carrots and celery. After using, I just remove all of the parts and rinse them out with water, and after about four or five uses, I will wash them in soapy water. It even comes with a little brush to help with the job! A++.
Canadian Link: Juicer
3. Milk Frother

If you have seen my Instagram reels, you know I love making new and different coffee drinks in the morning. This Milk Frother is the bomb. It works so well, is super cheap and it only takes 10-20 seconds to froth up your favourite milks (I personally love oat milk). To clean, just turn it on in a sink full of soapy water! It’s just the best contraption to have in your kitchen, one of my favourite Amazon kitchen must-haves, and it also comes with an egg beater attachment!
Canadian Link: Milk Frother
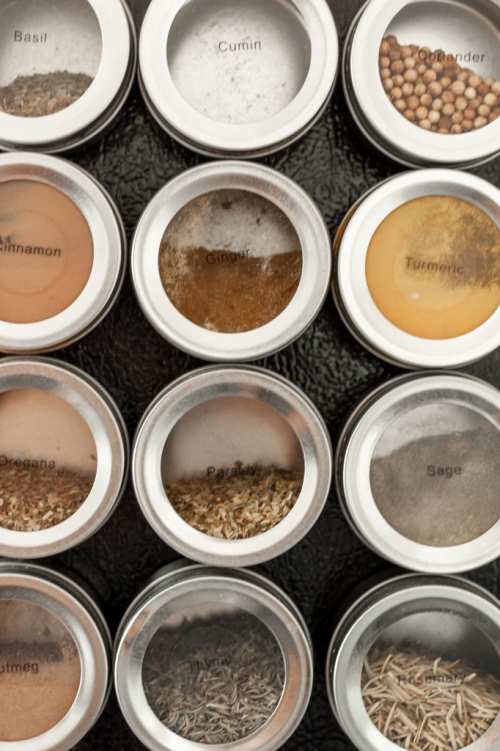
These are high up on my list of the best Amazon kitchen must-haves! If you have a smaller kitchen like me, and not much counter space, you need to get these Magnetic Spice Jars! Before buying these, I had a spice wheel that cluttered my countertop. I needed more room to work, so I invested in these babies, and let me tell you, I’m so glad I did.
I filled them with all of my most used spices and attached them to the side of my fridge for quick access. They even come with pre-made labels, and blank ones for any spices that they didn’t have listed already (which were unnecessary for me, because they thought of all of the best ones)! A game changer.
Canadian Link: Magnetic Spice Jars
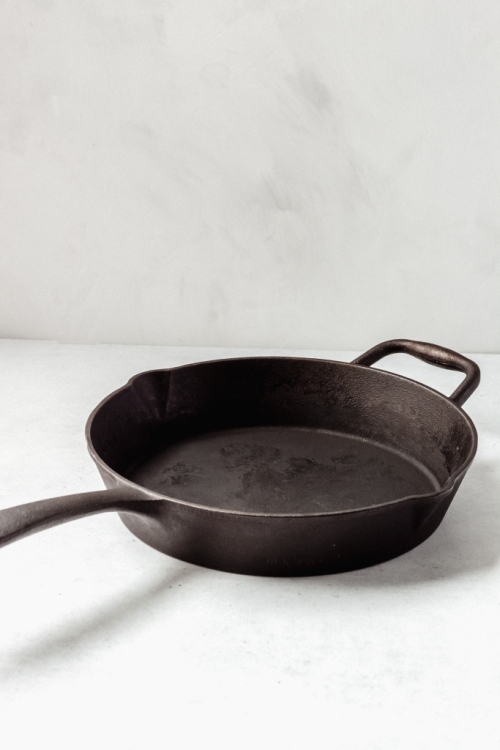
This is a two-for-one. I CANNOT live without these pans as I use them so frequently. First up, this regular cast iron pan. I use it for making both savoury dishes and desserts. It has the best heat distribution.
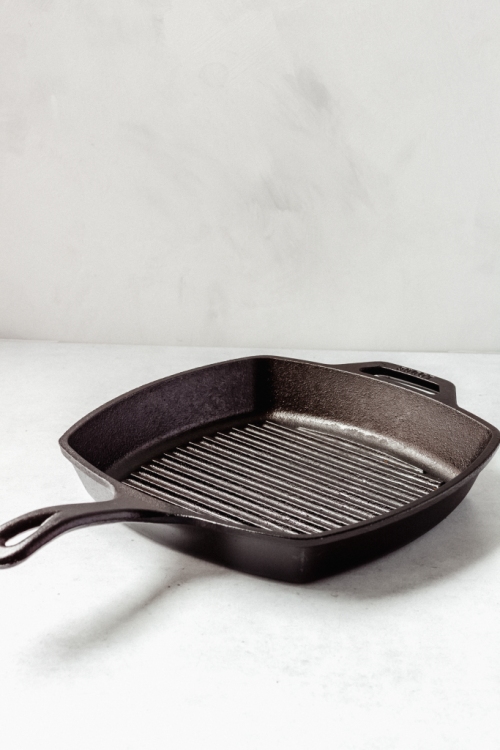
Secondly is this grill cast iron. It’s perfect if you want to grill meats, but don’t own a BBQ, or if you want to use it to grill veggies or fruits. I love using it for veggie burgers. Check out my Grilled Piña Colada French Toast for a recipe to make with this bad boy!
Canadian Link: Cast Iron Pan, Cast Iron Grill
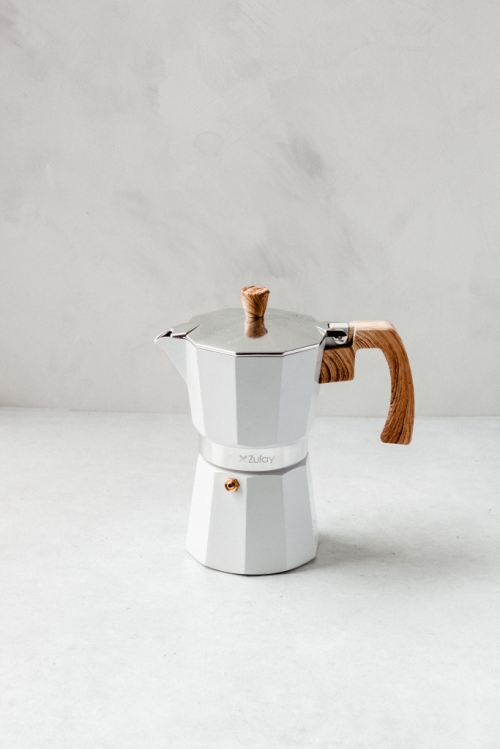
This is the perfect accompaniment to the Milk Frother listed above. I love this Espresso Maker because it is white, clean and looks pretty on your stovetop. It quickly makes some delicious espresso shots for your morning fix. If you want to save money on espresso drinks, try adding this to your kitchen!
Canadian Link: Espresso Maker
7. Turntable

This one is for all of my cake decorators out there. Even if you are just getting into baking and decorating cakes, a turntable is a MUST. It makes the job so much easier and less stressful to do. I have TONS of cake decorating videos on my Instagram feed (@nevernoteatingca), if you are just beginning and want to see a few cakes come together!
Canadian Link: Turntable
8. Dutch Oven

What are you even doing if you don’t own a dutch oven?! It is the ultimate kitchen must-have. This heavy-duty dutch oven is perfect for high-temperature ovens. I make sourdough, stock, soups, stews, and even a whole roasted cauliflower in mine. There are just some things you need to splurge on.
Canadian Link: Dutch Oven
9. Pasta Roller

If you make homemade pasta, this one’s for you! I didn’t want to purchase a pasta attachment for my KitchenAid mixer because they were just too pricey, therefore, I decided to look on Amazon for an alternative, and of course, I found something just as good! This Pasta Roller clamps to your countertop and has a number of settings and thicknesses that you can set prior to rolling out your dough. It cuts pasta into fettuccine, spaghetti, lasagna, linguine and more!
Canadian Link: Pasta Roller
10. Kitchen Scale

Let’s face it – we all know baking is a science, and it is 100 percent more precise with a kitchen scale. I use a kitchen scale pretty much everyday to feed my sourdough starter. You can set it to measure in ounces, grams, millilitres and pounds. It also comes with the very handy tare function, to set your scale back to zero at any point. This particular scale is sleek, modern and low-cost. Try it out when you bake to ensure accuracy with your recipes!
Canadian Link: Kitchen Scale
And, there you have it! Ten of my favourite essentials for the kitchen. I hope you found this blog post helpful. Leave a comment below to tell me your favourite kitchen tools!
This post contains affiliate links and I may earn a small commission when purchases are made after clicking the links, at no cost to you. Thank you for supporting me!
The post Top 10 Best Amazon Kitchen Must-Haves (2022) appeared first on Never. Not. Eating..
]]>The post Homemade Tzatziki appeared first on Never. Not. Eating..
]]>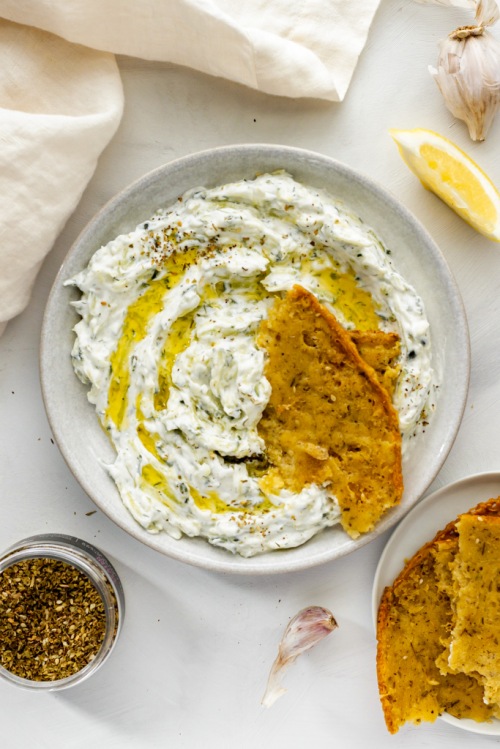
This tzatziki sauce is thick, creamy, refreshing and a great spread for wraps and gyros, or to go with falafel, fries, bread or vegetables. It’s the perfect match for anything that needs a creamy element! I love it with my Easy Za’atar Socca bread.
Tzatziki is popular around the Middle East and the Mediterranean, especially in Greece. It is my dream to travel to Greece one day and learn more about their cuisine, but until then, I will have this recipe on repeat, so I can pretend I’m there.
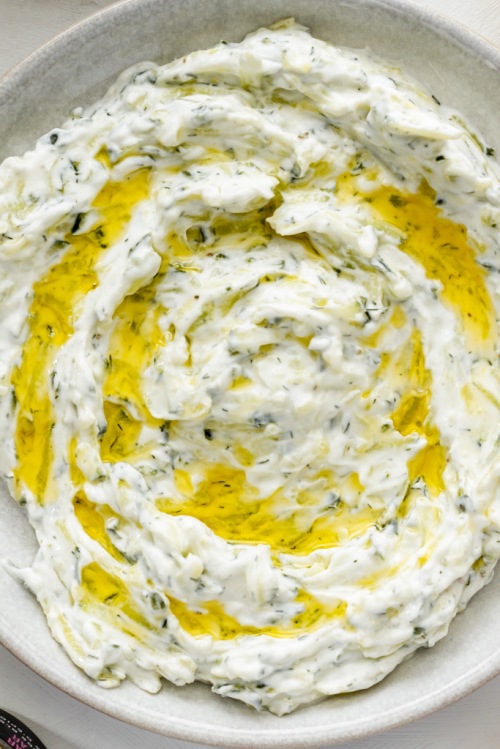
Tzatziki is simply a combination of yogurt, fresh herbs, lemon, cucumber, garlic, olive oil and salt. It’s a perfect summer dip, sauce or spread, as it’s cool and bright!
It is incredibly easy to whip up at home. Follow my recipe below, and feel free to add extras of your favourite ingredients!
Homemade Tzatziki
Serving size: Makes 1 cup
Prep time: 5 minutes
Ingredients:
- 1 cup cucumber, shredded
- 1 cup full-fat Greek yogurt
- 1 clove of garlic, grated
- zest of 1 lemon
- 1 1/2 tbsp freshly squeezed lemon juice
- 1 tbsp chopped dill
- pinch of salt
- olive oil (optional)
Instructions:
- Place cucumber in a clean tea towel or paper towel and squeeze the liquid out over a sink.
- Mix the cucumber, yogurt, garlic, lemon zest and juice, dill and salt in a bowl. Transfer to a small plate and use the back of a spoon to spread it out over the surface. Drizzle with a little bit of olive oil, if desired. Serve immediately.
- Store extra in an airtight container in the fridge for up to three days.

The post Homemade Tzatziki appeared first on Never. Not. Eating..
]]>The post Dark Chocolate Protein Nuggets appeared first on Never. Not. Eating..
]]>
I was in Costco the other day and I found these Keto Nuggets and decided to give them a shot. I’ve been looking for something that I can eat post-dinner that isn’t too terrible for you. I really just can’t get behind the idea that dinner is the last meal that I will eat in a day. I don’t vibe with that. Anyway, back to my story: I purchased them and they were pretty darn good! But, since it’s me and I need to make mostly everything from scratch, I decided that instead of buying them again, I was going to make them. And here we are!

So these “nuggets” are super quick and easy. The nuts and seeds in the recipe can easily be swapped out for your favourite nuts and seeds, as long as you abide by the number of grams listed!
I like to toast the almonds and pecans to get that roasty toasty flavah before dousing them in the melted chocolate. So good!

Note: There isn’t any extra sugar added to these…Just what is in the chocolate. I like things less-sweet, but also because I always use maple syrup, honey or agave to sweeten my food, and their properties could potentially seize the chocolate. Chocolate is super temperamental, and even the tiniest drop of water could ruin an entire bowl. Because all of my preferred sweeteners are in liquid form, I didn’t want to add any and compromise the chocolate.

You can definitely find a lot of the ingredients at Costco or your local bulk food store, but here are some links to the required products if you prefer to shop online:
- Pecans
- Almonds
- Hemp hearts
- Pumpkin seeds
- Chia seeds
- Shredded coconut
- Flaky sea salt
- Dark chocolate
- Coconut oil
Another very helpful item is a kitchen scale. This is so great to have on hand, especially if you do a lot of baking. I used my scale for this recipe as it is the most accurate, especially when you are measuring nuts – their awkward shape always fits differently into measuring cups.
Let’s make some nuggets!

This post contains affiliate links and I may earn a small commission when purchases are made after clicking the links, at no cost to you. Thank you for supporting me!
Dark Chocolate Protein Nuggets
Prep time: 10 minutes
Cook time: 10 minutes
Cool time (inactive): 1 hour
Ingredients:
- 1/2 tsp Flaky sea salt
Instructions:
- Preheat oven to 350 degrees Fahrenheit and line a large baking sheet with parchment paper.
- Spread the pecans out on the parchment paper and bake in oven for 3 minutes.
- Pull out the baking sheet and add the almonds. Bake for another 3-6 minutes, or until just starting to become brown. Watch carefully! They will burn easily.
- To a large bowl, mix together the toasted nuts, hemp hearts, pumpkin seeds, chia seeds, coconut and salt and set aside.
- Add the chocolate and coconut oil to a double boiler*, over low heat. Stir frequently with a spatula until almost completely melted. Remove and continue stirring until the remaining solid pieces melt.
- Pour the chocolate over the nut and seed mixture and use a wooden spoon to mix until all of the nuts and seeds are coated. Spread the mixture out onto a parchment lined baking sheet (you can use the same parchment you used for roasting the nuts). Place in the fridge for at least one hour to set.
- When fully set, remove from fridge and break into bite-size “nuggets.” Store in an airtight container in the fridge for up to 2 weeks!
NOTES:
*For the double boiler, fill a small pot with one – to two-inches of water and place over medium low heat. Add a larger glass, or heatproof bowl on top of the pot with a wooden spoon in between to let the steam escape. Place the chocolate and coconut oil into the glass bowl to melt.
The post Dark Chocolate Protein Nuggets appeared first on Never. Not. Eating..
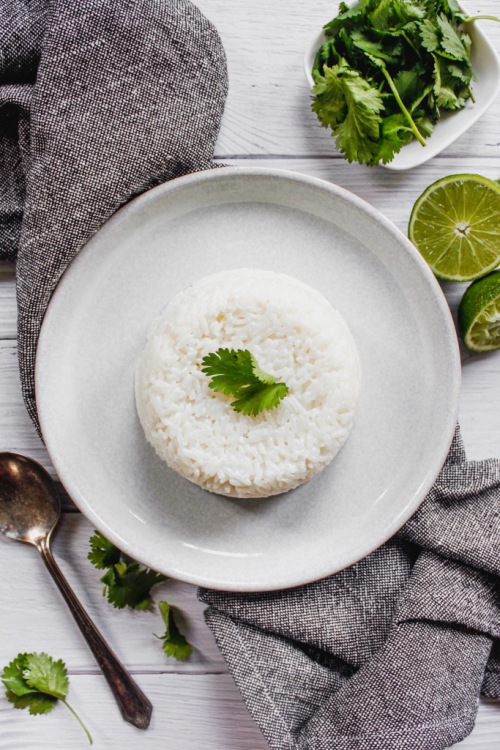
]]>The post Coconut Lime Cilantro Rice appeared first on Never. Not. Eating..
]]>
I traveled to SE Asia during the summer of 2017. Those were the days, man. It was like 6 weeks of pure foodie inspiration. Rice, curries, fresh fruit, toasties from the 7/11…If you know, you know.
The abundance of carbs I ate while there was record-breaking, and the best part is, I didn’t gain a pound…I actually lost weight. Afterall, you step outside and instantly sweat off a few kilos in the 50-degree weather. And now, I have a plethora of different rice dishes under my belt!
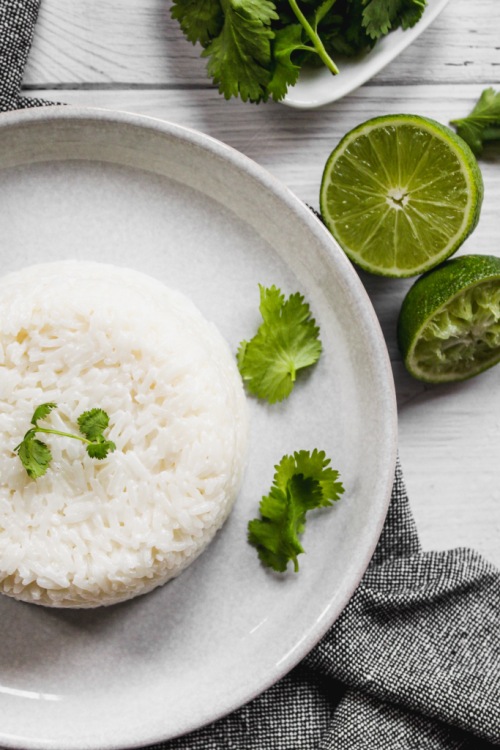
So let’s chat about this coconut rice dish. I just love coconut ‘er-thang! This rice makes for a perfect side dish to any meal – It has a creamy quality to it and it takes minutes to whip up. Here is what you will need:
- jasmine rice
- coconut milk
- salt
- lime
- cilantro
Let’s get started!
Coconut Lime Cilantro Rice
Serving size: 3-4
Prep time: 5 minutes
Cook time: 10 minutes
Ingredients:
- 1 cup jasmine rice
- 1 cup canned coconut milk
- 1 cup water
- salt
- juice of 1/2 lime
- 2 tbsp fresh cilantro, chopped
Instructions:
- Add rice, coconut milk, water and a generous pinch of salt to a saucepan and bring up to a boil. Turn heat to low, cover and simmer for 10 minutes (or according to rice package directions).
- Remove from heat and add the lime juice and cilantro to the rice, fluff with a fork to combine.
- Serve immediately.
NOTES:
*Add a touch of honey to the rice while cooking for a hint of sweetness.
The post Coconut Lime Cilantro Rice appeared first on Never. Not. Eating..
]]>The post Oatmeal Earl Grey and Lavender Sandwich Cookies appeared first on Never. Not. Eating..
]]>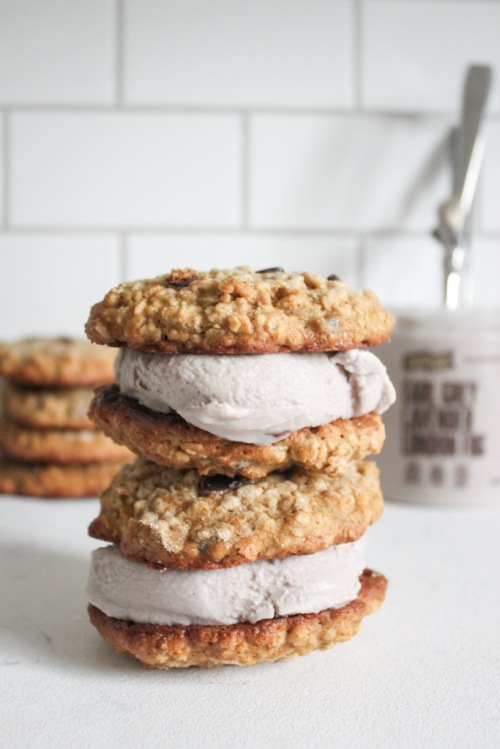
I’ve always loved baking, but as we all know, it’s a science. I tend to stick to cooking, because I like to just throw stuff into a pot and not have to worry about whether the ratios are going to work out or not. But, now that it is stretchy-pant season, I wanted to indulge in some sweet treats, so I thought I would try my hand at developing a cookie recipe. I won’t lie – it took me a few tries, but I am happy at where we landed.
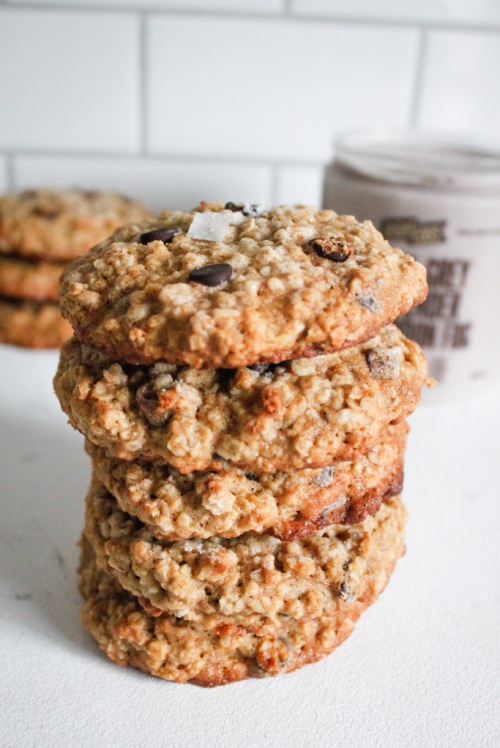
I was aiming for a soft and chewy cookie that stayed soft and chewy. I always find that the cookies I made that claimed to be “chewy,” always hardened up super fast. These ones don’t. Days later, they still have that perfect texture.
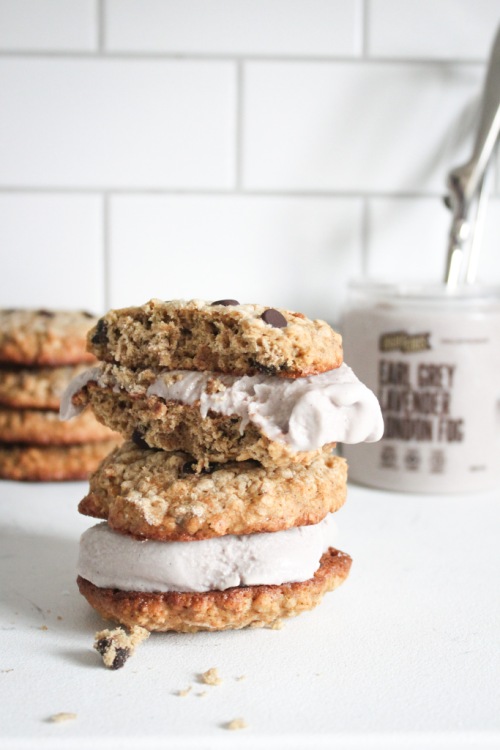
They are simple to make and when you scoop in that yummy gelato, they make for the perfect post-dinner, winter weather treat.
Peace, love and sandwich cookies.
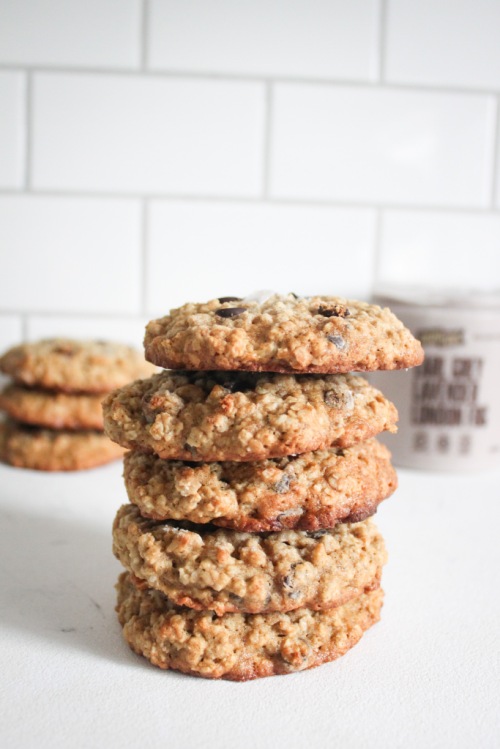
Oatmeal Earl Grey and Lavender Sandwich Cookies
Servings: Makes 18 cookies (9 sandwiches)
Prep time: 15 minutes
Cook time: 12 minutes
Ingredients:
- 3/4 cup unsalted butter, softened
- 1 cup packed brown sugar
- 2 eggs, at room temperature
- 1 banana, mashed
- 1 tsp pure vanilla extract
- 1.5 cups gluten free flour
- 1 tsp baking soda
- 1 tsp salt
- 1 tsp cinnamon
- 1/4 tsp nutmeg
- 3 cups quick oats
- 1 cup dark chocolate chips
- flaky sea salt, for topping (optional)
- 1 tub Earl Grey Lavender London Fog Gelato (or your favourite flavour)
Instructions:
- Add butter and brown sugar to a large stand mixer bowl. Beat on medium speed until light and fluffy. Add the eggs, one at a time, mixing until incorporated. Next, add the banana and vanilla and beat until combined.
- In a separate, medium bowl, whisk together the flour, baking soda, salt, cinnamon and nutmeg. Add to the wet ingredients and beat until incorporated. Remove bowl from stand mixer and use a spatula to fold in the oats and chocolate chips.
- Using a large, three tablespoon cookie scoop, scoop the dough and place on parchment lined baking sheet, two inches apart (you will need more than one baking sheet). Dip the bottom of a wide glass in sugar to press down and flatten the cookies. Place baking sheets in the fridge and set oven to 375 degrees Fahrenheit. When oven is ready, remove the cookies from the fridge and bake for 10-12 minutes, or until the bottoms just begin to brown and the centres are still pale. Sprinkle with some flaky sea salt, if desired. Let cool on the pan for five minutes before transferring to a wire rack to finish cooling.
- Add one large scoop of gelato between two cookies and gently press together to create a sandwich. Repeat for the number of sandwiches you are serving.
- Store extra cookies in an airtight container for up to three days.
The post Oatmeal Earl Grey and Lavender Sandwich Cookies appeared first on Never. Not. Eating..
]]>The post Roasted Tomato Soup with Grilled Cheese Crouton Skewers appeared first on Never. Not. Eating..
]]>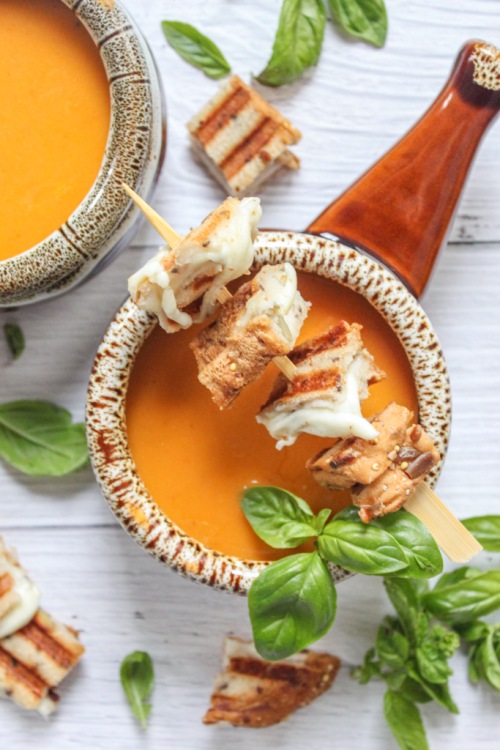
Tomato season is over where I am from, but soup season is just beginning, so I had to grab one more batch of fresh tomatoes to use to make this soup. It’s creamy and smooth and delicious. It’s just a warm, comforting classic.
My favourite part of this soup recipe is the roasted tomatoes. Roasting them just brings out a whole new flavour and caramelization that is always wanted. My second favourite part is the coconut milk, cuz that shizz creamy.
Here is what you will need for this super easy recipe:
- Tomatoes
- Onion
- Garlic
- Dried basil
- Salt
- Vegetable stock
- Canned coconut milk
- Bread slices
- A melting cheese, such as mozzarella
- A flavourful cheese, such as a sharp cheddar or gouda
I use my Simple Living Soup Maker to make this recipe. If you are a soupie, like me, you may want to invest in one. It’s my favourite way to make a post-work dinner. Soups are done in 30 minutes and it also makes smoothies, beverages, juices and batters. For this soup, I just throw everything in the soup maker after the roasting is done, turn it on and go watch Schitt’s Creek. The soup will be ready at the end of the episode. Also works with Friends, Sex and the City and The Big Bang Theory.
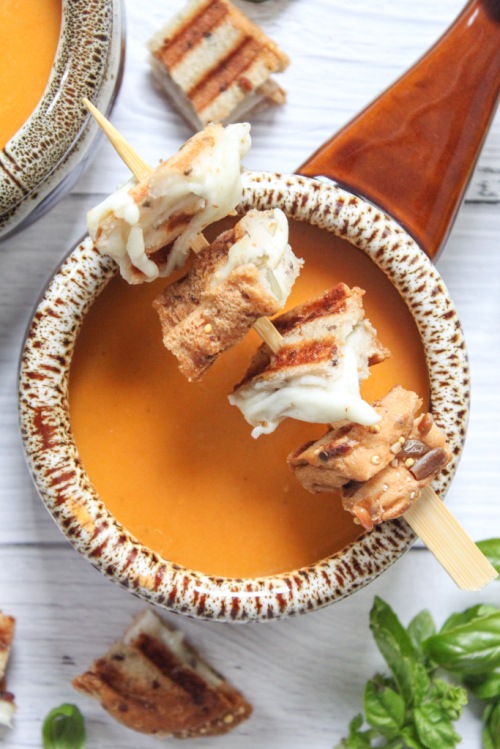
Who’s ready to get their slurp on?!
Roasted Tomato Soup with Grilled Cheese Crouton Skewers
Servings: 4
Prep time: 5 minutes
Cook time: 35 minutes
Ingredients:
- 4 large tomatoes, sliced into 1-inch wedges (I use vine tomatoes)
- 1/2 yellow onion, diced
- 2 cloves of garlic, peeled
- 1/2 tsp dried basil
- 2 cups vegetable stock
- 1 cup canned coconut milk
- salt
- olive oil
- 8 slices of bread (I like sourdough)
- 3 tablespoons of mayonnaise (or butter)
- 200 g cheese, shredded (I like to use a combination of mozzarella and cheddar)
- Fresh black pepper (for topping), optional
- Fresh basil (for topping), optional
Instructions:
- Preheat oven to 400 degrees Fahrenheit.
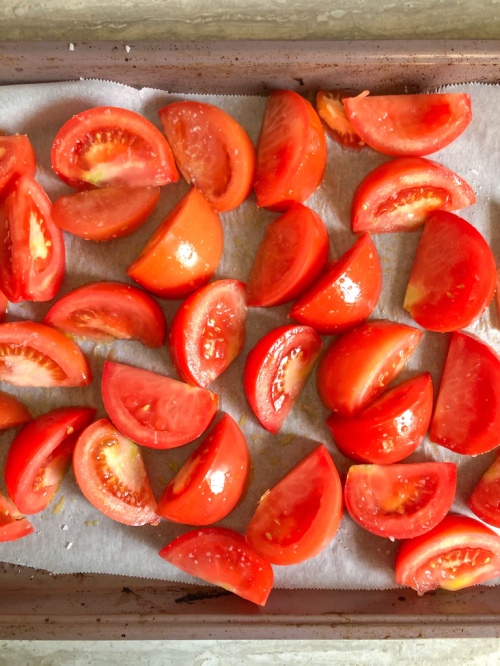
- Place tomatoes on a large baking sheet, drizzle with 1-2 tablespoons of olive oil and sprinkle with a few generous pinches of salt. Toss to coat and roast in the oven for 10 minutes. Remove and place the onion and garlic onto the baking sheet and toss again. Roast for another 10 minutes.
- Add the roasted tomatoes, garlic and onion to your soup maker along with the basil, vegetable stock and 1/4 teaspoon of salt. Place the lid on and set to “smooth.” Press “on.” Alternatively, place the tomatoes, garlic and onion into a large pot with the basil, vegetable stock and 1/4 teaspoon of salt. Bring to a boil and then reduce and let simmer for 15 minutes.
- While the soup is cooking, make the grilled cheese. Set a large pan over medium heat. Spread the mayo onto one side of each of the slices of bread. Build your sandwiches – bread (mayo side out), cheese, bread (mayo side out). Set your sandwich into the preheated pan and cook until golden brown on the first side, flip and repeat. Remove from pan and slice each sandwich into 8 crouton-sized cubes. Slide a skewer through the middle of each crouton. One sandwich will make two skewers with 4 croutons on each.
- (Skip to step 6 if using a soup maker) When the soup has simmered for 15 minutes, use an immersion blender to puree it. Alternatively, you can carefully pour it into a blender and blend until smooth, returning back to pot when done.
- Stir in the coconut milk. Taste and season accordingly. Ladle into four bowls and top each with two of the grilled cheese skewers, fresh black pepper and fresh basil, if desired.
The post Roasted Tomato Soup with Grilled Cheese Crouton Skewers appeared first on Never. Not. Eating..
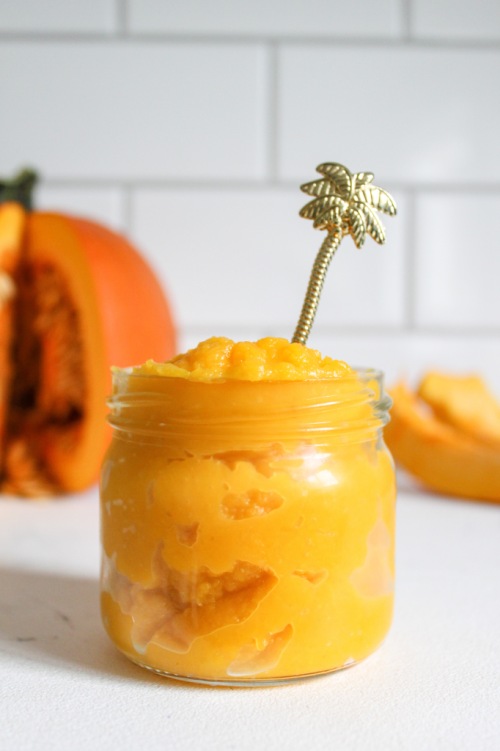
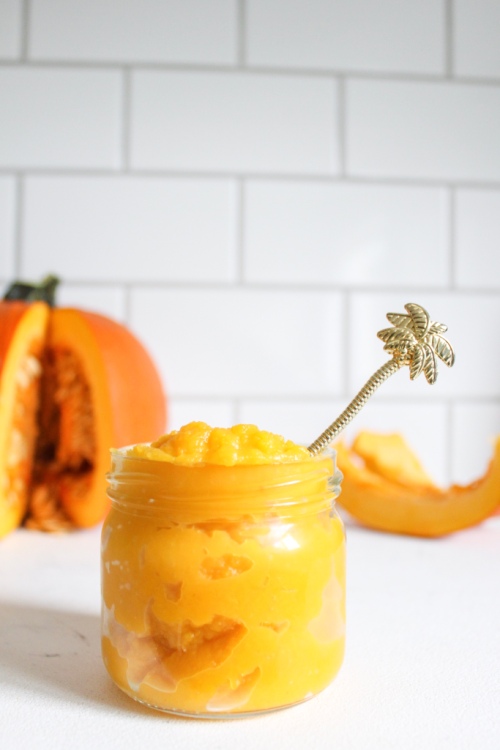
]]>The post Homemade Pumpkin Puree appeared first on Never. Not. Eating..
]]>
WHAT’S THE DIFFERENCE?
The puree from the store often includes preservatives, such as sugar and salt, so I prefer to avoid those additives by making my own. It’s the easiest thing to do, so if you were just thinking “Way too much work,” you’re wrong. Try it!
CHOOSING THE PROPER PUMPKIN
The most important part of this recipe is selecting the appropriate pumpkin variety. Those really big ones that you carve into on Halloween….No bueno. They are really bland in taste, and such a hassle to cut up due to their size. You CAN eat them, but they are not a good choice for pies or any other baked goods that include pumpkin. Your best bet is to find a Pie Pumpkin. They are sweeter and more flavourful and can be used in both sweet and savoury recipes.
I typically hold off on seasoning the pumpkin too much as one pumpkin usually makes a large enough batch to use in both savoury and sweet recipes, and each type of recipe would be seasoned differently. If you are making the puree solely for pie, pancakes, pumpkin spiced lattes, or anything on the sweeter end, you can definitely add some cinnamon and nutmeg to this recipe to jazz it up! On the contrary, you can grind some pepper and add some dried thyme or sage if you plan to use the puree in more savoury-type dishes, like soups or casseroles.
Like I said, pumpkin puree is really easy to make. The most challenging part is just getting your pumpkin cut up! So, grab yourself some sharp knives, and let’s roll!
Homemade Pumpkin Puree
Yield: About 3 cups (depending on the size of your pumpkin)
Prep time: 10 minutes
Cook time: 30 minutes
Ingredients:
- 1 pie pumpkin
- 1 tbsp olive oil
- 1/2 tsp salt
Instructions:
- Preheat oven to 375 degrees Fahrenheit.
- Using a sharp knife, cut your pumpkin into 1-inch wedges and remove the seeds. Lay the wedges flat, on a parchment-lined baking sheet. Drizzle them with the olive oil and sprinkle with salt. Use your hands to coat all of the wedges and then bake in the oven for 30-40 minutes, flipping once halfway through. When you can easily pierce a fork through the pumpkin, they are done.
- Let the wedges cool completely on the baking sheet and then remove the skin and discard. Place pumpkin into a food processor and blend until smooth. Transfer to an airtight container and store in the fridge for up to three days. You can also freeze the puree if you wish to use it later.
The post Homemade Pumpkin Puree appeared first on Never. Not. Eating..
]]>