The post Easy Peanut Butter Coconut Cake appeared first on Never. Not. Eating..
]]>
I immediately knew I needed to try to make my own version, and since Easter is around the corner, it seemed like the perfect cake to test out for the occasion.
WHAT IS PEANUT BUTTER COCONUT CAKE?
Let me let you in on a little secret – this is a cheater cake. That’s right, I zhuzhed- (how do you even spell that?! Do you know what I’m trying to say though?) up box cake. Sometimes Betty Crocker pulls through.
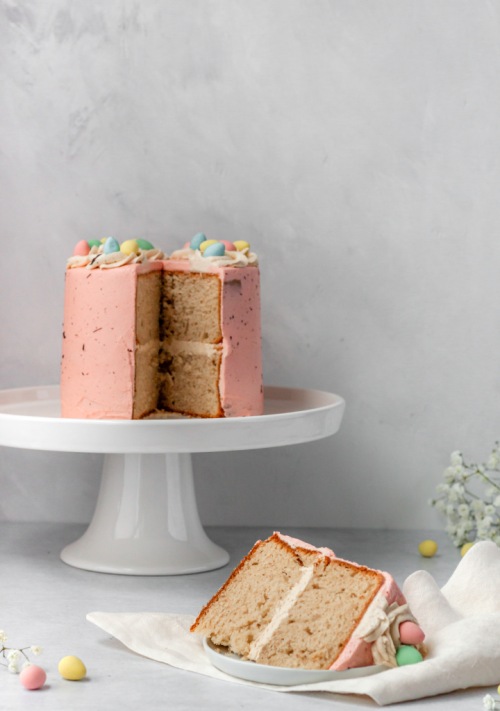
A few weeks ago I purchased a couple of boxes of Betty’s French Vanilla cake because it was on sale for $1.00 – what a steal! Now, I have the perfect use for it. All you need to do is add some peanut butter and swap the milk for coconut milk. It leaves you with this dreamy and decadent, fluffy cake. It’s an Easter miracle!
Oh, and the icing is also a peanut butter buttercream! You’re welcome.
THE INGREDIENTS
This is the simplest cake you will ever make! These are the ingredients you will need:
- boxed french vanilla cake
- eggs
- vegetable oil
- coconut milk (canned and full-fat)
- peanut butter
- icing sugar
- shortening
- butter
DECORATING THIS PEANUT BUTTER COCONUT CAKE
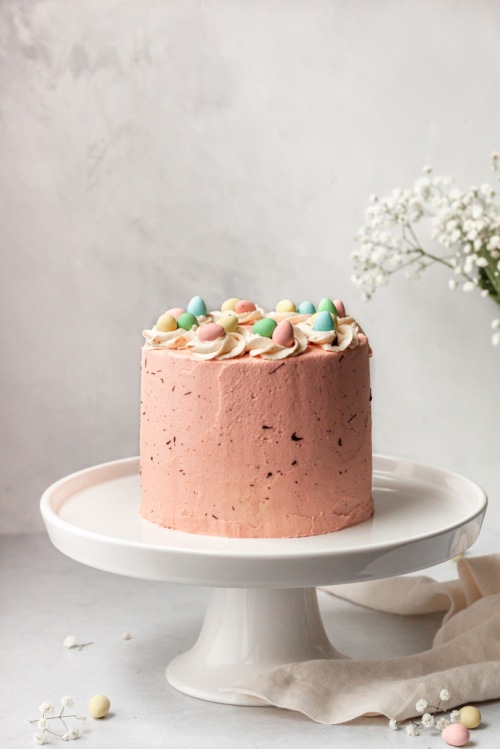
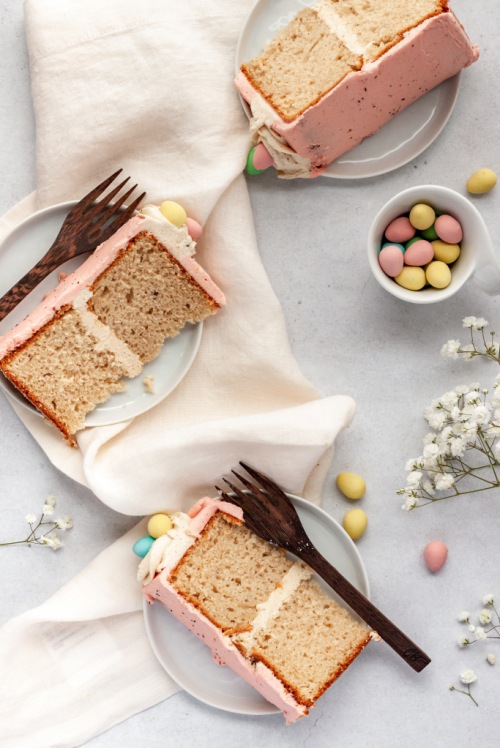
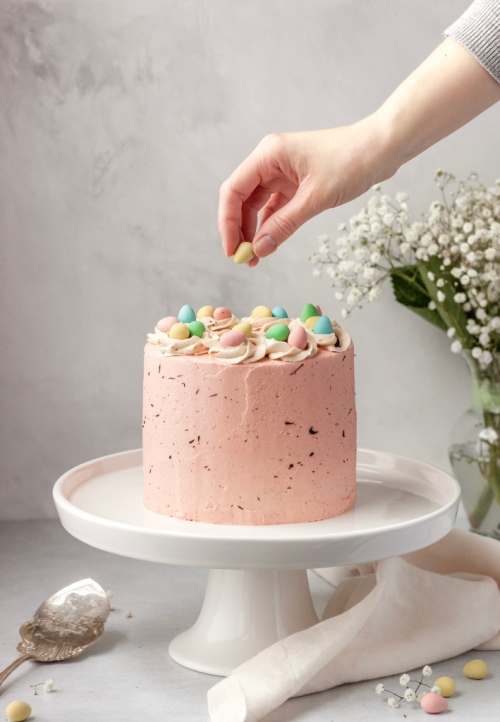
For the decoration, I used gel food colouring (a tiny bit of red) to dye my icing a pale pink colour, reserving a small amount of the original colour (which was slightly brown, from the pb) to create “nests” on top. I filled each nest with a few mini eggs and then melted down some chocolate, which I “flicked” onto my cake using a paintbrush to create a speckling.
Wishing you all a very happy spring and a lovely, cake-filled Easter, if you celebrate!
MORE EASY DESSERT RECIPES TO TRY
Gluten Free Stone Fruit Galette (a brilliant summer dessert)
Apple Cardamom Hand Pies with a Rum Glaze (just store-bought puff pastry and a quick filling)
Vegan Pumpkin Coconut Cake (pumpkin + coconut = goals)
TOOLS I USED TO MAKE THIS EASY PEANUT BUTTER COCONUT CAKE
If this recipe sounds like something you would want to make, click on the images below to see some helpful tools I used to get the job done.


This post contains affiliate links and I may earn a small commission when purchases are made after clicking the links, at no cost to you – thank you!
Easy Peanut Butter Coconut Cake
Servings: Makes four 6-inch cake layers (enough for two small cakes)
Prep time: 15 minutes
Cook time: 30 minutes
INGREDIENTS
- 2 boxes of French Vanilla cake mix (432 g each)
- 6 large eggs
- 3/4 cup vegetable oil
- 1 can full fat coconut milk (400 ml)
- 3/4 cup smooth peanut butter
For the icing:
- 1/2 cup vegetable shortening
- 1/2 cup butter, at room temperature
- 1 tbsp meringue powder (optional)
- 1/2 cup smooth peanut butter
- pinch of salt
- 4 cups powdered sugar
- 4-6 tbsp coconut milk
INSTRUCTIONS
- Preheat oven to 350 degrees Fahrenheit. Butter four 6-inch cake pans, line the bottoms with parchment paper and dust with flour.
- Firstly, dump the cake mix into a large bowl. Create a well in the middle of the mix and add the eggs and oil. Pour the coconut milk into a measuring cup and add water to bring it up to an even 2 cups. Pour into the bowl with the other ingredient and add the peanut butter. Mix all of these ingredients well with an electric mixer, starting on low and working up to medium speed, for about 1-2 minutes. Divide batter between the four cake pans – it works out to be approximately 450g per pan. Bake in the oven for 30-35 minutes, or until a toothpick comes out clean. Cool completely before icing.
For the icing:
- Combine the shortening, butter and peanut butter in a medium bowl and mix with an electric mixer until light and fluffy.
- Add the meringue powder (if using), the salt and one cup of powdered sugar and beat until combined, starting on low.
- Drizzle in one tablespoon of coconut milk and beat. Continue to alternate between adding one cup of powdered sugar and one tablespoon of milk until all of the powdered sugar has been used. If icing is too thick, continue to add half of a tablespoon of milk at a time until you have reached desired consistency.
ASSEMBLY TIPS
- Use a sharp serrated knife to level off the rounded top of each cake
- Place a large dollop in the middle of the first layer and gently push it out to the sides with an offset spatula until it is hanging off the edges
- Flip the second layer upside down before placing on top of the bottom layer
- Add another large dollop on the top of the cake and again, push the icing out to the sides with a back and forth motion, trying to avoid lifting the spatula in an upwards direction
- Once the top is levelled out, use the icing that spilled over the edge from the centre to fill in any gaps on the sides where the two layers meet, and add more icing to help cover the rest of the sides
I hope you enjoyed this easy cake recipe! If you have any feedback or comments, please leave them below! Don’t forget to follow me on Instagram @nevernoteatingca for more recipes, tips and tricks!
The post Easy Peanut Butter Coconut Cake appeared first on Never. Not. Eating..
]]>The post Winter Pear Spice Cake with a Vanilla “Buttercream” (Vegan, GF) appeared first on Never. Not. Eating..
]]>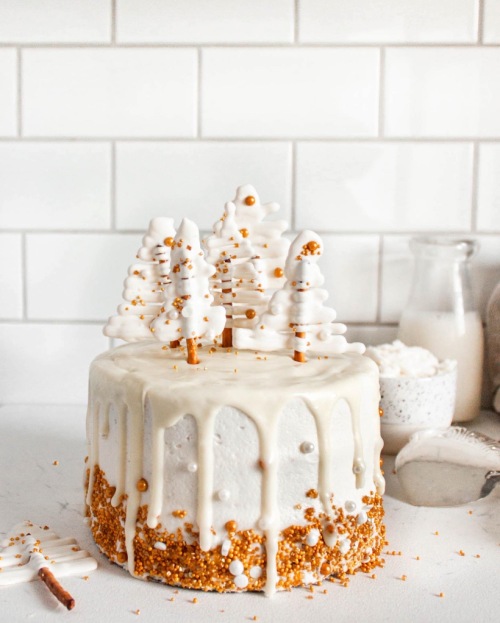
Feeling sad about the virus during the holidays? Do what I do – spend ample amounts of money on yourself, eat endless desserts and relish in all of your glorious decorations! It will 100% make you feel better.
Firstly, let’s talk about self-love. Haven’t you ever heard, “You gotta look out for #1?!” That’s you, babe! You’re #1! This holiday, why not buy that nice blender you wanted? Or, that new piece of art for your wall? I’m not seeing the people I normally see on Christmas, meaning, I don’t need to buy them gifts, so that money has to go somewhere…right?! Right!
I actually just bought myself a nice, new mattress, and you know what?! I deserve it. If not because I work hard, than because I survived this year. If you are looking for a well-priced, well-made mattress, check out Endy. They are a Canadian company, and have endless 5-star reviews. You get $55 off your purchase by clicking here…Treat yo’self!
The holidays are also for munchin’. It’s stretchy-pant season and I’m all for it. I had every intention of delivering this cake to some family members, but NOPE. Changed my mind. I ate it instead.

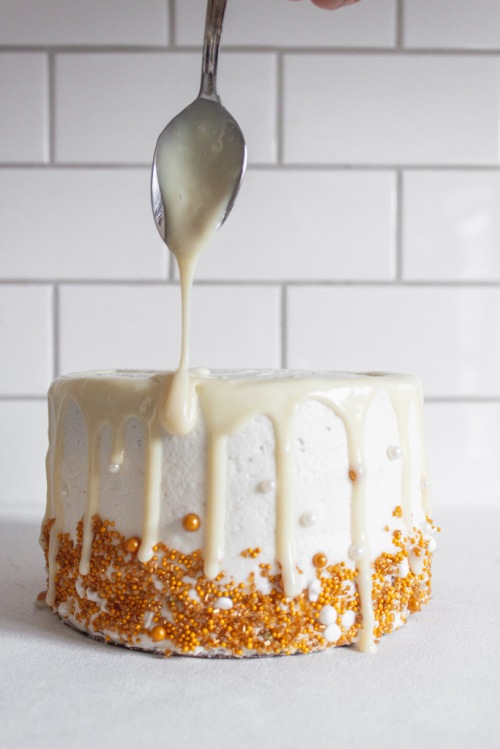
I have a passion for cake decorating – it makes me happy to bring together two of my loves – art and food. For this cake, I wanted to create a clean, and fresh winter scene. The mood is meant to be bright, airy and uplifting. I love how clean and profesh (that’s short for professional…did I just make up the next trending word?!) white looks on cake. I also wanted to add a little sparkle, because it’s Christmas, so I decorated with some gold and white sprinkles to pull it all together!
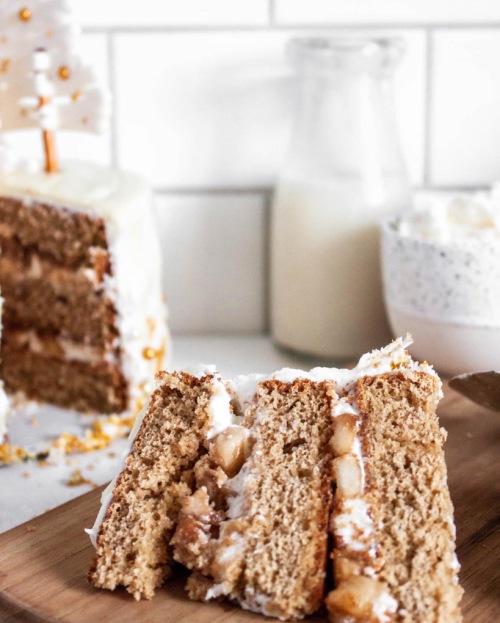
In terms of the cake itself, I wanted to stay true to holiday flavours – warm and aromatic spices with subtle notes of vanilla. I chose a pear filling that screams winter. Did I mention this cake is vegan and gluten-free as well? Yaass.
Winter Pear Spice Cake with a Vanilla “Buttercream” (Vegan, GF)
Yield: A two-layer 6-inch cake
Prep time: 60 minutes
Cook time: 20 minutes
Ingredients:
For the cake:
- 1 cup canned coconut milk
- 1 tbsp apple cider vinegar
- 3/4 cup + 2 tbsp brown sugar, packed
- 1 banana, mashed
- 2 tsp vanilla
- 2 cups gluten-free flour, I use Bob’s Red Mill
- 1 1/4 tsp cinnamon, separated
- 1/2 tsp dried ginger
- 1/4 tsp nutmeg
- 1 tsp salt
- 3/4 tsp baking powder
- 1/2 tsp baking soda
- 1 large pear, peeled and finely diced
For the icing:
- 1/2 cup vegan butter, softened
- 1/2 cup vegetable shortening
- 1 tsp pure vanilla extract
- pinch of salt
- 4 cups powdered sugar
- 3-4 tbsp canned coconut milk
Instructions:
For the cake:
- Grease two, 6-inch baking pans,* line with parchment paper and dust with flour. Preheat oven to 350 degrees Fahrenheit.
- Stir coconut milk and apple cider vinegar together and set aside.
- Wet ingredients: In a large bowl, beat 3/4 cup brown sugar with the banana and vanilla until combined.
- Dry ingredients: In a medium bowl, sift together the flour, cinnamon, ginger, nutmeg, salt, baking powder and baking soda.
- In a few additions, alternate between adding the flour mixture and the coconut milk to the wet ingredients. Beat on medium speed until combined.
- Pour batter into prepared pans and bake 30 minutes, or until inserted toothpick comes out clean. Let sit in pans for five minutes before transferring to a wire rack to finish cooling.
- While your cakes bake, combine the diced pear together with the remaining two tablespoons of brown sugar and 1/4 teaspoon of cinnamon. Let sit for at least 15 minutes.
For the icing:
- Beat butter, shortening, vanilla and salt on medium-high speed until light and fluffy. Add one cup of powdered sugar and beat on low. Continue adding sugar by the cup, along with the coconut milk, one tablespoon at a time, until you have used all of the powdered sugar. If frosting is too thick, slowly add more coconut milk. If it is too thin, add more powdered sugar.
To assemble:
- Use a serrated knife to trim the top (dome-like) part of the cakes off. Place one layer on your turntable, serving plate or cake stand, and dollop a large amount of frosting on top of it. Spread with a spatula to the edges to create an even layer of frosting, and then apply pressure in the middle with a small, offset spatula to create a “well.” You should have a “dam” around the circumference of the cake to contain the filling. Fill the well with the pear mixture. Place the second layer on top, upside down. Place another dollop of frosting on that layer and spread to the edges again. Add more icing to your spatula to cover the sides of the cake. Use a cake scraper to smooth out the icing. Serve and enjoy!
NOTES:
*Sometimes I like to create thinner layers and I use three 6-inch pans instead. If you do this, the cook time will reduce by about 10 minutes…Keep a close eye!
The post Winter Pear Spice Cake with a Vanilla “Buttercream” (Vegan, GF) appeared first on Never. Not. Eating..
]]>