The post Simple Beetroot Pasta appeared first on Never. Not. Eating..
]]>
I’m always diverting from traditional pasta sauces because life is too exciting to do boring things. The method this recipe follows is the tried-and-true method I use for most of my pasta sauces, and it’s SO easy.
It requires the cooking of the star ingredient, in this case, beets, followed by the blending, seasoning and simmering. Not to mention the addition of coconut milk to make it extra creamy and delicious. That’s it! So easy. So good!
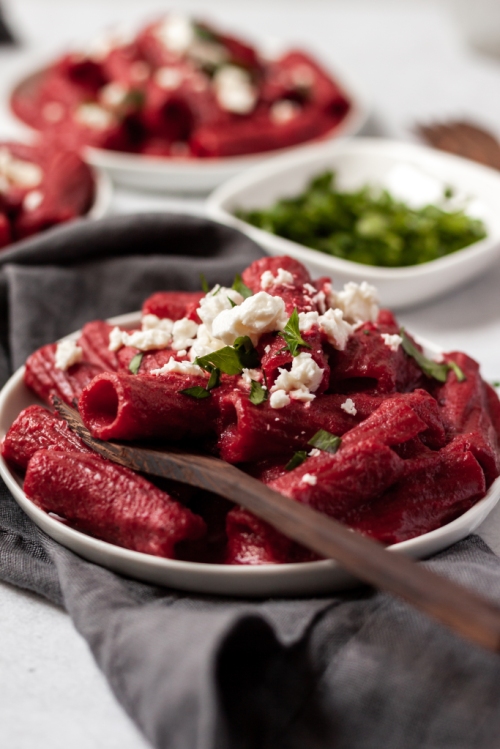
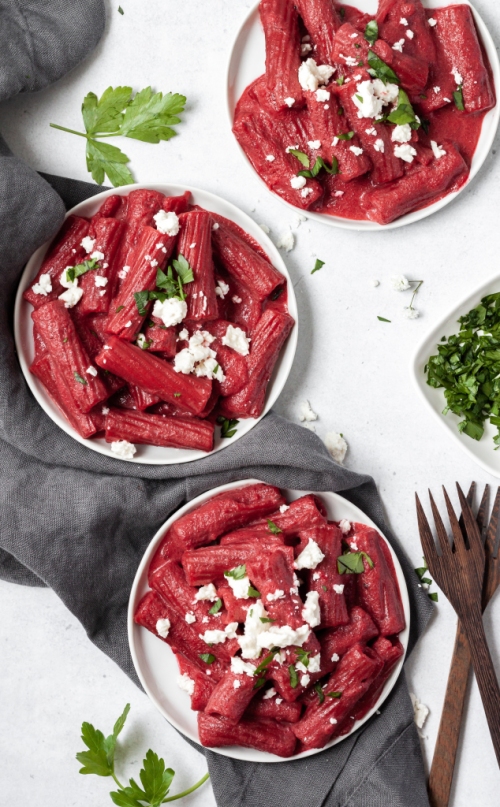
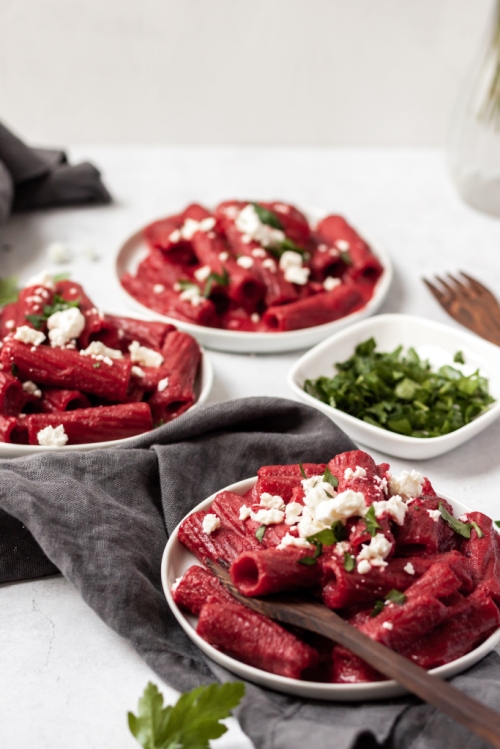
You can use whatever pasta you would like, but I prefer a rigatoni or tortiglioni as they have those gorgeous grooves to suck up and hold onto this vibrant sauce. My most favourite pasta to use can be found here.
It’s tortiglioni time to make this dish!
Simple Beetroot Pasta
Serving size: 4
Prep time: 5 minutes
Cook time: 45 minutes
Ingredients:
- 4 red beets, peeled and quartered
- 450 g pasta (I prefer tortiglioni)
- salt
- pepper
- 1 cup vegetable broth
- 1 tbsp olive oil
- 2 cloves garlic, minced
- 1 cup canned coconut milk
- 1/4 cup crumbled feta or goat’s cheese, for topping (optional)
- 2 tbsp parsley, chopped, for topping (optional)
Instructions:
- Bring a large pot of heavily salted water to a boil and add the beets, cooking until fork-tender (about 25-30 minutes).
- Use a wire spider (or a slotted spoon) to carefully remove the beets from the boiling water and transfer to a high-powered blender. Add the pasta to the same water the beets were cooking in and boil until ‘al dente.’
- Blend the beets with the broth and a pinch of pepper, until smooth.
- Add the olive oil to a large saucepan set over medium-low heat. When hot, add the garlic and saute for 30 seconds or until fragrant, being careful not to burn. Pour in the beet puree and simmer until smooth, stirring often. Pour in the coconut milk and let simmer until sauce thickens, approximately 8-10 minutes.
- Transfer the cooked pasta to the sauce and stir to coat and finish cooking. Add more salt and pepper to taste. *If you salted your pasta water enough, you may not need to add more salt at this point.
- Transfer pasta to a serving dish and top with the cheese and parsley, if using. Bon appetit!
The post Simple Beetroot Pasta appeared first on Never. Not. Eating..
]]>The post Coconut Lime Cilantro Rice appeared first on Never. Not. Eating..
]]>
I traveled to SE Asia during the summer of 2017. Those were the days, man. It was like 6 weeks of pure foodie inspiration. Rice, curries, fresh fruit, toasties from the 7/11…If you know, you know.
The abundance of carbs I ate while there was record-breaking, and the best part is, I didn’t gain a pound…I actually lost weight. Afterall, you step outside and instantly sweat off a few kilos in the 50-degree weather. And now, I have a plethora of different rice dishes under my belt!
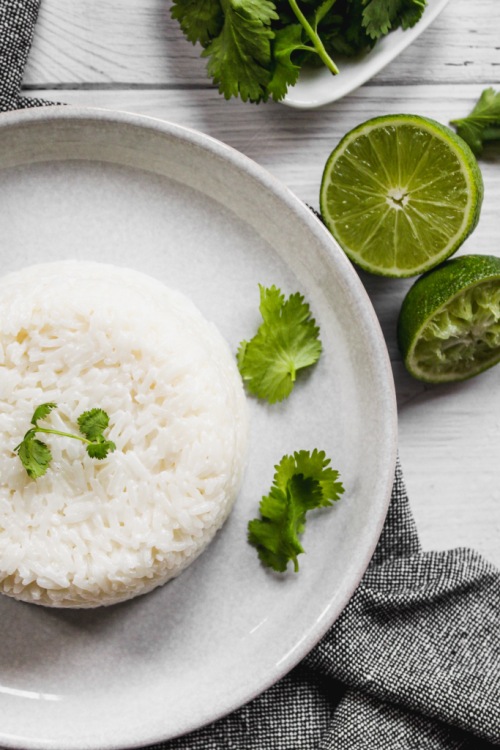
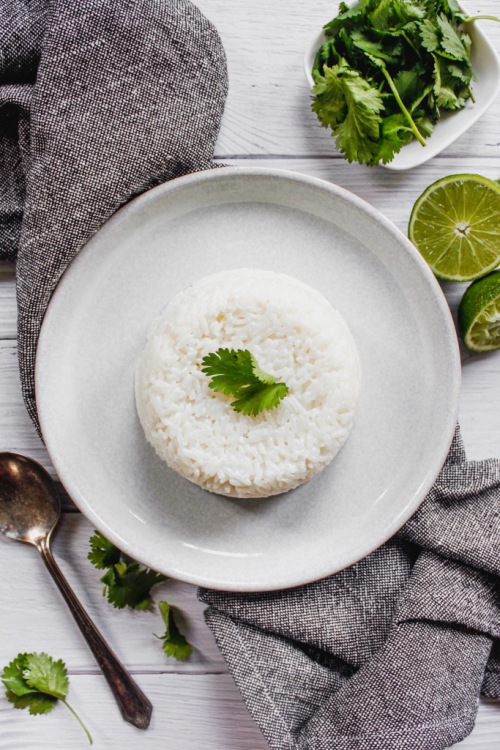
So let’s chat about this coconut rice dish. I just love coconut ‘er-thang! This rice makes for a perfect side dish to any meal – It has a creamy quality to it and it takes minutes to whip up. Here is what you will need:
- jasmine rice
- coconut milk
- salt
- lime
- cilantro
Let’s get started!
Coconut Lime Cilantro Rice
Serving size: 3-4
Prep time: 5 minutes
Cook time: 10 minutes
Ingredients:
- 1 cup jasmine rice
- 1 cup canned coconut milk
- 1 cup water
- salt
- juice of 1/2 lime
- 2 tbsp fresh cilantro, chopped
Instructions:
- Add rice, coconut milk, water and a generous pinch of salt to a saucepan and bring up to a boil. Turn heat to low, cover and simmer for 10 minutes (or according to rice package directions).
- Remove from heat and add the lime juice and cilantro to the rice, fluff with a fork to combine.
- Serve immediately.
NOTES:
*Add a touch of honey to the rice while cooking for a hint of sweetness.
The post Coconut Lime Cilantro Rice appeared first on Never. Not. Eating..
]]>The post Creamy Vegan Mushroom Rigatoni appeared first on Never. Not. Eating..
]]>
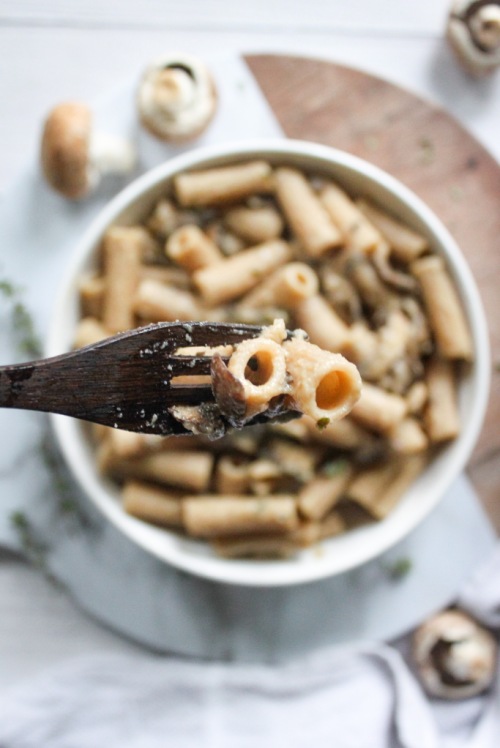
Now I love those little fungi so much. That’s why I had to dedicate this pasta to them – to say I’m sorry for a lifetime of neglect, and it won’t happen again.
One thing I never neglected – Rigatoni. Isn’t it such a great pasta choice? Those sweet little grooves that hold all the sauce? Yes, please! I love using spelt pasta, but any pasta works for this recipe. Make sure you cook it to al dente, as it will continue to cook once added to that creamy mushroom sauce!
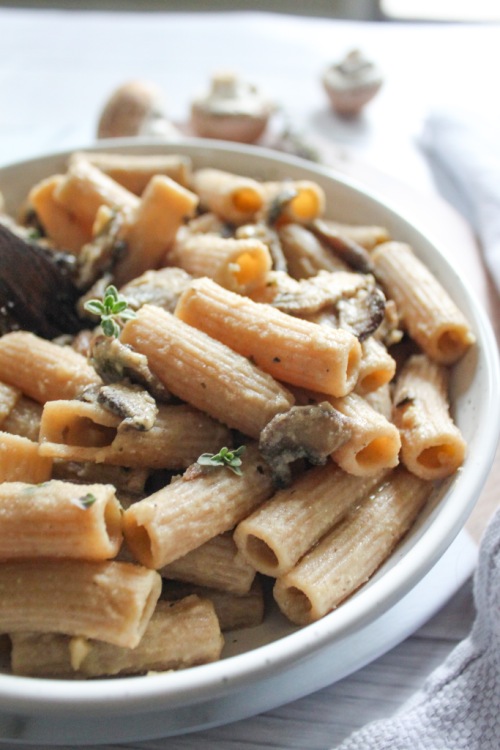
The sauce – Simple, yet delicious. Creamy, but vegan. This easy-to-make sauce requires only a few ingredients:
- garlic
- mushrooms
- thyme
- white wine
- stock
- coconut milk
- vegan butter
Start by adding the mushrooms to some olive oil and salt in a pan. Cook them down and caramelize them up! Next, add in the garlic, thyme and white wine. Cook until you cannot smell the alcohol anymore and then add the stock and milk. Let simmer until it thickens up, and transfer the pasta into the sauce to finish cooking. Finally, add in some of the pasta water to bring everything together and you got yourself some mushroom pasta!
Let’s all show our love to mushrooms!
Creamy Vegan Mushroom Rigatoni
Servings: 2
Prep time: 5 minutes
Cook time: 20 minutes
Ingredients:
- 200 g rigatoni
- 3 cups sliced mushrooms
- olive oil
- salt
- pepper
- 2 cloves garlic, minced
- 2 sprigs thyme, stems removed
- 1/4 cup white wine
- 3/4 cup vegetable stock
- 3/4 cup full-fat canned coconut milk
- 1 tbsp vegan butter
Instructions:
- Cook the pasta according to package instructions, in heavily salted boiling water. Reserve 1/4 cup of the pasta water before draining.
- Add two tablespoons of olive oil to a large saucepan over medium-low heat. When the oil begins to move easily in the pan, add the mushrooms and a pinch of salt. Cook for 6-8 minutes, stirring occasionally. Add the garlic and thyme to the pan and cook until fragrant, about 30 seconds. Add the wine and let simmer for about 5 minutes, or until the alcohol smell is gone. Pour in the vegetable stock, stir, and follow with the coconut milk. Let the sauce simmer until thickened, about 10 minutes. Finish with the butter and some cracks of fresh black pepper.
- Transfer the pasta into the pan, pour in the reserved pasta water, and mix to coat with the sauce. Taste and adjust seasoning as necessary. Enjoy!
The post Creamy Vegan Mushroom Rigatoni appeared first on Never. Not. Eating..
]]>The post Middle Eastern Orzo Pilaf appeared first on Never. Not. Eating..
]]>
Okay, I am in love with all flavours of all regions of the world (literally), but Middle Eastern…AND Italian?! Two heavyweights in the culinary world and I’m here for it! Like a hundo P’s.
Let me break down this fusion for you. We have the following Italian/Mediterannean ingredients:
- Orzo
- Feta
- Basil
And those from the Middle East include:
- Dried fruit (apricots, cherries, currants)
- Pistachios
- Olives
- Pomegranate seeds
- Cilantro
- Spices (Turmeric, Paprika, Cumin, Coriander, etc.)
Together, they are Chrissy and John. Rachel and Ross. Bey and Jay. Me and me.
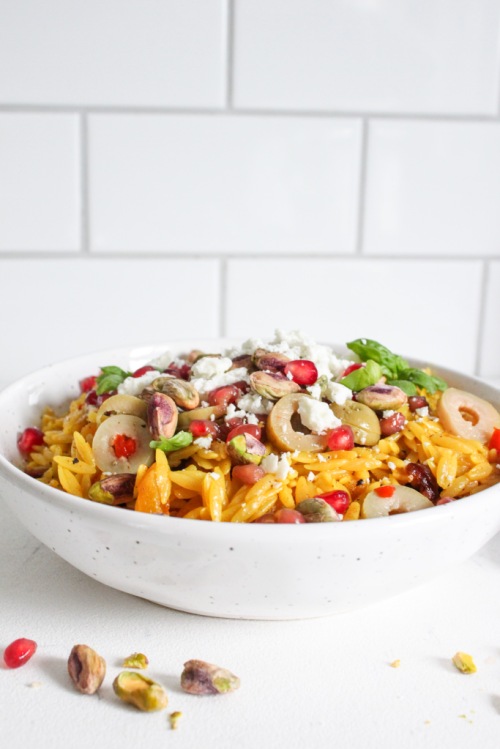
The warm flavours of the spices paired with creamy orzo, sweet fruit and salty olives and feta…hawt damn! I’m drooling.

Oh, one more thing…This makes the perfect lunch the next day. Leftovers for the win!
Middle Eastern Orzo Pilaf
Serving Size: 4
Prep time: 10 minutes
Cook time: 12 minutes
Ingredients:
- 1 tbsp olive oil
- 1 clove garlic, minced
- 1/2 tsp cumin
- 1/4 tsp turmeric
- 1/4 tsp paprika
- 1/4 tsp ground coriander
- pinch of fresh nutmeg
- pinch of black pepper
- 1 cup uncooked orzo, rinsed well
- 1 1/2 cups vegetable broth
- salt
- 1 cup dried fruit (I use cherries, currants and chopped apricots)
- 1 tbsp freshly squeezed lemon juice (optional)
- 4-5 olives, chopped
- 1/4 cup feta, crumbled
- 1/4 cup pomegranate arils
- 1/4 cup pistachios, shelled
- fresh herbs (cilantro and basil) for topping, (optional)
Instructions:
- Heat olive oil in a large pan over medium heat. Add the garlic and cook for 30 seconds or until fragrant. Add the cumin, turmeric, paprika, coriander, nutmeg and pepper and stir until toasted, another 30 seconds to 1 minute. Add the orzo and stir to coat with the spices. Once coated, pour in the broth, add 1/4 tsp salt and bring up to a boil and then reduce heat and let simmer for 8 minutes, with the lid on.
- After the 8 minutes, quickly lift the lid, add the dried fruit, and stir to incorporate with the orzo. Place the lid back on and let stand for 2 more minutes off the heat.
- Squeeze some fresh lemon juice into the pan and stir to combine. Transfer the orzo to a serving dish and top with olives, feta, pomegranate seeds, pistachios and fresh herbs. Serve immediately or let cool and refrigerate in an airtight container for up to three days.
The post Middle Eastern Orzo Pilaf appeared first on Never. Not. Eating..
]]>The post Roasted Tomato Soup with Grilled Cheese Crouton Skewers appeared first on Never. Not. Eating..
]]>
Tomato season is over where I am from, but soup season is just beginning, so I had to grab one more batch of fresh tomatoes to use to make this soup. It’s creamy and smooth and delicious. It’s just a warm, comforting classic.
My favourite part of this soup recipe is the roasted tomatoes. Roasting them just brings out a whole new flavour and caramelization that is always wanted. My second favourite part is the coconut milk, cuz that shizz creamy.
Here is what you will need for this super easy recipe:
- Tomatoes
- Onion
- Garlic
- Dried basil
- Salt
- Vegetable stock
- Canned coconut milk
- Bread slices
- A melting cheese, such as mozzarella
- A flavourful cheese, such as a sharp cheddar or gouda
I use my Simple Living Soup Maker to make this recipe. If you are a soupie, like me, you may want to invest in one. It’s my favourite way to make a post-work dinner. Soups are done in 30 minutes and it also makes smoothies, beverages, juices and batters. For this soup, I just throw everything in the soup maker after the roasting is done, turn it on and go watch Schitt’s Creek. The soup will be ready at the end of the episode. Also works with Friends, Sex and the City and The Big Bang Theory.

Who’s ready to get their slurp on?!
Roasted Tomato Soup with Grilled Cheese Crouton Skewers
Servings: 4
Prep time: 5 minutes
Cook time: 35 minutes
Ingredients:
- 4 large tomatoes, sliced into 1-inch wedges (I use vine tomatoes)
- 1/2 yellow onion, diced
- 2 cloves of garlic, peeled
- 1/2 tsp dried basil
- 2 cups vegetable stock
- 1 cup canned coconut milk
- salt
- olive oil
- 8 slices of bread (I like sourdough)
- 3 tablespoons of mayonnaise (or butter)
- 200 g cheese, shredded (I like to use a combination of mozzarella and cheddar)
- Fresh black pepper (for topping), optional
- Fresh basil (for topping), optional
Instructions:
- Preheat oven to 400 degrees Fahrenheit.
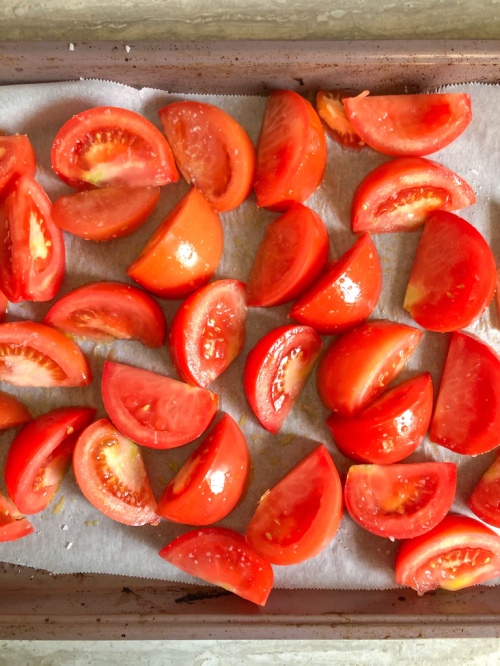
- Place tomatoes on a large baking sheet, drizzle with 1-2 tablespoons of olive oil and sprinkle with a few generous pinches of salt. Toss to coat and roast in the oven for 10 minutes. Remove and place the onion and garlic onto the baking sheet and toss again. Roast for another 10 minutes.
- Add the roasted tomatoes, garlic and onion to your soup maker along with the basil, vegetable stock and 1/4 teaspoon of salt. Place the lid on and set to “smooth.” Press “on.” Alternatively, place the tomatoes, garlic and onion into a large pot with the basil, vegetable stock and 1/4 teaspoon of salt. Bring to a boil and then reduce and let simmer for 15 minutes.
- While the soup is cooking, make the grilled cheese. Set a large pan over medium heat. Spread the mayo onto one side of each of the slices of bread. Build your sandwiches – bread (mayo side out), cheese, bread (mayo side out). Set your sandwich into the preheated pan and cook until golden brown on the first side, flip and repeat. Remove from pan and slice each sandwich into 8 crouton-sized cubes. Slide a skewer through the middle of each crouton. One sandwich will make two skewers with 4 croutons on each.
- (Skip to step 6 if using a soup maker) When the soup has simmered for 15 minutes, use an immersion blender to puree it. Alternatively, you can carefully pour it into a blender and blend until smooth, returning back to pot when done.
- Stir in the coconut milk. Taste and season accordingly. Ladle into four bowls and top each with two of the grilled cheese skewers, fresh black pepper and fresh basil, if desired.
The post Roasted Tomato Soup with Grilled Cheese Crouton Skewers appeared first on Never. Not. Eating..
]]>The post Homemade Pumpkin Puree appeared first on Never. Not. Eating..
]]>
WHAT’S THE DIFFERENCE?
The puree from the store often includes preservatives, such as sugar and salt, so I prefer to avoid those additives by making my own. It’s the easiest thing to do, so if you were just thinking “Way too much work,” you’re wrong. Try it!
CHOOSING THE PROPER PUMPKIN
The most important part of this recipe is selecting the appropriate pumpkin variety. Those really big ones that you carve into on Halloween….No bueno. They are really bland in taste, and such a hassle to cut up due to their size. You CAN eat them, but they are not a good choice for pies or any other baked goods that include pumpkin. Your best bet is to find a Pie Pumpkin. They are sweeter and more flavourful and can be used in both sweet and savoury recipes.
I typically hold off on seasoning the pumpkin too much as one pumpkin usually makes a large enough batch to use in both savoury and sweet recipes, and each type of recipe would be seasoned differently. If you are making the puree solely for pie, pancakes, pumpkin spiced lattes, or anything on the sweeter end, you can definitely add some cinnamon and nutmeg to this recipe to jazz it up! On the contrary, you can grind some pepper and add some dried thyme or sage if you plan to use the puree in more savoury-type dishes, like soups or casseroles.
Like I said, pumpkin puree is really easy to make. The most challenging part is just getting your pumpkin cut up! So, grab yourself some sharp knives, and let’s roll!
Homemade Pumpkin Puree
Yield: About 3 cups (depending on the size of your pumpkin)
Prep time: 10 minutes
Cook time: 30 minutes
Ingredients:
- 1 pie pumpkin
- 1 tbsp olive oil
- 1/2 tsp salt
Instructions:
- Preheat oven to 375 degrees Fahrenheit.
- Using a sharp knife, cut your pumpkin into 1-inch wedges and remove the seeds. Lay the wedges flat, on a parchment-lined baking sheet. Drizzle them with the olive oil and sprinkle with salt. Use your hands to coat all of the wedges and then bake in the oven for 30-40 minutes, flipping once halfway through. When you can easily pierce a fork through the pumpkin, they are done.
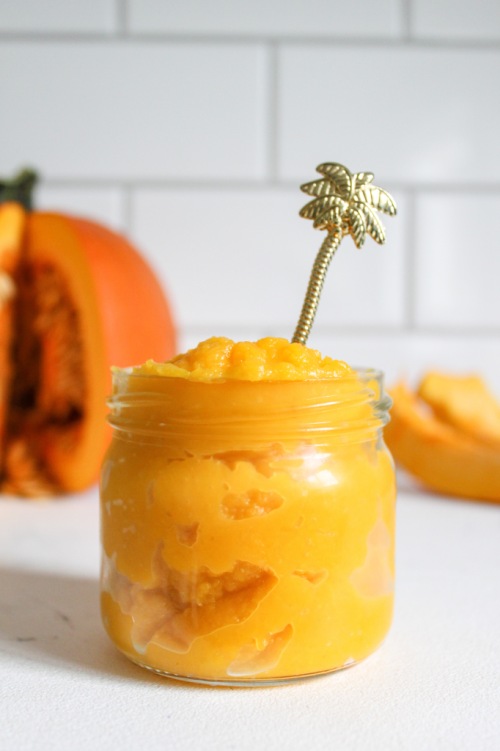
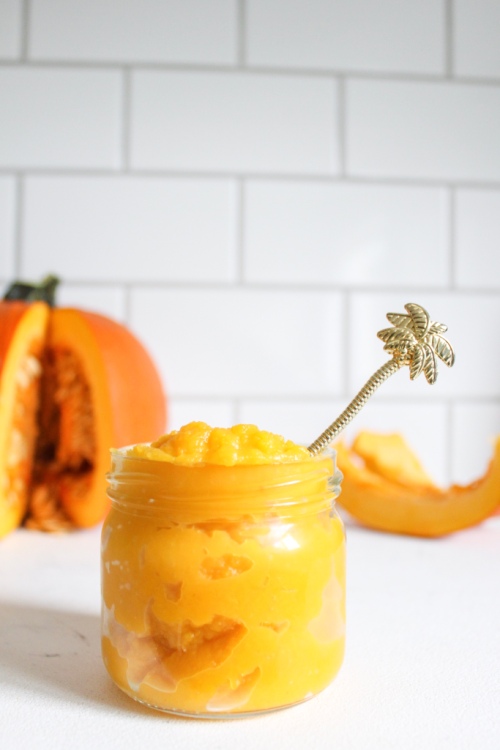
- Let the wedges cool completely on the baking sheet and then remove the skin and discard. Place pumpkin into a food processor and blend until smooth. Transfer to an airtight container and store in the fridge for up to three days. You can also freeze the puree if you wish to use it later.
The post Homemade Pumpkin Puree appeared first on Never. Not. Eating..
]]>The post Gluten Free Crepes with an Apple Cinnamon Compote appeared first on Never. Not. Eating..
]]>
I’ve used my soup maker to make an abundance of different recipes, such as: soup (duh!), smoothies, juices, pancakes and my favourite, alcoholic beverages. It’s truly simple to use and does all of the cooking and blending for you, allowing time to clean up your kitchen, or do something more fun, like snack while you wait for your food. If you have a soup maker, or are thinking of purchasing one, check out my Instagram account for some more fun recipes to make in it – @nevernoteatingca
So let’s talk about these crepes. Firstly, I struggle to call them “crepes,” because as a kid, my family and I only ever ate “Finnish pancakes,” which were more crepe-like in appearance, but were never referred to as crepes. Those were our style of pancakes. We never ate traditional American pancakes. But you know what?! I’m all about pleasing the people. People see flat pancakes, they say “crepes.” So, this is for you.
Secondly, if you follow my IG account, or have read some of my posts, or even tried some of my recipes (thank you), you know that I like to put a healthier spin on foods that aren’t so healthy. Therefore, I have made these “crepes” with gluten-free flour, plant-based milk and no refined sugar. If you want to indulge a bit more, feel free to sub in the healthy ingredients for the not-so-healthy ones.
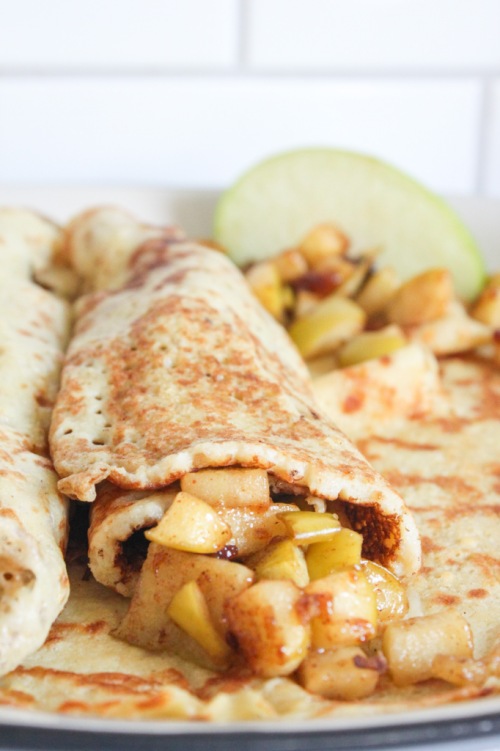
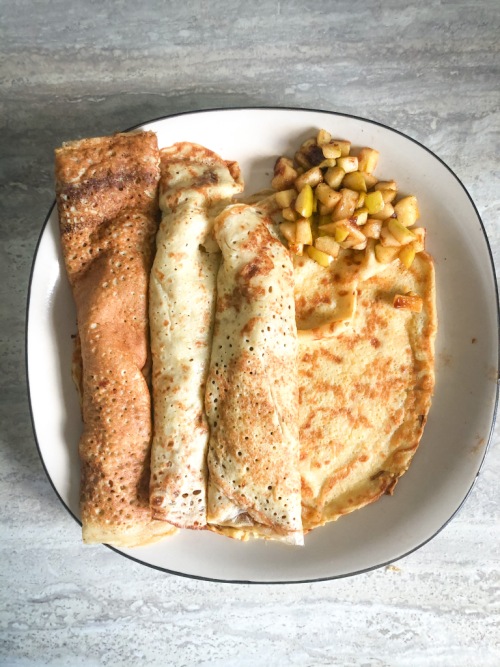
I can’t decided whether my favourite part of this dish is the pancake…I mean crepe…or the filling. It’s apple season right now, and nothing goes better together than apples and cinnamon. And nutmeg. Nutmeg is bomb. The filling is tart and sweet and ooey and gooey. It’s a great addition to these less-sweet crepes. I prefer to use honeycrisp or granny smith apples for this, but you can definitely use whatever you have on hand. I also like to keep the skins on, mostly because I’m lazy, but feel free to peel your apples if that’s your jam.
Below you will find two ways to make this recipe. The first is the easiest way, but you need a soup maker for that! The second is more traditional, but totally yummy just the same.
May your day be enhanced with pancake-crepes and fall fillings!
Gluten Free Crepes with an Apple Cinnamon Compote
Serving Size: Makes 10 large crepes
Prep time: 5 minutes
Cook time: 20 minutes
Ingredients
- 2.5 cups dairy-free milk
- 2 eggs, beaten
- 2 tbsp maple syrup, plus more for serving
- 1 tsp vanilla extract
- 1.5 cups gluten free flour
- 1/2 tsp salt
- 2 medium apples, finely diced (I use honeycrisp or granny smith)
- 1/2 tsp lemon zest
- 1 tbsp lemon juice
- 1/2 tsp cinnamon
- pinch of fresh nutmeg
- 1/2 tbsp of cornstarch
- 1 tbsp maple syrup or brown sugar
- coconut oil or butter (for the pan)
Instructions
With a soup maker:
- Add the milk, eggs, syrup, vanilla, flour and salt to your soup maker. Set to “juice.” When finished mixing, skip to step 3 below.
Without a soup maker:
- Whisk together milk, eggs, syrup and vanilla and set aside.
- In a medium bowl, whisk flour and salt together. Add the wet ingredients and whisk until combined.
- Place a large pan over medium-high heat and add half a tablespoon of coconut oil (or butter). When the pan is very hot, add about 1/3-1/2 cup of the crepe batter (depending on the size of your pan). Swirl the pan around until the batter coats the entire bottom. There shouldn’t be a lot of batter sitting on top.
- Let the crepe cook until the edges begin to come up from the pan and the bottom is browned. Flip and cook on the other side for about 2 minutes or until darker spots begin to develop on the underside. Remove from pan, place on a plate and store in the oven or microwave to keep warm. Continue with the remainder of the batter.
For the filling:
- While the crepes cook, add the apples, zest, lemon juice, cinnamon, nutmeg, cornstarch and sugar to a bowl and stir to combine. Let sit for at least 5 minutes.
- Preheat a large pan over medium-low heat. Add a half tablespoon of coconut oil or butter to the pan. When melted, add the apples. Let cook until apples are fork tender, about 8-10 minutes, stirring occasionally.
Assembly:
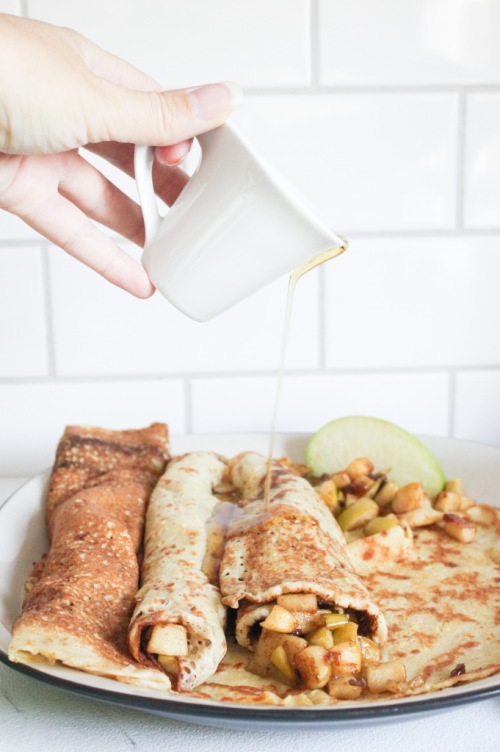
- Top each crepe with a few spoonfuls of the filling and a drizzle of maple syrup. Roll and enjoy!
The post Gluten Free Crepes with an Apple Cinnamon Compote appeared first on Never. Not. Eating..
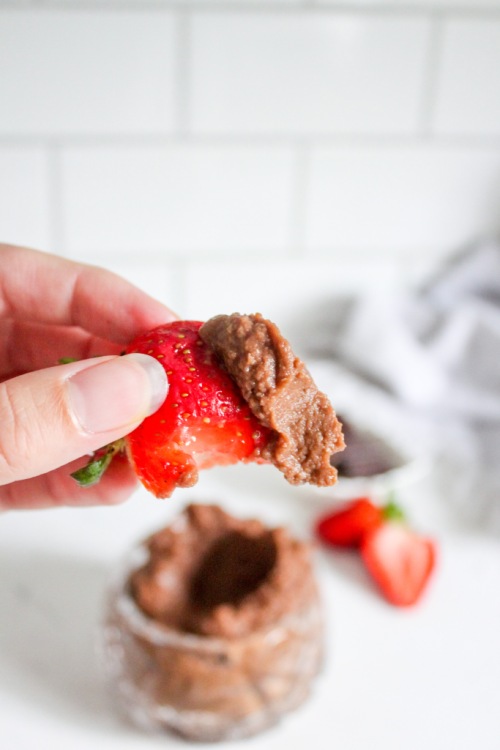
]]>The post Chocolate Hummus appeared first on Never. Not. Eating..
]]>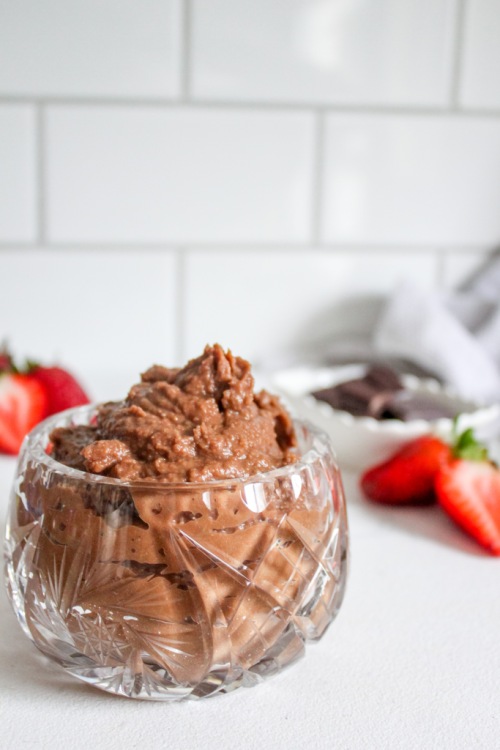
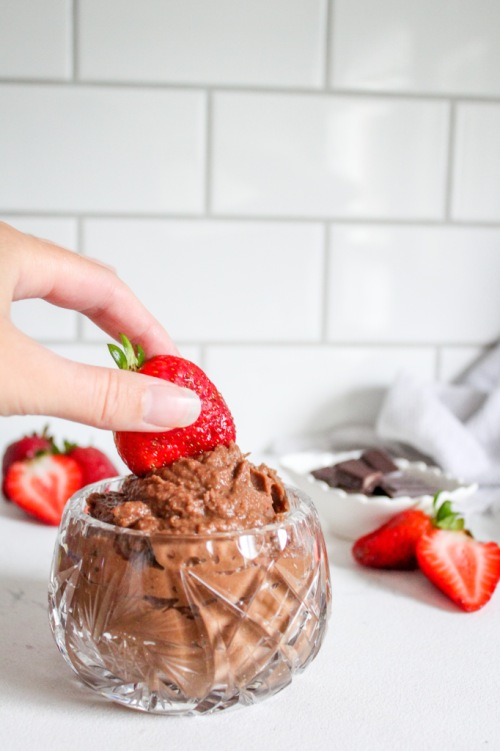
Y’all know I love a good healthy snack, and this is that. Full of protein, fibre, iron and CHOCOLATE. How do you eat chocolate hummus, you ask? Well, if not by the spoonful, then perhaps with fruits, on toast or alongside some salty pretzels. Follow your heart.
Here is what you will need for this recipe:
- Chickpeas (I always use dry chickpeas that I soak overnight and cook for an hour – they make dips much smoother than the canned stuff)
- Cocoa powder
- Maple syrup
- Vanilla
- Salt
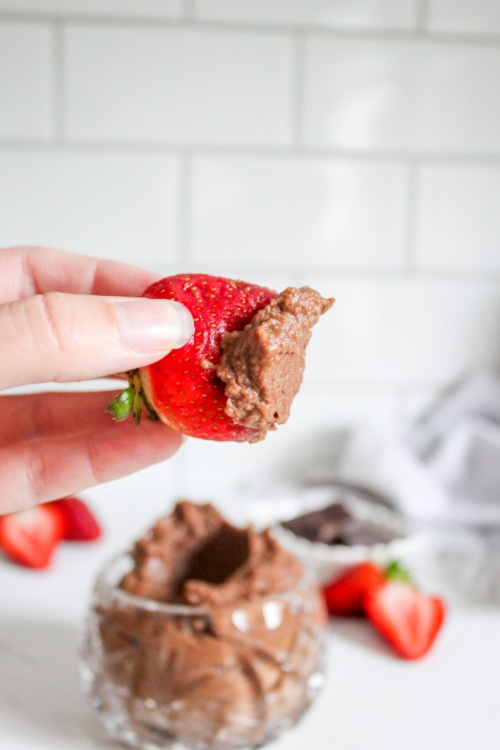
This recipe is flexible, depending on your taste. If you love chocolate, you can choose to add more cocoa powder, or if you would like a subtler chocolate flavour, add less. Same with the sweetness level. If you enjoy really sweet desserts, add more syrup. If you are like me and prefer less sweet, add the amount you see in the recipe.
Let’s do the damn thing!
Chocolate Hummus
Serving size: Makes about 1 cup
Prep time: 5 minutes
Inactive time (for soaking): 8 hours
Cook time: 1 hour
Ingredients:
- 3/4 cup dry chickpeas (or 2 cups canned, rinsed very well)
- 3 – 4 tbsp cocoa powder
- 3 tbsp maple syrup (or more, to taste)
- 1/2 tsp pure vanilla extract (optional)
- 1/4 tsp salt
Instructions:
- If working with dry chickpeas (recommended for a smoother consistency), cover chickpeas with two inches of water and soak overnight. Drain, rinse and transfer to a medium-sized pot. Cover with two inches of water and bring to a boil. Reduce heat to a rolling simmer and cook chickpeas, lid off, for one hour or until tender. If working with canned chickpeas, skip this step.
- Add cooked chickpeas to a food processor, along with three tablespoons of cocoa powder, the syrup, salt and the vanilla, if using. Blend until smooth, scraping down the sides of your food processor every so often. Taste and add more cocoa or syrup, if desired.
- Transfer hummus to an airtight container if not serving immediately and store in the fridge for up to four days.
The post Chocolate Hummus appeared first on Never. Not. Eating..
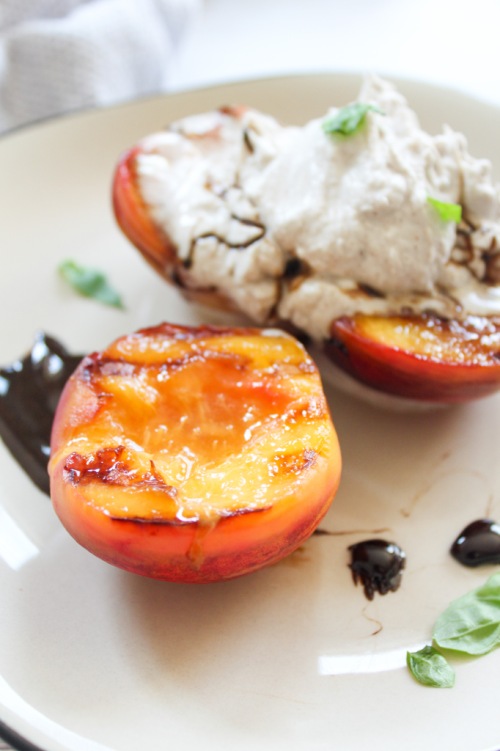
]]>The post Grilled Peaches with Cinnamon Coconut Whipped Cream and a Balsamic Reduction (Vegan & GF) appeared first on Never. Not. Eating..
]]>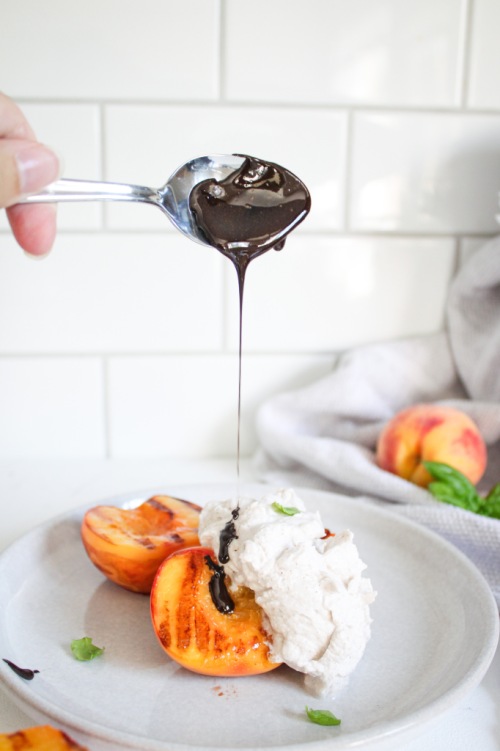
Okay, picture this – you are watching the abnormally late NBA playoffs (thanks, Covid), and you’re eating your wings, nachos and burgs. Halftime comes and you need something sweet. Why not fire up the BBQ and throw on some peaches? Dress them up with some coconut whip cream? A little sweet balsamic reduction? Yes, yes and yes. I vote yes.
Even easier, you can use a cast iron grill pan on your stovetop. I use the one found here, and I love it! It’s perfect for those without a barbeque, or anyone who just wants an easier clean-up. All you need to do is set it over medium-high heat and brush the peaches with olive oil before cooking them for about 2-3 minutes per side. They will still develop those beautiful grill marks that you get on the Q, just with less hassle.
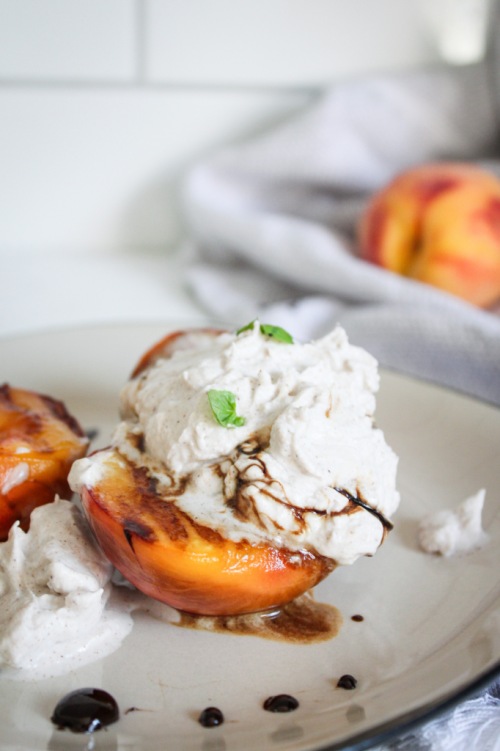
The coconut whip cream is my favourite. As a traditional whip cream lover, finding a vegan alternative was super exciting. This part is a bit tricky, as you need to find a can that solidifies properly when you store it in the fridge. I have found that 365 Everyday Value and Aroy-D are the best for this. To make the whipped cream, place a can of coconut milk in the fridge for at LEAST 24 hours. The longer, the better. Also, try not to shake the can too much before placing it in the fridge. The coconut milk and water will naturally separate, and we want to keep it that way, so shaking it before refrigerating it will slow the process of separation and then solidification.
When it is time to make the whipped cream, place your mixing bowl and mixers into the freezer to get super cold, about 15 minutes before you plan on beginning. Carefully open the can (without shaking) and scoop out the firm top part into your bowl. You will notice a clearer liquid at the bottom of the can (the water) – do not add this to the bowl. Save this and add to a morning smoothie! Add some cinnamon and vanilla to the coconut milk and whip until soft peaks form. Next, add in your sugar – I like to use maple syrup, but you can use powdered sugar as well. Continue beating until stiff peaks form. It is unlikely that they will become as stiff as regular whip cream, but sometimes I put the bowl in the freezer for ten minutes and re-whip for a few more seconds before serving. This usually does the trick!
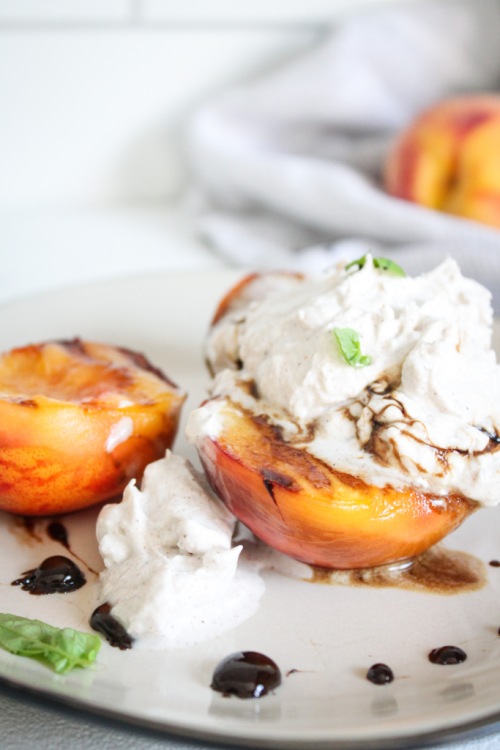
For the balsamic glaze, place some balsamic vinegar with a dash of maple syrup into a small pot and bring to a gentle simmer. Let it reduce for about eight minutes. TIP: Keep the pot over the lowest heat up until you use the reduction, as it cools quickly and becomes very sticky.
Now, grab a plate, put the peaches down, scoop on some whipped cream and drizzle with that lush reduction! It’s the freshest summer dessert one could ask for!
Grilled Peaches with Cinnamon Coconut Whipped Cream and a Balsamic Reduction (Vegan & GF)
Servings: 4
Prep time: 15 minutes
Cook time: 10 minutes
Ingredients:
- 1 14 oz can of full-fat coconut milk (I like Aroy-D and 365 Everyday Value), refrigerated for at LEAST 24 hours
- 1/2 tsp cinnamon powder
- 1/2 tsp pure vanilla extract
- 2 tbsp pure maple syrup (or confectioner’s sugar), divided
- 1/2 cup balsamic vinegar
- 4 peaches, halved and pits removed
- olive oil
Instructions:
- Place a medium bowl and your beaters into the freezer for at least 15 minutes.
- Remove the coconut milk from the fridge and carefully open it, without shaking. Scoop the top, white part into the cold bowl. You will see a clearer liquid at the bottom (the water), DO NOT add this to the bowl (save for morning smoothies). Add the cinnamon and vanilla to the coconut milk and whip on high until soft peaks. Add one tablespoon of syrup (or sugar) and whip again until stiff peaks form.* Place in the fridge while preparing the rest of the recipe.
- To a small pot over medium heat, add the balsamic and the remaining tablespoon of maple syrup. Bring to a gentle simmer and let cook down for about 8 minutes, stirring frequently. Turn the heat to the lowest setting to keep the reduction loose and drizzle-able. It cools quickly and becomes very sticky, so keeping it on the lowest heat prevents it from becoming taffy-like.
- Set your grill to medium-high heat and brush the peach halves with olive oil (I like to use my cast iron grill pan for this). Place the peaches cut side down onto your grill and cook for about 2 minutes, without touching them. Flip and cook for another three to four minutes, or until tender but not too soft.
- Place your peaches on a plate, top with the coconut whipped cream and drizzle with the balsamic reduction!
NOTES:
*Coconut whipped cream will not always create stiff peaks, as regular whipped cream does. It depends on how hot your kitchen is. If your whipped cream is looser, place the bowl back in the freezer for 10 minutes and re-whip for a few seconds when ready to plate.
The post Grilled Peaches with Cinnamon Coconut Whipped Cream and a Balsamic Reduction (Vegan & GF) appeared first on Never. Not. Eating..
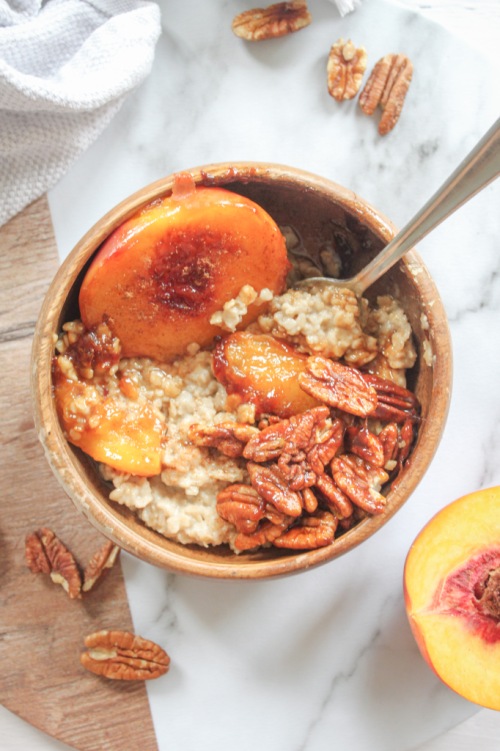
]]>The post Caramelized Peach and Pecan Oatmeal appeared first on Never. Not. Eating..
]]>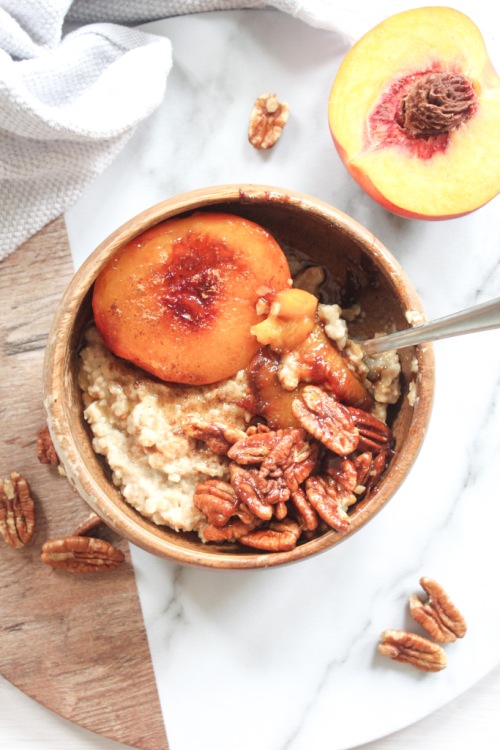
Alright, I’m taking full advantage of the local produce, here in Southern Ontario. We have amazing peaches during the summer months and I’m using them today to make this caramelized peach oatmeal. Typically, I don’t eat oatmeal very often, but when I do, it needs to be topped with nuts, fruit and maple syrup. Otherwise, I won’t eat it.

So today, I bring to you, my Caramelized Peach and Pecan Oatmeal. Creamy, spiced oatmeal with soft, tender peaches and sticky maple pecans. YUM.
Let’s talk oatmeal. Because I don’t drink cow’s milk, I always make my oatmeal with plant-based milk. You can check out my Homemade Cashew milk, here. This is a really great milk choice for this recipe as it is creamy and flavoured with vanilla. Otherwise, you can use almond milk, soy, oat, or even water. Whatever you have on hand!

The best part of this recipe would have to be the toppings. Peaches and pecans are a match made in heaven. I have even seen whiskey with these two flavours infused…YUM. The peaches become soft and fork-tender when cooked down with maple syrup, some lemon juice and a pinch of salt. You could easily just eat these themselves.
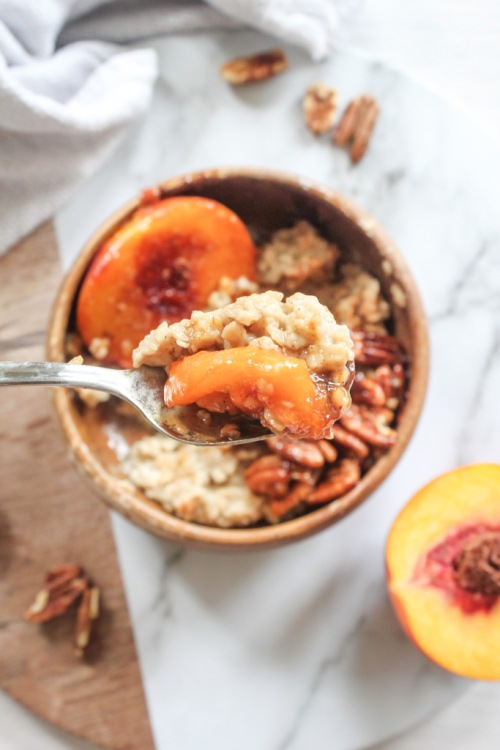
Pecans are delicious naturally, but when coated in the sticky syrup, they are even better. Not to mention all of the benefits you get from eating pecans – good fats, tons of fibre, magnesium, iron and protein. Tree nuts are a vegans dream food.
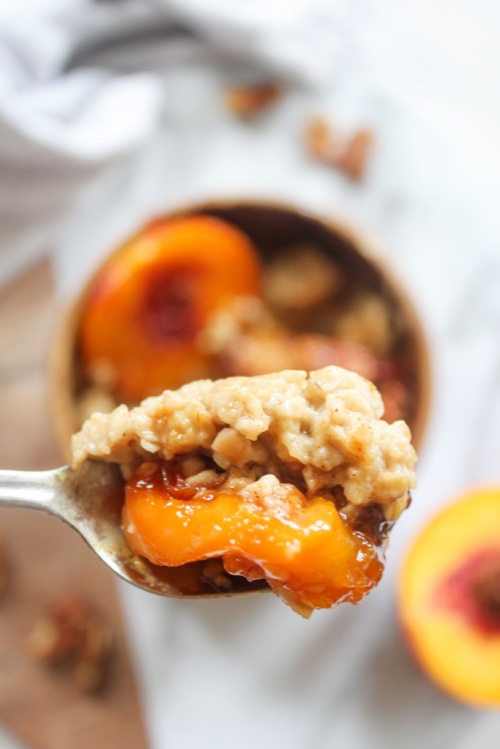
Finally, I always like to top my oatmeal off with (yet another) drizzle of pure Canadian maple syrup and a pinch of cinnamon.
This one’s for you, oatmeal lovers!
Caramelized Peach and Pecan Oatmeal
Serving size: 1
Prep time: 2 minutes
Cook time: 5-8 minutes
Ingredients:
- 2/3 cup plant-based milk (check out my homemade cashew milk, here)
- 3/4 tsp cinnamon, divided
- 1/4 tsp nutmeg, divided
- salt
- 1/3 cup rolled oats
- 1 peach, sliced into wedges
- 1 tbsp lemon juice
- 2 tbsp maple syrup
- 1 tbsp butter or oil of choice
- 1/4 cup raw pecans
Instructions:
- Add milk, 1/2 tsp cinnamon, pinch of nutmeg and a pinch of salt to a small pot over medium high heat. Bring to a boil and add the oats. Stir, bring back up to a boil and then reduce heat to a simmer. Cook for 4-5 minutes, or until oats have absorbed most of the liquid and mixture has thickened.
- To a small bowl, toss the peach slices with the lemon juice, a pinch of salt, the remaining 1/4 tsp cinnamon, a pinch of nutmeg and the maple syrup.
- Add the butter or oil to a medium pan (or cast iron skillet) over medium-high heat. When butter is hot, add in the peach slices. Cook for 3 minutes and then add the pecans. Finish cooking when the slices are fork-tender, stirring occasionally, another 2-4 minutes.
- Scoop oatmeal into a bowl and top with the caramelized peaches and pecans. Top with extra maple syrup and a dash of cinnamon if desired.
The post Caramelized Peach and Pecan Oatmeal appeared first on Never. Not. Eating..
]]>