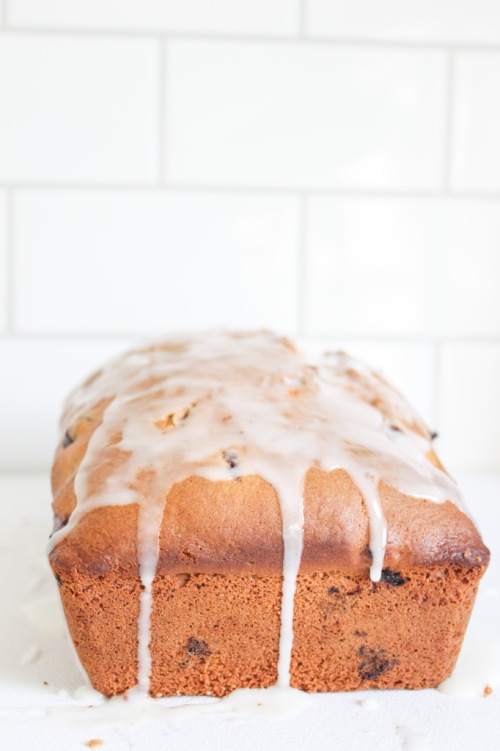
The post Lemon Blueberry Loaf appeared first on Never. Not. Eating..
]]>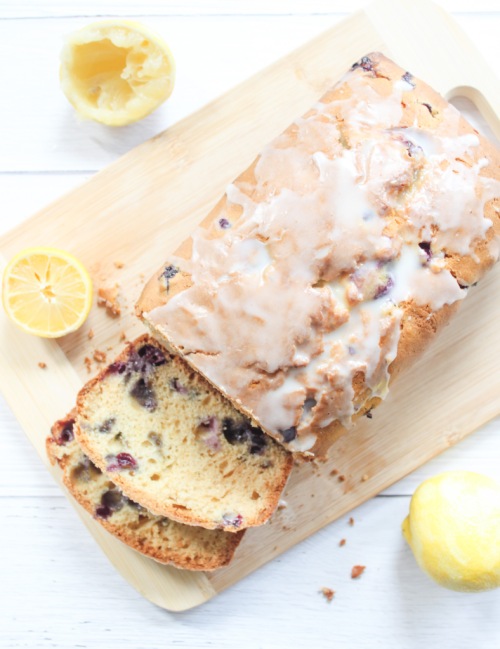
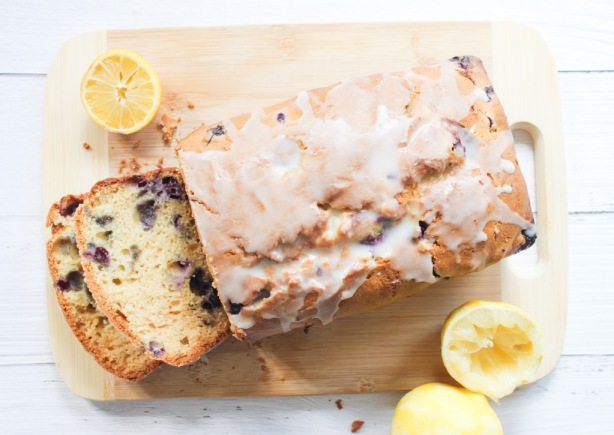
This recipe has two of my loves – gluten and fruit. That’s half healthy!
But seriously, this is the perfect morning treat with coffee. It is a great snack between meals. It’s a wonderful end to the day with tea. It’s just good anytime. You can’t put limits on loaves.
When I want to bake something, I always have this idea in my head that I need to set aside a ton of time for it. Then I get started and, every time, I realize that it actually just takes minutes to put together, and even the bake time isn’t too bad. This loaf honestly takes around 10 minutes to prep, and although the oven time is around an hour…It’s passive time. You can do anything while it is in the oven: laundry, work from home, lunges, paint… Whatever, man!

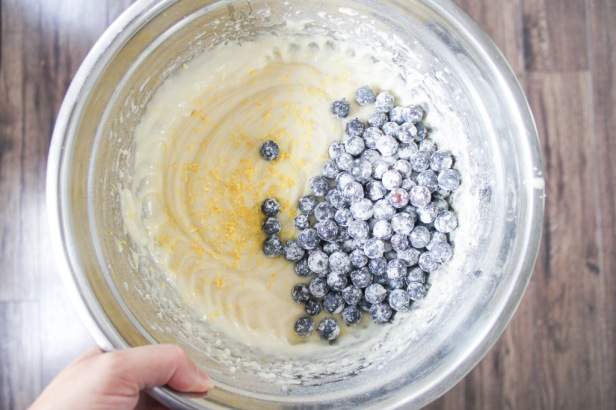
The first thing you need to do is whisk together all of your dry ingredients – flour, baking soda, baking powder and salt. Set this aside and move on to your wet – sugar, eggs, vanilla and oil. Beat this until smooth, and then in a few additions add the dry to the wet, alternating with some buttermilk. Fold in the lemon zest and blueberries and you are done! Easy breezy.
This loaf fills your house with the most delicious aroma. There is nothing more “home-y” than walking into a house that is filled with the smell of fresh baked goods. It let’s guests know that you have it together. You got it goin’ on. You are a successful adult.
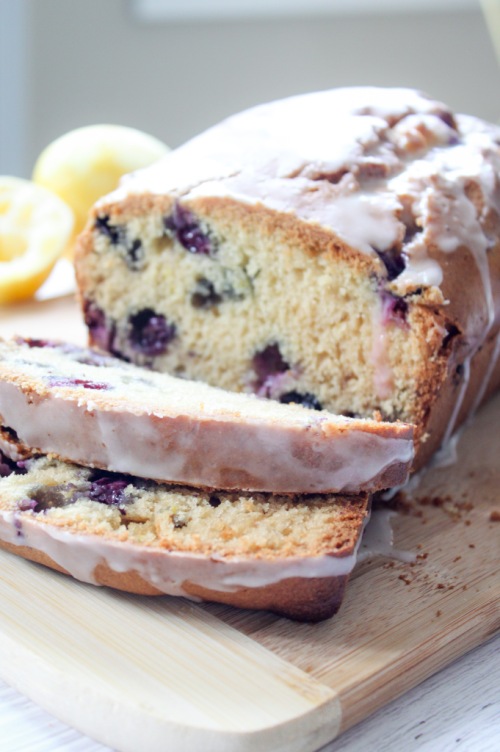
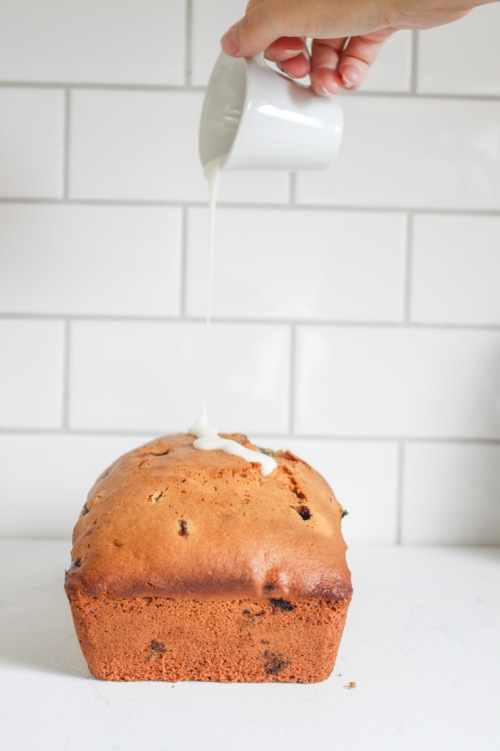
While your creation is forming in the oven, start making the glaze. This is not necessary, but it adds a little bit of sweetness to the loaf and also makes it look really pretty. All it requires is a little bit of powdered sugar and some lemon juice whisked together until smooth. I like to drizzle it over the top when the loaf is still warm so it can absorb all of the goodness throughout.
Loaf drop.
Lemon Blueberry Loaf
Prep time: 10 minutes
Cook time: 50 minutes
Ingredients:
- 2 cups all-purpose flour + 1 tbsp
- 3/4 teaspoon baking soda
- 1/2 teaspoon baking powder
- 3/4 teaspoon salt
- 1 cup sugar
- 1/2 cup canola oil
- 2 large eggs
- 1 teaspoon pure vanilla
- 3/4 cup buttermilk
- zest of one lemon
- 1 heaping cup blueberries, washed and dried
For the lemon glaze:
- 1/3 cup powdered sugar
- 1-2 tbsp freshly squeezed lemon juice
Instructions:
- Preheat the oven to 350 degrees and grease a loaf pan.
- In a medium-sized bowl, whisk together the two cups of flour, baking soda, baking powder and salt. Set aside.
- In a separate, larger bowl, beat the sugar, oil, eggs and vanilla together until smooth and combined.
- Add the dry ingredients and buttermilk alternately in three additions, being careful not to overmix the batter.
- Sprinkle the remaining tablespoon of flour over the blueberries and toss until coated. Shake off any excess flour and then carefully fold the blueberries into the batter along with the zest.
- Pour into prepared pan and bake for 50-60 minutes, or until a toothpick inserted in the middle comes out clean.
- Run a butter knife along the edges of the loaf to loosen and turn out onto a wire rack to cool completely.
- To prepare your glaze – add the powdered sugar to a small bowl and whisk in the lemon juice, a half tablespoon at a time, until you reach your desired consistency. Drizzle over the loaf* and use an offset spatula to evenly distribute over the top.
NOTES:
*I like to drizzle the glaze on the loaf when it is still warm. This way, the loaf absorbs the liquid and it gets distributed throughout. You will not be able to see the glaze on top if you do this. If you are going for more of a “look,” let the loaf cool completely before topping with the glaze.
The post Lemon Blueberry Loaf appeared first on Never. Not. Eating..
]]>The post Gluten-Free Cereal Bars appeared first on Never. Not. Eating..
]]>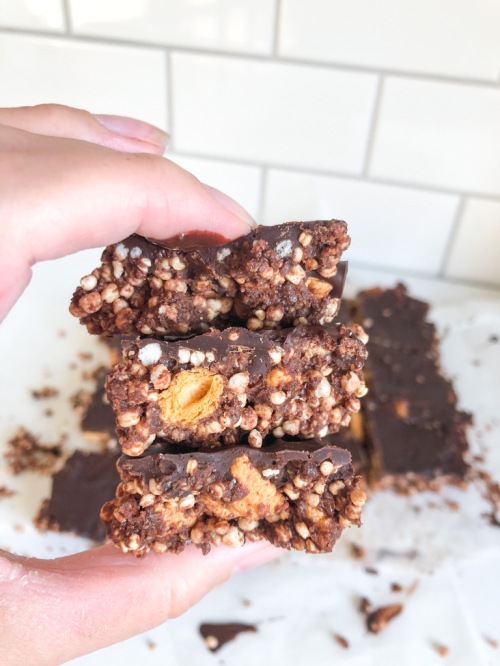
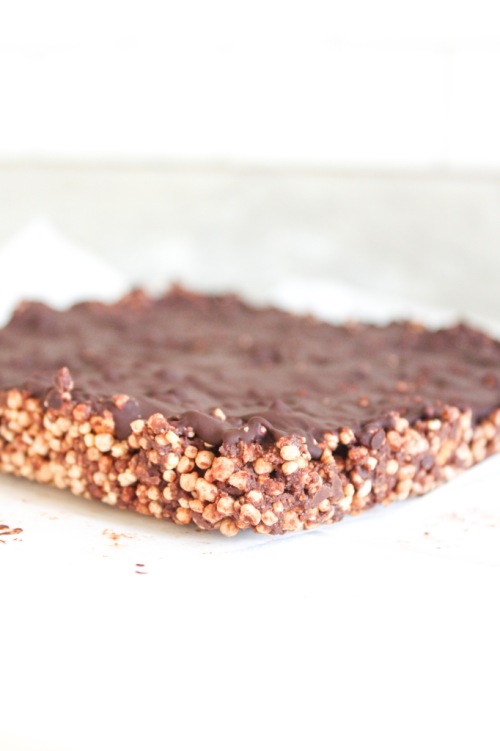
These chocolate cereal bars are crispy, crunchy and so satisfying. They have currently replaced my after-dinner-before-bedtime snack.
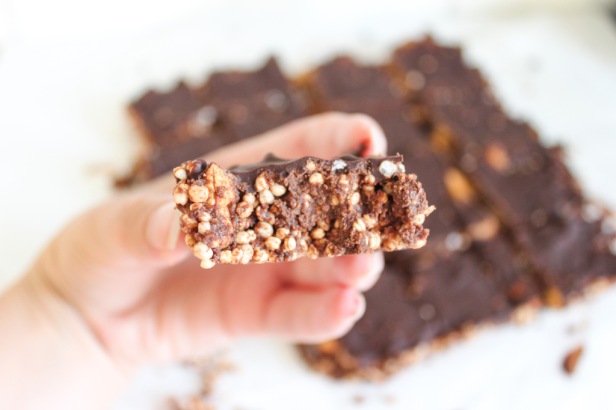
Here is what you will need to make them:
- Your favourite gluten-free cereal (I use a combination of Quaker Corn Squares and Puffed Quinoa)
- Peanut butter (try out my homemade peanut butter, found here)
- Pure vanilla extract
- Pure maple syrup
- Cinnamon
- Dark chocolate
- Flaky sea salt (optional)
These take minutes and are such a yummy treat. Check out the recipe below!
Gluten-Free Cereal Bars
Serving size: Fills an 8 x 8 inch square pan
Prep time: 5 minutes
Cook time: 8-10 minutes
Set time: 20 minutes
Ingredients:
- 200 g dark chocolate, divided
- 1/2 cup peanut butter
- 1/2 tsp pure vanilla extract
- 1/4 tsp cinnamon (optional)
- 1 tbsp pure maple syrup
- 1.5 cups corn square cereal*
- 1 cup puffed quinoa*
- Flaky sea salt (optional)
Instructions:
- Prepare an 8 x 8 inch square baking pan by lining it with two pieces of parchment paper for easy release.
- Over a double boiler, or in the microwave, melt 75 g of the chocolate in a medium-sized heat-resistant bowl. Once melted, add the peanut butter, vanilla, cinnamon and maple syrup. Stir to combine.
- Place the corn squares and puffed quinoa in a separate, large bowl. Pour the chocolate-peanut butter mix over and use your hands to incorporate the ingredients. Press into prepared baking pan.
- Melt the remainder of the dark chocolate and pour over cereal mixture. Spread evenly. Top with flaky sea salt, if desired. Place in the fridge to set for at least 20 minutes. Cut into squares and store in an airtight container in the fridge.
NOTES:
*Feel free to use your favourite gluten-free cereals
The post Gluten-Free Cereal Bars appeared first on Never. Not. Eating..
]]>The post How to Create the Perfect Smoothie Bowl appeared first on Never. Not. Eating..
]]>
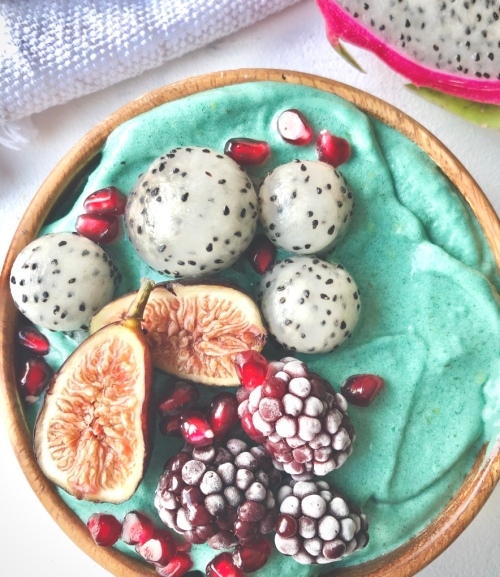
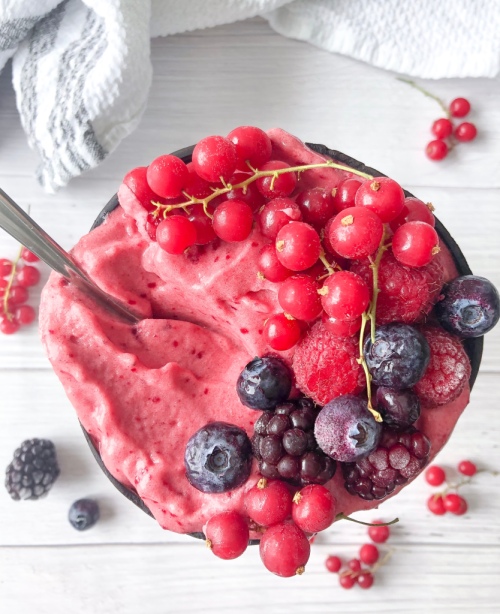
There’s just something about a creamy, texture-perfect bowl in the morning. It’s art, really.
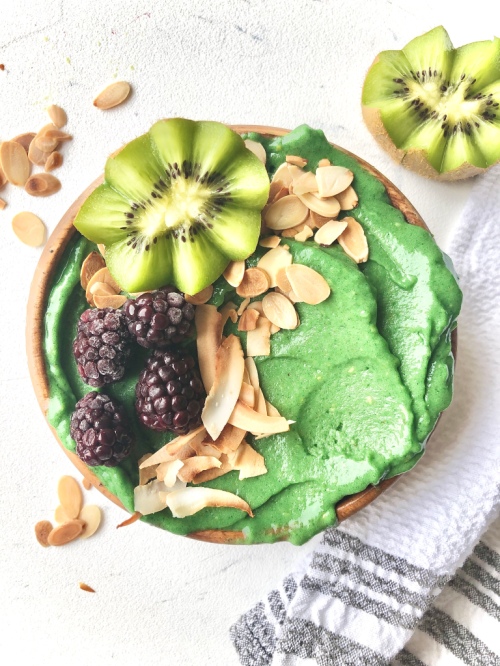
Do you follow any of the most popular smoothie bowl accounts on Instagram? Their dreamy posts show the blending, spooning and topping of amazingly colourful, smooth and creamy bowls. This post is meant to teach you how to achieve a smoothie bowl that mimics that perfect texture and all of the other hacks that go along with creating the ultimate smoothie bowl, including product recommendations and links.
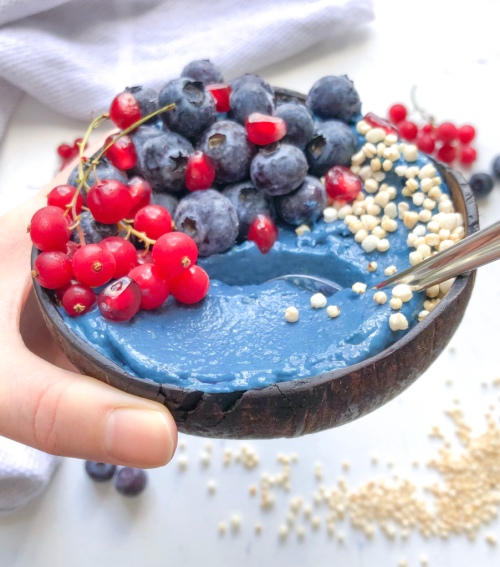
HOW TO CREATE THE PERFECT SMOOTHIE BOWL – TEXTURE
TEXTURE is one of the most important things about a smoothie bowl. Not too soupy so that it doesn’t support all of your delicious topping choices, and not too stiff so that it is “nice cream.” We are looking for that glorious in-between stage.

And here’s how: Choose a high-powered blender. The Vitamix is ah-mazing. I also love the Ninja food processor. This is really important as it needs to be able to pulverize frozen fruit.
CHOOSING THE RIGHT FRUITS
Secondly, choose fruits that “cream-up” well. Bananas (obviously) are the #1 choice. However, if for some reason you can’t have bananas, mangos are an excellent alternative. I buy fresh bananas, wait until they are slightly overripe and brown (but super sweet) and then peel them, cut them in half and freeze them. You can also cut them into rounds, but it’s much easier to know how much you are putting in if they are halved.
THE ADD-INS
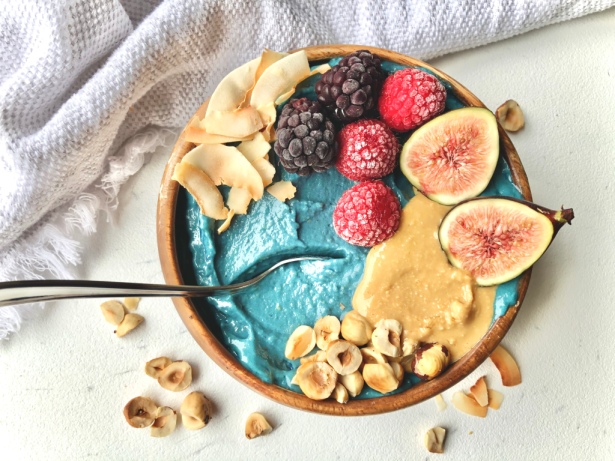
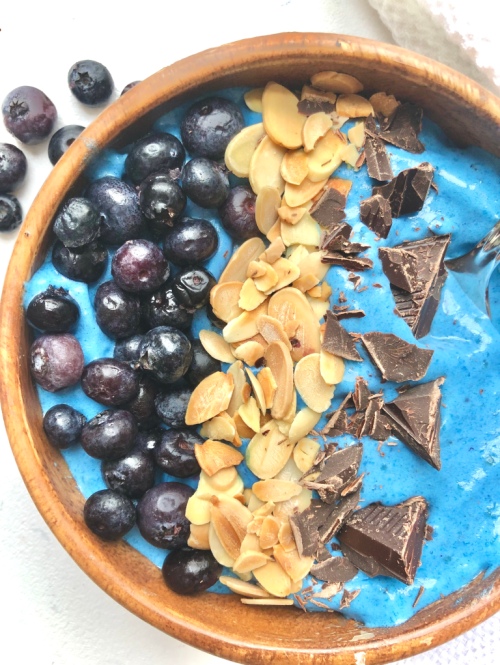
Add your frozen fruit choices to a blender/processor with all of your favourite superfoods. I have tried, tested and loved the following – Purple Sweet Potato Powder, Activated Coconut Charcoal, Maca Powder, Blue Spirulina Powder, and Green Spirulina Powder. Usually I choose two or three of them to add in one smoothie bowl. One colourful powder, one protein powder and Maca. Always.
BLEND IT UP!
Once you have your fruit and superfoods ready to go, pulse the blender a few times to start breaking up the fruit. Afterwards, blend on high, and while blending, slowly pour in the tiniest amount of non-dairy milk. This is the tricky part, as too much milk will make it too loose and none at all will make it nice cream (which is good, too). I would say start with one tablespoon and judge from there!
At this point, you need to continuously stop the blender to scrape down the sides of your bowl. Keep doing this until everything is well combined and smooth. Have faith in your smoothie…it will come together. Just do not over-mix as this will also loosen the texture.

HOW TO CREATE THE PERFECT SMOOTHIE BOWL – TOPPINGS
When you have achieved the ultimate smoothie consistency, pour your art into a beautiful bowl and top with all of your favs. My tried and true recommendations are as follows: Hemp hearts, chia seeds, hazelnuts, frozen berries, homemade peanut butter, slivered almonds, granola and coconut flakes.

THE FROSTED BERRY LOOK
One of the most popular toppings you will see in Instagram photos are frozen berries. They develop this gorgeous pale-white layer on their surface after you remove them from your freezer and let them hang out on the counter for a few minutes. Some tricks to achieving this look that I have found work for me are:
- Not washing your berries before freezing them (either buy organic or wash AFTER you take pictures…hehe)
- Do not stack berries on top of each other in their container in the freezer- just one single layer is best
- Leave them in your freezer for longer than 24 hours to achieve this look
- After a day or two in your freezer, remove them for about 10-15 minutes (don’t use them) and then put them back into your freezer…the next time you pull them out, they will be perfect!
- When plating, use food tweezers to place carefully – the warmth of your fingers will melt the spots you touch

Now take some pictures and grab a spoon!

I hope this post helps you achieve your ideal smoothie bowl. Here is an example of a pretty standard recipe that I use when creating my own. Enjoy!
How to Create the Perfect Smoothie Bowl – Mauve Smoothie Bowl
Servings: 2
Prep time: 5 minutes
Ingredients:
- 2 frozen bananas
- 1/2 cup frozen mango
- 1 tbsp vanilla protein powder
- 1 tsp maca powder
- 2 tsp Purple Sweet Potato Powder, optional (you can replace with your favourite superfood powder)
- splash non-dairy milk
Instructions:
- To a high-speed food processor or blender, add frozen fruit, protein powder, maca and superfood powder. Pulse a few times and then blend. While blending, drizzle in the non-dairy milk. You only need a tiny amount. Blend until everything is combined and smooth, scraping down the sides a few times as it comes together.
- Transfer to a bowl and add toppings of your choice. Enjoy!
The post How to Create the Perfect Smoothie Bowl appeared first on Never. Not. Eating..
]]>The post Pear, Mozzarella and Caramelized Onion Flatbread appeared first on Never. Not. Eating..
]]>
Ordering pizza has never really been something that I do very often. I guess because I don’t think about it. I guess because I like to cook. I guess because…I can make it myself?! And it’s SO easy, why wouldn’t I?? You are in full control this way. Healthy toppings or unhealthy toppings. Red sauce or white sauce. Meat or veggies. Cauliflower crust or wheat crust. You choose, babe. You choose.
So I like to call this recipe a “flatbread” because,
1. I don’t know the difference between flatbread and pizza (I won’t lie);
2. It comes across as more refined;
3. It sounds healthier for some reason, and;
4. It’s pretty flat, yo!
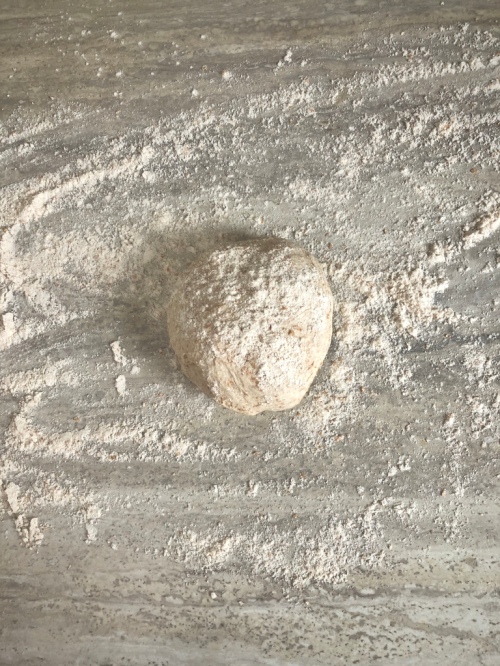
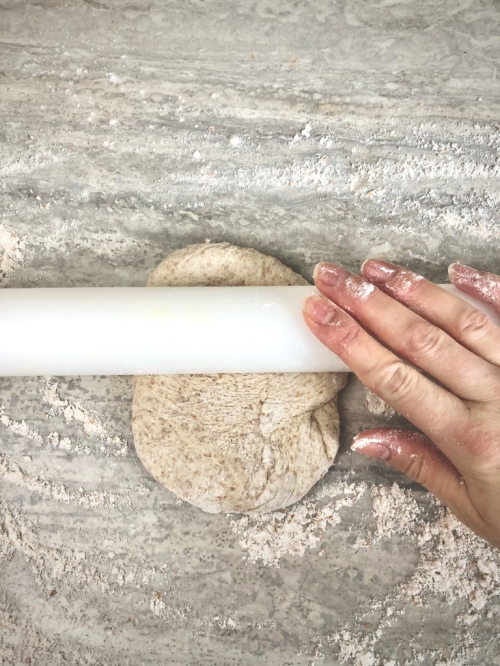
I start with just a basic dough recipe. Make this and chill it in a Ziploc bag overnight and the flavours meld together and it’s really quite magical. When you are ready to make some ‘za, pull it out of the fridge, roll it out and load it up with your choice of toppings, cook on high heat and in 10 minutes, you have amazing pizza.
The dough is simple. It is just flour (I use whole wheat), salt, olive oil, warm water and instant yeast. Toss it all into your stand mixer and then let it rise for an hour or two. This recipe will make one giant pizza, or three respectable-sized personal pizzas. I like to make three different types when I make this dough. Keep it interesting.
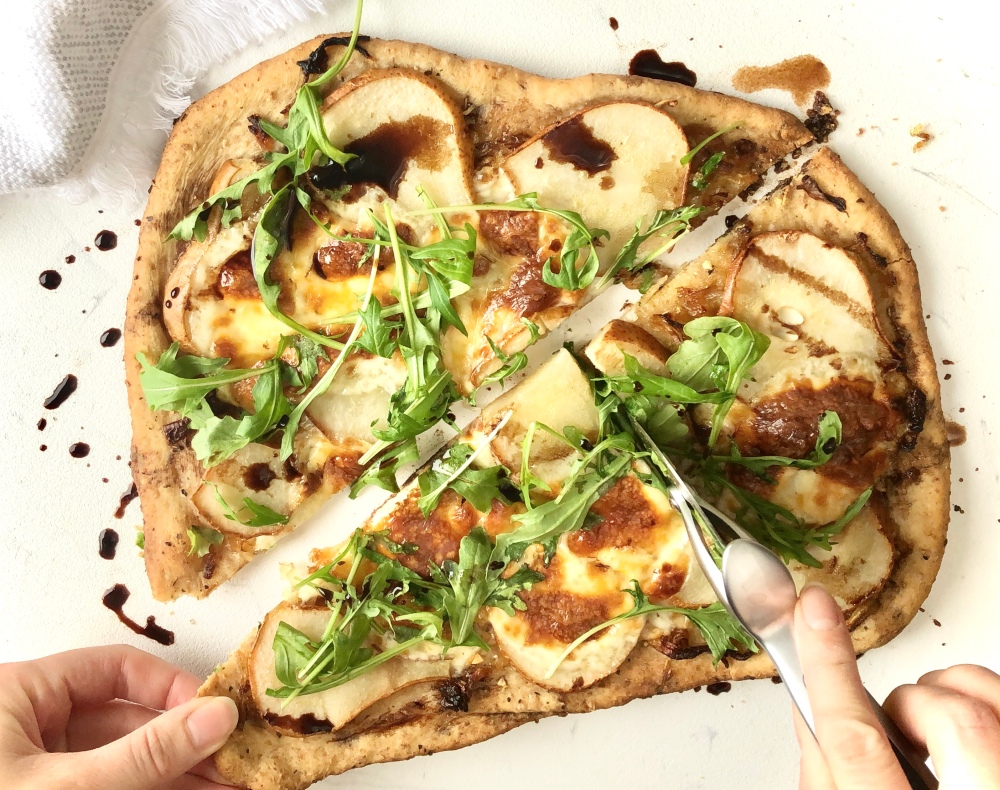
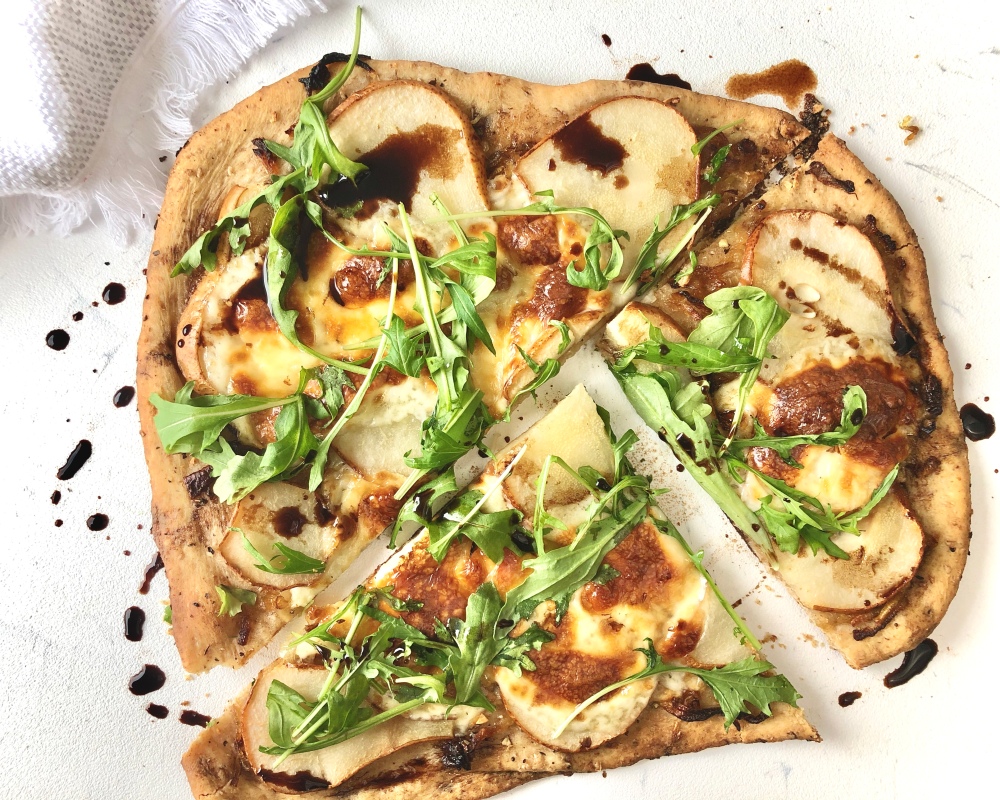
There are numerous combinations of toppings that I’ve tried in the past, and I am quite positive that I will be posting more flatbread recipes in the near future, but this one is in my Top 3. Sweet pears, flavourful caramelized onions, bubbly mozza cheese and peppery arugula. YUM! You literally cannot go wrong. Like, literally.
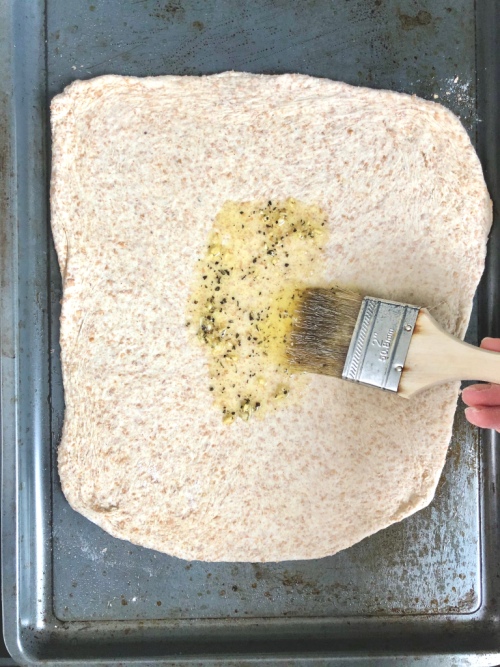
So grab your dough. Roll it out. Add my simple oil base (olive oil, garlic, dried basil, salt, pepper).
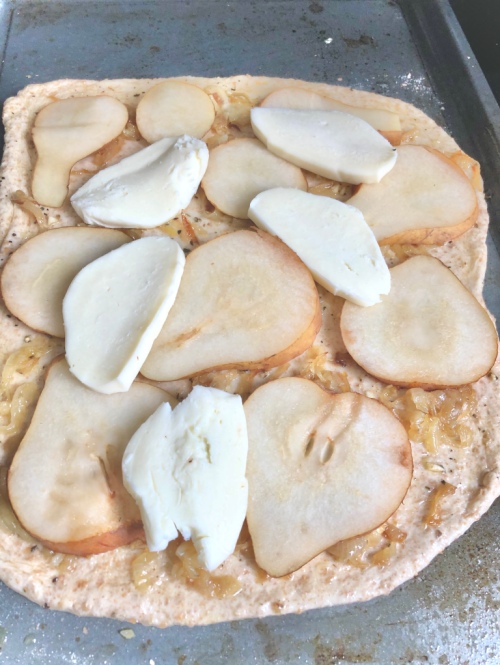
Top with onions, pears and cheese.
Bake at 500 degrees F. Remove. Arugula. Balsamic vinegar drizzle. Eat. Love your life.
Pear, Mozzarella and Caramelized Onion Flatbread
Serving size: 3-5 (Depending on whether you make it as a meal or a side)
Prep time: 12 hours (inactive time)
Cook time: 30 minutes
Ingredients:
Dough:
- 3/4 cup warm water
- 1 tsp active dry yeast
- 2 cups whole wheat flour
- 1/2 tsp salt
- 3 tbsp olive oil
Pizza:
- 4 tbsp olive oil, separated
- 1 large onion, sliced thinly
- 1 garlic clove, minced
- 1/2 tsp dried basil
- pinch of salt
- pinch of fresh pepper
- 2 bosc pears, sliced thinly
- 250 g mozzarella, cut into thin slices (fresh or balled mozzarella is best)
- arugula for topping
- balsamic vinegar for drizzling (optional)
Ingredients:
For the pizza dough:
- Sprinkle the yeast over the warm water and let sit for 10 minutes until the top looks foamy.
- Add flour and salt to a stand mixer bowl attached with the dough hook. Turn the speed on low and in a slow, steady stream, drizzle the olive oil in until fully incorporated. Pour in the water/yeast mixture and mix until fully incorporated. You may need to scrape down the sides to help it come together. Dough will be sticky. Coat a large mixing bowl with olive oil and turn the dough into the bowl. Cover bowl with plastic wrap and let rise in a warm area for two hours.
- After it has risen, you can roll it out and use immediately, but it is much better with more time to let the flavours develop. Place it in a large Ziploc bag and store in the fridge overnight or up to three days. Dough will continue to expand in the fridge.
For the pizza:
- Preheat oven to 500 degrees F.
- In a pan over low heat, add two tablespoons of olive oil and the sliced onion. Let the onion cook and caramelize for about 20 minutes, stirring every so often. If you wish to speed up this process, add small amounts of water to help the onions along.
- In a small bowl, whisk together the remaining two tablespoons of olive oil, the garlic, basil, salt and pepper. Set aside.
- Remove dough from fridge. Flour your surface and turn the dough out onto it. Use your hands to knead the dough for about 1 minute, or until it no longer sticks to your hands. At this point, you can either cut the dough into three even pieces and roll each into a ball, or make one large pizza ball with the entire dough.
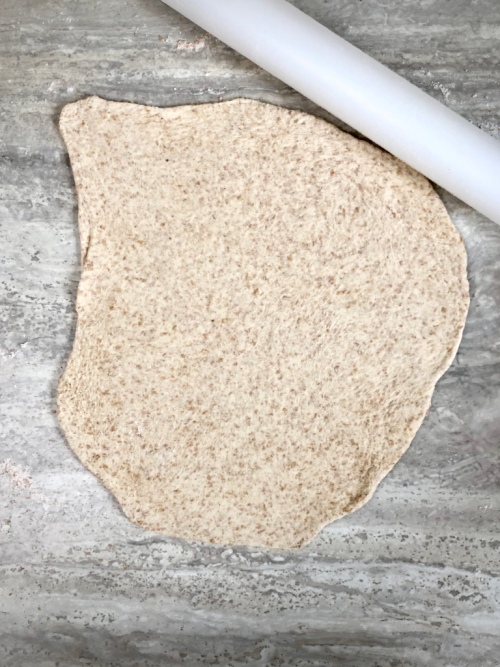
- Using a floured rolling pin, start in the centre of your dough and roll outwards, turning your dough a quarter turn after every few rolls, trying to achieve a rectangular shape. Use your hands to pull and stretch the dough until it is about 1/4 inch thick. Lay the dough on a large baking sheet that has been brushed with olive oil.
- Brush the top of the dough with the olive oil and garlic mixture. Add the caramelized onions, sliced pears and then mozzarella slices. Bake in the oven for 10-14 minutes, or until crust has browned and the cheese bubbles. Top with arugula and a drizzle of balsamic vinegar. Cut with a pizza slicer and enjoy warm!
The post Pear, Mozzarella and Caramelized Onion Flatbread appeared first on Never. Not. Eating..
]]>The post White Wine Israeli Couscous with Spinach and Mushrooms appeared first on Never. Not. Eating..
]]>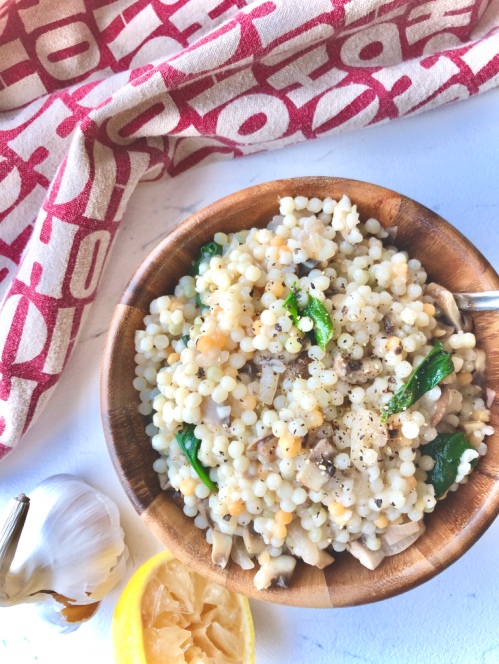
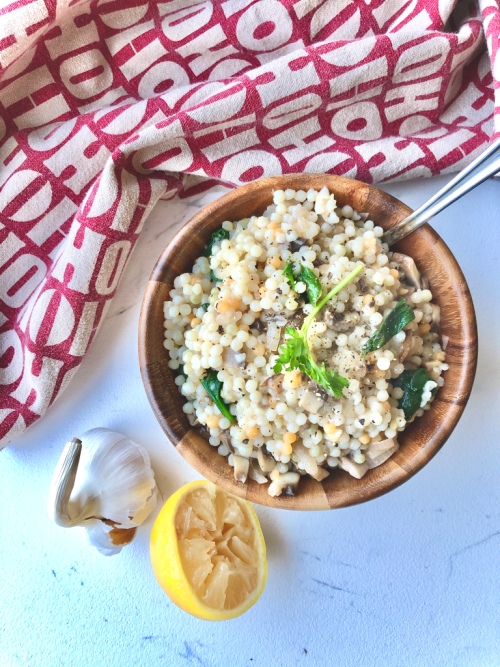
This dish is so simple…sauteed shallots, garlic, mushrooms and spinach deglazed with white wine, mixed into a heaping pile of delicious, brilliant Israeli couscous. Hellllloooo.
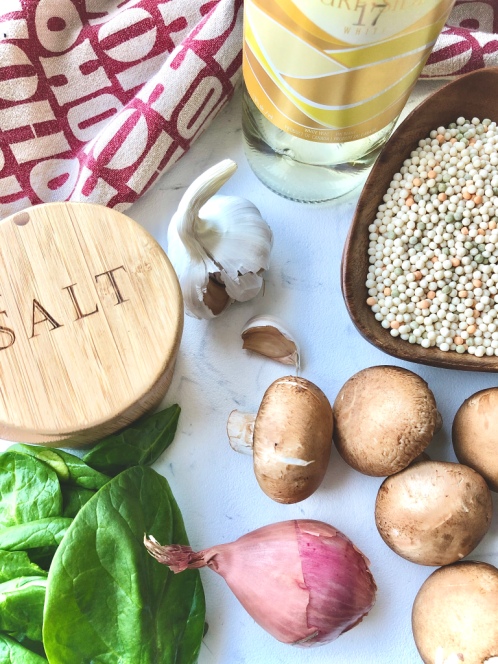
Israeli couscous is much larger than the typical Moroccan style cous. It is a small pasta also known as “pearl couscous.” It cooks super quickly and can be used in a variety of dishes including salads, soups and on it’s own as a side.
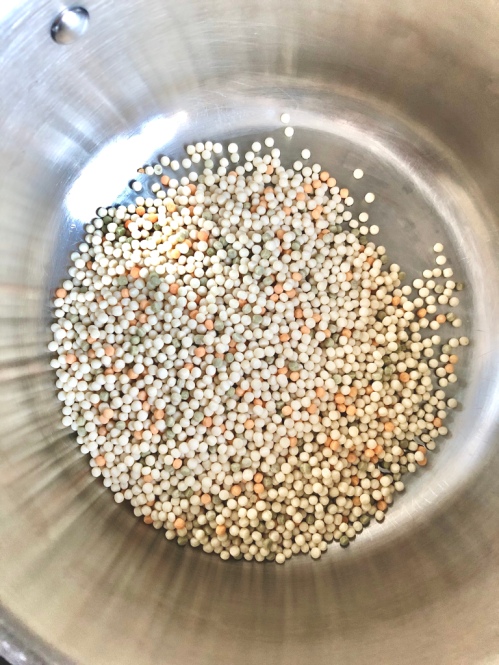
To cook the couscous, add to a pot with some olive oil and toast over medium-high heat for 1-2 minutes. Add water and salt (don’t skip!) and bring to a boil. Reduce heat and simmer for 8-10 minutes.
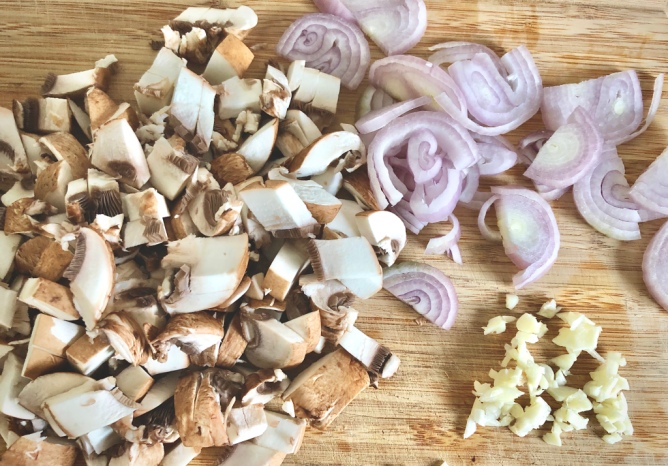
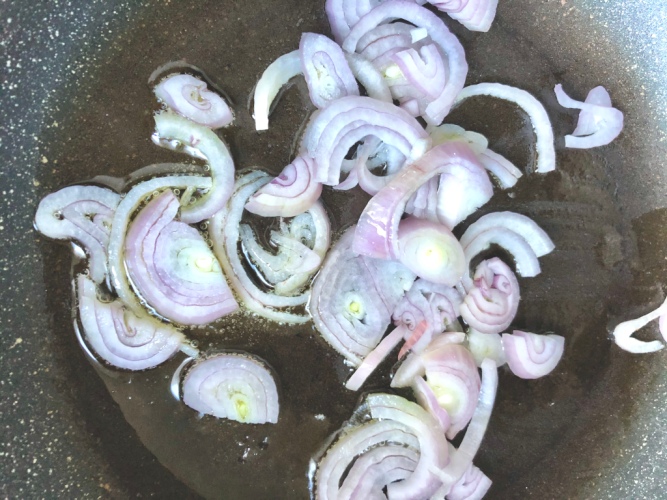
For the vegetables, add sliced shallot to a pan with olive oil over medium-low heat. Cook for a few minutes until it begins to soften and then add the garlic.
Stir for 30 seconds before adding the sliced mushrooms. Let saute for a few minutes and then pour in the white wine.
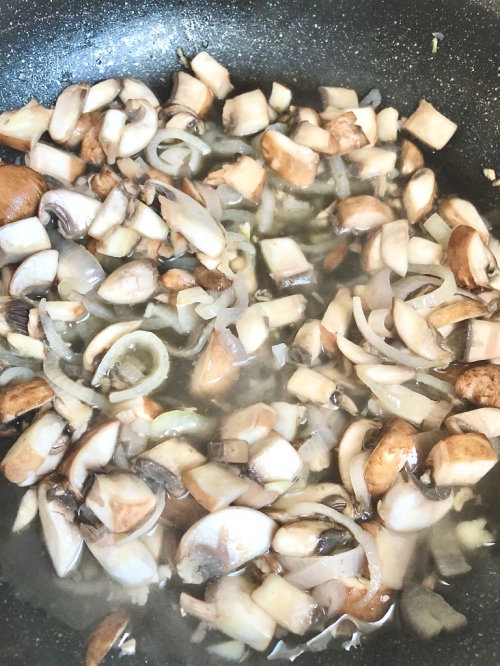
Turn the heat to medium-high and saute until the alcohol has been cooked out, about 5 minutes. Add a few handfuls of spinach and cook down until wilted.
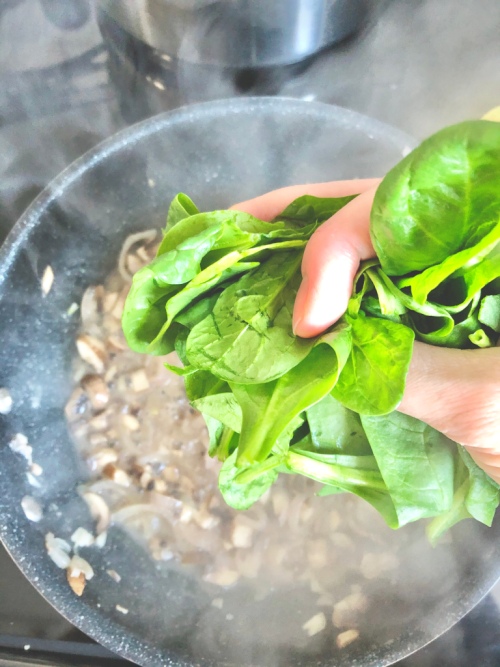
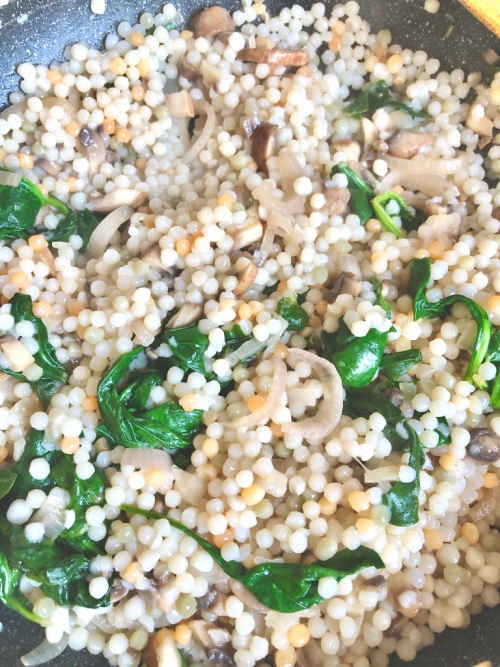
Rinse the couscous under cold water and add to the pan with the vegetables. Stir until combined, turn off heat and add a squeeze of lemon. Side dish perfection.
Serve at your holiday dinner…or bring to someone else’s! Double the recipe if you have a large party to feed.
White Wine Israeli Couscous with Spinach and Mushrooms
Serving size: 4
Prep time: 5 minutes
Cook time: 10 minutes
Ingredients:
- 1 cup Israeli couscous
- olive oil
- 2 cups water
- salt
- pepper
- 1 shallot, sliced
- 2 cloves garlic, minced
- 6 cremini mushrooms, sliced
- 1/3 cup good white wine
- 2 handfuls spinach
- squeeze of lemon juice
Instructions:
- In a medium-sized pot, add 1 tablespoon of olive oil and the couscous and toast over medium-high heat for 1-2 minutes. It will become fragrant. Add 1 teaspoon of salt and the water and bring to a boil. Reduce heat and simmer for 8 minutes, or until al dente. Drain in a fine mesh sieve and rinse with cold water. Set aside.
- In a medium-sized saucepan, heat a tablespoon of olive oil over medium-low heat. Add the sliced shallot and let cook for a minute in the oil. Add the garlic and stir for 30 seconds. Add mushrooms, a few grinds of fresh black pepper and a pinch of salt. Saute for another minute and then add the white wine. Turn the heat up to medium-high and cook until the alcohol has been cooked out – about five minutes. Add the spinach and continue to cook until it is wilted down.
- Finally, add the cooked couscous to the pan, tossing with the vegetables. Turn the heat off after a minute, add a squeeze of lemon and a few more grinds of pepper and some salt to taste. Transfer to a bowl and serve immediately.
The post White Wine Israeli Couscous with Spinach and Mushrooms appeared first on Never. Not. Eating..
]]>The post Spirulina Chia Parfait appeared first on Never. Not. Eating..
]]>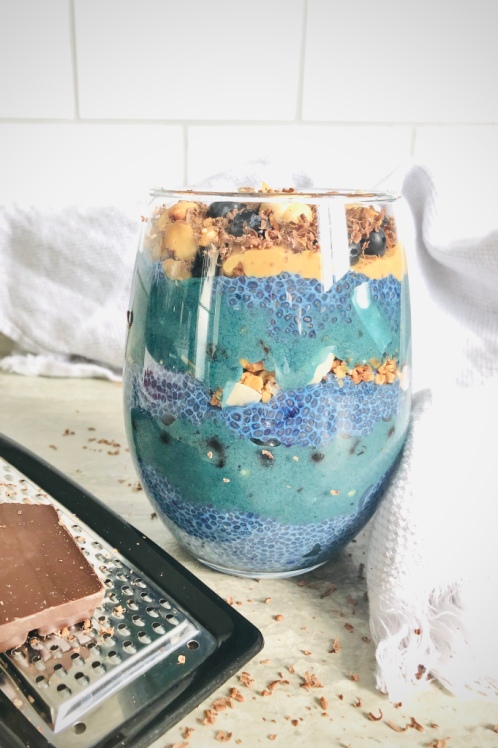
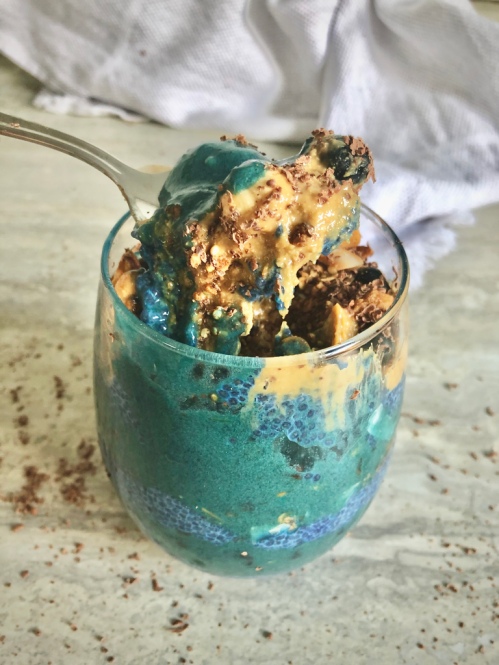
Chia seeds are my go-to when I’m trying to incorporate more fibre, healthy fats and protein. They are little sponges that absorb liquid like it’s nobody’s business, creating a thick “pudding” of sorts in just a short amount of time. I use the Costco brand chia seeds, found here.
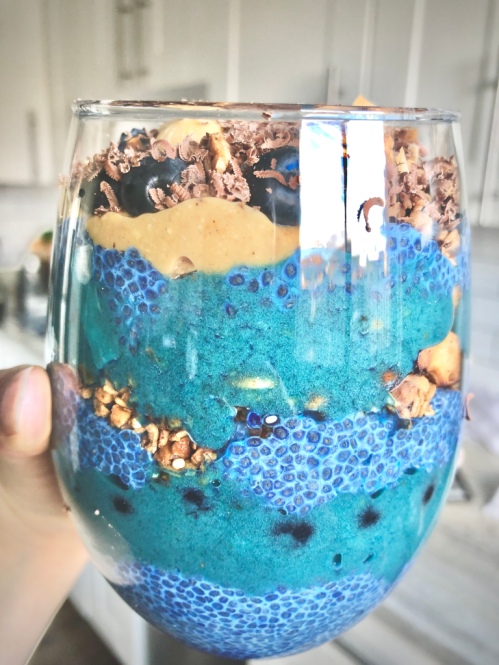
Here are the layers:
Layer 1: Chia pudding – the ratio I use for the pudding is 1:3, seeds:liquid. In a mixing bowl, add one-third cup chia seeds with three times the amount (one cup) of your favourite dairy-free milk (I prefer almond). Mix in half a teaspoon of blue spirulina (optional), half a teaspoon of pure vanilla extract and a pinch of salt. Place in the fridge while you prepare the other layers.
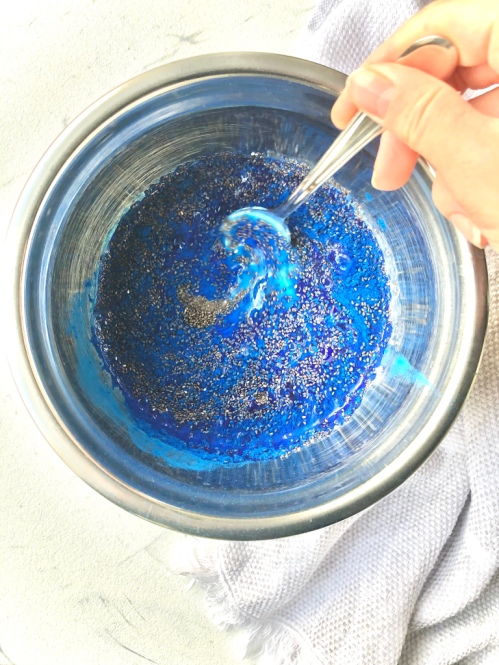
Layer 2: Frozen fruit smoothie – to a food processor (I have a ninja), add two frozen bananas, half a cup of frozen mango, a quarter teaspoon of green spirulina (optional) and a half teaspoon of blue spirulina (optional). Blend until smooth, adding a splash of dairy-free milk to get it going, and scraping down the sides every so often. The spirulina powders give it that amazing teal colour and are packed with healthy nutrients.
Layer 3: Fresh blueberries
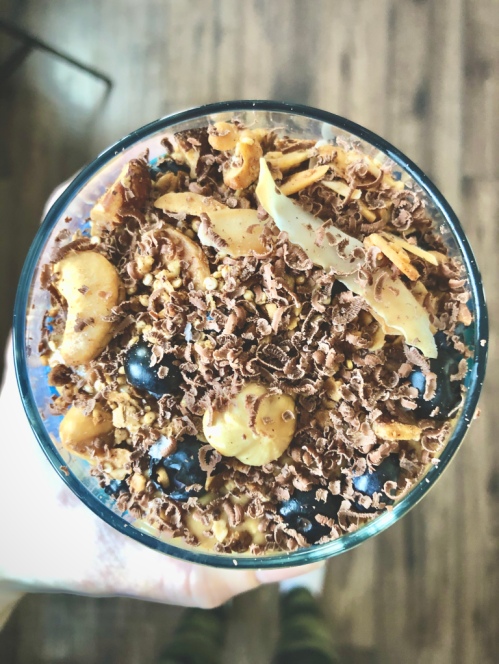
Layer 4: My Brown Butter Nutty Granola
Layer 5: Favoured toppings – My Homemade Peanut Butter, dark chocolate shavings, toasted coconut, etc.
Spirulina Chia Parfait
Serving size: 2
Prep time: 20 minutes
Ingredients:
- 1/3 cup chia seeds
- 1 cup dairy-free milk (I prefer almond), plus 1-2 teaspoons
- 1/2 tsp pure vanilla extract
- 1 tsp blue spirulina, separated
- salt
- 2 frozen bananas
- 1/2 cup frozen mango
- 1/4 tsp green spirulina
- Brown Butter Nutty Granola (optional)
- Homemade Peanut Butter (optional)
- Fresh fruit for topping
Instructions:
- In a medium-sized mixing bowl, whisk chia seeds, milk, vanilla, half of a teaspoon of blue spirulina and a pinch of salt. Place in the fridge to set for about 20 minutes while you prepare the other layers.
- To a food processor, add the bananas, mango, green spirulina powder and the remaining half teaspoon of blue spirulina powder. Pulse a few times and then blend, adding in 1-2 teaspoons of milk to help it along. Scrape down the sides as needed and blend until smooth.
- To build the parfait: In a Mason Jar or a short glass, scoop in a few spoonfuls of the chia pudding. Next, add the smoothie layer and top with granola. Repeat these layers and then add the fresh fruit, peanut butter and more granola.
The post Spirulina Chia Parfait appeared first on Never. Not. Eating..
]]>The post Brown Butter Nutty Granola appeared first on Never. Not. Eating..
]]>- Christmas is coming
- You need a hostess gift
- You like nuts
Truly – this is the best, most perfect, thoughtful, fast, easy, cheap and delicious gift that you could give to someone for hosting you over the holidays. I wouldn’t lie to you. Scout’s honour.
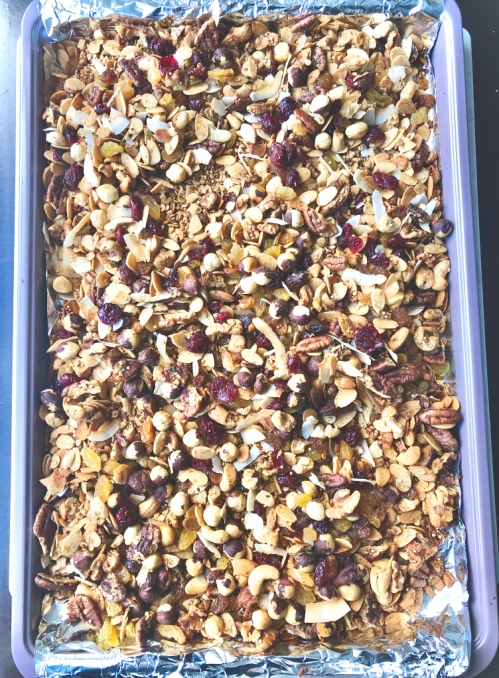
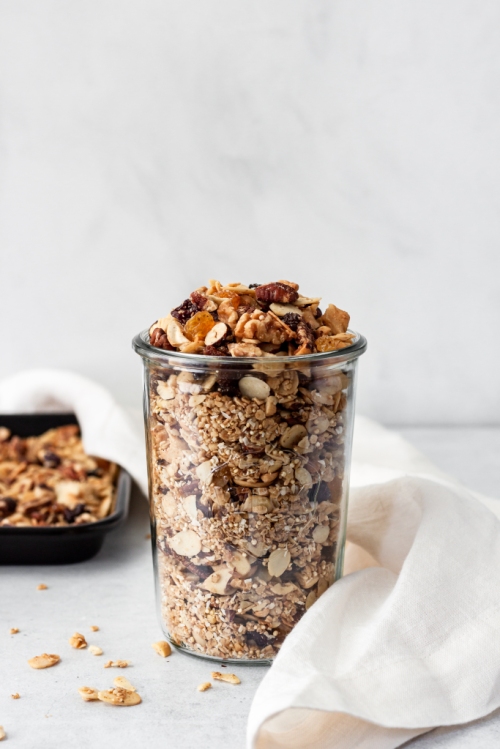
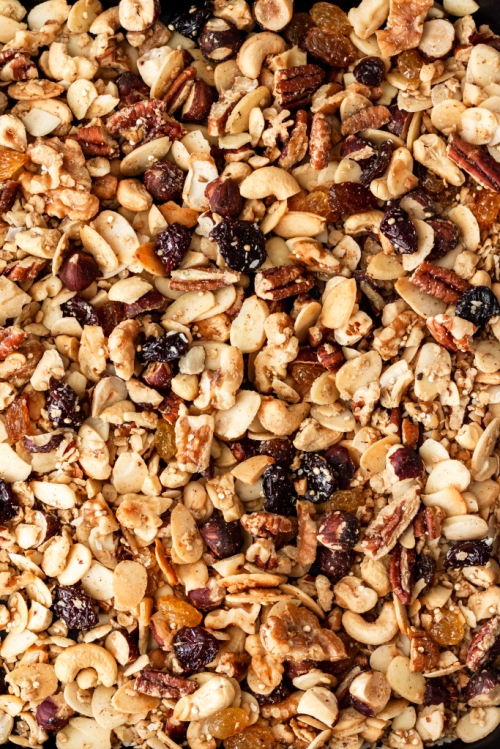
This granola recipe boasts all things Christmas – warm spices, toasted nuts, jeweled cranberries…and brown butter – the best part. Grab a few small mason jars and fill ’em up, tie some bows and get ready to have a handful of new best friends.
Alright, less talk, more granola.

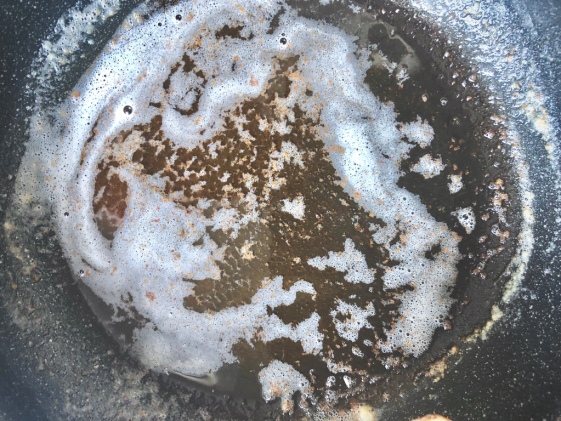
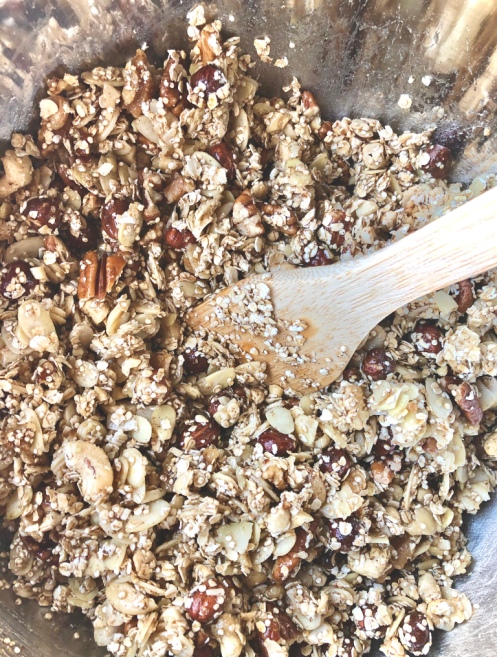
First step: Make the brown butter. Add a quarter cup of cold butter to a pan over medium-low heat. Let the butter foam up and become fragrant, stirring often.
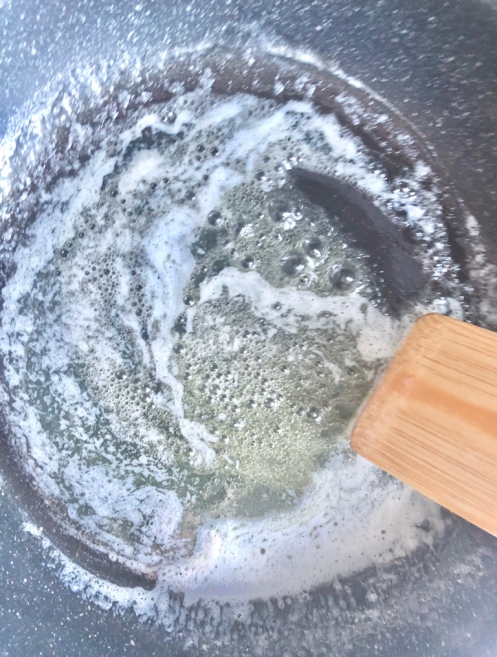
It will begin to develop brown bits on the bottom of the pan (5 minutes or so) – remove from heat and let cool (put it in the fridge or freezer to speed up this process).
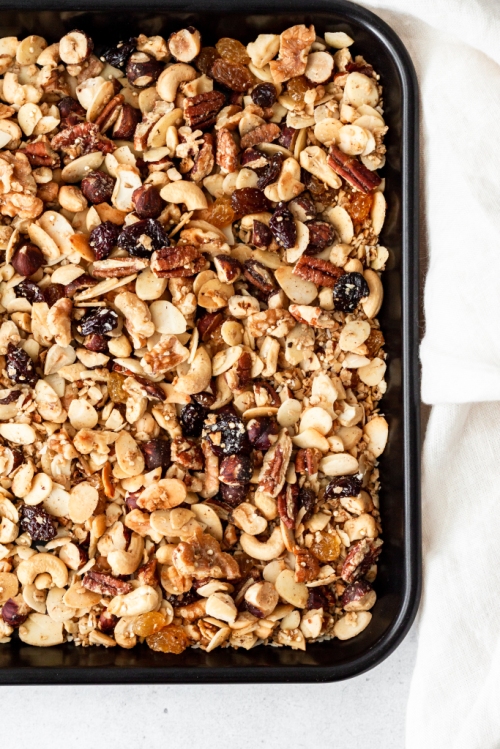
Secondly: Grab the biggest bowl you own. We’re not messin’ around.
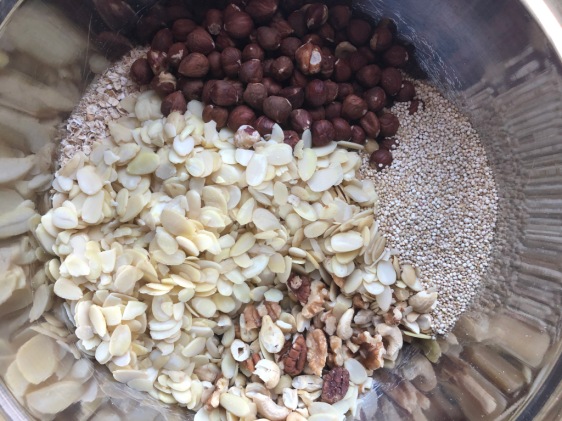
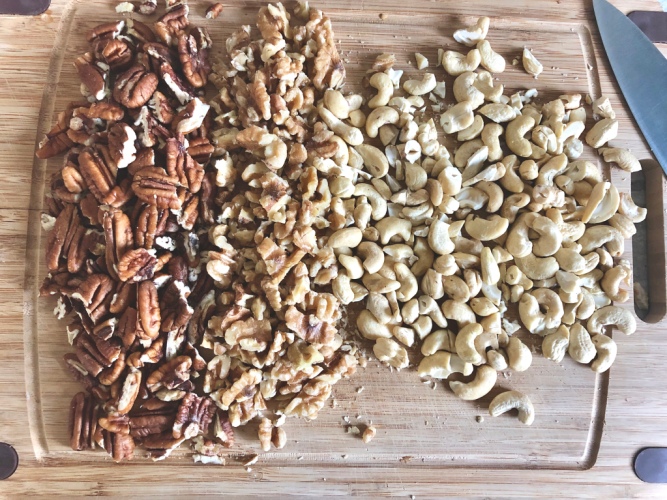
Dump in 2 cups of rolled oats, 6 cups of your favourite types of nuts (I do one cup pecans, one cup walnuts, one cup cashews, two cups slivered almonds and one cup hazelnuts) and half of a cup of quinoa. Set aside.
Next: In a small measuring cup, whisk together three-quarters of a cup of maple syrup, the cooled brown butter, half a teaspoon vanilla, half a teaspoon cinnamon and a quarter of a teaspoon of nutmeg.
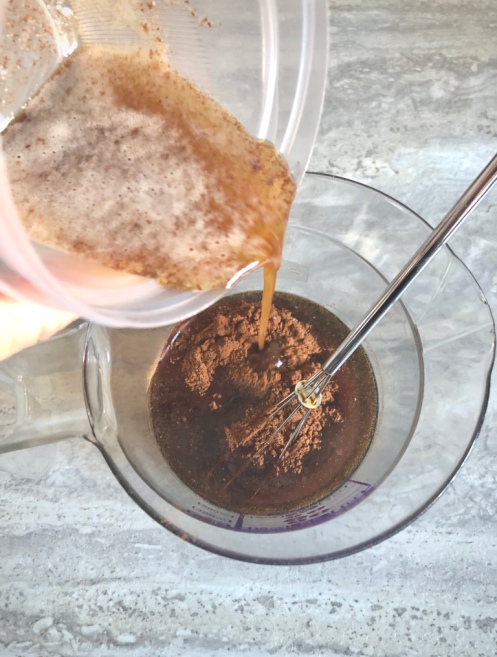
Pour over the nut mixture and stir, making sure everything is coated nicely.
Transfer to a baking sheet that is lined with aluminum foil and bake in a 375 degree oven for 30-35 minutes, stirring often to prevent burning. Add large coconut flakes for the last two minutes of baking. Remove from oven and add some golden and sultana raisins as well as a handful of dried cranberries and a bunch of flaky sea salt. Cool for twenty minutes before putting into jars or storing in airtight containers.
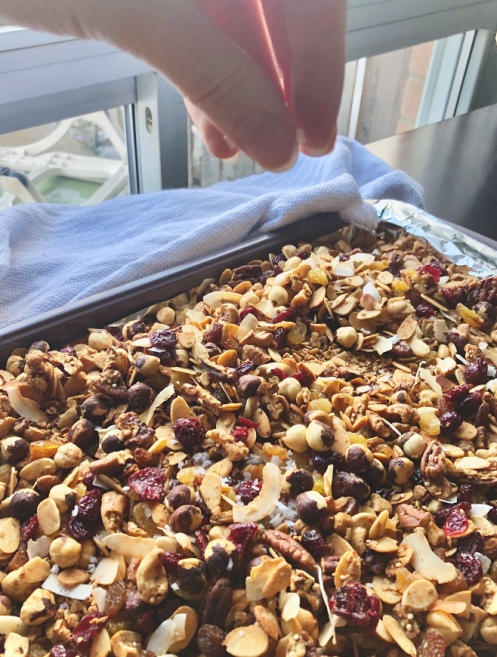
*I highly recommend using heavy duty aluminum foil for this as thinner foil can rip easily when you are stirring the granola. No one likes tin flakes in their food!
Brown Butter Nutty Granola
Yield: 8 cups
Prep time: 10 minutes
Cook time: 35 minutes
Ingredients:
- 1/4 cup cold butter
- 2 cups quick (or rolled) oats
- 1 cup pecans, rough chop
- 1 cup walnuts, rough chop
- 1 cup cashews, rough chop
- 2 cups slivered almonds
- 1 cup hazelnuts, rough chop
- 1/2 cup raw quinoa
- 3/4 cup pure maple syrup
- 1/2 teaspoon vanilla
- 1/2 teaspoon cinnamon
- 1/4 teaspoon nutmeg
- 1/2 cup large flake coconut
- 1/3 cup sultana raisins
- 1/3 cup golden raisins
- 1/3 cup dried cranberries
- 1/2 tbsp – 1 tbsp flaky sea salt
Instructions:
- Add butter to a medium-sized pan over medium-low heat. Cook, stirring often, until you see brown bits begin to form on the bottom of the pan (about 5 minutes). Remove from heat immediately and cool completely (speed up cooling process in fridge or freezer). Do not burn the butter!
- Preheat oven to 375 degrees Fahrenheit and line a large baking sheet with heavy duty aluminum foil.
- In a very large mixing bowl, add the oats, nuts and quinoa.
- In a small measuring cup, measure out the maple syrup. Add the cooled brown butter, vanilla, cinnamon and nutmeg and whisk until combined. Drizzle over the nut mixture and toss until everything is coated. Spread evenly on the foil-lined baking sheet. Bake granola in oven for 35 minutes, stirring frequently to avoid burning. During the last five minutes, add the flaked coconut. The granola is ready when everything is a golden brown colour.
- Remove from oven and add the raisins, cranberries and sea salt to taste (don’t skip the salt!!!).
- Let cool completely before storing in an airtight container.
The post Brown Butter Nutty Granola appeared first on Never. Not. Eating..
]]>The post Shakshuka appeared first on Never. Not. Eating..
]]>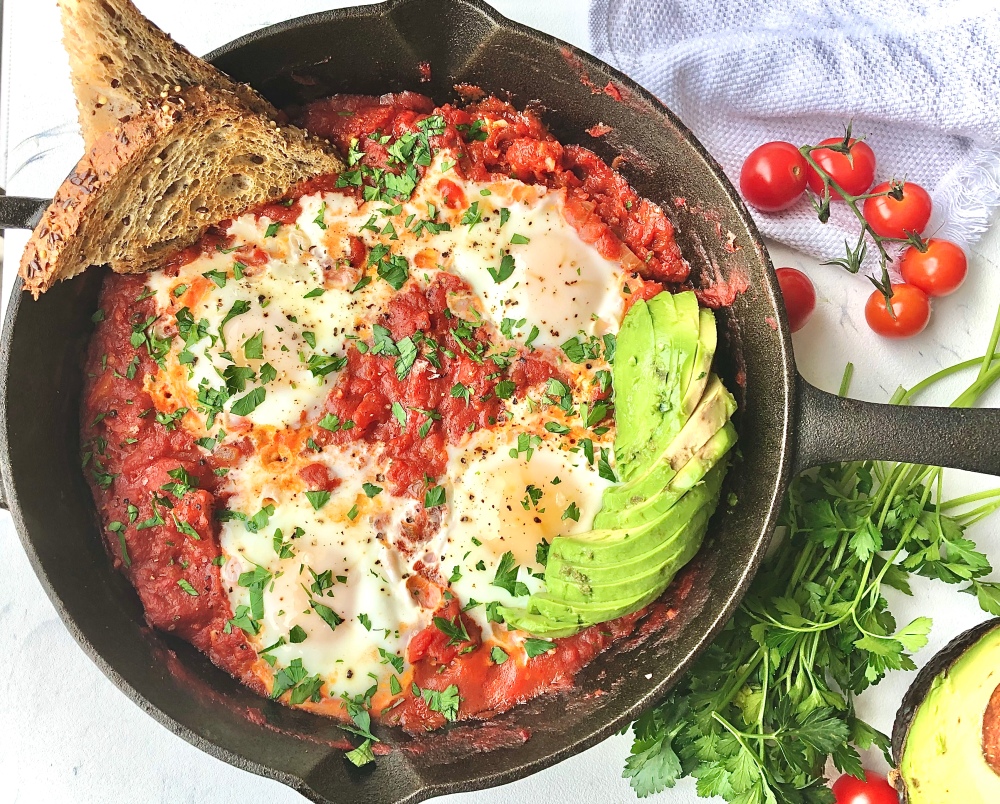
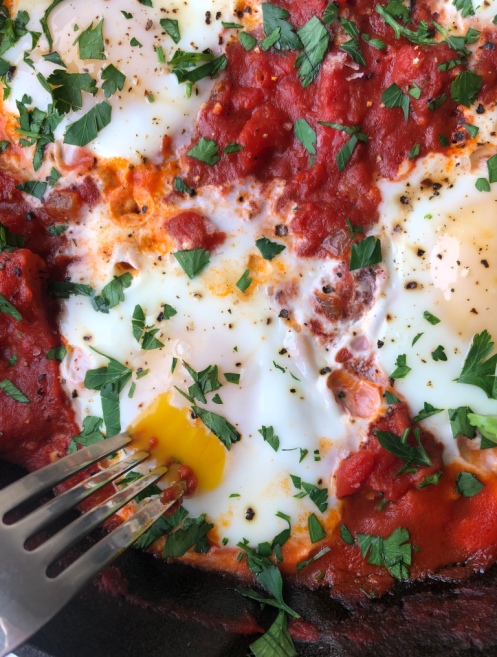
I’ve been really diggin’ Middle Eastern cuisine lately, and shakshuka is something that has been on rotation in my kitchen for a while now. It is basically eggs poached in a spicy tomato sauce served with crusty bread for dipping. And I’m not mad about anything that I can dip into.
There are many places where shakshuka can be found on every corner, and one that has been inspiring me lately is Israel. Does anyone want to go with me?? I’m patiently waiting for the school year to be over so I can hop on a plane and land in Tel Aviv where I will devour all of the deliciousness that derives from this up and coming city.
Shakshuka is so simple and easy. It’s onions and bell pepper, sauteed with garlic and traditional middle-eastern spices, like cumin, coriander, paprika and cayenne, and simmered in a tomato sauce. Make a few wells in the sauce, crack a few eggs, let them cook to your liking and you have breakfast. Or brunch. Or lunch or dinner. Good for a friendly gathering, too. You can’t limit shakshuka…Don’t even try.
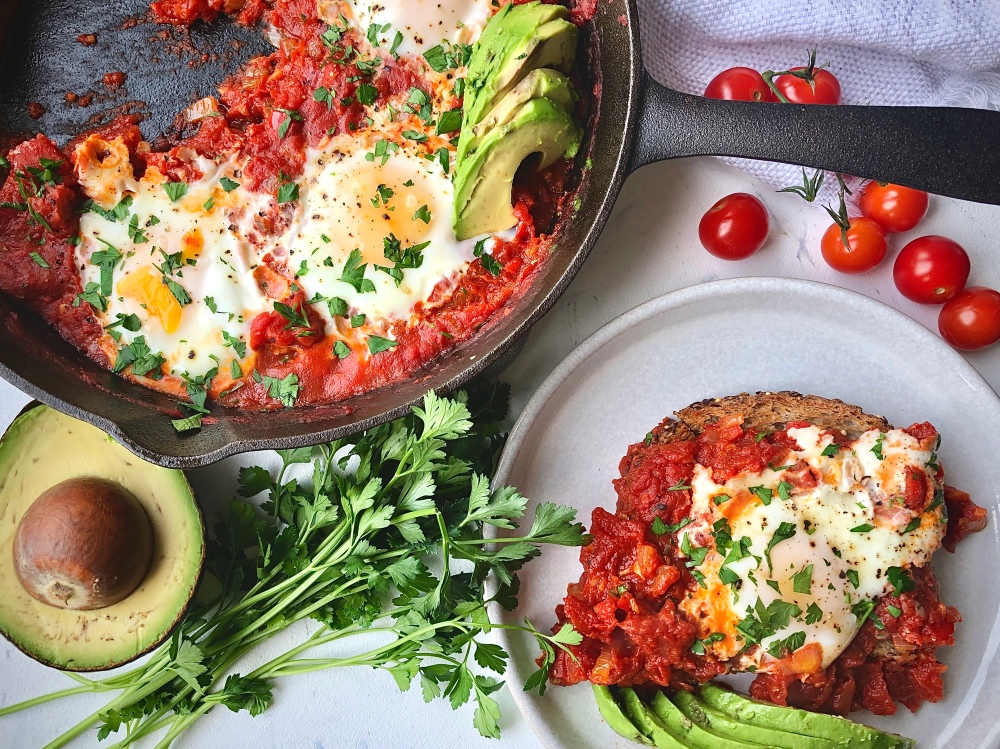
Did I mention that all of this delightfulness is made in ONE cast iron pan. Yup. I love an easy clean.
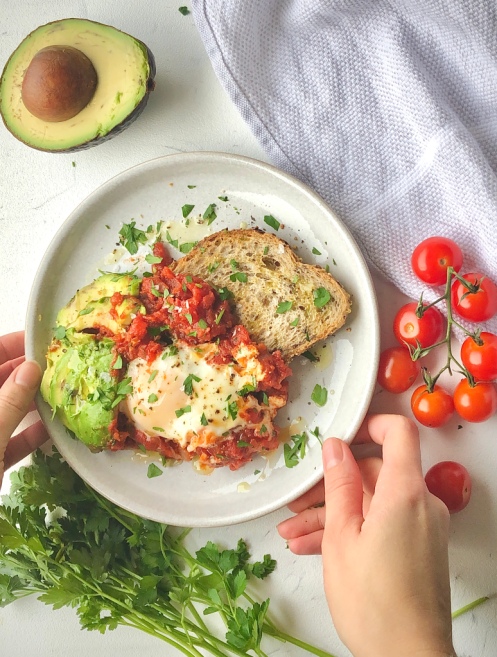
Toppings: You know I’m the topping queen. If I can find more food to put onto a dish full of food than I’m a happy girl. I like to add creamy avocado slices, a crusty sourdough bread for dipping, fresh parsley and flaky sea salt on top of my shak. Feta is also a badass addition.
Shakshuka
Servings: 3-4
Prep time: 5 minutes
Cook time: 30 minutes
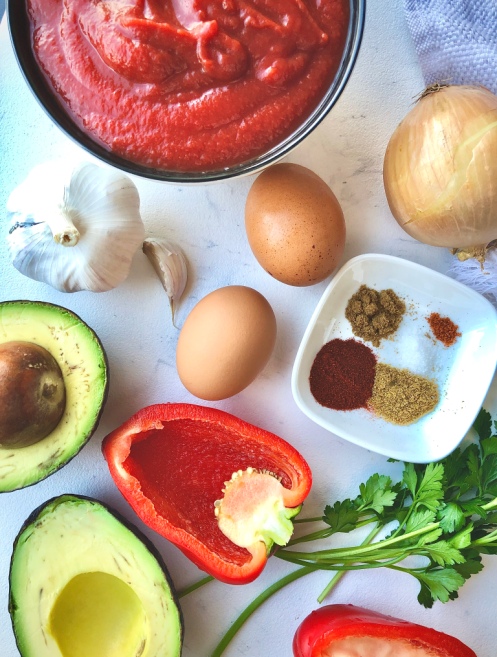
Ingredients:
- 2 tbsp olive oil, plus more for drizzling
- 1/2 of an onion, diced
- 1/2 of a red bell pepper, seeded and finely diced
- 2 cloves of garlic, finely chopped
- 1/2 tsp cumin
- 1/2 tsp paprika
- 1/4 tsp coriander
- pinch of cayenne (optional)
- 1 cup crushed tomatoes
- 1 cup canned diced tomatoes (with their liquid)
- 4 large eggs
- salt
- fresh black pepper
- parsley
- avocado (optional)
- toasted, crusty bread (I prefer sourdough), for dipping
Instructions:
- Heat olive oil over medium heat in a cast iron skillet. Add the onion and saute for a minute. Add the bell pepper and continue to cook for about 10 minutes, or until onion starts becoming translucent and just slightly browned around the edges.
- Add the garlic, cumin, paprika, coriander and cayenne. Toast until fragrant, about one minute.
- Pour in the crushed and diced tomatoes, a pinch of salt and a few grinds of fresh black pepper. Let simmer for 15-20 minutes. The sauce will lose a lot of its water content and it will thicken up.
- Make 4 wells in the sauce and crack an egg into each one. Turn the burner down to medium-low, cover the skillet and cook for 3-5 minutes, or until eggs are cooked to your liking.
- Turn heat off and sprinkle with fresh parsley, a few more grinds of pepper and flaky sea salt. Add avocado slices and eat with your favourite crusty bread.
The post Shakshuka appeared first on Never. Not. Eating..
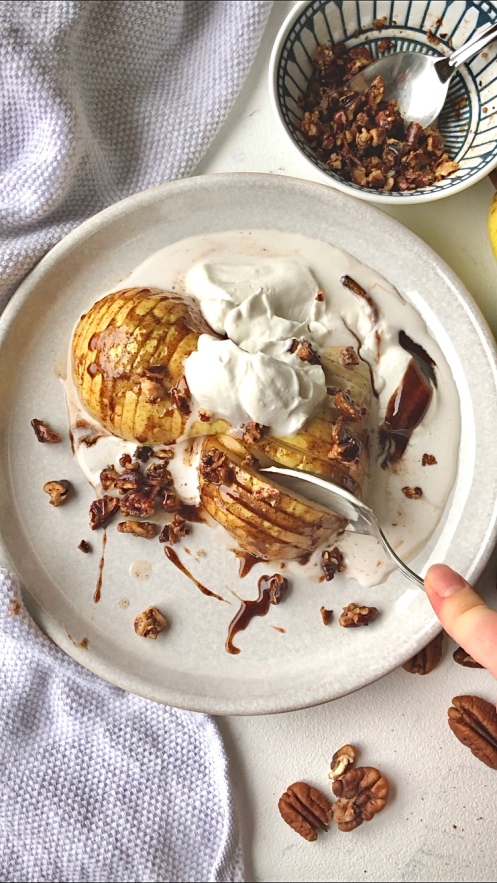
]]>The post Maple Chai Hasselback Pears with Candied Pecans and Coconut Whip Cream appeared first on Never. Not. Eating..
]]>This is a dessert that you can feel good about. It is paleo, vegan and gluten-free and therefore could just be replaced for tonight’s dinner and you are winning.
To hasselback something means to make a number of thinly-spaced slices which take on the job of sucking up all of the delicious sauces that will be poured on top, and in this case, it’s an aromatic maple syrup and chai spice hybrid. Holy Hannah.
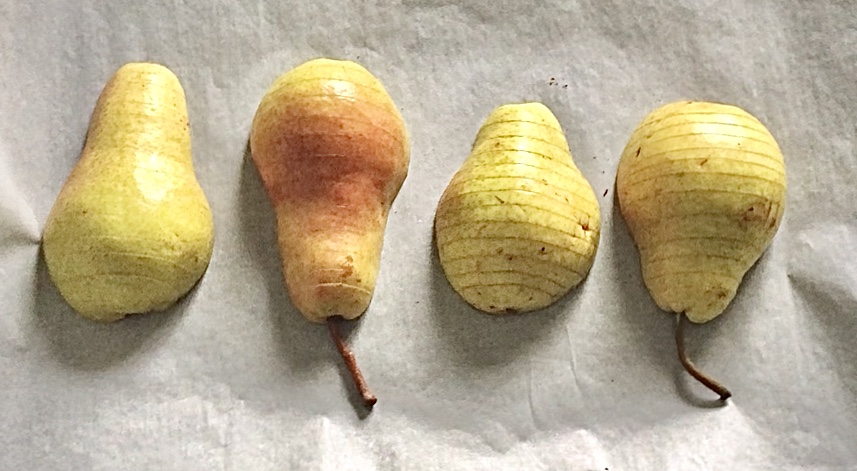
To successfully hasselback your pears for this recipe, cut them in half and remove the core with your knife. Starting with one half at a time, place slice-side down between two chopsticks (or butter knives if you don’t have them) and use a sharp knife to cut slices all the way across the length of the pear. The chopsticks act as a stopper so that your slices don’t go all the way through the fruit.
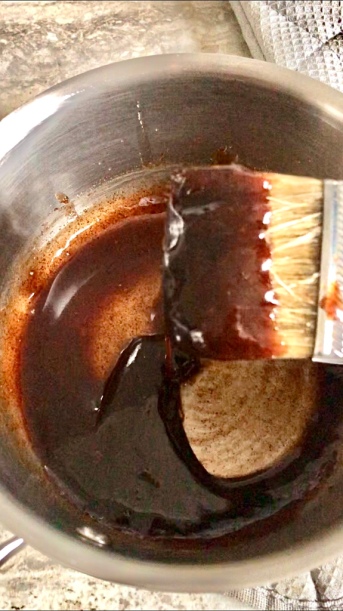
The maple chai glaze starts with maple syrup and coconut oil in a small saucepan, whisked together with cinnamon, cardamom, ground ginger, allspice, cloves, nutmeg and some black pepper. Simmer for just a few minutes. You will see it thicken slightly. Turn off heat and finish off with some vanilla and flaky sea salt and then it’s ready for drizzling.
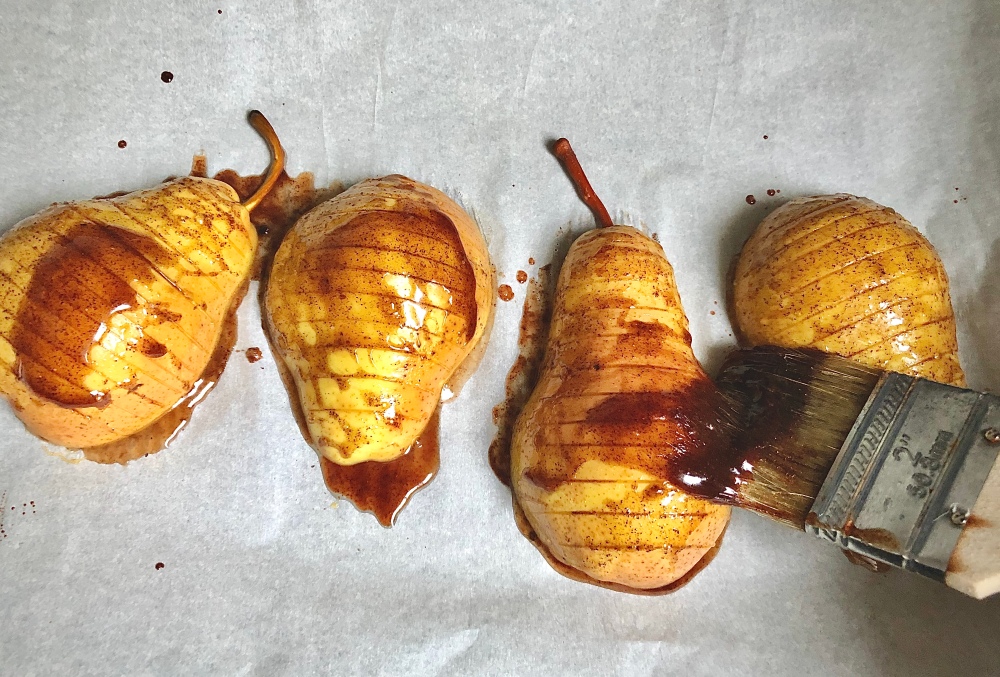
Brush some of the glaze on the pears and pop ’em in the oven to start tenderizing, about 15 minutes. Remove from oven and carefully (they are hot!) use your fingers to separate some of the slices so that you can brush even more glaze onto and into the pears. Bake for another 10-15 minutes until the pears are fork-tender.
Grab some pecans and give them a fine chop. Place them on a baking sheet lined with parchment and pop them in the oven to toast up real quick. Keep watch – you don’t want them to burn! After about 6-7 minutes, pull them out and toss them with a bit of brown sugar and either coconut oil (if you are vegan or paleo), or butter.
To prep for the whip cream, place a metal mixing bowl into the freezer with your wire beaters for at least 15 minutes before making this recipe. Place a can of coconut milk in the fridge overnight or a few days for best results. This allows the full fat “cream” layer to separate from the more transparent “water” layer. We will only be using the cream for this recipe, but don’t throw away that precious coconut water that you find at the bottom of the can! You can blend it into smoothies or use it instead of almond milk in my Power Boosting Smoothie Bowl recipe!

Carefully scoop the cream into the bowl that was in the freezer. With your hand mixer, beat the cream for a minute. You should see it start to thicken. Add your vanilla and maple syrup (or honey) and beat for two more minutes until it resembles regular whip cream. Chill until ready to use.
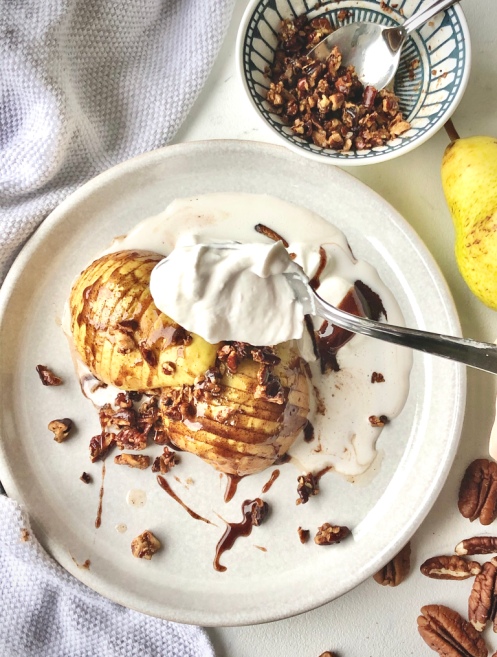
Assembly time – Place your pear halves on a plate and top with pecans and whip cream. Drizzle with the extra maple chai glaze and thank me later.
Maple Chai Hasselback Pears with Candied Pecans and Coconut Whip Cream
Servings: 2
Prep time: 10 minutes
Cook time: 25 minutes
Ingredients:
- 2 ripe pears (Bosc or Bartlett), halved and cores removed
For the maple chai glaze:
- 1/4 cup pure maple syrup
- 1 tbsp coconut oil
- 1 tsp cinnamon
- 1/2 tsp ground cardamom
- 1/4 tsp ground ginger
- pinch of cloves
- pinch of allspice
- pinch of nutmeg
- fresh black pepper
- 1/2 tsp vanilla
- pinch of flaky sea salt
For the candied pecans:
- 1/3 cup finely chopped pecans
- 1 tsp brown sugar
- 1 tbsp coconut oil, melted (or butter, if not vegan)
For the whip cream:
- one can of full fat coconut milk (I find the brand Aroy-d works well), chilled at least overnight
- one tsp pure vanilla extract
- one tbsp pure maple syrup (or honey, if not vegan)
Instructions:
- Preheat oven to 375 degrees F. Place a metal bowl and wire beaters into the freezer.
- Prepare the pears by placing one half at a time, slice-side down, between two chopsticks (or butter knives). Use a sharp knife to cut slices all the way across the length of the pear. The chopsticks act as a stopper so that your slices don’t go all the way through the fruit. Set aside while you prepare the glaze.
For the maple chai glaze:
- Add maple syrup, coconut oil, cinnamon, cardamom, ginger, cloves, allspice, nutmeg and a few grinds of black pepper to a small saucepan and bring to a simmer over medium heat. Simmer for 4 minutes. It will thicken slightly. Remove from heat.
- Brush the glaze over the hasselback pears and place pears into the oven to bake for 15 minutes.
- Remove from oven and use your fingers to separate the slices a little more (careful, it will be hot). Brush over more of the glaze, making sure it seeps into the grooves that you helped separate, and return to oven for another 10-15 minutes, or until fork tender. Remove and let cool for a few minutes.
For the candied pecans:
- Place the pecans on a small baking sheet lined with parchment paper. Toast in the oven alongside the pears for about 6 minutes or until fragrant. Watch carefully to avoid burning.
- Remove from oven and add brown sugar and coconut oil (or butter) to the nuts, tossing together. Set aside.
For the coconut whip cream:
- While the pears are baking, make your whip cream. Remove the can of coconut milk from the fridge. Open carefully and scoop out the solidified cream, placing into the metal bowl that was chilling in the freezer earlier. Do not add the water at the bottom of the can.
- Beat on medium speed for 1-2 minutes, until it has began to noticeably thicken up.
- Add vanilla and maple syrup and beat for another 2 minutes on high, until it resembles regular whip cream. Place back in the fridge to stay cold.
Assemble:
Place the baked pears onto a plate. Add candied pecans and coconut whip cream. Drizzle over the remaining maple chai glaze. Dig in!
The post Maple Chai Hasselback Pears with Candied Pecans and Coconut Whip Cream appeared first on Never. Not. Eating..
]]>