The post Easy Za’atar Socca appeared first on Never. Not. Eating..
]]>
WHAT IS EASY ZA’ATAR SOCCA?
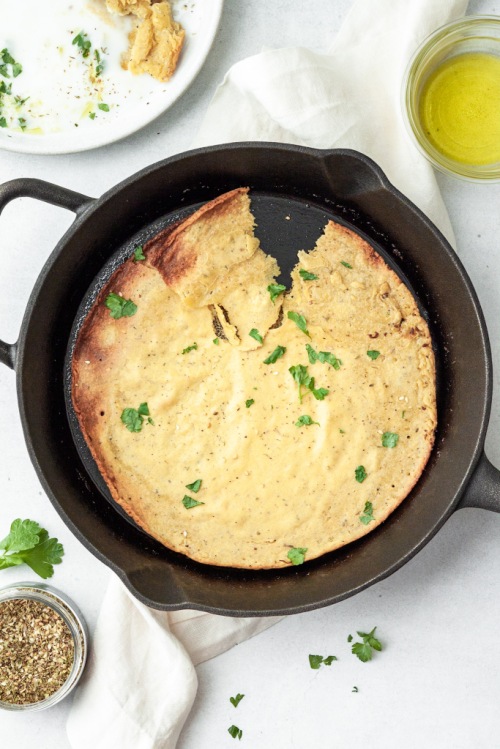
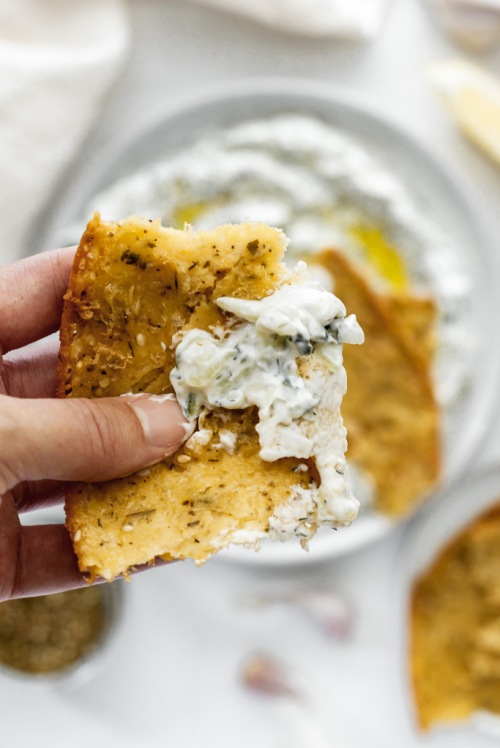
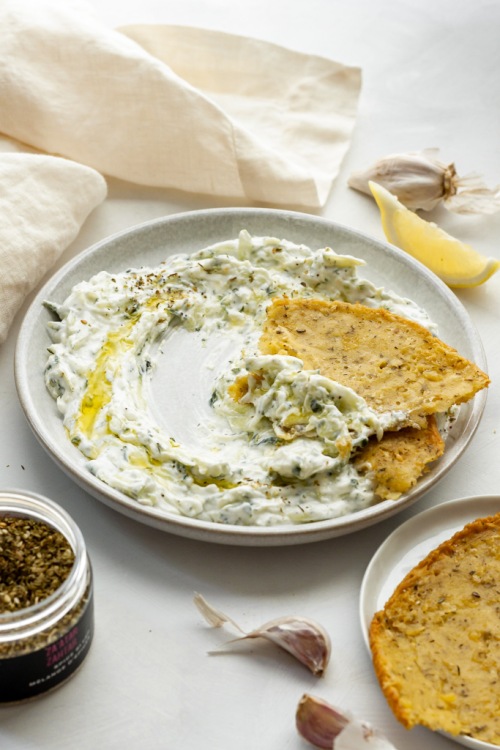
Crispy, gluten-free and the perfect vessel for dipping. I could ask for nothing more in my life. Socca is an Italian-French, crepe-like flatbread that is just so delicious. Try it with my Homemade Tzatziki recipe!
TIPS FOR MAKING SOCCA
The most important tool for perfecting this recipe, in my opinion, is a cast iron pan. It’s crucial to get the pan and oil scorching hot before pouring in the batter the ensure you achieve even heat distribution and crispy socca. Check out this one from Amazon.
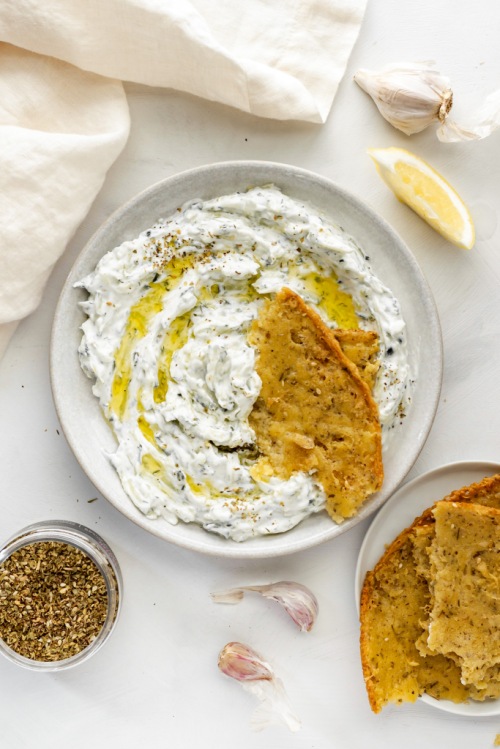
What do you eat Socca with? If not just as is, then try it with your favourite dips, stews or curries. It is great for picking up sauce or just adding that missing piece to a meal!
This recipe only requires these three ingredients (salt and water don’t really count as an ingredient…right?!):
- chickpea flour
- za’atar
- olive oil
The easiest, most delicious gluten-free bread you will ever make!
This post contains affiliate links and I may earn a small commission when purchases are made after clicking the links, at no cost to you. Thank you for supporting me!
Easy Za’atar Socca
Serving size: Makes 2 large flatbreads
Prep time: 5 minutes
Cook time: 10-12 minutes
Ingredients:
- 1 cup chickpea flour
- 1/2 tsp salt
- 1 tsp za’atar
- 1 tbsp olive oil + more for the pan
- 1 cup water
Instructions:
- In a medium bowl, whisk together the flour, salt, za’atar, 1 tablespoon of olive oil and water until smooth. Set aside.
- Preheat oven to 450 degrees Fahrenheit. Coat the bottom of a cast iron pan with olive oil (about 2 tbsp) and place in the oven for 5 minutes to heat the oil. Remove carefully and pour in half of the batter, swirling the pan around to help spread it out. Cook in the oven for 10-12 minutes, or until edges turn brown and bread is cooked through. Remove from oven and repeat this process for the remaining half of the batter.
NOTES:
Socca is best when served immediately after cooking, but you can store in an airtight container in the fridge for a few days, if necessary.
The post Easy Za’atar Socca appeared first on Never. Not. Eating..
]]>The post Sumac Roasted Cauliflower appeared first on Never. Not. Eating..
]]>
There’s no easier recipe, I promise you that. This whole-roasted cauliflower head is simple to prepare but complex on the palate! It’s vibe is very Middle Eastern – sumac, currants, pomegranates, pistachios. It’s visually stunning and a perfect side to go along with the rest of your dinner.
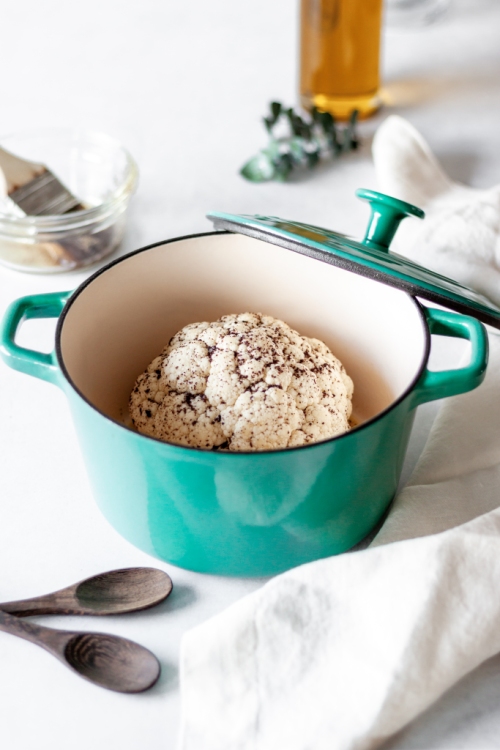
To prepare, combine the sumac, salt and olive oil, and pour over the cauliflower. Roast in a dutch oven (click here to see the one I use) for about 40 minutes until it is tender. Drizzle with the zingy-est chimichurri and top with all the fixings. Chef’s kiss!

Sumac Roasted Cauliflower
Serving size: 4-5 people
Prep time: 10 minutes
Cook time: 40 minutes
Ingredients:
- 1 medium head of cauliflower
- 1/2 cup olive oil
- 1 tsp sumac
- 1/2 tsp salt
- 1/4 cup pomegranate arils, for topping
- 1/4 cup pistachios, shelled and chopped, for topping
- 1/4 cup feta cheese, for topping
- 2 tbsp dried currants, for topping
For the Chimichurri Sauce:
- 1/4 cup olive oil
- 1 tbsp red wine vinegar (or less if you don’t want it as tangy)
- 2 cups packed fresh herbs (I use basil, cilantro and parsley)
- 1-2 cloves of garlic
- pinch of salt
- pinch of red pepper flakes (optional)
Instructions:
- Preheat oven to 400 degrees Fahrenheit.
- Remove the leaves of the cauliflower, rinse the head well and pat completely dry. Cut off the bottom part of the stem to make the cauliflower level and have a flat surface to sit on.
- In a small bowl, combine the olive oil, sumac and salt. Place the cauliflower head upside down into a dutch oven. Pour 1/2 of the olive oil mixture onto the bottom and allow it to drip down into the crevices of the cauliflower. Turn over and pour the rest on the top, using a pastry brush to help coat the sides. Put the lid on and then place in the oven to roast for 40 minutes or until fork-tender. Cook time depends on the size of your cauliflower.
- While the cauliflower is roasting, prepare the chimichurri. Add all ingredients to a blender and blend until smooth. Taste and adjust seasonings as necessary.
- Place currants in a small bowl and cover with boiling water to rehydrate them. Let sit for at least 5 minutes before draining.
- Transfer the cooked cauliflower to a serving platter. Drizzle with the chimichurri and top with the pomegranate arils, pistachios, currants and crumbled feta cheese. Serve immediately!
The post Sumac Roasted Cauliflower appeared first on Never. Not. Eating..
]]>The post Creamy Vegan Mushroom Rigatoni appeared first on Never. Not. Eating..
]]>
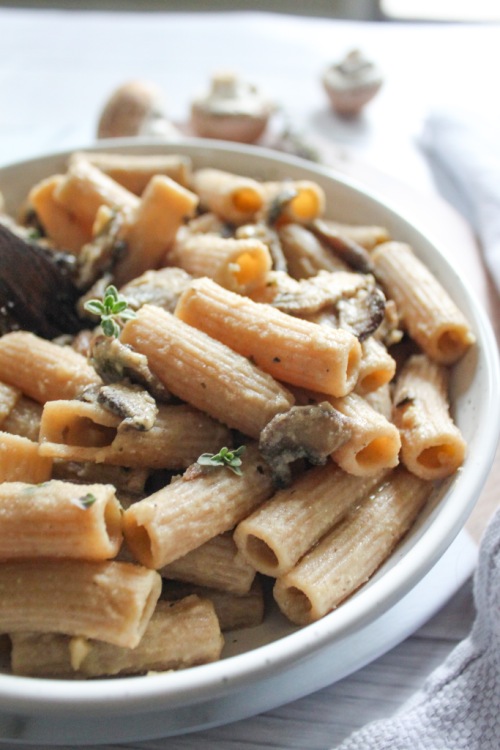
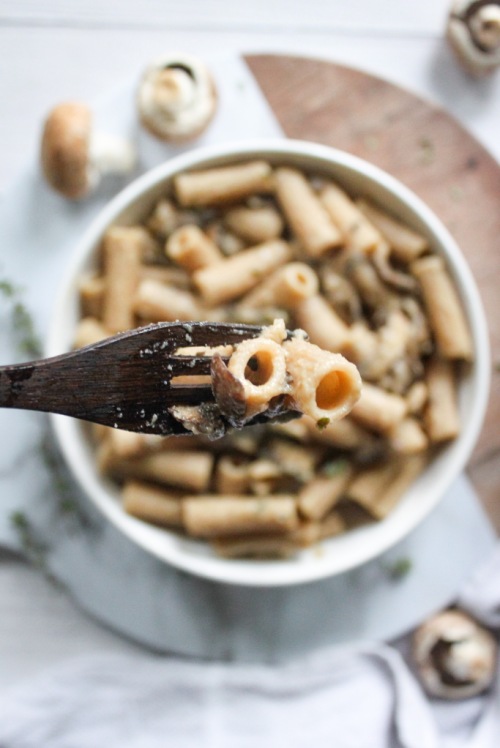
Now I love those little fungi so much. That’s why I had to dedicate this pasta to them – to say I’m sorry for a lifetime of neglect, and it won’t happen again.
One thing I never neglected – Rigatoni. Isn’t it such a great pasta choice? Those sweet little grooves that hold all the sauce? Yes, please! I love using spelt pasta, but any pasta works for this recipe. Make sure you cook it to al dente, as it will continue to cook once added to that creamy mushroom sauce!
The sauce – Simple, yet delicious. Creamy, but vegan. This easy-to-make sauce requires only a few ingredients:
- garlic
- mushrooms
- thyme
- white wine
- stock
- coconut milk
- vegan butter
Start by adding the mushrooms to some olive oil and salt in a pan. Cook them down and caramelize them up! Next, add in the garlic, thyme and white wine. Cook until you cannot smell the alcohol anymore and then add the stock and milk. Let simmer until it thickens up, and transfer the pasta into the sauce to finish cooking. Finally, add in some of the pasta water to bring everything together and you got yourself some mushroom pasta!
Let’s all show our love to mushrooms!
Creamy Vegan Mushroom Rigatoni
Servings: 2
Prep time: 5 minutes
Cook time: 20 minutes
Ingredients:
- 200 g rigatoni
- 3 cups sliced mushrooms
- olive oil
- salt
- pepper
- 2 cloves garlic, minced
- 2 sprigs thyme, stems removed
- 1/4 cup white wine
- 3/4 cup vegetable stock
- 3/4 cup full-fat canned coconut milk
- 1 tbsp vegan butter
Instructions:
- Cook the pasta according to package instructions, in heavily salted boiling water. Reserve 1/4 cup of the pasta water before draining.
- Add two tablespoons of olive oil to a large saucepan over medium-low heat. When the oil begins to move easily in the pan, add the mushrooms and a pinch of salt. Cook for 6-8 minutes, stirring occasionally. Add the garlic and thyme to the pan and cook until fragrant, about 30 seconds. Add the wine and let simmer for about 5 minutes, or until the alcohol smell is gone. Pour in the vegetable stock, stir, and follow with the coconut milk. Let the sauce simmer until thickened, about 10 minutes. Finish with the butter and some cracks of fresh black pepper.
- Transfer the pasta into the pan, pour in the reserved pasta water, and mix to coat with the sauce. Taste and adjust seasoning as necessary. Enjoy!
The post Creamy Vegan Mushroom Rigatoni appeared first on Never. Not. Eating..
]]>The post Middle Eastern Orzo Pilaf appeared first on Never. Not. Eating..
]]>
Okay, I am in love with all flavours of all regions of the world (literally), but Middle Eastern…AND Italian?! Two heavyweights in the culinary world and I’m here for it! Like a hundo P’s.
Let me break down this fusion for you. We have the following Italian/Mediterannean ingredients:
- Orzo
- Feta
- Basil
And those from the Middle East include:
- Dried fruit (apricots, cherries, currants)
- Pistachios
- Olives
- Pomegranate seeds
- Cilantro
- Spices (Turmeric, Paprika, Cumin, Coriander, etc.)
Together, they are Chrissy and John. Rachel and Ross. Bey and Jay. Me and me.
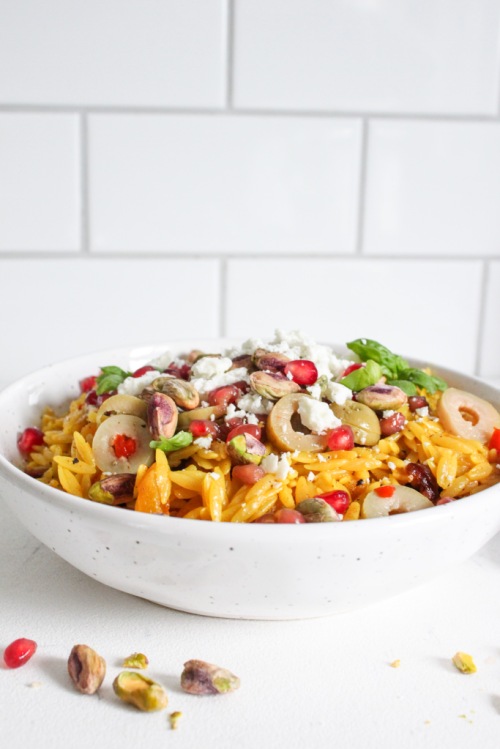
The warm flavours of the spices paired with creamy orzo, sweet fruit and salty olives and feta…hawt damn! I’m drooling.

Oh, one more thing…This makes the perfect lunch the next day. Leftovers for the win!
Middle Eastern Orzo Pilaf
Serving Size: 4
Prep time: 10 minutes
Cook time: 12 minutes
Ingredients:
- 1 tbsp olive oil
- 1 clove garlic, minced
- 1/2 tsp cumin
- 1/4 tsp turmeric
- 1/4 tsp paprika
- 1/4 tsp ground coriander
- pinch of fresh nutmeg
- pinch of black pepper
- 1 cup uncooked orzo, rinsed well
- 1 1/2 cups vegetable broth
- salt
- 1 cup dried fruit (I use cherries, currants and chopped apricots)
- 1 tbsp freshly squeezed lemon juice (optional)
- 4-5 olives, chopped
- 1/4 cup feta, crumbled
- 1/4 cup pomegranate arils
- 1/4 cup pistachios, shelled
- fresh herbs (cilantro and basil) for topping, (optional)
Instructions:
- Heat olive oil in a large pan over medium heat. Add the garlic and cook for 30 seconds or until fragrant. Add the cumin, turmeric, paprika, coriander, nutmeg and pepper and stir until toasted, another 30 seconds to 1 minute. Add the orzo and stir to coat with the spices. Once coated, pour in the broth, add 1/4 tsp salt and bring up to a boil and then reduce heat and let simmer for 8 minutes, with the lid on.
- After the 8 minutes, quickly lift the lid, add the dried fruit, and stir to incorporate with the orzo. Place the lid back on and let stand for 2 more minutes off the heat.
- Squeeze some fresh lemon juice into the pan and stir to combine. Transfer the orzo to a serving dish and top with olives, feta, pomegranate seeds, pistachios and fresh herbs. Serve immediately or let cool and refrigerate in an airtight container for up to three days.
The post Middle Eastern Orzo Pilaf appeared first on Never. Not. Eating..
]]>The post Roasted Carrot Soup with Ginger (Vegan) appeared first on Never. Not. Eating..
]]>
WHAT’S IN ROASTED CARROT SOUP
My love for ginger will be very clear when, and if, you make this soup. It is very ginger-forward, but that’s not to say that you can’t tone it down if you aren’t quite at the same level. It’s just so good that when I was testing this recipe, I kept on grating, thought it would be too much, put it in anyways and LOVED it. But seriously, if you aren’t a ginger person, don’t put as much in. But still put in a little bit, because: flavour.
Carrots – It’s almost Easter, right? We have rabbits hoppin’ around, so we have to have carrots included in the menu. It’s just logical, plus I’m pretty sure every Canadian (and American) likely has a bag of carrots in their fridge. They have probably been there for a few months, because let’s be honest, carrots never expire (who’s with me?!). Furry hairs growing out of yours? Pff…that’s what a peeler is for. Plus, what else do you use carrots for other than soup? You know how hot that liquid is? Perfect for (really) old vegetables.

Honestly though, this soup is da bomb. The key is roasting the carrots first, before soupifying it. Oh, and ginger.
THE INGREDIENTS IN ROASTED CARROT SOUP
So, you’re going to need about 4 medium sized carrots – peeled, washed and quartered (cut in half lengthwise and then halve each of those halves, widthwise). You’re going to slather those babies with some EVOO and give them a little salt and pepper rub – pop them in the sauna and let them roast for about 25 minutes or until they are browned and caramelized on the edges. Yum, yum, yum.

While the carrots are getting their spa treatment, throw some chopped onions into a pot with olive oil to cook down. Add the star of the show (ginger) and some garlic (best supporting actor), alongside some vibrant turmeric, freshly ground nutmeg (or the packaged stuff) and some salt and pepper. Stir, stir, stir.
Small dice a half of a sweeter type of apple – Granny Smith or Honeycrisp – and add it to the pot. When the carrots are done, add those in with some veggie broth and bring it up to a boil, then reduce and simmer for at least 15 minutes. The longer you simmer, the more flavourful!
At this point you can either whip out the ‘ol immersion blender, or throw it all (carefully) into your more modern blender, blend it up and pour back into the pot. I refuse to learn from experience (mainly because I prefer less dishes), so I always take the longer route and use my immersion blender. Hey, it works the pipes, okay?!

THE ENDING
Now is the sweetest, most beautiful ending. Pour in three-quarters of a cup of canned coconut milk and watch the colour turn from an ugly, rusted mustard (picture it) to a beautiful, pale-orange colour. Very cantaloupe-esque, if you will.
Anyway…this is the perfect Easter starter. Whether you are celebrating this year or not, I highly recommend you try this soup. After all, summer is coming and you know what that means – souportunities are coming to an end.
GINGER!
MORE SOUP RECIPES
Roasted Tomato Soup with Grilled Cheese Crouton Skewers (a classic)
Easy Creamy Cauliflower Soup (healthy and comes together in a flash)
Crockpot Ginger and Turmeric Immune-Boosting Soup (make it in the morning and come home to dinner)
Butternut Squash, Pear and Pumpkin Soup with Crispy Sage (something different, yet delicious)
This post contains affiliate links and I may earn a small commission when purchases are made after clicking the links, at no cost to you. Thank you!
Vegan Ginger and Roasted Carrot Soup
Servings: 3-4
Prep time: 10 minutes
Cook time: 45 minutes
Ingredients:
- 4 medium carrots, peeled, washed and cut in half lengthwise
- olive oil
- salt
- pepper
- half of a yellow onion, diced
- one inch chunk of ginger, grated
- 2 cloves garlic, grated/minced
- 1/2 tsp turmeric
- 1/4 tsp freshly grated nutmeg
- 1/2 of an apple, diced (I prefer Honeycrisp)
- 4 cups veggie stock*
- 3/4 cup canned coconut milk
- coconut yogurt and parsley for topping (optional)
Instructions:
- Preheat oven to 375 degrees Fahrenheit.
- Add carrots to a baking sheet lined with parchment paper, drizzle with one tablespoon olive oil and sprinkle generously with salt and pepper. Roast in the oven for 25 minutes, turning once. Carrots should be slightly caramelized around the edges.
- In the meantime, heat two tablespoons olive oil in a medium saucepan over medium-low heat. Add the onion and cook until it begins to soften, about five minutes and then add the garlic, ginger, turmeric, nutmeg, half a teaspoon salt and a quarter teaspoon pepper. Stir until you begin to smell the spices, approximately one minute. Add the apple and cook for another minute.
- Transfer carrots from the baking sheet to the saucepan. Pour in the stock and bring up to a boil. Turn heat down and simmer for at least 15 minutes.
- Use an immersion blender to puree the soup in the saucepan. Alternatively, carefully transfer the soup to a blender, blend until smooth and then return to saucepan.
- Add the coconut milk, stir and let it warm through and then ladle into a bowl and top with coconut yogurt and fresh parsley, if desired.
NOTES:
*If you would like a thinner soup, add in an extra 1-2 cups water along with the 4 cups of stock. Simmer for a little longer to develop the flavours of the soup.
The post Roasted Carrot Soup with Ginger (Vegan) appeared first on Never. Not. Eating..
]]>The post Make-Ahead Vegan Sweet Potato Salad appeared first on Never. Not. Eating..
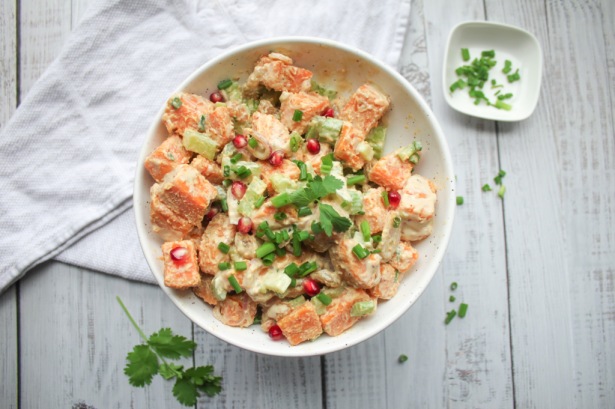
]]>- You can (and should) make it the day before
- It is 100% vegan
- It tastes like traditional mayo-based potato salad, but healthier
- It’s a smaller batch (you should be social distancing!)
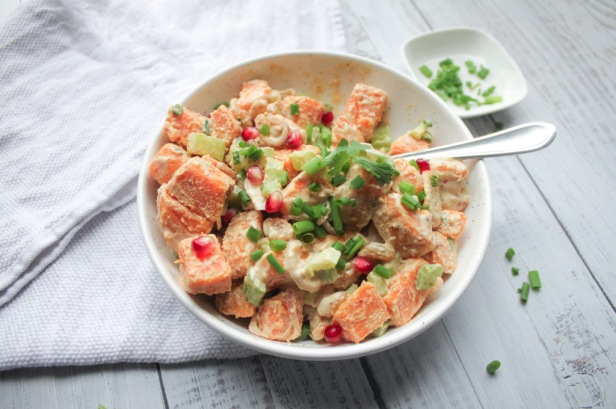
I love potatoes of all kinds, yet I find that I only ever buy sweet potatoes. And guess what, guys?! They are better for you, so swap them for those starchy white potatoes and let’s make a salad.
Okay, we all know the good part of a potato salad is the creamy, rich dressing, which comes from mayo, which is not vegan. So I wanted to find a way to recreate that creaminess, but using fully plant-based ingredients. Enter: Tahini – the love of my life. Yes, it seems a bit odd…I know, but trust me! It tastes very similar to the typical potato salad dressing, yet it has a ton of protein, fibre and healthy vitamins! It’s a gosh darn win if you ask me.
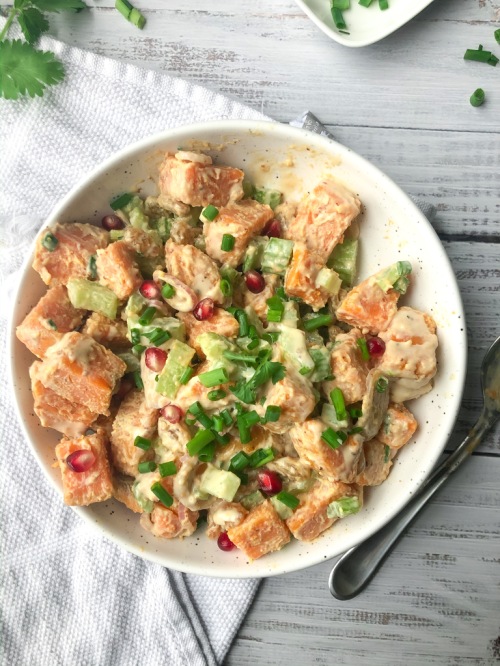
The dressing is made up of tahini, lemon juice, dijon mustard, salt, pepper and cold water. Whisk it all up and pop it in your fridge to let the flavours get to know one another.
For the rest, chop up two large sweet potatoes into 1/2 inch cubes. Boil them for about 10 minutes – it is important not to over-boil as they will become mushy and will lose all integrity. Might I say, until they are “al dente.” When you strain them from the boiling water, immediately pop them into an ice bath to stop the cooking and then lay them out onto a clean tea towel to completely cool and dry.
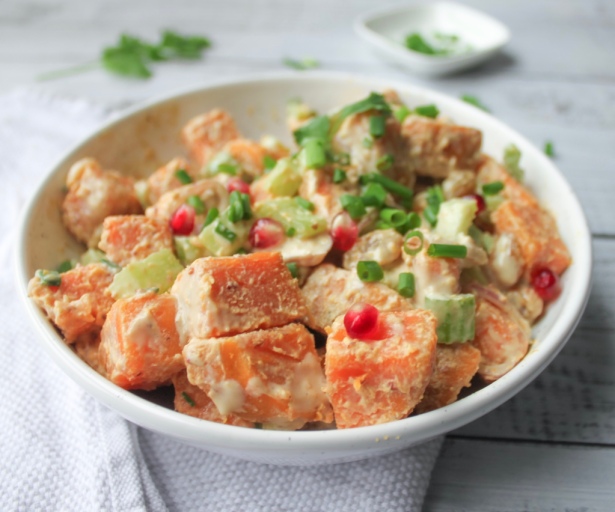
To a bowl, add your other ingredients. Golden raisins – these are optional, but they honestly make the dish. They add the greatest pop of joy to this salad. So, DO IT. Finely chopped shallots (or red onion) and celery also go into the bowl. Dump in your potatoes, and drizzle over the dressing. Very carefully toss until everything is coated and then add some fresh chives on top. Test to make sure the seasoning is right and then cover and pop in the fridge for at least an hour. It is honestly a million times better the next day though.
Happy Easter, everyone. Stay tuned for more vegan options coming at yah soon!
Make-Ahead Vegan Sweet Potato Salad
Servings: 3-4 (as a side)
Prep time: 10 minutes
Cook time: 10 minutes
Ingredients:
- 2 large sweet potatoes, diced into 1/2 inch cubes
- 1/4 cup tahini
- 1 tbsp lemon juice
- 1 tbsp dijon mustard
- salt
- pepper
- cold water
- 1/4 cup golden raisins (optional, but the best)
- 2 stalks of celery, sliced in half lengthwise then chopped
- 1 small shallot, finely diced (you can substitute for red onion)
- 3 tbsp fresh chives, chopped
- pomegranate seed, for topping (optional)
Instructions:
- Add potatoes to a large pot of salted water and boil for about 10 minutes, or until just cooked. Do not over-boil or potatoes will be too mushy and not hold their shape. Drain the potatoes into a sieve and then place the sieve in a bowl full of ice and water for a minute to stop the cooking. Transfer the potatoes to a clean tea towel to dry and cool completely.
- While the potatoes are cooling, make your dressing. To a small bowl, add tahini, lemon juice, dijon mustard, a pinch of salt and a few grinds of pepper. Mix together and then add the cold water, one teaspoon at a time until you have achieved your desired consistency. I usually use about two tablespoons or so altogether.
- To a large bowl, add the potatoes, raisins, celery and shallot. Pour the dressing overtop and carefully mix together until everything is well coated. Cover and put in the fridge for at least one hour (preferably overnight).
- Top with chives and pomegranate seeds before serving.
The post Make-Ahead Vegan Sweet Potato Salad appeared first on Never. Not. Eating..
]]>The post Pear, Mozzarella and Caramelized Onion Flatbread appeared first on Never. Not. Eating..
]]>
Ordering pizza has never really been something that I do very often. I guess because I don’t think about it. I guess because I like to cook. I guess because…I can make it myself?! And it’s SO easy, why wouldn’t I?? You are in full control this way. Healthy toppings or unhealthy toppings. Red sauce or white sauce. Meat or veggies. Cauliflower crust or wheat crust. You choose, babe. You choose.
So I like to call this recipe a “flatbread” because,
1. I don’t know the difference between flatbread and pizza (I won’t lie);
2. It comes across as more refined;
3. It sounds healthier for some reason, and;
4. It’s pretty flat, yo!
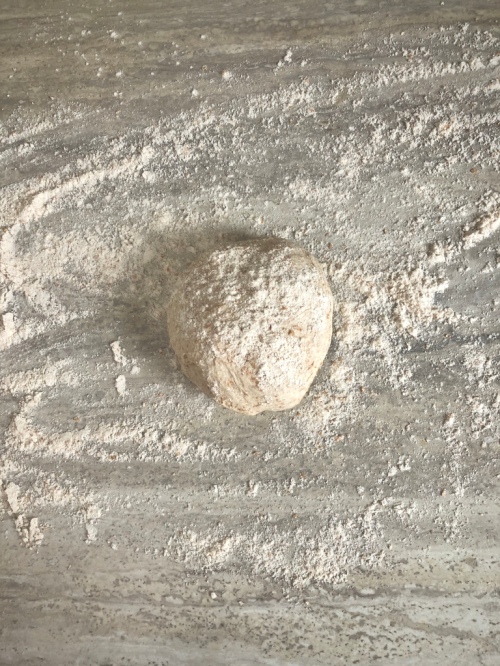
I start with just a basic dough recipe. Make this and chill it in a Ziploc bag overnight and the flavours meld together and it’s really quite magical. When you are ready to make some ‘za, pull it out of the fridge, roll it out and load it up with your choice of toppings, cook on high heat and in 10 minutes, you have amazing pizza.
The dough is simple. It is just flour (I use whole wheat), salt, olive oil, warm water and instant yeast. Toss it all into your stand mixer and then let it rise for an hour or two. This recipe will make one giant pizza, or three respectable-sized personal pizzas. I like to make three different types when I make this dough. Keep it interesting.
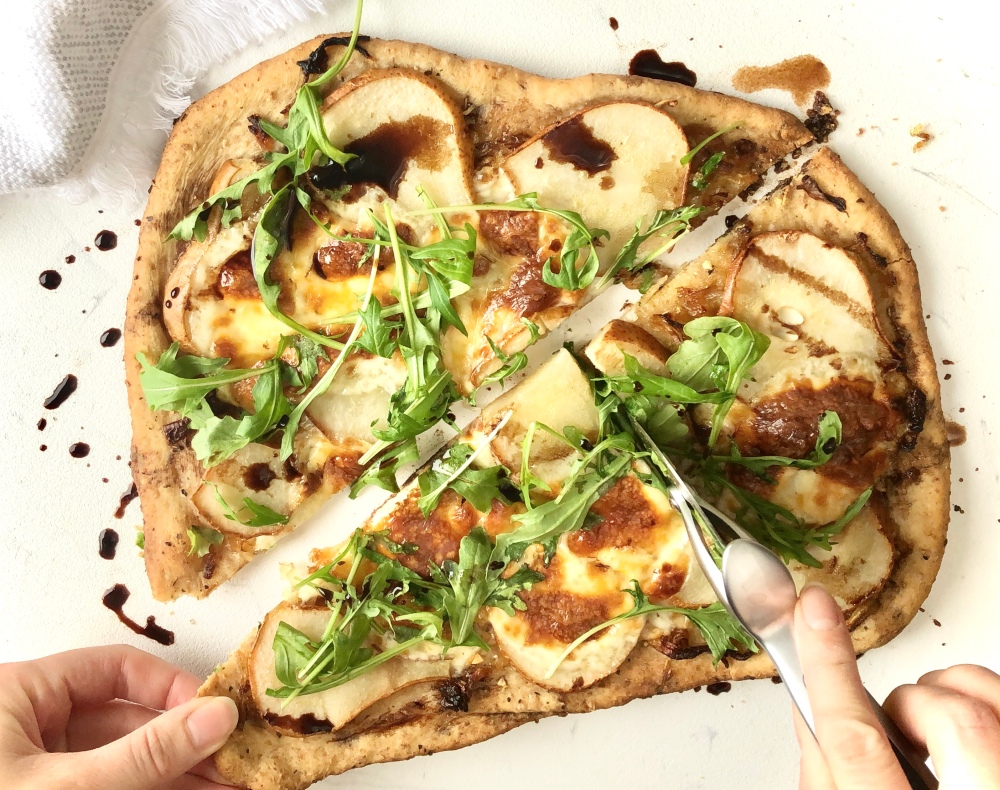
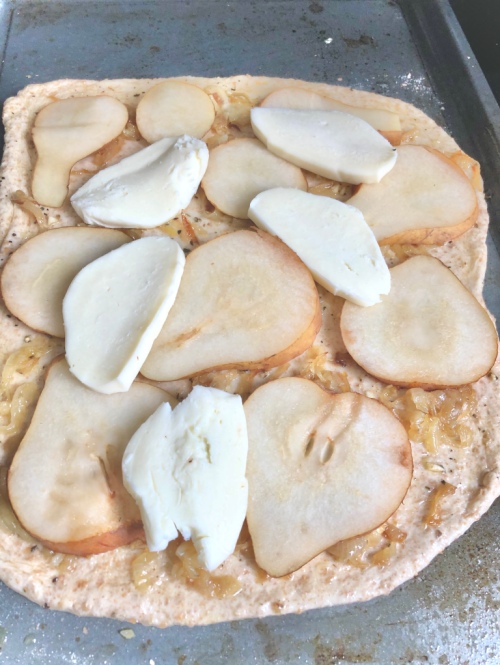
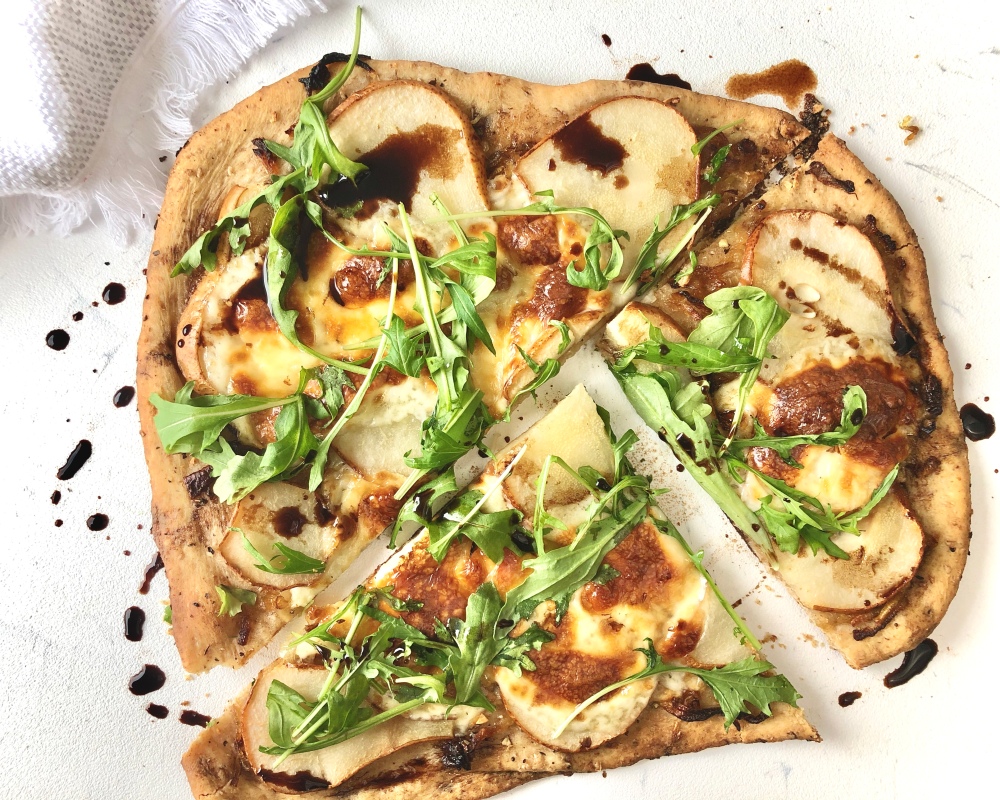
There are numerous combinations of toppings that I’ve tried in the past, and I am quite positive that I will be posting more flatbread recipes in the near future, but this one is in my Top 3. Sweet pears, flavourful caramelized onions, bubbly mozza cheese and peppery arugula. YUM! You literally cannot go wrong. Like, literally.
So grab your dough. Roll it out. Add my simple oil base (olive oil, garlic, dried basil, salt, pepper).
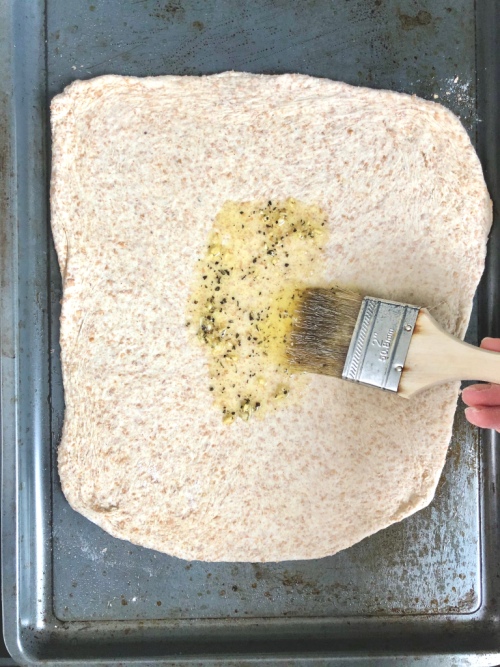
Top with onions, pears and cheese.
Bake at 500 degrees F. Remove. Arugula. Balsamic vinegar drizzle. Eat. Love your life.
Pear, Mozzarella and Caramelized Onion Flatbread
Serving size: 3-5 (Depending on whether you make it as a meal or a side)
Prep time: 12 hours (inactive time)
Cook time: 30 minutes
Ingredients:
Dough:
- 3/4 cup warm water
- 1 tsp active dry yeast
- 2 cups whole wheat flour
- 1/2 tsp salt
- 3 tbsp olive oil
Pizza:
- 4 tbsp olive oil, separated
- 1 large onion, sliced thinly
- 1 garlic clove, minced
- 1/2 tsp dried basil
- pinch of salt
- pinch of fresh pepper
- 2 bosc pears, sliced thinly
- 250 g mozzarella, cut into thin slices (fresh or balled mozzarella is best)
- arugula for topping
- balsamic vinegar for drizzling (optional)
Ingredients:
For the pizza dough:
- Sprinkle the yeast over the warm water and let sit for 10 minutes until the top looks foamy.
- Add flour and salt to a stand mixer bowl attached with the dough hook. Turn the speed on low and in a slow, steady stream, drizzle the olive oil in until fully incorporated. Pour in the water/yeast mixture and mix until fully incorporated. You may need to scrape down the sides to help it come together. Dough will be sticky. Coat a large mixing bowl with olive oil and turn the dough into the bowl. Cover bowl with plastic wrap and let rise in a warm area for two hours.
- After it has risen, you can roll it out and use immediately, but it is much better with more time to let the flavours develop. Place it in a large Ziploc bag and store in the fridge overnight or up to three days. Dough will continue to expand in the fridge.
For the pizza:
- Preheat oven to 500 degrees F.
- In a pan over low heat, add two tablespoons of olive oil and the sliced onion. Let the onion cook and caramelize for about 20 minutes, stirring every so often. If you wish to speed up this process, add small amounts of water to help the onions along.
- In a small bowl, whisk together the remaining two tablespoons of olive oil, the garlic, basil, salt and pepper. Set aside.
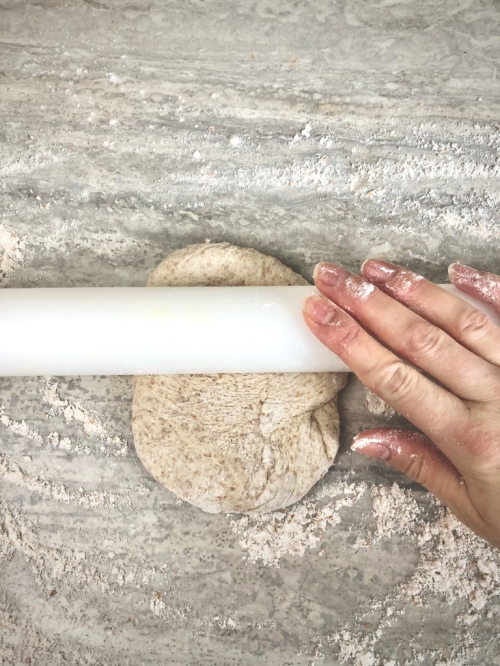
- Remove dough from fridge. Flour your surface and turn the dough out onto it. Use your hands to knead the dough for about 1 minute, or until it no longer sticks to your hands. At this point, you can either cut the dough into three even pieces and roll each into a ball, or make one large pizza ball with the entire dough.
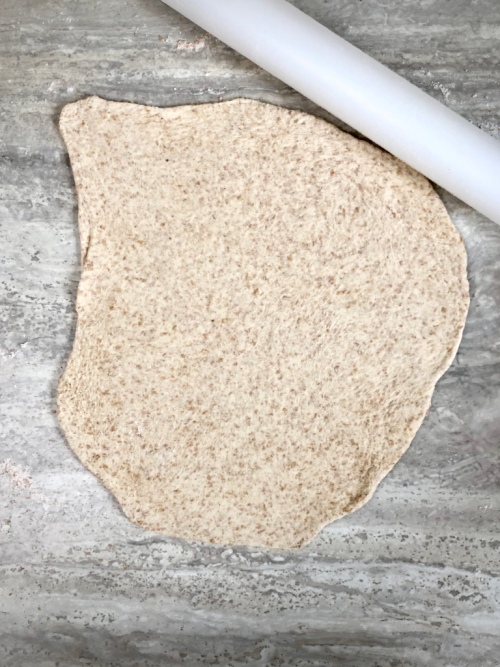
- Using a floured rolling pin, start in the centre of your dough and roll outwards, turning your dough a quarter turn after every few rolls, trying to achieve a rectangular shape. Use your hands to pull and stretch the dough until it is about 1/4 inch thick. Lay the dough on a large baking sheet that has been brushed with olive oil.
- Brush the top of the dough with the olive oil and garlic mixture. Add the caramelized onions, sliced pears and then mozzarella slices. Bake in the oven for 10-14 minutes, or until crust has browned and the cheese bubbles. Top with arugula and a drizzle of balsamic vinegar. Cut with a pizza slicer and enjoy warm!
The post Pear, Mozzarella and Caramelized Onion Flatbread appeared first on Never. Not. Eating..
]]>The post White Wine Israeli Couscous with Spinach and Mushrooms appeared first on Never. Not. Eating..
]]>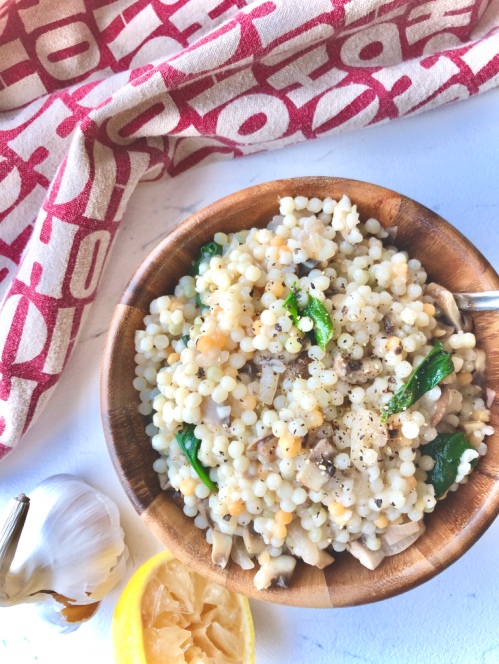
This dish is so simple…sauteed shallots, garlic, mushrooms and spinach deglazed with white wine, mixed into a heaping pile of delicious, brilliant Israeli couscous. Hellllloooo.
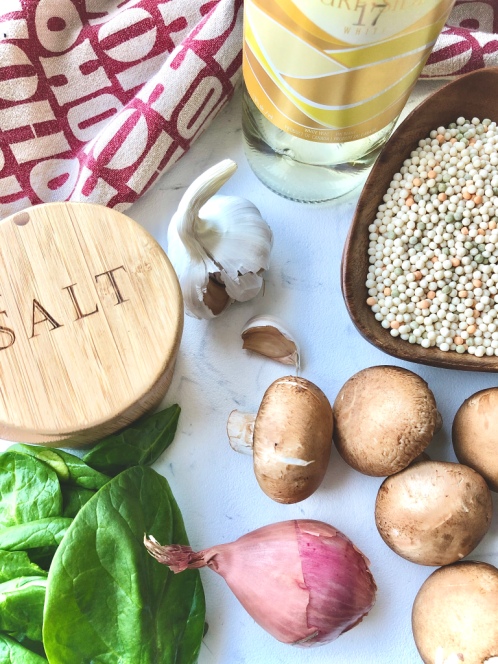
Israeli couscous is much larger than the typical Moroccan style cous. It is a small pasta also known as “pearl couscous.” It cooks super quickly and can be used in a variety of dishes including salads, soups and on it’s own as a side.
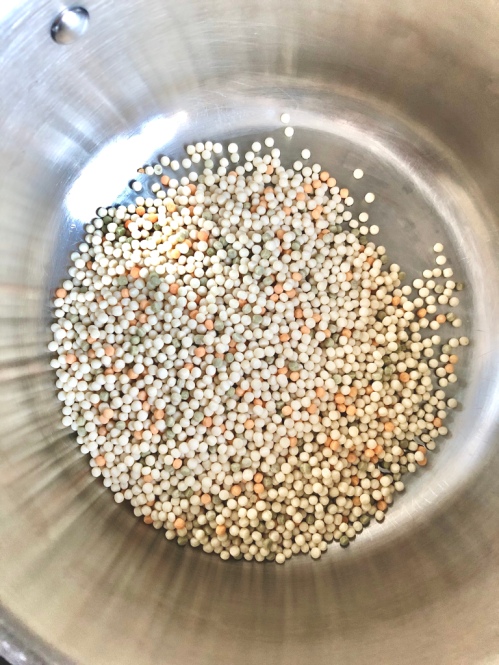
To cook the couscous, add to a pot with some olive oil and toast over medium-high heat for 1-2 minutes. Add water and salt (don’t skip!) and bring to a boil. Reduce heat and simmer for 8-10 minutes.
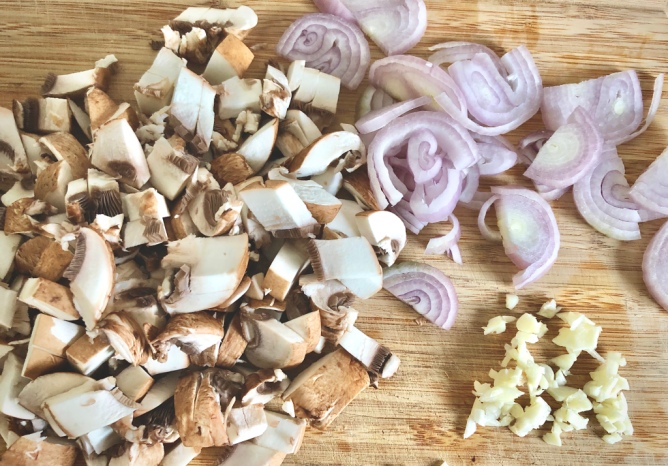
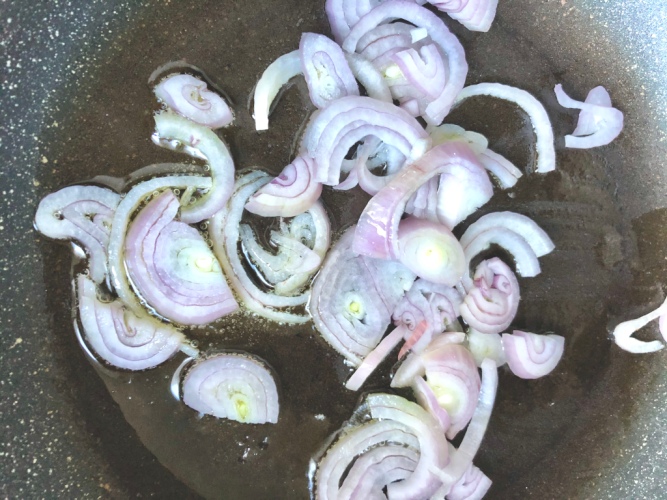
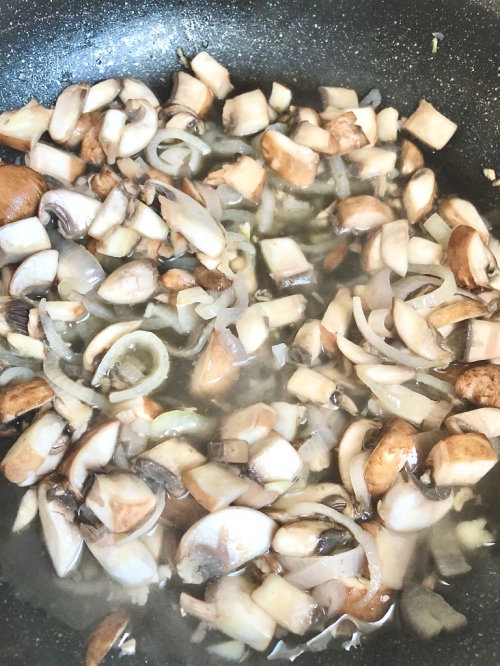
For the vegetables, add sliced shallot to a pan with olive oil over medium-low heat. Cook for a few minutes until it begins to soften and then add the garlic.
Stir for 30 seconds before adding the sliced mushrooms. Let saute for a few minutes and then pour in the white wine.
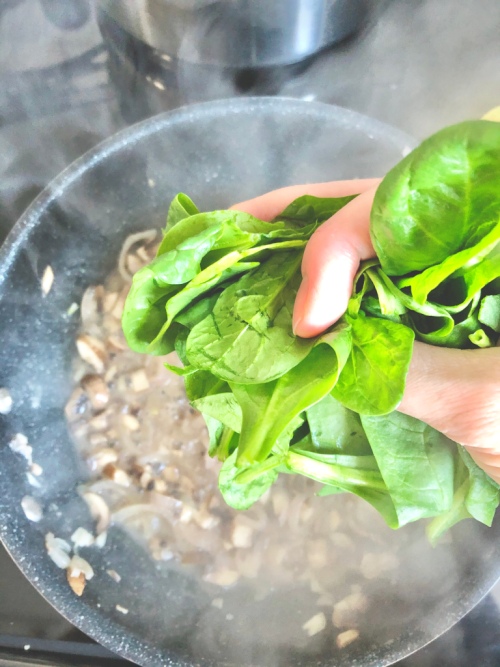
Turn the heat to medium-high and saute until the alcohol has been cooked out, about 5 minutes. Add a few handfuls of spinach and cook down until wilted.
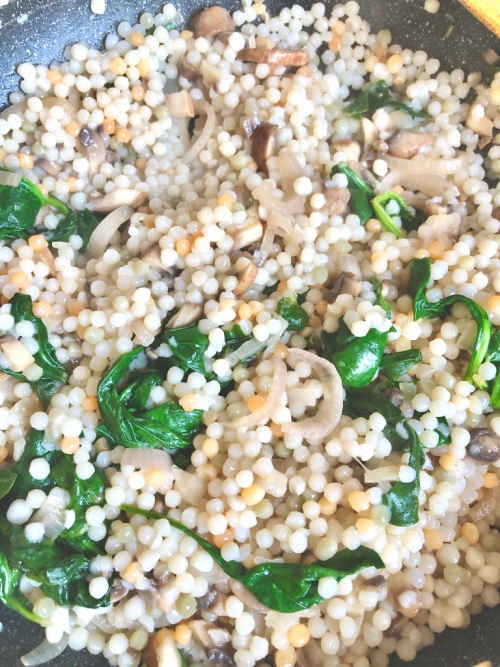
Rinse the couscous under cold water and add to the pan with the vegetables. Stir until combined, turn off heat and add a squeeze of lemon. Side dish perfection.
Serve at your holiday dinner…or bring to someone else’s! Double the recipe if you have a large party to feed.
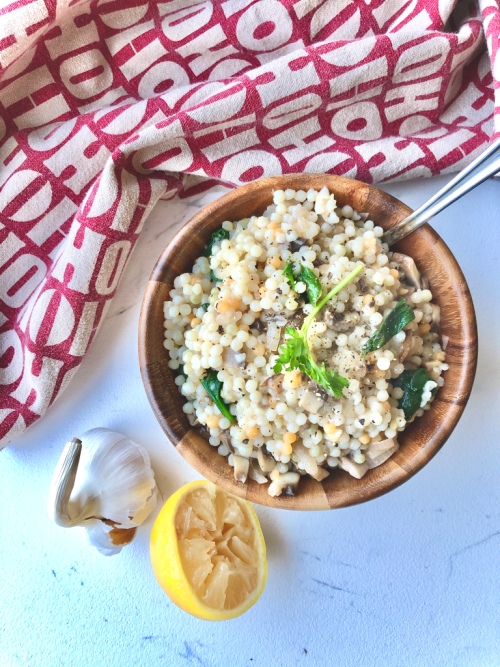
White Wine Israeli Couscous with Spinach and Mushrooms
Serving size: 4
Prep time: 5 minutes
Cook time: 10 minutes
Ingredients:
- 1 cup Israeli couscous
- olive oil
- 2 cups water
- salt
- pepper
- 1 shallot, sliced
- 2 cloves garlic, minced
- 6 cremini mushrooms, sliced
- 1/3 cup good white wine
- 2 handfuls spinach
- squeeze of lemon juice
Instructions:
- In a medium-sized pot, add 1 tablespoon of olive oil and the couscous and toast over medium-high heat for 1-2 minutes. It will become fragrant. Add 1 teaspoon of salt and the water and bring to a boil. Reduce heat and simmer for 8 minutes, or until al dente. Drain in a fine mesh sieve and rinse with cold water. Set aside.
- In a medium-sized saucepan, heat a tablespoon of olive oil over medium-low heat. Add the sliced shallot and let cook for a minute in the oil. Add the garlic and stir for 30 seconds. Add mushrooms, a few grinds of fresh black pepper and a pinch of salt. Saute for another minute and then add the white wine. Turn the heat up to medium-high and cook until the alcohol has been cooked out – about five minutes. Add the spinach and continue to cook until it is wilted down.
- Finally, add the cooked couscous to the pan, tossing with the vegetables. Turn the heat off after a minute, add a squeeze of lemon and a few more grinds of pepper and some salt to taste. Transfer to a bowl and serve immediately.
The post White Wine Israeli Couscous with Spinach and Mushrooms appeared first on Never. Not. Eating..
]]>The post Spirulina Chia Parfait appeared first on Never. Not. Eating..
]]>
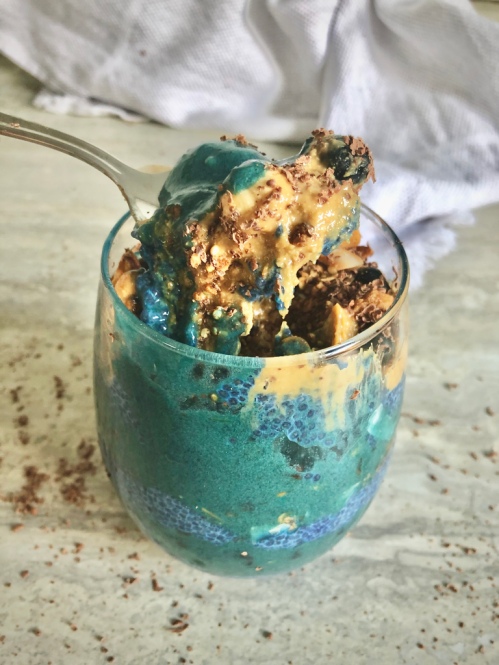
Chia seeds are my go-to when I’m trying to incorporate more fibre, healthy fats and protein. They are little sponges that absorb liquid like it’s nobody’s business, creating a thick “pudding” of sorts in just a short amount of time. I use the Costco brand chia seeds, found here.
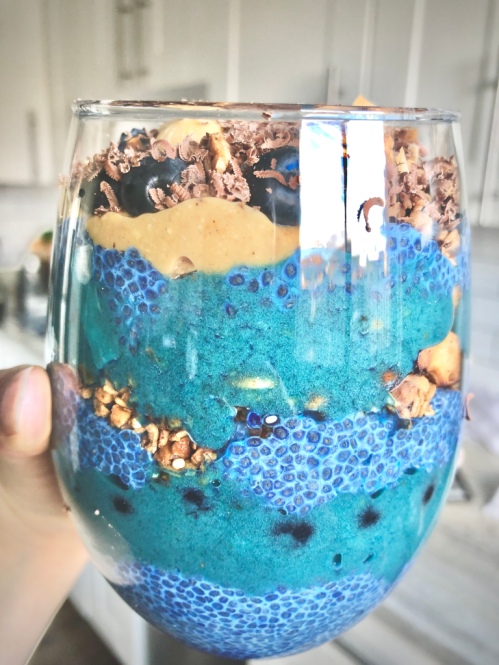
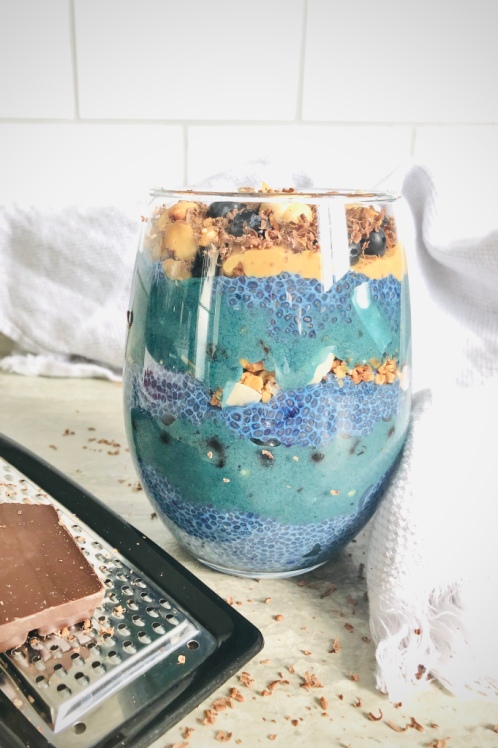
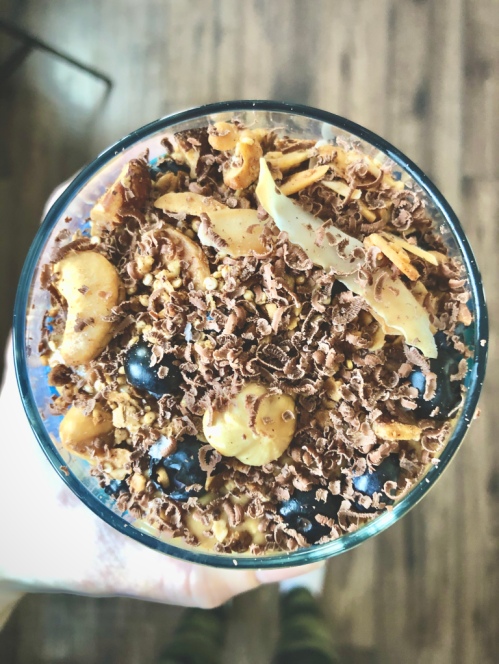
Here are the layers:
Layer 1: Chia pudding – the ratio I use for the pudding is 1:3, seeds:liquid. In a mixing bowl, add one-third cup chia seeds with three times the amount (one cup) of your favourite dairy-free milk (I prefer almond). Mix in half a teaspoon of blue spirulina (optional), half a teaspoon of pure vanilla extract and a pinch of salt. Place in the fridge while you prepare the other layers.
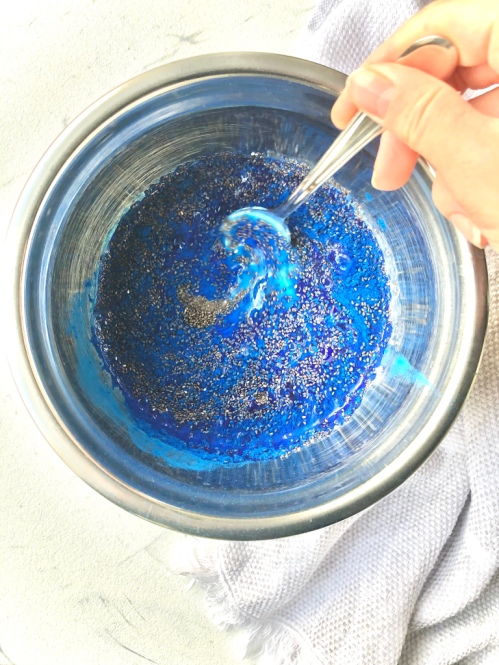
Layer 2: Frozen fruit smoothie – to a food processor (I have a ninja), add two frozen bananas, half a cup of frozen mango, a quarter teaspoon of green spirulina (optional) and a half teaspoon of blue spirulina (optional). Blend until smooth, adding a splash of dairy-free milk to get it going, and scraping down the sides every so often. The spirulina powders give it that amazing teal colour and are packed with healthy nutrients.
Layer 3: Fresh blueberries
Layer 4: My Brown Butter Nutty Granola
Layer 5: Favoured toppings – My Homemade Peanut Butter, dark chocolate shavings, toasted coconut, etc.
Spirulina Chia Parfait
Serving size: 2
Prep time: 20 minutes
Ingredients:
- 1/3 cup chia seeds
- 1 cup dairy-free milk (I prefer almond), plus 1-2 teaspoons
- 1/2 tsp pure vanilla extract
- 1 tsp blue spirulina, separated
- salt
- 2 frozen bananas
- 1/2 cup frozen mango
- 1/4 tsp green spirulina
- Brown Butter Nutty Granola (optional)
- Homemade Peanut Butter (optional)
- Fresh fruit for topping
Instructions:
- In a medium-sized mixing bowl, whisk chia seeds, milk, vanilla, half of a teaspoon of blue spirulina and a pinch of salt. Place in the fridge to set for about 20 minutes while you prepare the other layers.
- To a food processor, add the bananas, mango, green spirulina powder and the remaining half teaspoon of blue spirulina powder. Pulse a few times and then blend, adding in 1-2 teaspoons of milk to help it along. Scrape down the sides as needed and blend until smooth.
- To build the parfait: In a Mason Jar or a short glass, scoop in a few spoonfuls of the chia pudding. Next, add the smoothie layer and top with granola. Repeat these layers and then add the fresh fruit, peanut butter and more granola.
The post Spirulina Chia Parfait appeared first on Never. Not. Eating..
]]>The post Brown Butter Nutty Granola appeared first on Never. Not. Eating..
]]>- Christmas is coming
- You need a hostess gift
- You like nuts
Truly – this is the best, most perfect, thoughtful, fast, easy, cheap and delicious gift that you could give to someone for hosting you over the holidays. I wouldn’t lie to you. Scout’s honour.
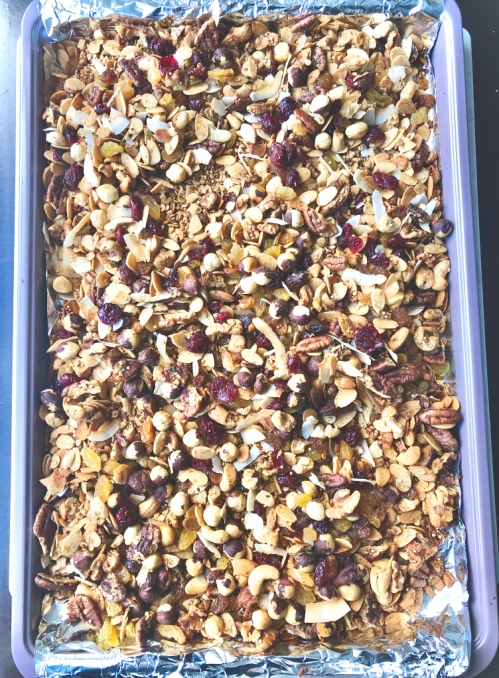
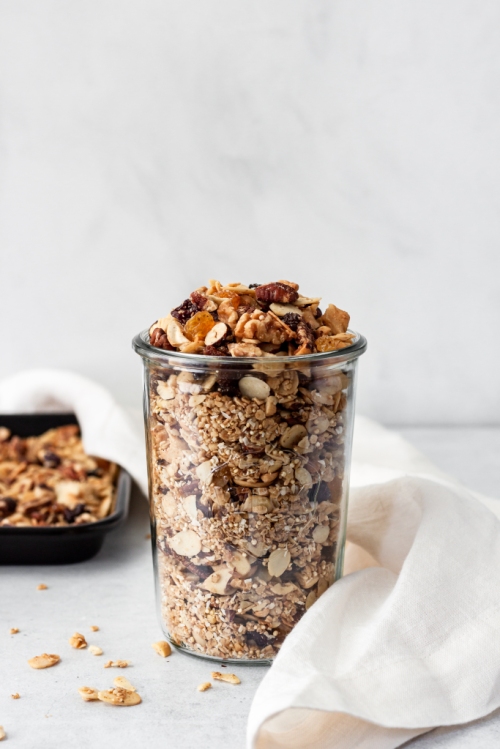
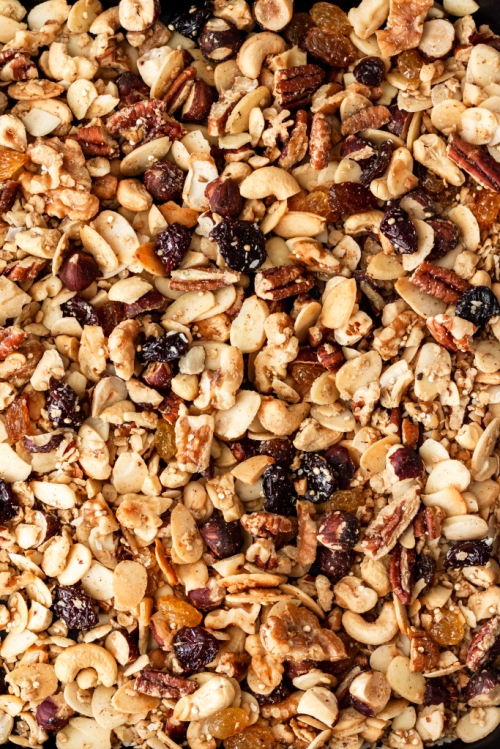
This granola recipe boasts all things Christmas – warm spices, toasted nuts, jeweled cranberries…and brown butter – the best part. Grab a few small mason jars and fill ’em up, tie some bows and get ready to have a handful of new best friends.
Alright, less talk, more granola.

First step: Make the brown butter. Add a quarter cup of cold butter to a pan over medium-low heat. Let the butter foam up and become fragrant, stirring often.
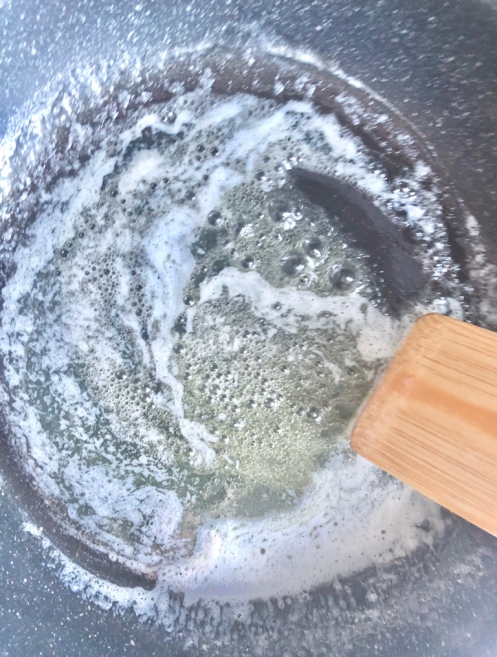
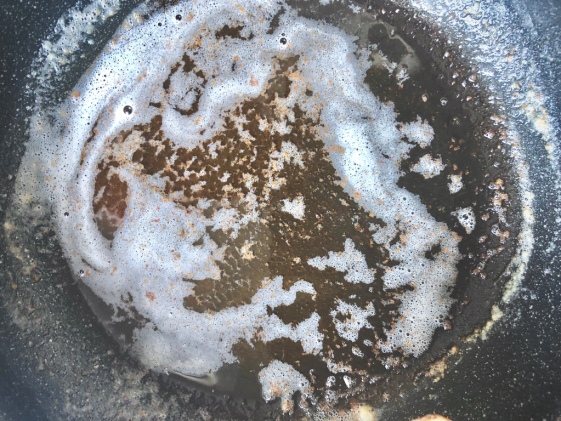
It will begin to develop brown bits on the bottom of the pan (5 minutes or so) – remove from heat and let cool (put it in the fridge or freezer to speed up this process).
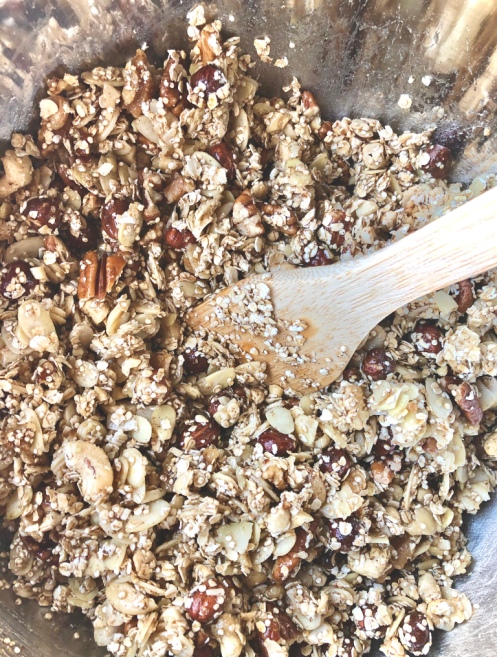
Secondly: Grab the biggest bowl you own. We’re not messin’ around.
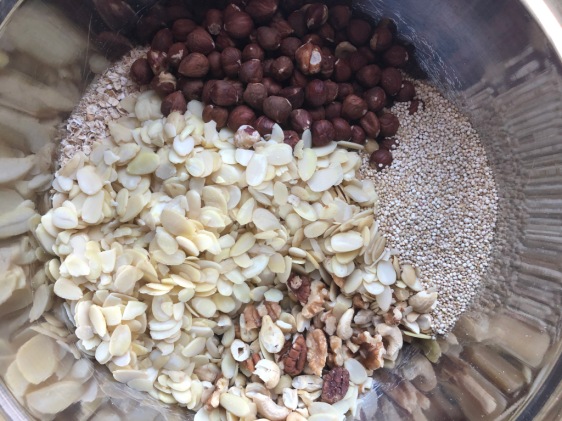
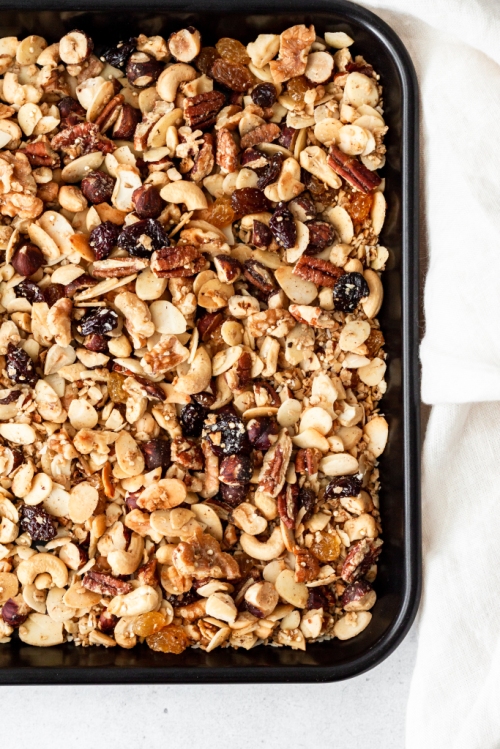
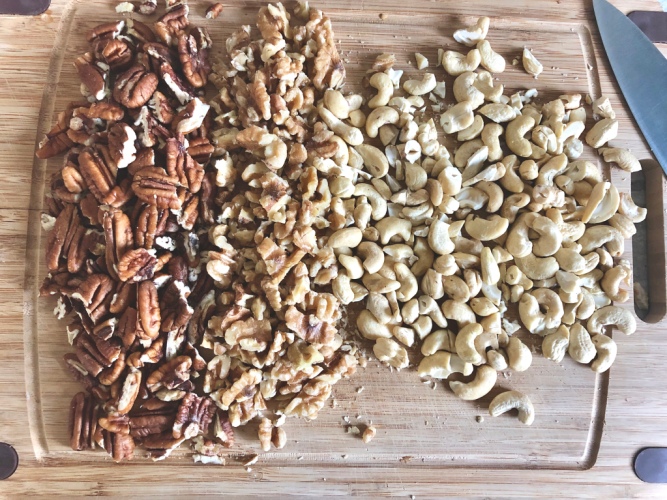
Dump in 2 cups of rolled oats, 6 cups of your favourite types of nuts (I do one cup pecans, one cup walnuts, one cup cashews, two cups slivered almonds and one cup hazelnuts) and half of a cup of quinoa. Set aside.
Next: In a small measuring cup, whisk together three-quarters of a cup of maple syrup, the cooled brown butter, half a teaspoon vanilla, half a teaspoon cinnamon and a quarter of a teaspoon of nutmeg.
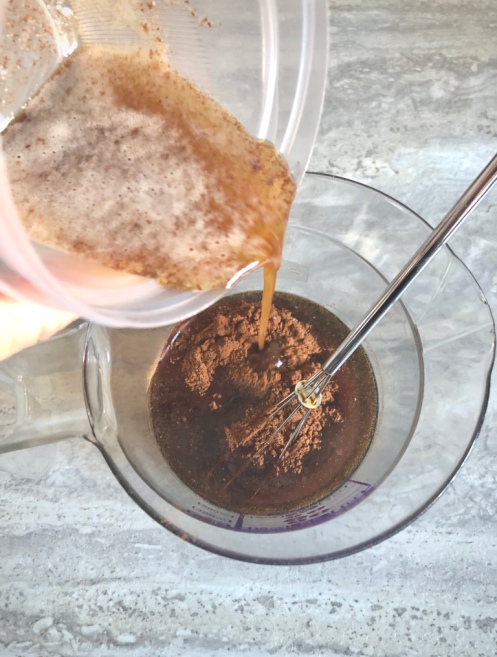
Pour over the nut mixture and stir, making sure everything is coated nicely.
Transfer to a baking sheet that is lined with aluminum foil and bake in a 375 degree oven for 30-35 minutes, stirring often to prevent burning. Add large coconut flakes for the last two minutes of baking. Remove from oven and add some golden and sultana raisins as well as a handful of dried cranberries and a bunch of flaky sea salt. Cool for twenty minutes before putting into jars or storing in airtight containers.
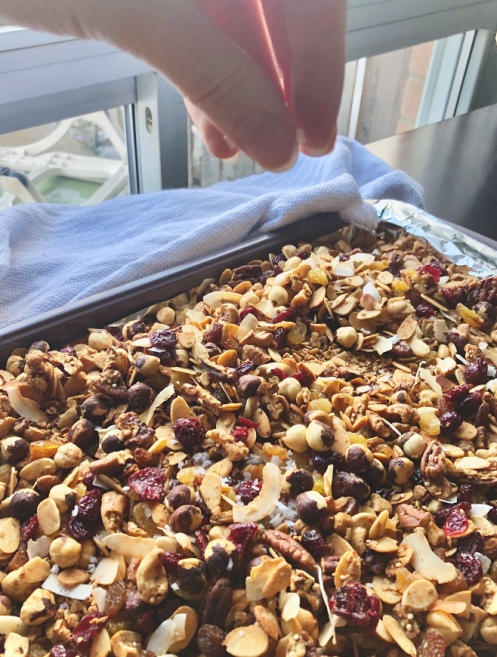
*I highly recommend using heavy duty aluminum foil for this as thinner foil can rip easily when you are stirring the granola. No one likes tin flakes in their food!
Brown Butter Nutty Granola
Yield: 8 cups
Prep time: 10 minutes
Cook time: 35 minutes
Ingredients:
- 1/4 cup cold butter
- 2 cups quick (or rolled) oats
- 1 cup pecans, rough chop
- 1 cup walnuts, rough chop
- 1 cup cashews, rough chop
- 2 cups slivered almonds
- 1 cup hazelnuts, rough chop
- 1/2 cup raw quinoa
- 3/4 cup pure maple syrup
- 1/2 teaspoon vanilla
- 1/2 teaspoon cinnamon
- 1/4 teaspoon nutmeg
- 1/2 cup large flake coconut
- 1/3 cup sultana raisins
- 1/3 cup golden raisins
- 1/3 cup dried cranberries
- 1/2 tbsp – 1 tbsp flaky sea salt
Instructions:
- Add butter to a medium-sized pan over medium-low heat. Cook, stirring often, until you see brown bits begin to form on the bottom of the pan (about 5 minutes). Remove from heat immediately and cool completely (speed up cooling process in fridge or freezer). Do not burn the butter!
- Preheat oven to 375 degrees Fahrenheit and line a large baking sheet with heavy duty aluminum foil.
- In a very large mixing bowl, add the oats, nuts and quinoa.
- In a small measuring cup, measure out the maple syrup. Add the cooled brown butter, vanilla, cinnamon and nutmeg and whisk until combined. Drizzle over the nut mixture and toss until everything is coated. Spread evenly on the foil-lined baking sheet. Bake granola in oven for 35 minutes, stirring frequently to avoid burning. During the last five minutes, add the flaked coconut. The granola is ready when everything is a golden brown colour.
- Remove from oven and add the raisins, cranberries and sea salt to taste (don’t skip the salt!!!).
- Let cool completely before storing in an airtight container.
The post Brown Butter Nutty Granola appeared first on Never. Not. Eating..
]]>