The post Healthy Pumpkin Oatmeal Chocolate Chip Cookies appeared first on Never. Not. Eating..
]]>
WHAT ARE PUMPKIN OATMEAL CHOCOLATE CHIP COOKIES?
These cookies are a one-bowl miracle – they are simple to make, healthy and perfect for autumn. Refined-sugar free, these little treats can be eaten without guilt, for breakfast or as a snack in-between meals.

WHY I LIKE THESE PUMPKIN OATMEAL CHOCOLATE CHIP COOKIES
Other than for obvious reasons, I love these cookies because they are a fun and healthy way to incorporate pumpkin into a recipe. It has proven to be challenging to find recipes made with pumpkin puree that aren’t packed with processed sugars and unhealthy fats. I also love making my own pumpkin puree (recipe found here) to ensure I know exactly what is going into my baking!

THE INGREDIENTS
A few simple pantry ingredients are all you will need to make these cookies:
- Banana
- Pumpkin puree (NOT pie filling)
- Cashew butter (or any nut butter)
- Vanilla
- Maple syrup
- An egg
- Spices (pumpkin pie and cinnamon)
- Oats
- Dark chocolate chips
MAKING HEALTHY PUMPKIN OATMEAL CHOCOLATE CHIP COOKIES
The first thing you will want to do is whisk together all of your wet ingredients – mash up the banana and add in the puree, nut butter, vanilla, maple syrup and egg.
Add your spices, some salt, the oats and chocolate chips right into the wet ingredients and mix with a spatula. Once combined, use a large cookie scoop to portion your cookies, placing them on a parchment lined baking sheet. These will not spread out, so you don’t need to worry about spacing them out too much. Flatten them with the palm of your hand and bake for 11-14 minutes.

TIPS
- Choose an all-natural nut butter to maintain the healthiness of this recipe (look at the ingredient list on the jar – it should only have one ingredient)!
- Don’t use pumpkin pie filling. Make sure you have pure pumpkin puree – click here for a recipe, or find it canned at any grocery store.
- The cookie dough will be on the wetter side – don’t worry, they will bake up nicely and easily release from the baking sheet when they are fully cooked.
OTHER HEALTHY TREATS YOU NEED TO TRY
No-Measure Oatmeal Almond Butter Cookies (skip the measuring with these failproof cookies)
Vegan Rice Crispy Chocolate Treats (a fun, bite-size snack)
Vegan Ice Cream Bars (like a Magnum, but vegan)

TOOLS I USED TO MAKE THESE PUMPKIN OATMEAL CHOCOLATE CHIP COOKIES
Click on the images below to see what I used for this recipe.


Healthy Pumpkin Oatmeal Chocolate Chip Cookies
Servings: Makes a dozen cookies
Prep time: 10 minutes
Cook time: 13 minutes
Ingredients
- 1 very ripe banana, mashed
- 1/4 cup pure pumpkin puree
- 1/4 cup cashew butter (or any nut butter)
- 1 tsp pure vanilla extract
- 2 tbsp pure maple syrup
- 1 large egg
- 1/2 tsp pumpkin pie spice
- 1/4 tsp cinnamon
- 1/2 tsp salt
- 2 1/4 – 2 1/2 cups rolled oats
- 3/4 cup sugar-free dark chocolate chips
Instructions
- Preheat your oven to 350 degrees Fahrenheit.
- In a large bowl, whisk together the mashed banana, pumpkin puree, cashew butter, vanilla and maple syrup. Add in the egg and whisk until fully combined.
- Add the pumpkin pie spice, cinnamon, salt and 2 1/4 cups of oats to the bowl. Mix with a spatula. If the dough is very wet, add in the extra 1/4 cup of oats. The mixture should be slightly on the wetter side.
- Fold in the chocolate chips and then use a 1.5 tablespoon cookie scoop to form 12 cookies (alternatively, roll into balls using wet hands). Place on a parchment lined baking sheet and use your palm to flatten each cookie. As these will not spread, you don’t need to leave too much space between them.
- Bake for 13 minutes, remove from oven and let cool for 2 minutes on the baking sheet before transferring to a wire rack to cool completely.
- Once they have fully cooled, store in an airtight container for up to four days.

The post Healthy Pumpkin Oatmeal Chocolate Chip Cookies appeared first on Never. Not. Eating..
]]>The post 3-Ingredient Strawberry Chia Jam appeared first on Never. Not. Eating..
]]>
WHAT IS STRAWBERRY CHIA JAM
This is the easiest jam you will ever make, I promise you that! This 3-Ingredient Strawberry Chia Jam comes together in about 15 minutes and is made with fresh ingredients and no refined sugar. It is the perfect topping for yogurt, toast, scones…even ice cream!
THE INGREDIENTS
As suggested in the title, this jam requires only three main ingredients. I have included other add-ins that enhance the flavour profile of this jam, but they are totally optional, according to your taste. You will need:
- strawberries
- honey or maple syrup (optional)
- lemon juice
- chia seeds
- cinnamon (optional)

HOW TO MAKE 3-INGREDIENT STRAWBERRY CHIA JAM
You won’t believe how easy this recipe is to make. The first step is to add your strawberries and lemon juice to a pot, along with your sweetener of choice and cinnamon, if using. Let the strawberries cook down for about 10 minutes, stirring occasionally. You will notice that they release their juices and begin to break down.
After the strawberries have been cooking for 10 minutes, mash them up with a fork or a potato masher and stir in the chia seeds, cooking for another 2 minutes. Remove from heat and let cool for a few minutes before serving right away, or pouring into an airtight container to be stored in the fridge.

RECIPES THAT GO WELL WITH THIS JAM
Easy Chia Pudding Parfait (sub the fresh fruit in this chia pudding for a few dollops of jam)
Blueberry Basil Moscow Mule (swap the blueberries for this jam in this delicious cocktail)
Gluten Free Crepes with an Apple Cinnamon Compote (fill these crepes with jam instead of the apple compote)
TOOLS I USED TO MAKE THIS RECIPE
Click on the images below to see what I use for this recipe.


This post contains affiliate links and I may earn a small commission when purchases are made after clicking the links, at no cost to you – thank you!
3-Ingredient Strawberry Chia Jam
Serving size: Makes about 12 ounces of jam
Prep time: 5 minutes
Cook time: 12 minutes
INGREDIENTS
- 1 lb (454g) fresh strawberries, quartered (or cut into smaller chunks if they are larger)
- juice of half a lemon (2 tbsp)
- 2 tbsp honey or maple syrup (optional)
- 1 tsp cinnamon (optional)
- pinch of salt
- 1.5 tbsp chia seeds
INSTRUCTIONS
- Place a medium-sized pot over medium heat and add the strawberry pieces, lemon juice, honey, cinnamon and salt. Let the mixture cook for 10 minutes, until the strawberries have broken down and have released their juices. Use a fork or potato masher to crush the strawberries until they are fully broken down.
- Add the chia seeds to the pot and stir to incorporate. Cook for another two minutes, remove from heat and let cool for 5 minutes before serving. Place in an airtight container and store in the fridge for up to one week.
The post 3-Ingredient Strawberry Chia Jam appeared first on Never. Not. Eating..
]]>The post Brown Sugar Candied Walnuts appeared first on Never. Not. Eating..
]]>
WHAT ARE BROWN SUGAR CANDIED WALNUTS?
Candied walnuts are a crunchy, crispy treat that make a perfect topper for many dishes. They are made by mixing walnuts into a caramel-like candy made from sugar and butter. When the walnuts are added to the hot sugar, the mixture coats the nuts, getting into all of their glorious nooks and crannies. After cooling, the candied walnuts become crunchy, sweet little bites of perfection!
WAYS TO USE BROWN SUGAR CANDIED WALNUTS
There are no limits to how to use candied walnuts. Here are my favourites:
- eat them on their own
- top salads with them
- add them as a topping on smoothie bowls
- mix them into oatmeal
- top yogurt with them

THE INGREDIENTS
As the title states, you only need three ingredients to make this simple recipe. All of which you likely have in your kitchen already:
- walnuts
- butter
- brown sugar
I also LOVE adding this flaky sea salt to them (this is totally optional – but, you should do it…trust me)!
TRY BROWN SUGAR CANDIED WALNUTS ON:
Pear, Gorgonzola and Candied Walnut Salad (so delicious and perfect for dinner parties)
Beet and Orange Salad with Goat Cheese (the perfect sweet and savoury side)
Power Boosting Smoothie Bowl (an extra crunch on top of a creamy smoothie bowl)

OTHER TOPPERS YOU NEED TO TRY
Avocado Croutons (perfect for salad)
Homemade Brown Butter Granola (amazing on yogurt or with a smoothie bowl)
Let’s make some candied walnuts!
This post contains affiliate links and I may earn a small commission when purchases are made after clicking the links, at no cost to you. Thank you!
Crunchy 3-Ingredient Candied Walnuts
Serving size: Makes 1 cup walnuts
Prep time: 5 minutes
Cook time: 15 minutes
Ingredients
- 1 cup raw walnuts, halved
- 1/4 cup packed brown sugar
- 3 tbsp butter
- flaky sea salt (optional)
- Preheat the oven to 350 degrees Fahrenheit.
- Place the walnuts on a baking sheet and toast in the oven for 5-8 minutes, or until lightly browned and fragrant. Watch carefully as they burn easily! Remove and set aside.
- In a small pot over medium heat, melt the butter and brown sugar until the sugar starts to bubble. Add the walnuts and cook another 2 minutes. Spread the mixture onto a parchment lined baking sheet and immediately sprinkle with a few pinches of salt and separate with a fork. Let cool completely, about 10 minutes, before enjoying!
Store in an airtight container.
The post Brown Sugar Candied Walnuts appeared first on Never. Not. Eating..
]]>The post Vegan Protein Energy Balls appeared first on Never. Not. Eating..
]]>
WHAT ARE PROTEIN BALLS?
Protein Balls are a grab-and-go snack that have enough protein and fibre to fill you up between meals. They are usually vegan (like these ones!) and made with natural ingredients that carry a number of health benefits.
HEALTH BENEFITS
These particular protein balls include a number of healthy ingredients that deliver essential nutrients to the body. Protein helps to repair muscle and improve skin, hair and nails. Fibre, from the Medjool Dates, helps relieve constipation. Dates are also known to be full of antioxidants, can reduce cholesterol and make you feel full, longer.

THE INGREDIENTS
To make this recipe, you will need:
- dates
- your favourite nut butter
- protein powder
- almond flour
- vanilla extract
- maca powder (optional)
- dark, vegan chocolate

TOOLS NEEDED TO MAKE VEGAN PROTEIN ENERGY BALLS
The main tool needed for this recipe is a high-powered food processor. It breaks down the dates and takes minutes to incorporate everything together.
OTHER VEGAN SNACK IDEAS
Are you vegan or going vegan? Check out these other snack ideas that fulfill cravings:
- Vegan Ice Cream Bars
- Dark Chocolate Protein Nuggets
- Vegan Power Muffins
- Vegan Chocolate Bars (my favourite)

This post contains affiliate links and I may earn a small commission when purchases are made after clicking the links, at no cost to you. Thank you for supporting me!
Vegan Protein Energy Balls
Serving size: Makes 15 balls
Prep time: 10 minutes
Soak time: 1 hour
Ingredients
- 10 Medjool dates, pitted and soaked in water for 1 hour
- 1/4 cup almond butter
- 1 cup almond flour
- 1 scoop (28 g) vanilla protein powder
- 1/4 tsp cinnamon
- 1 tsp maca powder (optional)
- 1/2 tbsp vanilla extract
- pinch of salt
- 1 cup vegan chocolate
- 1 tbsp coconut oil
Instructions
- Drain the dates and add them to a food processor with the almond butter, flour, protein powder, cinnamon, maca, vanilla and salt. Pulse until the mixture comes together. Use a 1-tablespoon cookie scoop to scoop the mixture out and roll into balls. Place the protein balls onto a cookie sheet and refrigerate while preparing the chocolate coating.
- Over a double broiler, melt the chocolate and coconut oil until smooth. You can also do this in the microwave in 20 second increments, stirring the chocolate after each session.
- Coat the protein balls in the chocolate and place on a parchment lined baking sheet. Refrigerate until solid, approximately 30 minutes, and then transfer to an airtight container to store in the fridge for up to 10 days.

The post Vegan Protein Energy Balls appeared first on Never. Not. Eating..
]]>The post Sumac Roasted Cauliflower appeared first on Never. Not. Eating..
]]>
There’s no easier recipe, I promise you that. This whole-roasted cauliflower head is simple to prepare but complex on the palate! It’s vibe is very Middle Eastern – sumac, currants, pomegranates, pistachios. It’s visually stunning and a perfect side to go along with the rest of your dinner.
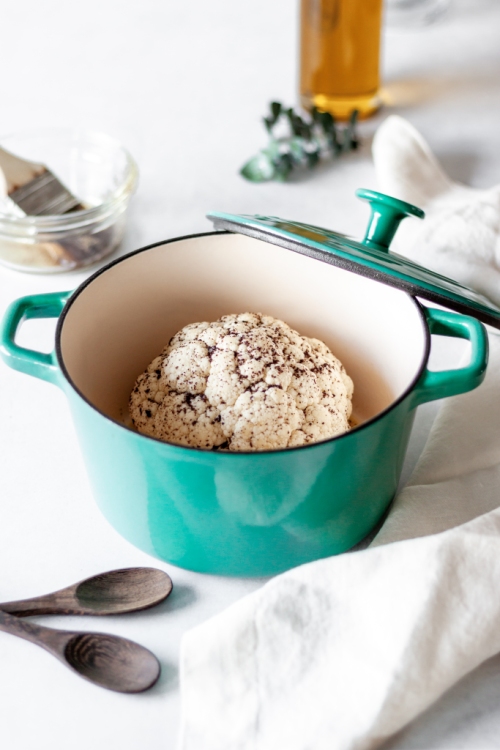
To prepare, combine the sumac, salt and olive oil, and pour over the cauliflower. Roast in a dutch oven (click here to see the one I use) for about 40 minutes until it is tender. Drizzle with the zingy-est chimichurri and top with all the fixings. Chef’s kiss!

Sumac Roasted Cauliflower
Serving size: 4-5 people
Prep time: 10 minutes
Cook time: 40 minutes
Ingredients:
- 1 medium head of cauliflower
- 1/2 cup olive oil
- 1 tsp sumac
- 1/2 tsp salt
- 1/4 cup pomegranate arils, for topping
- 1/4 cup pistachios, shelled and chopped, for topping
- 1/4 cup feta cheese, for topping
- 2 tbsp dried currants, for topping
For the Chimichurri Sauce:
- 1/4 cup olive oil
- 1 tbsp red wine vinegar (or less if you don’t want it as tangy)
- 2 cups packed fresh herbs (I use basil, cilantro and parsley)
- 1-2 cloves of garlic
- pinch of salt
- pinch of red pepper flakes (optional)
Instructions:
- Preheat oven to 400 degrees Fahrenheit.
- Remove the leaves of the cauliflower, rinse the head well and pat completely dry. Cut off the bottom part of the stem to make the cauliflower level and have a flat surface to sit on.
- In a small bowl, combine the olive oil, sumac and salt. Place the cauliflower head upside down into a dutch oven. Pour 1/2 of the olive oil mixture onto the bottom and allow it to drip down into the crevices of the cauliflower. Turn over and pour the rest on the top, using a pastry brush to help coat the sides. Put the lid on and then place in the oven to roast for 40 minutes or until fork-tender. Cook time depends on the size of your cauliflower.
- While the cauliflower is roasting, prepare the chimichurri. Add all ingredients to a blender and blend until smooth. Taste and adjust seasonings as necessary.
- Place currants in a small bowl and cover with boiling water to rehydrate them. Let sit for at least 5 minutes before draining.
- Transfer the cooked cauliflower to a serving platter. Drizzle with the chimichurri and top with the pomegranate arils, pistachios, currants and crumbled feta cheese. Serve immediately!
The post Sumac Roasted Cauliflower appeared first on Never. Not. Eating..
]]>The post Grilled Piña (Colada) French Toast appeared first on Never. Not. Eating..
]]>
Whenever I travel to the Caribbean, I have piña coladas on rotate. They are thick, slushy and sweet, and just the perfect hot-day drink. And, obviously my inspiration for this recipe!

A traditional piña colada has rum, coconut milk and pineapple juice, and we’re keeping it consistent with this recipe! The spiced rum and coconut milk come together with some fragrant vanilla, eggs and warm spices to create the batter for the bread. Speaking of the bread, I chose to use brioche for this recipe, because seriously there is nothing better than brioche. Eggy, buttery and just darn delicious.

I love cooking my french toast in my cast iron. It helps with even heat distribution, and that means a beautiful browning on either side of the toast! I also use a ribbed cast iron to grill up some pineapple to top the french toast off with. It’s muy deliciosa!
Grilled Piña (Colada) French Toast
Servings: 3-4
Prep time: 10 minutes
Cook time: 20 minutes
Ingredients:
- 2 large eggs
- 1 tsp vanilla
- pinch of salt
- 1/2 tsp cinnamon
- pinch of fresh nutmeg
- 1/2 cup canned coconut milk
- 1/2 cup coconut milk (I use Silk Brand)
- 2 oz of spiced dark rum (optional)
- 12-14 slices of day old brioche bread
- vegan butter (or regular butter)
- coconut oil
- 1/2 of a fresh pineapple, sliced into flatter wedges
- pure maple syrup, for topping
- 1/4 cup coconut flakes, for topping (optional)
Instructions:
- Whisk the eggs, vanilla, salt, cinnamon, nutmeg, coconut milks and rum in a shallow container, until combined.
- Add a tablespoon of butter to a hot pan (temperature at medium-high). Dip a slice of brioche into the milk mixture and then transfer to pan. Cook for 2-4 minutes, or until golden brown, and then flip and repeat. Continue with the rest of the brioche.
- While the french toast is cooking, preheat your grill over medium-high heat. Add the Pineapple slices right to your grill if using an outdoor barbeque, or, oil your indoor grill with 1 tablespoon of coconut oil first, then add the pineapple. Grill for 2-3 minutes on each side, or until you see those nice grill marks!
- Place a few slices of french toast on a plate, top with a few pieces of grilled pineapple, sprinkle with the coconut flakes, and drizzle with pure maple syrup. Salud!
The post Grilled Piña (Colada) French Toast appeared first on Never. Not. Eating..
]]>The post Middle Eastern Orzo Pilaf appeared first on Never. Not. Eating..
]]>
Okay, I am in love with all flavours of all regions of the world (literally), but Middle Eastern…AND Italian?! Two heavyweights in the culinary world and I’m here for it! Like a hundo P’s.
Let me break down this fusion for you. We have the following Italian/Mediterannean ingredients:
- Orzo
- Feta
- Basil
And those from the Middle East include:
- Dried fruit (apricots, cherries, currants)
- Pistachios
- Olives
- Pomegranate seeds
- Cilantro
- Spices (Turmeric, Paprika, Cumin, Coriander, etc.)
Together, they are Chrissy and John. Rachel and Ross. Bey and Jay. Me and me.
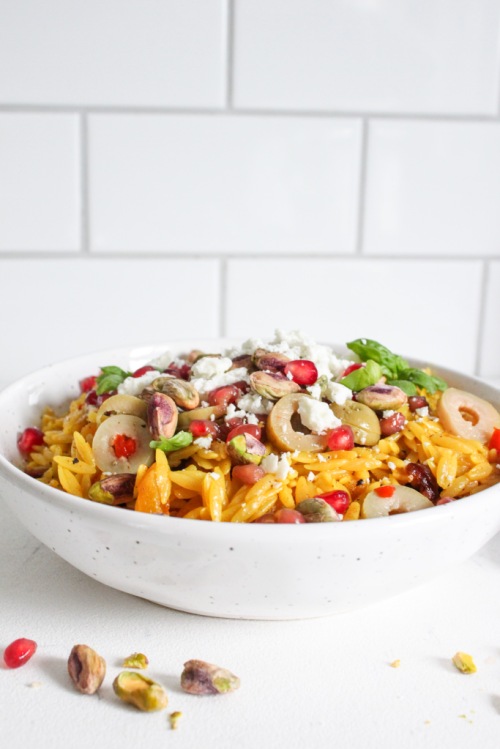
The warm flavours of the spices paired with creamy orzo, sweet fruit and salty olives and feta…hawt damn! I’m drooling.

Oh, one more thing…This makes the perfect lunch the next day. Leftovers for the win!
Middle Eastern Orzo Pilaf
Serving Size: 4
Prep time: 10 minutes
Cook time: 12 minutes
Ingredients:
- 1 tbsp olive oil
- 1 clove garlic, minced
- 1/2 tsp cumin
- 1/4 tsp turmeric
- 1/4 tsp paprika
- 1/4 tsp ground coriander
- pinch of fresh nutmeg
- pinch of black pepper
- 1 cup uncooked orzo, rinsed well
- 1 1/2 cups vegetable broth
- salt
- 1 cup dried fruit (I use cherries, currants and chopped apricots)
- 1 tbsp freshly squeezed lemon juice (optional)
- 4-5 olives, chopped
- 1/4 cup feta, crumbled
- 1/4 cup pomegranate arils
- 1/4 cup pistachios, shelled
- fresh herbs (cilantro and basil) for topping, (optional)
Instructions:
- Heat olive oil in a large pan over medium heat. Add the garlic and cook for 30 seconds or until fragrant. Add the cumin, turmeric, paprika, coriander, nutmeg and pepper and stir until toasted, another 30 seconds to 1 minute. Add the orzo and stir to coat with the spices. Once coated, pour in the broth, add 1/4 tsp salt and bring up to a boil and then reduce heat and let simmer for 8 minutes, with the lid on.
- After the 8 minutes, quickly lift the lid, add the dried fruit, and stir to incorporate with the orzo. Place the lid back on and let stand for 2 more minutes off the heat.
- Squeeze some fresh lemon juice into the pan and stir to combine. Transfer the orzo to a serving dish and top with olives, feta, pomegranate seeds, pistachios and fresh herbs. Serve immediately or let cool and refrigerate in an airtight container for up to three days.
The post Middle Eastern Orzo Pilaf appeared first on Never. Not. Eating..
]]>The post Gluten Free Crepes with an Apple Cinnamon Compote appeared first on Never. Not. Eating..
]]>
I’ve used my soup maker to make an abundance of different recipes, such as: soup (duh!), smoothies, juices, pancakes and my favourite, alcoholic beverages. It’s truly simple to use and does all of the cooking and blending for you, allowing time to clean up your kitchen, or do something more fun, like snack while you wait for your food. If you have a soup maker, or are thinking of purchasing one, check out my Instagram account for some more fun recipes to make in it – @nevernoteatingca
So let’s talk about these crepes. Firstly, I struggle to call them “crepes,” because as a kid, my family and I only ever ate “Finnish pancakes,” which were more crepe-like in appearance, but were never referred to as crepes. Those were our style of pancakes. We never ate traditional American pancakes. But you know what?! I’m all about pleasing the people. People see flat pancakes, they say “crepes.” So, this is for you.
Secondly, if you follow my IG account, or have read some of my posts, or even tried some of my recipes (thank you), you know that I like to put a healthier spin on foods that aren’t so healthy. Therefore, I have made these “crepes” with gluten-free flour, plant-based milk and no refined sugar. If you want to indulge a bit more, feel free to sub in the healthy ingredients for the not-so-healthy ones.
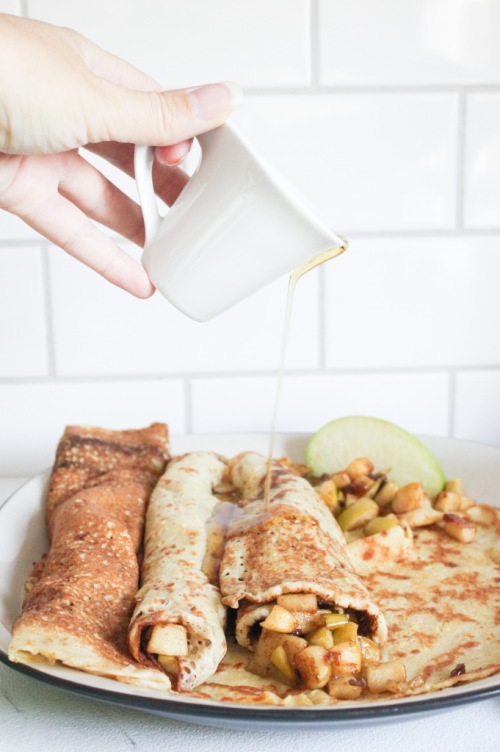
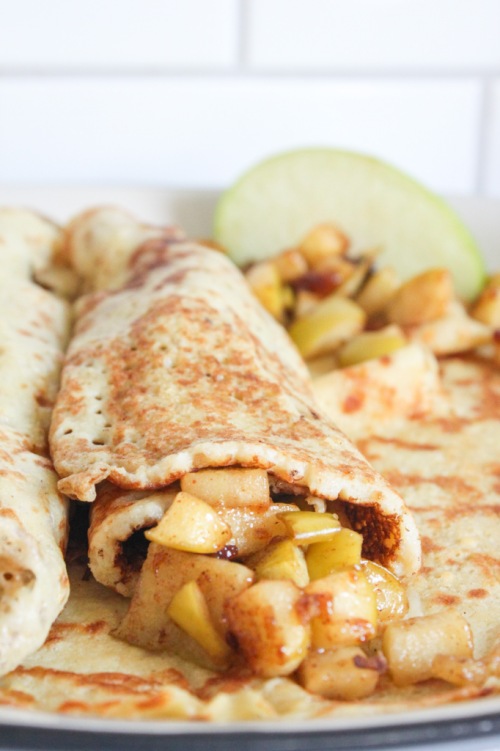
I can’t decided whether my favourite part of this dish is the pancake…I mean crepe…or the filling. It’s apple season right now, and nothing goes better together than apples and cinnamon. And nutmeg. Nutmeg is bomb. The filling is tart and sweet and ooey and gooey. It’s a great addition to these less-sweet crepes. I prefer to use honeycrisp or granny smith apples for this, but you can definitely use whatever you have on hand. I also like to keep the skins on, mostly because I’m lazy, but feel free to peel your apples if that’s your jam.
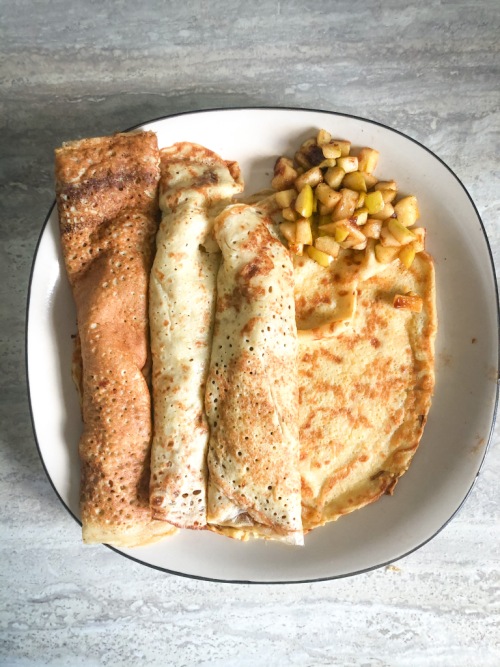
Below you will find two ways to make this recipe. The first is the easiest way, but you need a soup maker for that! The second is more traditional, but totally yummy just the same.
May your day be enhanced with pancake-crepes and fall fillings!
Gluten Free Crepes with an Apple Cinnamon Compote
Serving Size: Makes 10 large crepes
Prep time: 5 minutes
Cook time: 20 minutes
Ingredients
- 2.5 cups dairy-free milk
- 2 eggs, beaten
- 2 tbsp maple syrup, plus more for serving
- 1 tsp vanilla extract
- 1.5 cups gluten free flour
- 1/2 tsp salt
- 2 medium apples, finely diced (I use honeycrisp or granny smith)
- 1/2 tsp lemon zest
- 1 tbsp lemon juice
- 1/2 tsp cinnamon
- pinch of fresh nutmeg
- 1/2 tbsp of cornstarch
- 1 tbsp maple syrup or brown sugar
- coconut oil or butter (for the pan)
Instructions
With a soup maker:
- Add the milk, eggs, syrup, vanilla, flour and salt to your soup maker. Set to “juice.” When finished mixing, skip to step 3 below.
Without a soup maker:
- Whisk together milk, eggs, syrup and vanilla and set aside.
- In a medium bowl, whisk flour and salt together. Add the wet ingredients and whisk until combined.
- Place a large pan over medium-high heat and add half a tablespoon of coconut oil (or butter). When the pan is very hot, add about 1/3-1/2 cup of the crepe batter (depending on the size of your pan). Swirl the pan around until the batter coats the entire bottom. There shouldn’t be a lot of batter sitting on top.
- Let the crepe cook until the edges begin to come up from the pan and the bottom is browned. Flip and cook on the other side for about 2 minutes or until darker spots begin to develop on the underside. Remove from pan, place on a plate and store in the oven or microwave to keep warm. Continue with the remainder of the batter.
For the filling:
- While the crepes cook, add the apples, zest, lemon juice, cinnamon, nutmeg, cornstarch and sugar to a bowl and stir to combine. Let sit for at least 5 minutes.
- Preheat a large pan over medium-low heat. Add a half tablespoon of coconut oil or butter to the pan. When melted, add the apples. Let cook until apples are fork tender, about 8-10 minutes, stirring occasionally.
Assembly:
- Top each crepe with a few spoonfuls of the filling and a drizzle of maple syrup. Roll and enjoy!
The post Gluten Free Crepes with an Apple Cinnamon Compote appeared first on Never. Not. Eating..
]]>The post Roasted Garlic Mashed Cauliflower (Low-Carb) appeared first on Never. Not. Eating..
]]>We are officially entering Fall and that means, Thanksgiving. I’m a lover of enjoying seventy-four side dishes and can always forego the main one. I am always on the hunt for new and fun sides to add to any meal…especially those around the holidays!

This Roasted Garlic Mashed Cauliflower is the perfect side for Thanksgiving, Christmas, Easter…you name it! It’s low-carb and will please your keto and vegan family members. Bonus: It tastes just as good as mashed potatoes!
How to Make Vegan Roasted Garlic Mashed Cauliflower
I highly recommend a good food processor or blender. The Ninja Kitchen line is a great product and I use their food processor every single day. I make EVERYTHING in it – smoothie bowls, pestos, pastry doughs and this mashed cauliflower. It is an affordable alternative to the well-known Vitamix.

For this recipe, everything gets precooked, placed in your food processor and then blended until smooth – it’s THAT easy! Here is what you will need:
- One medium-sized head of cauliflower
- A head of garlic
- Vegetable broth
The Roasted Garlic
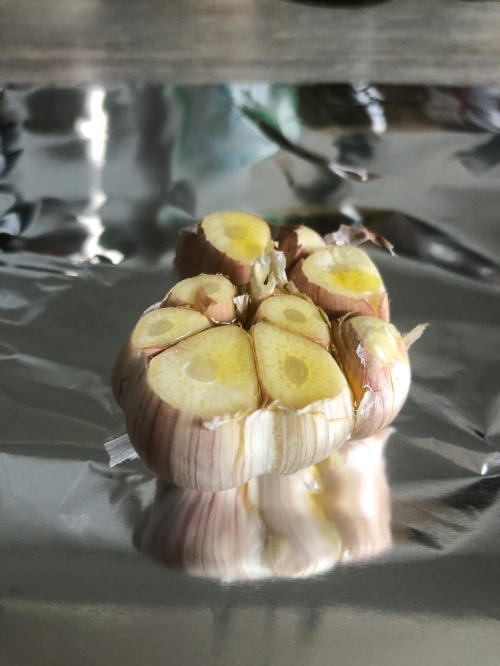
Let’s talk about the garlic – is there anything better?! For this recipe I love using roasted garlic, and although it may take longer, it’s so worth it. In addition, you will also have leftover cloves that you can use in other dishes that you will be serving (or just save them for another day). Roasting a head of garlic is a great move for large dinner parties or holiday gatherings.
To roast, all you have to do is cut off the top of the entire head of garlic, leaving the top of the cloves exposed. Drizzle the head with olive oil, wrap in tin foil and place on a baking sheet and into the oven for 45 minutes. If you want to save on time, you can mince your raw garlic, add to a pan over low heat with some olive oil for about 30 seconds to one minute, and use this in place of the roasted stuff in the recipe. Above all, don’t skimp on the garlic!
Cooking the Cauliflower
To cook the cauliflower, place the florets into a large pot with about a cup and a half of veggie stock. Cover and set your burner to high, and when the liquid starts boiling, turn the burner down slightly and let steam for about 5-10 minutes (depending on how small your florets are). They will be ready when they are fork-tender. Don’t overcook them because you will end up with mushy cauliflower instead of mashed cauliflower!
After you cook the garlic and cauliflower, all that’s left to do is throw it all into your food processor and watch it come together – Pillowy, low-carb clouds of heaven!

More Amazing Cauliflower Sides
Sumac Roasted Cauliflower (a showstopper)
Hot and Sweet Cauliflower Wings (perfect for game day)
East Creamy Cauliflower Soup (a winter hit)
This post contains affiliate links and I may earn a small commission when purchases are made after clicking the links, at no cost to you. Thank you!
Vegan Roasted Garlic Mashed Cauliflower
Servings: 4
Prep time: 10 minutes
Cook time: 45 minutes
Ingredients:
- 1 whole head of garlic
- medium head of cauliflower, broken into florets
- 1 1/2 cups vegetable stock
- salt
- pepper
- olive oil
- fresh thyme, for topping (optional)
Instructions
For the garlic:
- Preheat oven to 375 degrees Fahrenheit.
- Peel the outer layer of skin off of the garlic and slice the top of the head off (see photo above). Place on a piece of tin foil and drizzle the top with about one tablespoon of olive oil. Wrap the garlic up so that there are no holes for the steam to escape and place on a baking sheet and then in the oven for 45-55 minutes.
For the cauliflower:
- When the garlic has been roasting for about half hour, start your cauliflower. Place the florets into a large pot with the vegetable stock, cover and bring to a boil. Once boiling, reduce slightly to a rolling boil and allow the cauliflower to steam for 5-10 minutes, or until just fork tender – do not drain.
- Use a slotted spoon to transfer the cauliflower to a food processor or blender and add one tablespoon of the veggie stock that the cauliflower was cooking in.
- Remove the garlic from the oven and carefully unwrap. Use your fingers to squeeze out two of the cloves (or as many as you want!) and place in the food processor with the cauliflower and stock. Add in 1/4 teaspoon of salt and a few grinds of fresh black pepper and pulse everything to combine and then blend until smooth. Be patient and scrape down the sides often. You can add more of the veggie stock to help loosen it, but don’t add too much or else it will become mushy. Eventually, if you continue to blend and scrape, the mixture will become smooth without the added veggie stock.
- Taste and add more salt and pepper or another clove of garlic, if desired. I like to put more than 1/4 teaspoon of salt, but it is always better to start with less and add more, than to add too much for your taste.
- Transfer the cauliflower to a serving bowl, drizzle with some olive oil and top with fresh thyme, if desired.
The post Roasted Garlic Mashed Cauliflower (Low-Carb) appeared first on Never. Not. Eating..
]]>The post Gluten-Free Zucchini Galette appeared first on Never. Not. Eating..
]]>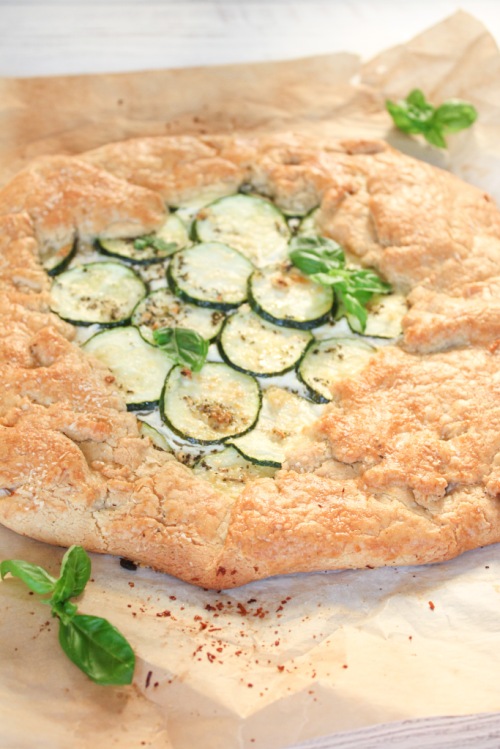
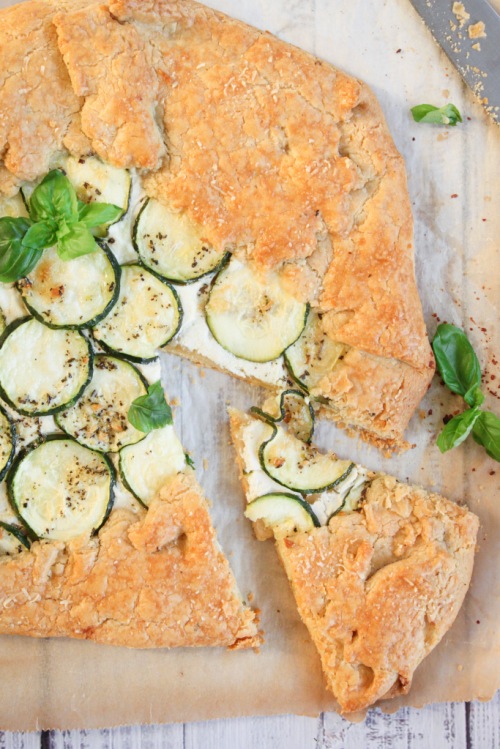
If you know me, you know I love a good galette. And I love mixing it up and creating both sweet and savoury galettes. I’ve tried everything from stone fruit to tomato to apple, and now, zucchini! You can literally wrap any produce in flaky pastry and 90% of the time it will be tasty. WORD.
I decided to make this galette gluten-free, mostly because I avoid gluten as much as I can, but also because I just bought an All-Purpose Gluten-Free Flour by Bob’s Red Mill that I was really excited to try. Of course, anything made with gluten-free flour has a different taste than that made with regular, wheat flour, but I must say, I was impressed with how this crust held together and how flaky it was. If you eat regular wheat flour, feel free to swap in some all-purpose in it’s place!
Let’s talk filling – Smooth, lemony ricotta. This is my favourite part. Extra creamy ricotta with lemon juice and zest, salt and pepper whipped together to make the dreamiest of beds for the lucky zucchini. Smear the crust with as little or as much as you want. The addition of lemon brings a brightness to the dish that makes it perfect for Spring or Summer.
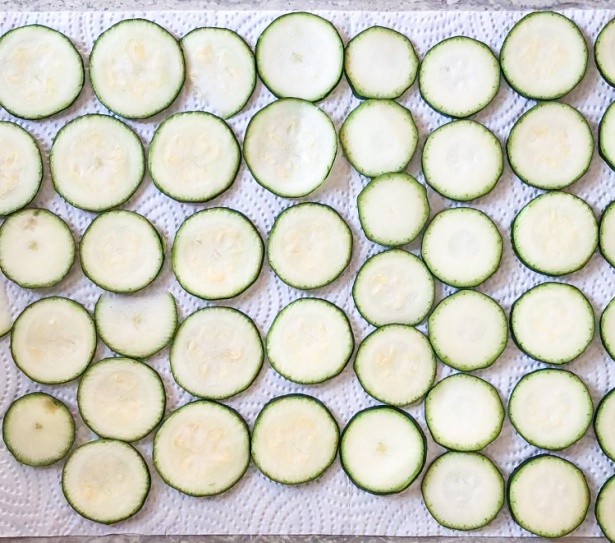
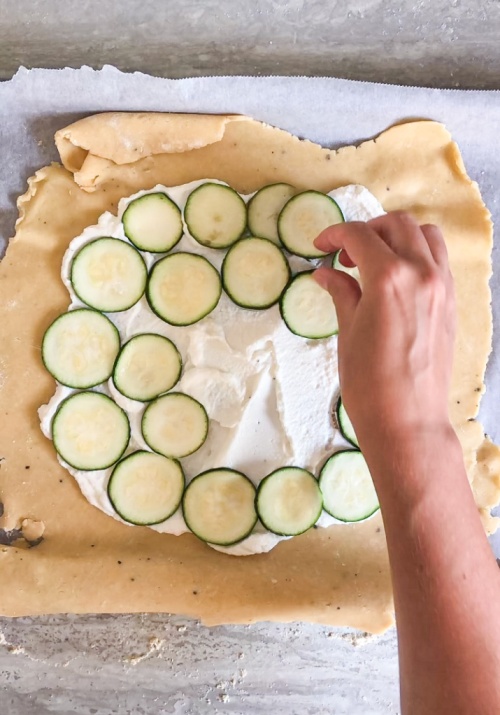
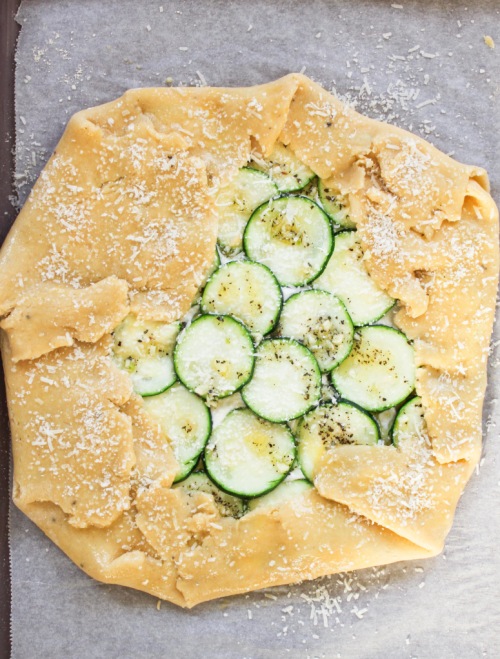
The leading actress here is the zucchini. A few important tips that will help you achieve the ideal galette would be to slice the zucchini about a quarter of an inch thick, making sure they are all the same thickness, place the slices onto paper towels for 30 minutes before assembling your tart and salt them well. This allows the (abundant) excess water to be pulled out, avoiding a soggy mess.

The dough – Finally, let’s talk about the dough. I used to be intimidated when making pastry dough, but it’s actually quite an easy skill to master. The most important part of pastry is to use very cold butter. If the butter is cold, it melts down slower into the flour and, in turn, creates air pockets, which make for flaky pastry. To ensure your butter is perfect, cut it into cubes and store it in the fridge up until you need to use it. After combining it with the flour and forming a disc shape, wrap it in plastic wrap and return it to the fridge to firm up again. After I roll out the dough and assemble the galette, I like to pop it in the fridge yet again for ten minutes. Tip: Assemble your galette, put it in the fridge and set your oven. When your oven is ready, the galette can go right from your fridge to that 400 degree heat!
That’s it…Not too complicated, right?!
Gluten-Free Zucchini Galette
Serving size: 4
Prep time: 15 minutes
Chill time: 30 minutes
Cook time: 30 minutes
Ingredients:
For the crust:
- 1 1/2 cups gluten-free flour
- 1/2 tsp salt
- 1/4 tsp black pepper
- 1/3 cup parmesan cheese, grated, plus more for topping
- 3/4 cup cold butter, cubed
- 1 tbsp white vinegar
- 3-5 tbsp ice-cold water
For the ricotta filling:
- 1 cup ricotta cheese (I use extra creamy)
- zest of one lemon
- 1 tbsp lemon juice
- a few grinds black pepper
- pinch of salt
- 1 small zucchini, sliced into 1/8-inch rounds
- 2 tbsp olive oil
- 1/2 tsp dried basil
- 1 clove garlic, minced
- 1 egg, beaten
Instructions:
For the crust:
- To a food processor, add the flour, salt and pepper and pulse a few times to combine. Add parmesan cheese and the cold butter and pulse again until dough resembles small pea shape crumbs (see photo). Add vinegar and two tablespoons of ice cold water and pulse. Continue to add water, one tablespoon at a time, until dough begins to come together. Typically, I use around four tablespoons in total. Dump the dough onto a piece of plastic wrap, form into a disc and then wrap and place in fridge to chill for 30 minutes.
- Prepare the zucchini by laying the rounds onto paper towels and sprinkling salt on the tops to draw out any excess water. Let sit for at least 30 minutes.
For the ricotta filling:
- To a small bowl, add the ricotta, zest, lemon juice, pepper and salt and mix to combine. Place in the fridge until ready to assemble.
For the rest of the galette:
- Combine olive oil, basil and garlic in a small bowl. Set aside.
- Flour your work surface and remove the dough from the fridge. Roll out into a circle about 1/4-inch thick. Carefully transfer the dough to a parchment lined baking sheet.
- Spread the ricotta mixture onto the dough, leaving a 2-inch border all the way around. Arrange the zucchini slices on top of the ricotta. Drizzle the olive oil mixture on top of the zucchini. Fold over the edges of the pastry. Preheat your oven to 400 degrees Fahrenheit and transfer the galette to the fridge for 10 minutes, or until the oven is ready. Right before placing the galette into the oven, brush the exposed pastry edges with the egg wash and sprinkle on some extra parmesan cheese, if desired. Bake for 25-30 minutes, or until galette is golden brown in colour.
The post Gluten-Free Zucchini Galette appeared first on Never. Not. Eating..
]]>