The post Chocolate Chai Ganache (Vegan, Gluten-Free) appeared first on Never. Not. Eating..
]]>
WHAT IS CHOCOLATE CHAI GANACHE?
A ganache is traditionally a mixture of chocolate and warmed cream. It is often used as a filling or icing for cakes, to serve with fruit or something to stuff pastries with! It is also really addicting on it’s own…by the spoonful. Just sayin’.
THE INGREDIENTS
This Chocolate Chai Ganache is fully vegan, meaning no dairy whatsoever! Whoop, whoop! Instead, I use full-fat coconut milk. You can also use a lower-fat coconut milk, if you prefer. To make this recipe, you will need three ingredients – vegan chocolate, chai tea bags and one can of coconut milk.

THE PROCESS
The first step is to infuse that beautiful chai flavour into the coconut milk. Pour the coconut milk into a small saucepan and add two chai tea bags. Bring to a gentle simmer for 15 minutes. You don’t want to simmer for much longer, or else you will lose more of the liquid. 15 minutes is the perfect length of time to retain enough liquid and still get a rich chai flavour!
When the milk is ready, simply pour it over the vegan chocolate, wait one minute, and then stir until all of the chocolate is melted. See below for different ways you can use this ganache and how the recipe may change slightly, depending on it’s purpose.

CHOCOLATE CHAI GANACHE AS A GLAZE
If you are tired of the overly sweet American buttercream usually used on the outside of cakes, try making this ganache and pouring it over your cake instead. To make this the perfect glaze consistency, use 1 can of coconut milk to 1 cup of chocolate. Once it has cooled, pour it over a cold cake and watch it drip over the sides and coat your cake in a luscious layer of pure YUM.
CHOCOLATE CHAI GANACHE AS A FILLING
Okay, this may be my favourite way to use ganache – INSIDE cakes. Cake layer one goes down, a thick layer of ganache goes on top, cake layer two goes down – perfection! It is important that, if you are making a filling, the texture is thicker so it doesn’t ooze out of the sides of your cake. Therefore, use 1 can of coconut milk to one and a quarter cup of chopped chocolate. After the coconut milk has been poured over the chocolate and stirred completely, the chocolate will begin to firm up. You can even put it in the fridge to speed up the process, but you still want to be able to spread it easily, so keep an eye on it!

DON’T MISS THESE OTHER VEGAN DESSERTS
Vegan Ice Cream Bars (similar to Magnums)
Vegan Mocha Buttercream (fill your cakes with ganache and top them with this perfect buttercream)
Sweet Potato Creme Brulee (perfect for a dinner party)
This post contains affiliate links and I may earn a small commission when purchases are made after clicking the links, at no cost to you. Thank you!
Chocolate Chai Ganache (Vegan, Gluten-Free)
Prep time: 2 minutes
Cook time: 15 minutes
INGREDIENTS
| Purpose | Vegan Chocolate | Coconut Milk | Chai |
|---|---|---|---|
| Glazing cakes | 1 cup, chopped (or chunks) | 1 can (400 ml) | 2 tea bags |
| Filling cakes | 1 1/4 cup, chopped (or chunks) | 1 can (400 ml) | 2 tea bags |
INSTRUCTIONS
- Add coconut milk and tea bags to a small pot and bring to a gentle simmer for 15 minutes, uncovered.
- Place vegan chocolate into a heat-proof bowl, remove the tea bags from the pot, and strain the coconut milk over the chocolate. Let sit for one minute and then whisk until the chocolate is fully melted. Let cool before using.
TIPS:
- If GLAZING – when the ganache has cooled, pour it over an assembled cake that has been elevated and has a baking tray underneath to catch the drips.
- If FILLING – you can place the ganache in the fridge to help cool and firm up, but you want it to be spreadable, so make sure it doesn’t get too firm.
The post Chocolate Chai Ganache (Vegan, Gluten-Free) appeared first on Never. Not. Eating..
]]>The post 5-Ingredient Peach Crisp appeared first on Never. Not. Eating..
]]>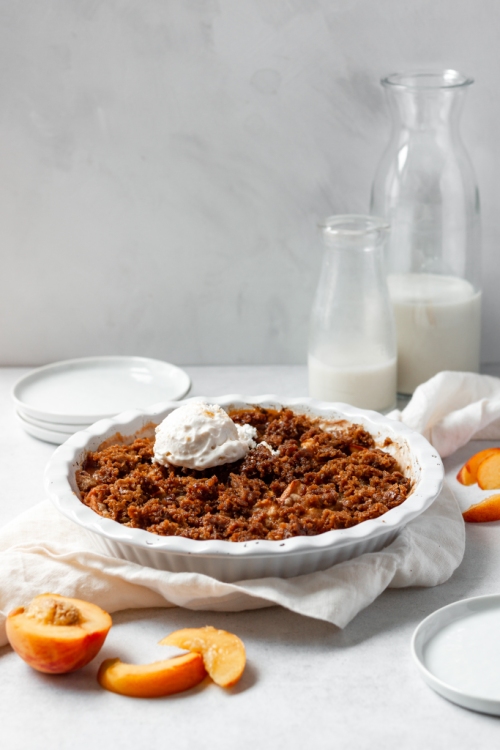
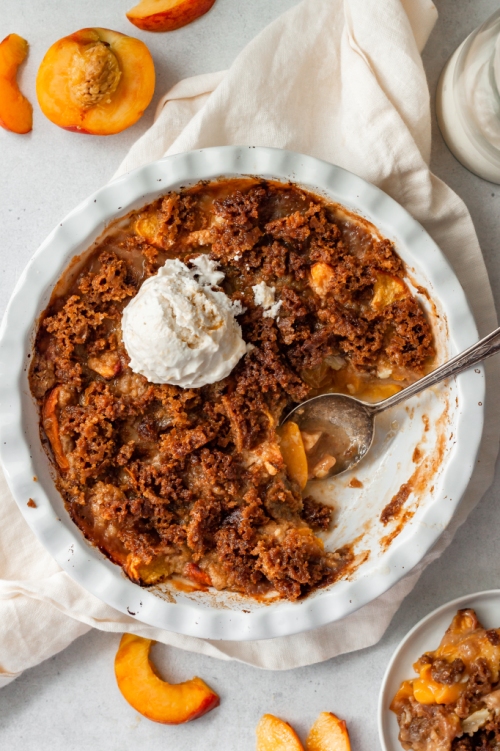
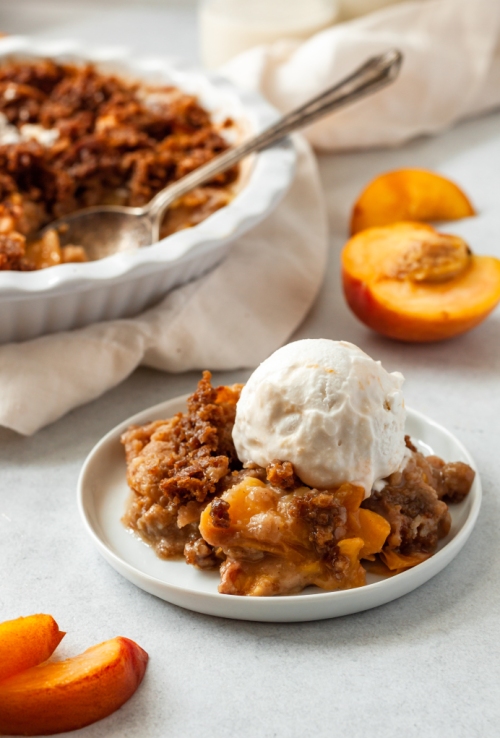
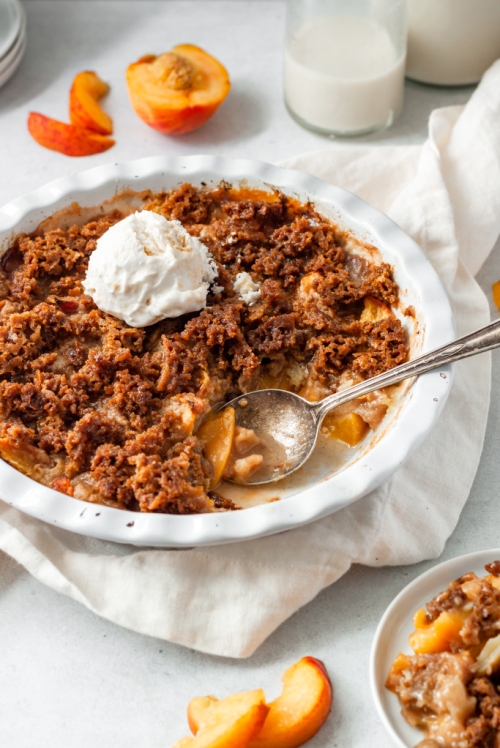
My mom used to make the best apple crisp growing up and it was my absolute favourite post-dinner treat. Since peaches are in season (in Ontario), I decided to make a peach crisp instead, and it did not disappoint. Take your girl up to the north, yeh, for those Canadian peaches! I hope you are a Justin Bieber fan, otherwise this post will make absolutely zero sense to you. And also, we cannot be friends if you aren’t (joking) (not really).
As the name suggests all you need are FIVE simple ingredients:
- Peaches
- Brown sugar
- Flour
- Lemon juice
- Butter
The simplicity of this recipe is insane, making it the easiest, most delicious dessert on the fly. It’s also perfect for a summer BBQ or outdoor gathering. Let’s make some peach crisp!
This post contains affiliate links and I may earn a small commission when purchases are made after clicking the links, at no cost to you. Thank you for supporting me!
5-Ingredient Peach Crisp
Serving size: 5-6 people
Prep time: 10 minutes
Cook time: 35 minutes
Ingredients:
- 3/4 cup brown sugar
- 1/2 cup all-purpose flour
- 1/4 tsp salt
- 1/2 tsp cinnamon powder (optional)
- 6 tbsp cold butter, cubed
- 4 large peaches (approximately 6 cups), washed and cut into 1/2-inch wide slices
- 1.5 tbsp lemon juice
Instructions:
- Preheat oven to 375 degrees Fahrenheit.
- In a medium bowl, combine brown sugar, flour, salt and cinnamon (if using). Use your hands or a pastry cutter to incorporate the cubed butter until it resembles large crumbs. Place the bowl in the freezer while you prepare the peaches.
- Place peaches into an 8-inch baking dish or cast iron pan. Pour the lemon juice over top and use your hands to toss the peaches around.
- Top the peaches with the crumble, making sure it is evenly spread across the top.
- Bake for 30-35 minutes, or until the top begins to turn golden brown and crispy.
Serve warm and with a scoop of vanilla ice cream. Store in an airtight container for up to 2 days.
The post 5-Ingredient Peach Crisp appeared first on Never. Not. Eating..
]]>The post Easy Peanut Butter Coconut Cake appeared first on Never. Not. Eating..
]]>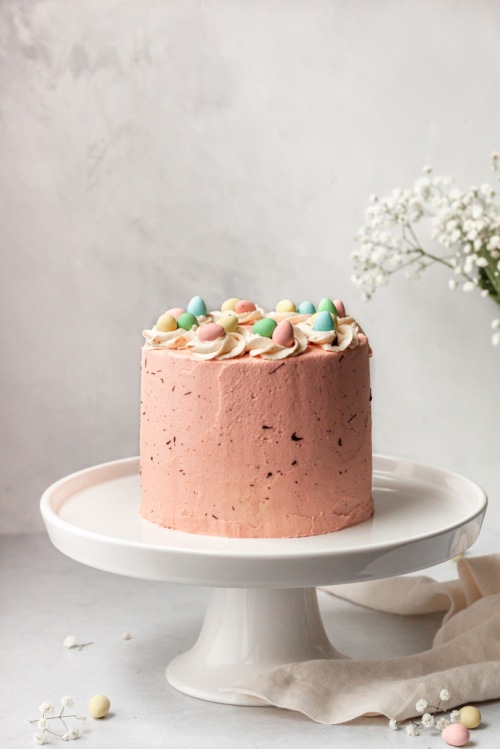
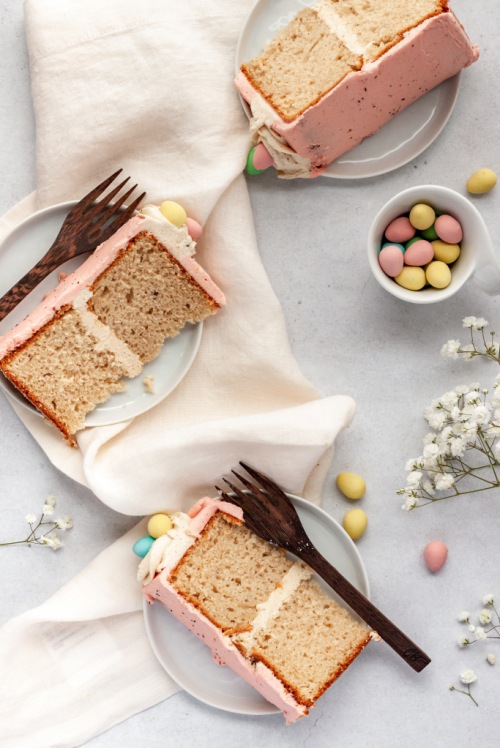
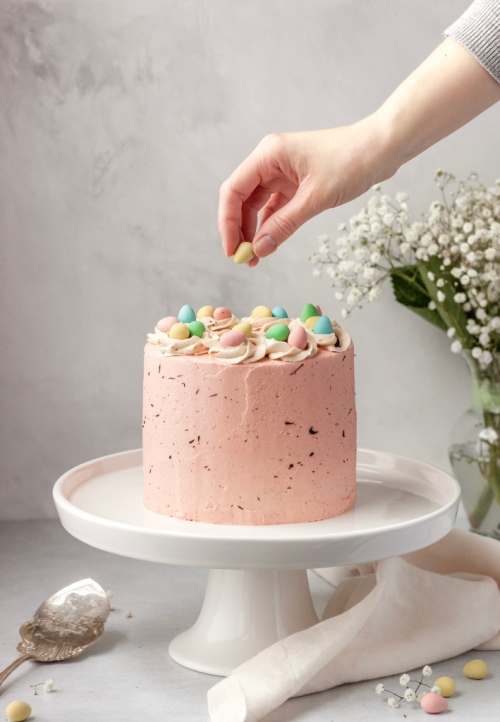
I immediately knew I needed to try to make my own version, and since Easter is around the corner, it seemed like the perfect cake to test out for the occasion.
WHAT IS PEANUT BUTTER COCONUT CAKE?
Let me let you in on a little secret – this is a cheater cake. That’s right, I zhuzhed- (how do you even spell that?! Do you know what I’m trying to say though?) up box cake. Sometimes Betty Crocker pulls through.
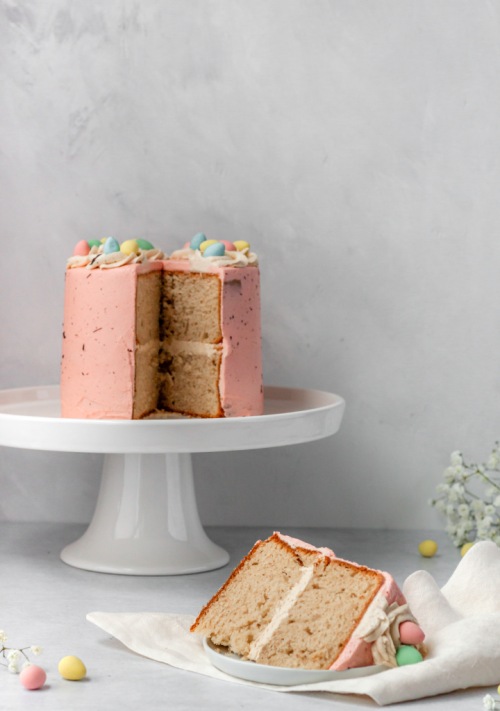
A few weeks ago I purchased a couple of boxes of Betty’s French Vanilla cake because it was on sale for $1.00 – what a steal! Now, I have the perfect use for it. All you need to do is add some peanut butter and swap the milk for coconut milk. It leaves you with this dreamy and decadent, fluffy cake. It’s an Easter miracle!
Oh, and the icing is also a peanut butter buttercream! You’re welcome.
THE INGREDIENTS
This is the simplest cake you will ever make! These are the ingredients you will need:
- boxed french vanilla cake
- eggs
- vegetable oil
- coconut milk (canned and full-fat)
- peanut butter
- icing sugar
- shortening
- butter
DECORATING THIS PEANUT BUTTER COCONUT CAKE
For the decoration, I used gel food colouring (a tiny bit of red) to dye my icing a pale pink colour, reserving a small amount of the original colour (which was slightly brown, from the pb) to create “nests” on top. I filled each nest with a few mini eggs and then melted down some chocolate, which I “flicked” onto my cake using a paintbrush to create a speckling.
Wishing you all a very happy spring and a lovely, cake-filled Easter, if you celebrate!
MORE EASY DESSERT RECIPES TO TRY
Gluten Free Stone Fruit Galette (a brilliant summer dessert)
Apple Cardamom Hand Pies with a Rum Glaze (just store-bought puff pastry and a quick filling)
Vegan Pumpkin Coconut Cake (pumpkin + coconut = goals)
TOOLS I USED TO MAKE THIS EASY PEANUT BUTTER COCONUT CAKE
If this recipe sounds like something you would want to make, click on the images below to see some helpful tools I used to get the job done.


This post contains affiliate links and I may earn a small commission when purchases are made after clicking the links, at no cost to you – thank you!
Easy Peanut Butter Coconut Cake
Servings: Makes four 6-inch cake layers (enough for two small cakes)
Prep time: 15 minutes
Cook time: 30 minutes
INGREDIENTS
- 2 boxes of French Vanilla cake mix (432 g each)
- 6 large eggs
- 3/4 cup vegetable oil
- 1 can full fat coconut milk (400 ml)
- 3/4 cup smooth peanut butter
For the icing:
- 1/2 cup vegetable shortening
- 1/2 cup butter, at room temperature
- 1 tbsp meringue powder (optional)
- 1/2 cup smooth peanut butter
- pinch of salt
- 4 cups powdered sugar
- 4-6 tbsp coconut milk
INSTRUCTIONS
- Preheat oven to 350 degrees Fahrenheit. Butter four 6-inch cake pans, line the bottoms with parchment paper and dust with flour.
- Firstly, dump the cake mix into a large bowl. Create a well in the middle of the mix and add the eggs and oil. Pour the coconut milk into a measuring cup and add water to bring it up to an even 2 cups. Pour into the bowl with the other ingredient and add the peanut butter. Mix all of these ingredients well with an electric mixer, starting on low and working up to medium speed, for about 1-2 minutes. Divide batter between the four cake pans – it works out to be approximately 450g per pan. Bake in the oven for 30-35 minutes, or until a toothpick comes out clean. Cool completely before icing.
For the icing:
- Combine the shortening, butter and peanut butter in a medium bowl and mix with an electric mixer until light and fluffy.
- Add the meringue powder (if using), the salt and one cup of powdered sugar and beat until combined, starting on low.
- Drizzle in one tablespoon of coconut milk and beat. Continue to alternate between adding one cup of powdered sugar and one tablespoon of milk until all of the powdered sugar has been used. If icing is too thick, continue to add half of a tablespoon of milk at a time until you have reached desired consistency.
ASSEMBLY TIPS
- Use a sharp serrated knife to level off the rounded top of each cake
- Place a large dollop in the middle of the first layer and gently push it out to the sides with an offset spatula until it is hanging off the edges
- Flip the second layer upside down before placing on top of the bottom layer
- Add another large dollop on the top of the cake and again, push the icing out to the sides with a back and forth motion, trying to avoid lifting the spatula in an upwards direction
- Once the top is levelled out, use the icing that spilled over the edge from the centre to fill in any gaps on the sides where the two layers meet, and add more icing to help cover the rest of the sides
I hope you enjoyed this easy cake recipe! If you have any feedback or comments, please leave them below! Don’t forget to follow me on Instagram @nevernoteatingca for more recipes, tips and tricks!
The post Easy Peanut Butter Coconut Cake appeared first on Never. Not. Eating..
]]>The post Winter Pear Spice Cake with a Vanilla “Buttercream” (Vegan, GF) appeared first on Never. Not. Eating..
]]>
Feeling sad about the virus during the holidays? Do what I do – spend ample amounts of money on yourself, eat endless desserts and relish in all of your glorious decorations! It will 100% make you feel better.
Firstly, let’s talk about self-love. Haven’t you ever heard, “You gotta look out for #1?!” That’s you, babe! You’re #1! This holiday, why not buy that nice blender you wanted? Or, that new piece of art for your wall? I’m not seeing the people I normally see on Christmas, meaning, I don’t need to buy them gifts, so that money has to go somewhere…right?! Right!
I actually just bought myself a nice, new mattress, and you know what?! I deserve it. If not because I work hard, than because I survived this year. If you are looking for a well-priced, well-made mattress, check out Endy. They are a Canadian company, and have endless 5-star reviews. You get $55 off your purchase by clicking here…Treat yo’self!
The holidays are also for munchin’. It’s stretchy-pant season and I’m all for it. I had every intention of delivering this cake to some family members, but NOPE. Changed my mind. I ate it instead.

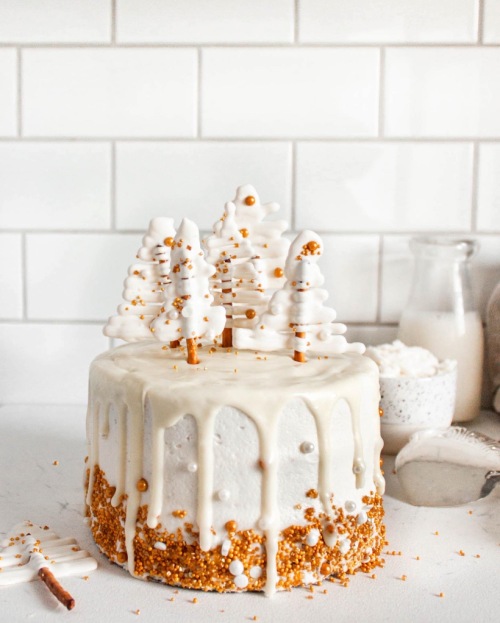
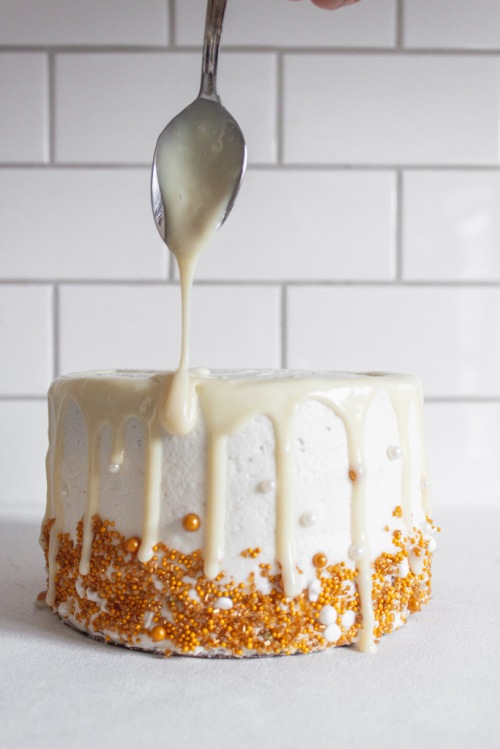
I have a passion for cake decorating – it makes me happy to bring together two of my loves – art and food. For this cake, I wanted to create a clean, and fresh winter scene. The mood is meant to be bright, airy and uplifting. I love how clean and profesh (that’s short for professional…did I just make up the next trending word?!) white looks on cake. I also wanted to add a little sparkle, because it’s Christmas, so I decorated with some gold and white sprinkles to pull it all together!
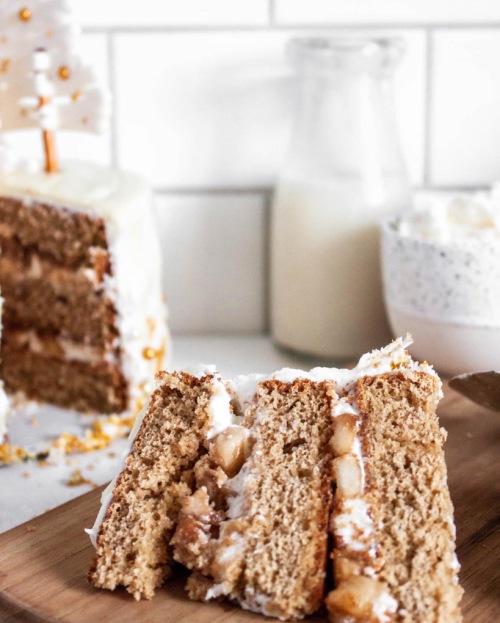
In terms of the cake itself, I wanted to stay true to holiday flavours – warm and aromatic spices with subtle notes of vanilla. I chose a pear filling that screams winter. Did I mention this cake is vegan and gluten-free as well? Yaass.
Winter Pear Spice Cake with a Vanilla “Buttercream” (Vegan, GF)
Yield: A two-layer 6-inch cake
Prep time: 60 minutes
Cook time: 20 minutes
Ingredients:
For the cake:
- 1 cup canned coconut milk
- 1 tbsp apple cider vinegar
- 3/4 cup + 2 tbsp brown sugar, packed
- 1 banana, mashed
- 2 tsp vanilla
- 2 cups gluten-free flour, I use Bob’s Red Mill
- 1 1/4 tsp cinnamon, separated
- 1/2 tsp dried ginger
- 1/4 tsp nutmeg
- 1 tsp salt
- 3/4 tsp baking powder
- 1/2 tsp baking soda
- 1 large pear, peeled and finely diced
For the icing:
- 1/2 cup vegan butter, softened
- 1/2 cup vegetable shortening
- 1 tsp pure vanilla extract
- pinch of salt
- 4 cups powdered sugar
- 3-4 tbsp canned coconut milk
Instructions:
For the cake:
- Grease two, 6-inch baking pans,* line with parchment paper and dust with flour. Preheat oven to 350 degrees Fahrenheit.
- Stir coconut milk and apple cider vinegar together and set aside.
- Wet ingredients: In a large bowl, beat 3/4 cup brown sugar with the banana and vanilla until combined.
- Dry ingredients: In a medium bowl, sift together the flour, cinnamon, ginger, nutmeg, salt, baking powder and baking soda.
- In a few additions, alternate between adding the flour mixture and the coconut milk to the wet ingredients. Beat on medium speed until combined.
- Pour batter into prepared pans and bake 30 minutes, or until inserted toothpick comes out clean. Let sit in pans for five minutes before transferring to a wire rack to finish cooling.
- While your cakes bake, combine the diced pear together with the remaining two tablespoons of brown sugar and 1/4 teaspoon of cinnamon. Let sit for at least 15 minutes.
For the icing:
- Beat butter, shortening, vanilla and salt on medium-high speed until light and fluffy. Add one cup of powdered sugar and beat on low. Continue adding sugar by the cup, along with the coconut milk, one tablespoon at a time, until you have used all of the powdered sugar. If frosting is too thick, slowly add more coconut milk. If it is too thin, add more powdered sugar.
To assemble:
- Use a serrated knife to trim the top (dome-like) part of the cakes off. Place one layer on your turntable, serving plate or cake stand, and dollop a large amount of frosting on top of it. Spread with a spatula to the edges to create an even layer of frosting, and then apply pressure in the middle with a small, offset spatula to create a “well.” You should have a “dam” around the circumference of the cake to contain the filling. Fill the well with the pear mixture. Place the second layer on top, upside down. Place another dollop of frosting on that layer and spread to the edges again. Add more icing to your spatula to cover the sides of the cake. Use a cake scraper to smooth out the icing. Serve and enjoy!
NOTES:
*Sometimes I like to create thinner layers and I use three 6-inch pans instead. If you do this, the cook time will reduce by about 10 minutes…Keep a close eye!
The post Winter Pear Spice Cake with a Vanilla “Buttercream” (Vegan, GF) appeared first on Never. Not. Eating..
]]>The post Gluten Free Stone Fruit Galette appeared first on Never. Not. Eating..
]]>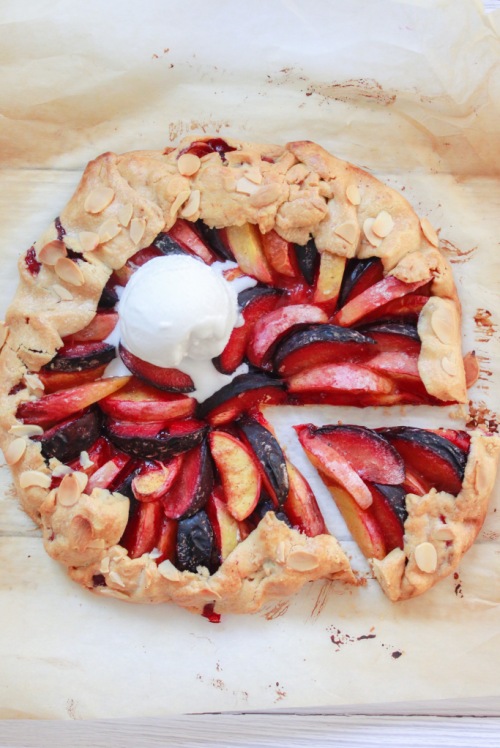
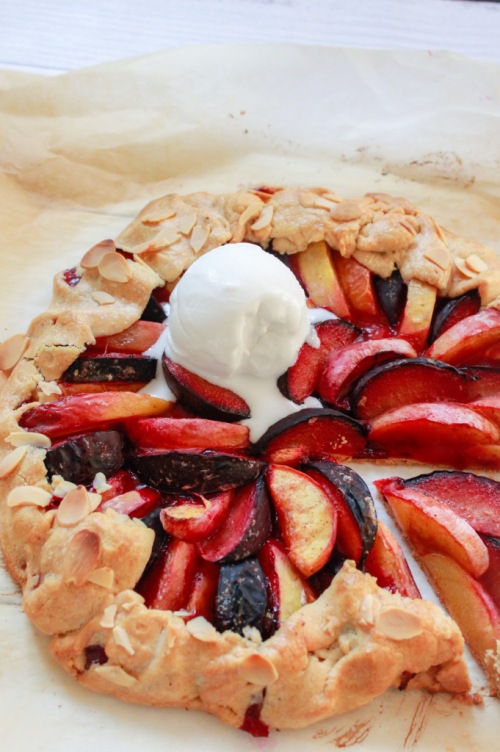
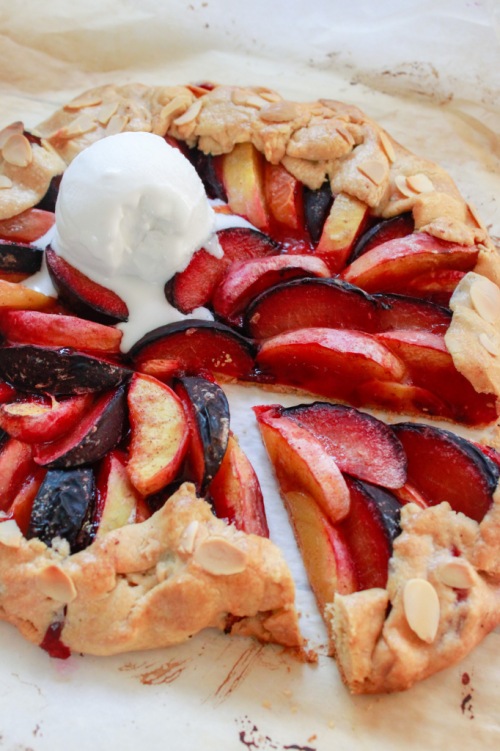
I’m sadly shedding a tear over here as stone fruit season is slipping away. It feels like peaches have only been around for a few weeks, so I’m not sorry that I am bombarding you with a million recipes. And, you need to make this one NOW, before the peaches are gone and it’s too late – get on it!
WHAT IS A GLUTEN FREE STONE FRUIT GALETTE?
If you’ve been following my blog for a while, first of all thank you, I love you, secondly, you know I do a lot of gluten-free stuff and this galette is no exception. Sometimes people think things that are gluten-free don’t taste as good as the glutinous stuff, but I’m here to tell them they’re wrong – WRONG! This crust is still flaky and delicious. So, if taste isn’t compromised, and you had to choose between a gluten-free dessert or a wheat flour dessert…Which one are you going for? I thought so.
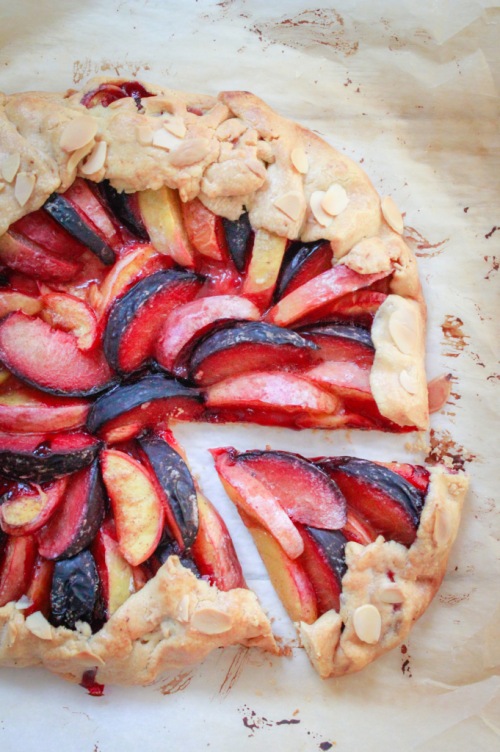
Let’s start by talking about stone fruit. If you are unsure, stone fruit is any fruit with a stone in it. We’re talkin’ peaches, nectarines, plums, cherries, apricots, etc. – you can literally use any of those for this galette. My only recommendation is, if you choose to use apricots, you should add a tablespoon or two of sugar to the fruit as fresh apricots can be very tart. I chose to use peaches, nectarines and plums as those fruits are currently at their peak where I live.
THE PASTRY DOUGH
I think making pastry intimidates people. It intimidates me sometimes, which is why I am always stunned when it turns out so well. Despite being gluten-free, this crust is still everything a great crust should be – flaky, buttery, light, golden. It also rolls out so easily. It’s worth a shot, gluten-free or not – did you catch the rhyme?
WHY SHOULD YOU MAKE THIS GLUTEN FREE STONE FRUIT GALETTE?
If you aren’t convinced to make this yet, I have one further piece of information that may help – TIME. It takes hardly any of it. Seriously, I can understand looking at something like a galette and thinking, “that looks too intense for me,” but this isn’t like that – I promise. The dough takes about 5 minutes to put together, and then it chills in the fridge for 30 minutes. The fruit just needs to be chopped and mixed with a few simple ingredients and also needs to sit for a bit. After that, all you need to do is roll out the dough, place the fruit on top and bake – easy peasy.
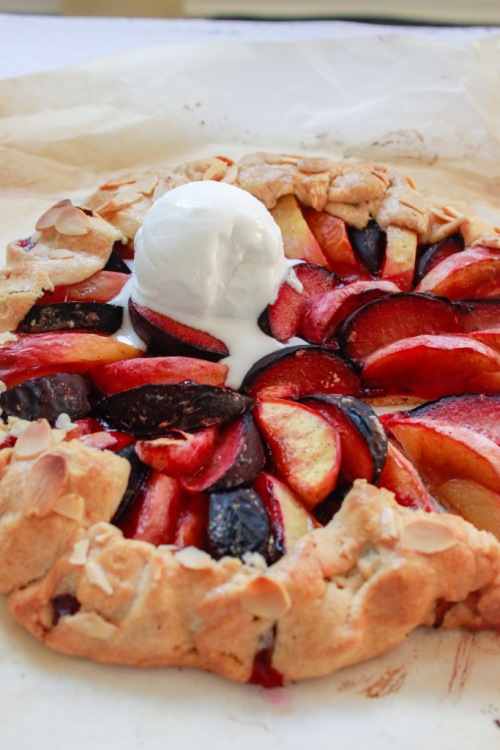
THE INGREDIENTS
Like I said, this galette is so easy to make. Moreover, it requires minimal ingredients that come together quickly. Here’s what you need to pick up from your grocery store (like, today!):
For the crust:
- Gluten-Free All Purpose Flour (I prefer Bob’s Red Mill)
- Salt
- Butter
For the Filling:
- Stone fruit of your choice (peaches, plums, nectarines, etc.)
- Cornstarch
- A lemon
- Cinnamon
- Nutmeg
- Salt
- An egg (for the egg wash)
- Sliced almonds (to top, optional)
OTHER MUST-TRY GALETTE RECIPES
Strawberry Honey Ginger Galette (for a unique dessert when you’re feeling sassy)
Gluten Free Zucchini Galette (another fun option, but this time – savoury)
TOOLS NEEDED TO MAKE THIS GLUTEN FREE STONE FRUIT GALETTE
Click on the images below to see what I use for this recipe.


This post contains affiliate links and I may earn a small commission when purchases are made after clicking the links, at no cost to you – Thank you!
GLUTEN FREE STONE FRUIT GALETTE
Serving size: 8-10
Prep time: 15 minutes
Chill time: 30 minutes
Cook time: 30 minutes
Ingredients
For the crust:
- 1 1/4 cup gluten-free flour
- 1/2 tsp salt
- 3/4 cup cold unsalted butter, cubed
- 1 tbsp vinegar
- ice-cold water
For the filling:
- 4 cups of stone fruit (approximately 5-6 medium-sized fruits, I used 2 peaches, 1 nectarine and 2 plums)
- 1 tbsp cornstarch
- 1 tbsp lemon juice
- 1/2 tsp cinnamon
- pinch of nutmeg
- pinch of salt
- 1 egg, beaten
- 2 tbsp slivered almonds (optional)
Instructions
For the crust:
- Add the flour and salt to a food processor and pulse a few times to combine. Toss in the cold cubed butter and pulse again until dough resembles small peas. Add the vinegar and one tablespoon of ice-cold water and pulse. If needed, add more water, half tablespoon at a time until larger pieces of dough come together – this usually takes me 1.5 to 2 tablespoons of water to achieve. Be careful not to add too much water or dough will be too sticky.
- Turn dough out onto a piece of plastic wrap and use your hands to form dough into a disc. Wrap and place in fridge to chill for 30 minutes.
For the filling:
- Add all of the filling ingredients to a bowl and stir to combine. Set aside while the dough finishes chilling.
Assembling:
- Firstly, make sure you flour your work surface well. Place the dough on floured surface and sprinkle more flour on top of the dough, as well as on your rolling pin. Roll out dough to about 1/4-inch thick. Carefully transfer it to a parchment lined baking sheet and arrange the stone fruit slices on top, in a circular formation, leaving a one-inch border all the way around. Fold the edges over the fruit and place the baking sheet back into the fridge, setting the oven to 400 degrees Fahrenheit to preheat.
- When the oven is ready, remove the galette from the fridge and brush the beaten egg over the exposed pastry edges and top with a few sliced almonds, if desired. Bake the galette for 25-35 minutes, or until crust is golden brown. Be sure to let it cool for 5 minutes before serving, as the fruit can be very hot.
NOTES
This galette is best when eaten immediately, but can be stored in an airtight container in the fridge for up to 3 days.
This recipe is less-sweet, so add a tablespoon or two of sugar to the fruit when combining with the other ingredients if you would like a sweeter dessert.
Try with a scoop of vanilla bean ice cream!
The post Gluten Free Stone Fruit Galette appeared first on Never. Not. Eating..
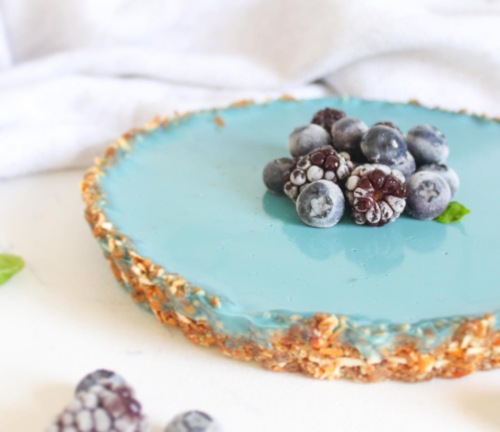
]]>The post Vegan Coconut Spirulina Tart appeared first on Never. Not. Eating..
]]>
I’ve been experiencing a lot with the ingredient agar agar. It is by far the coolest vegan ingredient I’ve tried to-date. It works like gelatin – minus the animal skin and bones. It sets fairly quickly and proves to have amazing results!
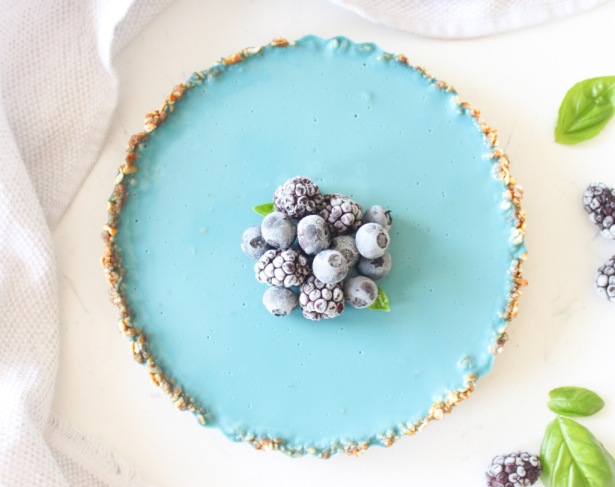
As the weather becomes scorching, here in Canada, I was inspired to make something cool and refreshing. The coconut in this tart gives off some major tropical vibes and creates the perfect dessert to enjoy after your summer BBQ. It’s light and fun!
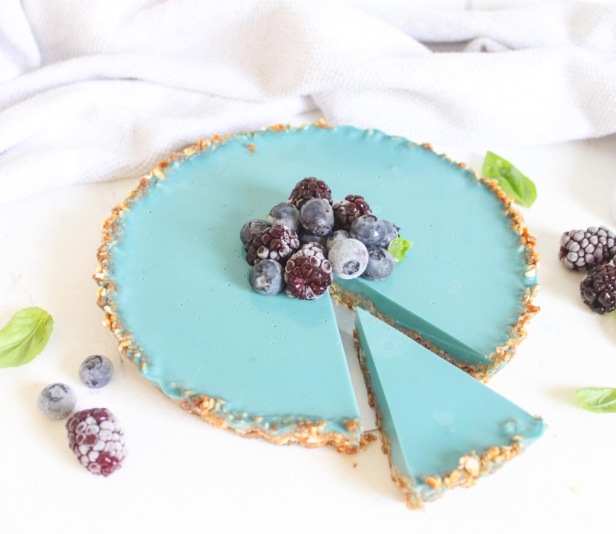
Vegan Coconut Spirulina Tart
Servings: Makes an 8-inch tart
Prep time: 10 minutes
Cook time: 5 minutes
Set time: 1.5 hours
Ingredients:
For the crust:
- 1 cup pretzels
- 1/2 cup pecans
- 6 dates, pitted
- 1 tbsp pure maple syrup
For the filling:
- 3/4 cup full-fat canned coconut milk
- 1 cup organic white grape juice
- 1 tbsp blue spirulina
- 3/4 tsp agar agar
- 1/4 tsp salt
- 2 tbsp pure maple syrup
Instructions:
- Combine all ingredients for the crust into a food processor. Pulse until ingredients stick together – about 1-2 minutes. Dump the crust into a tart pan and press down and into sides. Place in the freezer while you work on the filling.
- In a small pot, add the coconut milk, grape juice and blue spirulina and bring to a boil, whisking often. Once boiling, add the agar agar and continue to whisk for a minute. Reduce the heat to a simmer, add the salt and maple syrup and cook for another two minutes. Remove from heat and strain through a fine-mesh sieve over a measuring cup with a spout. Let cool for 10 minutes before pouring over the crust. Refrigerate for at least an hour and a half or until set through. Best if consumed within 24 hours.
The post Vegan Coconut Spirulina Tart appeared first on Never. Not. Eating..
]]>