The post Flourless Oatmeal Blueberry Cookies appeared first on Never. Not. Eating..
]]>
WHAT ARE FLOURLESS OATMEAL BLUEBERRY COOKIES?
These healthy cookies are a guilt-free, post-dinner or pre-workout snack! They are made in one bowl, with only natural ingredients and no refined sugar. I make them every week because I refuse to allow dinner to be my final meal of the night.

WHY I LIKE THESE COOKIES
I don’t just like these cookies – I am obsessed with them! The blueberries add the juiciest “pop” and a perfect sweetness that is unmatched, in my opinion. I also feel good about eating them (every day), as they only contain natural ingredients, all of which are pantry staples.

THE INGREDIENTS
You only need a few pantry ingredients to make this recipe:
- banana
- peanut butter
- egg
- vanilla
- maple syrup
- cinnamon
- salt
- oats
- blueberries
MAKING FLOURLESS OATMEAL BLUEBERRY COOKIES
You will honestly be amazed with how easy these are to make. Grab a big mixing bowl and add all of the wet ingredients – a mashed banana, peanut butter, egg, vanilla and syrup. Whisk together – that’s right, you don’t even need an electric mixer!
Add in the dry ingredients – the salt, cinnamon and oats. Switch over to a spatula to make sure everything has been mixed fully. Finally, fold in the blueberries and save a few to put on top of the cookies before baking. Scoop the dough onto a parchment lined cookie sheet, using a large cookie scoop and flatten them with the palm of your hand (they will not rise in the oven, so no need to space them too far apart). Bake for 12-14 minutes and enjoy!

TIPS
- Choose an all-natural nut butter to maintain the healthiness of this recipe (look at the ingredient list on the jar – it should only have one ingredient)!
- You can use fresh or frozen blueberries for this recipes, either one works beautifully!
- The cookie dough will be on the wetter side – don’t worry, they will bake up nicely and easily release from the baking sheet when they are fully cooked.
OTHER HEALTHY TREATS YOU NEED TO TRY
Vegan Rice Crispy Chocolate Treats (a fun, bite-sized snack)
No-Measure Oatmeal Almond Butter Cookies (skip the measuring with these perfect failproof cookies)
Healthy Pumpkin Oatmeal Chocolate Chip Cookies (the perfect Fall version of these Flourless Oatmeal Blueberry Cookies)
TOOLS I USED TO MAKE THESE FLOURLESS OATMEAL BLUEBERRY COOKIES
Click on the images below to see what I used for this recipe.


FLOURLESS OATMEAL BLUEBERRY COOKIES
Servings: Makes 8 large cookies
Prep time: 10 minutes
Cook time: 13 minutes
Ingredients
- 1 very ripe banana, mashed
- 1/4 cup peanut butter (or any nut butter)
- 1 tbsp pure vanilla extract
- 2 tbsp pure maple syrup
- 1 large egg
- 1/2 tsp cinnamon
- 1/2 tsp salt
- 2 1/4 – 2 1/2 cups rolled oats
- 1 cup fresh or frozen blueberries
Instructions
- Preheat your oven to 350 degrees Fahrenheit.
- In a large bowl, whisk together the mashed banana, peanut butter, vanilla and maple syrup. Next, add in the egg and whisk until fully combined.
- Add the cinnamon, salt and 2 1/4 cups of oats to the bowl. Mix with a spatula. If the dough is very wet, add in the extra 1/4 cup of oats. The mixture should be slightly on the wetter side.
- Fold in the blueberries and then use a 1.5 tablespoon cookie scoop to form 12 cookies (alternatively, roll into balls using wet hands). Place on a parchment lined baking sheet and use your palm to flatten each cookie. As these will not spread, you don’t need to leave too much space between them.
- Bake for 13 minutes, remove from oven and let cool for a minute on the baking sheet before transferring to a wire rack to cool completely.
- Once they have fully cooled, store in an airtight container for up to four days.

The post Flourless Oatmeal Blueberry Cookies appeared first on Never. Not. Eating..
]]>The post Vegan Whipped Cream (Vanilla Bean) appeared first on Never. Not. Eating..
]]>I’m here to tell you that you can vegan-ify whipped cream using coconut milk instead of dairy cream. Irish coffee topping? Check! Berries and cream? Check! Pie topping? Check! This vegan whipped cream recipe does it all!

WHAT IS VEGAN WHIPPED CREAM?
It’s a fact that a high percentage of humans living on Earth have a sensitivity to dairy, so if that’s true for you, or you eat a plant-based diet, why not try this delicious and completely vegan whipped cream? It is made with solidified coconut milk instead of dairy cream. When placed in the fridge, canned coconut milk firms up and becomes perfect for whipping into a delicious dream cloud of a dessert topping!
WHY I LIKE THIS RECIPE
I recently took a food sensitivity test and guess what? Yup, that’s right – dairy was marked as an inflammatory food for my body. This didn’t surprise me, knowing that more than two-thirds of the world is lactose intolerant. I naturally try to steer clear of having dairy in my diet anyway, but this test really gave me the push I needed to avoid it on most days.
This Vegan Whipped Cream is the perfect substitute for the real thing. It whips up to a luscious texture that mimics that of real whipped cream. I like knowing that I am able to still enjoy some of my favourite desserts, despite it not having traditional ingredients in it. If I can make it plant based, I will!

INGREDIENTS
This Vegan Whipped Cream recipe only calls for three ingredients:
- canned coconut milk
- powdered sugar
- one vanilla bean (or vanilla extract)

MAKING VEGAN WHIPPED CREAM
This recipe couldn’t be easier. All you need to do is place all of the ingredients into a bowl and whip until stiff peaks form – it actually takes less time than a dairy-based whip cream!
TIPS
- Make sure your canned coconut milk is full-fat and a good quality brand. I use Aroy-D.
- Try not to shake your can, you want to keep the coconut milk and water separate.
- Place the can of coconut milk in the fridge for as long as possible. It needs at least 24 hours for the milk to firm up. I usually just place one can in the fridge when I buy it and leave it in there for a few weeks, until I decide I want to make whipped cream.
- Place your bowl and beater attachments into the freezer for at least 15 minutes beforehand to make sure it stays nice and cold.
- Place the cold bowl in a larger bowl filled with ice if you are making this on a hot day.

OTHER VEGAN RECIPES TO TRY
Chocolate Chai Ganache (the perfect vessel for this whipped cream).
Vegan Rice Crispy Chocolate Treats (the most-fun little snack)!
Vegan Protein Energy Balls (the perfect pre-gym pump-me-up).
TOOLS I USED TO MAKE THIS VEGAN WHIPPED CREAM
Click on the images below to see what I used for this recipe.


Vegan Whipped Cream (Vanilla Bean)
Servings: Approximately 2 cups
Prep time: 20 minutes
INGREDIENTS
- 1 can full-fat coconut milk (placed in the fridge for at least 24 hours)
- 3 tbsp powdered sugar
- 1/2 vanilla bean or 2 tsp pure vanilla extract
INSTRUCTIONS
- Set up your station – Place a medium bowl and the beater attachments from your hand mixer into the freezer for at least 15 minutes. Measure out your sugar and set aside. Slice the vanilla bean lengthwise, scraping the inner seeds out with a knife and set aside. Alternatively, measure out your vanilla extract into a small bowl.
- Open the cold can of coconut milk, being careful not to shake it. Remove the bowl and attachments from the freezer and scoop out the top, solid part of the canned milk into the bowl. Don’t throw away the water at the bottom of the can – reserve it for smoothies or other recipes.
- Add the powdered sugar and vanilla to the bowl with the coconut milk. Whip on medium-high speed until stiff peaks form, approximately 1-2 minutes. Taste the whipped cream – if you would like it sweeter, add another tablespoon of powdered sugar and whip to combine.
Store in an airtight container in the fridge for up to 3 days.
The post Vegan Whipped Cream (Vanilla Bean) appeared first on Never. Not. Eating..
]]>The post Healthy Pumpkin Oatmeal Chocolate Chip Cookies appeared first on Never. Not. Eating..
]]>
WHAT ARE PUMPKIN OATMEAL CHOCOLATE CHIP COOKIES?
These cookies are a one-bowl miracle – they are simple to make, healthy and perfect for autumn. Refined-sugar free, these little treats can be eaten without guilt, for breakfast or as a snack in-between meals.

WHY I LIKE THESE PUMPKIN OATMEAL CHOCOLATE CHIP COOKIES
Other than for obvious reasons, I love these cookies because they are a fun and healthy way to incorporate pumpkin into a recipe. It has proven to be challenging to find recipes made with pumpkin puree that aren’t packed with processed sugars and unhealthy fats. I also love making my own pumpkin puree (recipe found here) to ensure I know exactly what is going into my baking!

THE INGREDIENTS
A few simple pantry ingredients are all you will need to make these cookies:
- Banana
- Pumpkin puree (NOT pie filling)
- Cashew butter (or any nut butter)
- Vanilla
- Maple syrup
- An egg
- Spices (pumpkin pie and cinnamon)
- Oats
- Dark chocolate chips
MAKING HEALTHY PUMPKIN OATMEAL CHOCOLATE CHIP COOKIES
The first thing you will want to do is whisk together all of your wet ingredients – mash up the banana and add in the puree, nut butter, vanilla, maple syrup and egg.
Add your spices, some salt, the oats and chocolate chips right into the wet ingredients and mix with a spatula. Once combined, use a large cookie scoop to portion your cookies, placing them on a parchment lined baking sheet. These will not spread out, so you don’t need to worry about spacing them out too much. Flatten them with the palm of your hand and bake for 11-14 minutes.

TIPS
- Choose an all-natural nut butter to maintain the healthiness of this recipe (look at the ingredient list on the jar – it should only have one ingredient)!
- Don’t use pumpkin pie filling. Make sure you have pure pumpkin puree – click here for a recipe, or find it canned at any grocery store.
- The cookie dough will be on the wetter side – don’t worry, they will bake up nicely and easily release from the baking sheet when they are fully cooked.
OTHER HEALTHY TREATS YOU NEED TO TRY
No-Measure Oatmeal Almond Butter Cookies (skip the measuring with these failproof cookies)
Vegan Rice Crispy Chocolate Treats (a fun, bite-size snack)
Vegan Ice Cream Bars (like a Magnum, but vegan)

TOOLS I USED TO MAKE THESE PUMPKIN OATMEAL CHOCOLATE CHIP COOKIES
Click on the images below to see what I used for this recipe.
Healthy Pumpkin Oatmeal Chocolate Chip Cookies
Servings: Makes a dozen cookies
Prep time: 10 minutes
Cook time: 13 minutes
Ingredients
- 1 very ripe banana, mashed
- 1/4 cup pure pumpkin puree
- 1/4 cup cashew butter (or any nut butter)
- 1 tsp pure vanilla extract
- 2 tbsp pure maple syrup
- 1 large egg
- 1/2 tsp pumpkin pie spice
- 1/4 tsp cinnamon
- 1/2 tsp salt
- 2 1/4 – 2 1/2 cups rolled oats
- 3/4 cup sugar-free dark chocolate chips
Instructions
- Preheat your oven to 350 degrees Fahrenheit.
- In a large bowl, whisk together the mashed banana, pumpkin puree, cashew butter, vanilla and maple syrup. Add in the egg and whisk until fully combined.
- Add the pumpkin pie spice, cinnamon, salt and 2 1/4 cups of oats to the bowl. Mix with a spatula. If the dough is very wet, add in the extra 1/4 cup of oats. The mixture should be slightly on the wetter side.
- Fold in the chocolate chips and then use a 1.5 tablespoon cookie scoop to form 12 cookies (alternatively, roll into balls using wet hands). Place on a parchment lined baking sheet and use your palm to flatten each cookie. As these will not spread, you don’t need to leave too much space between them.
- Bake for 13 minutes, remove from oven and let cool for 2 minutes on the baking sheet before transferring to a wire rack to cool completely.
- Once they have fully cooled, store in an airtight container for up to four days.

The post Healthy Pumpkin Oatmeal Chocolate Chip Cookies appeared first on Never. Not. Eating..
]]>The post Caramelized Pear Trifle appeared first on Never. Not. Eating..
]]>
WHAT IS A TRIFLE?
Trifle is an English dessert that usually includes alcohol-soaked cake, beneath layers of custard, fruit and whipped cream. There are many different ways to compose a trifle, but the key is for all of those beautiful ingredients to be layered in a glass bowl so they are visible to those who will be eating it.

THE LAYERS OF THIS CARAMELIZED PEAR TRIFLE
This may not be your traditional trifle, but nothing I do is traditional, so you’ll have to excuse me as I add my own flair to my recipes. This trifle includes four delicious layers – a winter spiced pear cake, gooey caramelized pears, a crunchy walnut crumble and fluffy vanilla whipped cream.
Winter Spiced Pear Cake – This cake is one of my favourites, as it’s actually completely vegan (if you want to make it on it’s own), and gluten-free! I add ginger, cinnamon and nutmeg, to give it that warm, cozy, winter appeal.
Caramelized Pears – You can’t have a caramelized pear trifle without caramelized pears! Finely diced pears warmed with brown sugar and cinnamon – these pears are to-die-for in this trifle, and on their own…by the spoonful!
Crunchy Walnut Crumble – Dessert isn’t dessert without a crunch factor, and this is it. Toasted walnuts tossed with melted butter and sugar bring this dessert to life!
Vanilla Whipped Cream – The perfect and prettiest topping to finish it all off!

HOW TO MAKE THIS DESSERT FULLY VEGAN
The cake itself is actually a fully vegan cake, so if you would like to keep this dessert vegan, follow the instructions below:
- Make the cake layer in the exact same way.
- For the caramelized pear and crunchy walnut layers – substitute regular butter for vegan butter.
- For the whipped cream, use canned coconut milk that has been chilling in the fridge for at least 24 hours, instead of whipping cream. Scoop the top, solid milk from the can and whip in the same manner as the recipe suggests!

THE PERFECT TIME TO MAKE THIS TRIFLE
When I think of pears, I often think of winter and warm spices. This trifle would definitely be a kick-ass dessert to serve during any fall or winter holiday – Thanksgiving, Christmas, New Year’s – you name it! Each individual component can be made the day before and then assembled prior to serving. This is definitely a dessert that feeds a crowd!
OTHER DELICIOUS LAYERED DESSERTS YOU MUST TRY:
Vegan Coconut Panna Cotta with a Mango Compote (made in individual serving cups!)
Dark Chocolate Almond Butter Bars (what’s better than nut butter + chocolate?!)
This post contains affiliate links and I may earn a small commission when purchases are made after clicking the links, at no cost to you. Thank you!
Caramelized Pear Trifle
*I highly recommend reading through this recipe in full first, before making.
Serving size: 8-10
Prep time: 45 minutes
Cook time: 35 minutes
Ingredients
For the spiced cake layer:
- 1 cup full-fat, canned coconut milk
- 1 tbsp apple cider vinegar
- 3/4 cup brown sugar, packed
- 1 banana, mashed
- 2 tsp vanilla
- 2 cups gluten-free flour, plus 1 tbsp for dusting cake pans, I use Bob’s Red Mill
- 1 tsp cinnamon, separated
- 1/2 tsp dried ginger
- 1/4 tsp nutmeg
- 1 tsp salt
- 3/4 tsp baking powder
- 1/2 tsp baking soda
For the caramelized pear layer:
- 2 tbsp unsalted butter (or vegan butter)
- 4 pears, small dice (I like to use Bartlett)
- 1/4 cup brown sugar
- 1/2 tsp cinnamon powder
- pinch of salt
For the crunchy walnut layer:
- 1 cup walnuts, chopped into small pieces
- 2 tbsp unsalted butter (or vegan butter), melted
- 1 tbsp brown sugar
- pinch of salt
For the vanilla whipped cream layer:
- 2 cups heavy whipping cream
- 2 tbsp powdered sugar
- 1 tbsp pure vanilla extract
Instructions
For the spiced cake layer:
- Preheat oven to 350 degrees Fahrenheit and prepare two, six-inch cake pans by buttering, lining the bottom with parchment, and dusting with some of the gluten free flour.
- Stir the apple cider vinegar into the coconut milk and set aside.
- Using a stand mixer or a hand mixer, beat together the brown sugar, banana and vanilla in a large bowl until combined.
- In a separate, medium bowl, sift the flour, cinnamon, ginger, nutmeg, salt, baking powder and baking soda.
- In a few additions, alternate between adding the dry ingredients and coconut milk to the banana mixture, beating until combined and smooth.
- Divide batter evenly between pans and bake for 25-30 minutes, or until inserted toothpick comes out clean.
- Let cool in pan for 5 minutes and then transfer to wire rack to finish cooling.
For the caramelized pear layer:
- Place all ingredients in a saucepan over medium-low heat and cook until the pears are soft, approximately 10 minutes. Remove from heat and set aside while preparing the remainder of the ingredients.
For the crunchy walnut layer:
- Preheat oven to 350 degrees Fahrenheit.
- Place walnuts on a parchment lined baking sheet and toast in the oven for 5-10 minutes, watching very carefully – they burn quickly! Remove when they are starting to look a bit more brown in colour and they become fragrant.
- Mix the walnuts with the melted butter, brown sugar and a pinch of salt and set aside.
For the vanilla whipped cream layer:
- Place a large bowl and beaters into the freezer for at least 15 minutes.
- Pour the heavy whipping cream into the cold bowl and beat on medium-high speed with the cold beaters, until soft peaks form. Add in the powdered sugar and beat again until medium peaks form (about 1-2 minutes in total). Add the vanilla and beat until just combined.
To assemble this Caramelized Pear Trifle:
- Slice the cake rounds into cubes and place 3/4 of them on the bottom of your glass trifle bowl.
- Spoon over half of the caramelized pears.
- Sprinkle half of the crunchy walnuts.
- Top with half of the whipped cream.
- Repeat steps 1-4 with the remaining ingredients and finish it off with a dusting of cinnamon on top! Enjoy!
I recommend serving this trifle immediately. It can be stored in the fridge for up to two days.

The post Caramelized Pear Trifle appeared first on Never. Not. Eating..
]]>The post 5-Ingredient Peach Crisp appeared first on Never. Not. Eating..
]]>
My mom used to make the best apple crisp growing up and it was my absolute favourite post-dinner treat. Since peaches are in season (in Ontario), I decided to make a peach crisp instead, and it did not disappoint. Take your girl up to the north, yeh, for those Canadian peaches! I hope you are a Justin Bieber fan, otherwise this post will make absolutely zero sense to you. And also, we cannot be friends if you aren’t (joking) (not really).
As the name suggests all you need are FIVE simple ingredients:
- Peaches
- Brown sugar
- Flour
- Lemon juice
- Butter
The simplicity of this recipe is insane, making it the easiest, most delicious dessert on the fly. It’s also perfect for a summer BBQ or outdoor gathering. Let’s make some peach crisp!
This post contains affiliate links and I may earn a small commission when purchases are made after clicking the links, at no cost to you. Thank you for supporting me!
5-Ingredient Peach Crisp
Serving size: 5-6 people
Prep time: 10 minutes
Cook time: 35 minutes
Ingredients:
- 3/4 cup brown sugar
- 1/2 cup all-purpose flour
- 1/4 tsp salt
- 1/2 tsp cinnamon powder (optional)
- 6 tbsp cold butter, cubed
- 4 large peaches (approximately 6 cups), washed and cut into 1/2-inch wide slices
- 1.5 tbsp lemon juice
Instructions:
- Preheat oven to 375 degrees Fahrenheit.
- In a medium bowl, combine brown sugar, flour, salt and cinnamon (if using). Use your hands or a pastry cutter to incorporate the cubed butter until it resembles large crumbs. Place the bowl in the freezer while you prepare the peaches.
- Place peaches into an 8-inch baking dish or cast iron pan. Pour the lemon juice over top and use your hands to toss the peaches around.
- Top the peaches with the crumble, making sure it is evenly spread across the top.
- Bake for 30-35 minutes, or until the top begins to turn golden brown and crispy.
Serve warm and with a scoop of vanilla ice cream. Store in an airtight container for up to 2 days.
The post 5-Ingredient Peach Crisp appeared first on Never. Not. Eating..
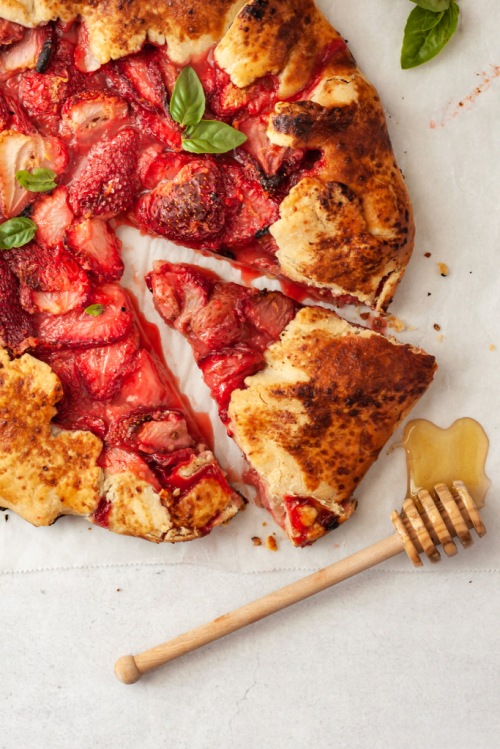
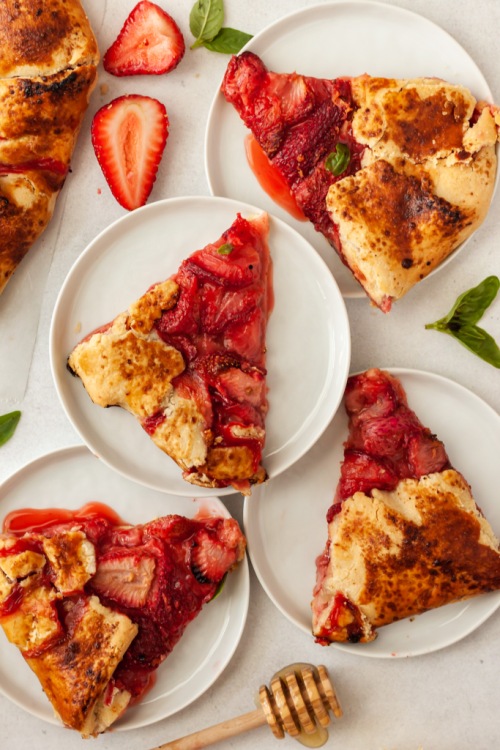
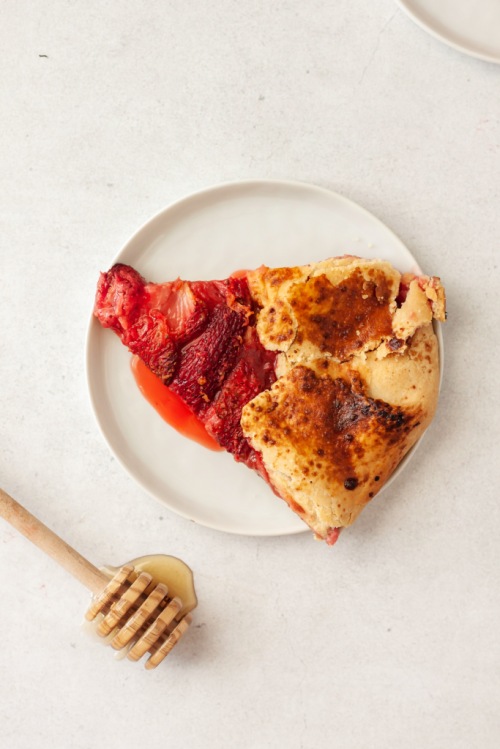
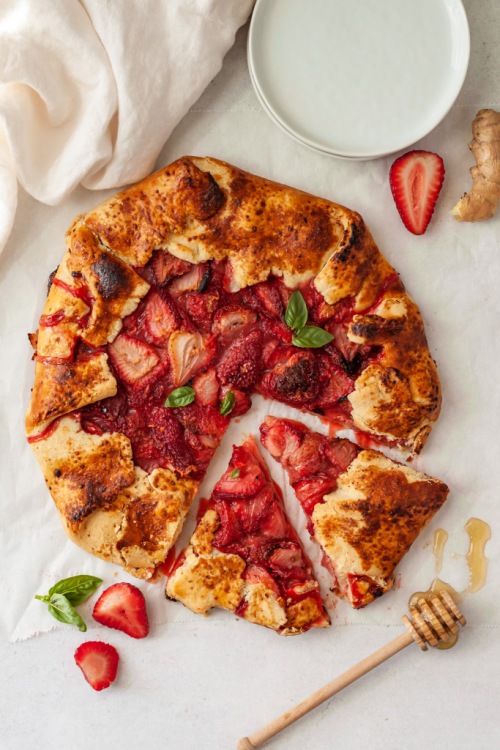
]]>The post Strawberry Honey Ginger Galette appeared first on Never. Not. Eating..
]]>
WHAT IS A STRAWBERRY HONEY GINGER GALETTE?
Sometimes I just need a WAHBAM, hit-me-in-the-face kind of dessert and I think this is it. We all know and love the humble strawberry, but sometimes she gets lonely all by herself. Therefore, I introduced her to a new friend in this recipe and they form a perfect match. Strawberry + ginger = BFFs.
I’ll be straight up with you – if you don’t like ginger, this recipe probably isn’t for you, however, I’m okay with you leaving it out. I’ll allow it, just this once. But, if you do like ginger, then why not switch up your summer dessert game? It adds a little kick that only ginger can give and I’m here for it.
THE INGREDIENTS
This recipe is not complicated. It’s actually quite simple, and requires minimal ingredients. Here is what you will need:
For the Dough:
- Flour
- Butter
- Salt & Ginger powder
For the filling:
- Strawberries
- Fresh ginger
- A lemon
- Honey
- Cornstarch
- An egg + sanding sugar (for the egg wash)
THE PASTRY DOUGH
You can definitely use store-bought pie dough for this, but why would you when making it yourself is uber easy?! All you need to do is throw all ingredients into a food processor and it comes together in a jiffy. You then roll it out, fill it up, fold it over, bake it and it becomes a gorgeously rustic little galette that will please all of your ginger-loving friends.
To ensure your pie dough is extra flaky when baked, you need to make sure your butter is super cold. I like to cube up the required amount and put the cubes in the freezer while I measure out the rest of the ingredients. This allows the butter to melt slower and create pockets of air that form those gorgeous layers in your crust.
THE FILLING
Firstly, you are going to want to prepare your strawberries. If they are smaller, halve them, and if they are larger, I like to cut them into thirds to have nice, big pieces in the galette. They will shrink down as they cook, so keep this in mind!
When your strawberries are ready, place them in a bowl with the other filling ingredients and that is *literally* it. Let it sit to thicken up while you roll out your dough – how easy is that?!
OTHER GLUTEN-FREE RECIPES
Gluten-Free Crepes with an Apple Cinnamon Compote (the perfect weekend breakfast)
Chocolate Chai Ganache (a luscious cake filling)
Gluten-Free Stone Fruit Galette (another open face pie for you to enjoy)
Gluten-Free Zucchini Galette (another galette, but a more savoury option)
TOOLS NEEDED TO MAKE THIS STRAWBERRY HONEY GINGER GALETTE
Click on the images below to see what I use for this recipe.


This post contains affiliate links and I may earn a small commission when purchases are made after clicking the links, at no cost to you – Thank you!
STRAWBERRY HONEY GINGER GALETTE
Serving size: 7-8
Prep time: 30 minutes (much of this is inactive time)
Cook time: 30 minutes
Ingredients:
- 1 1/2 cups all purpose flour
- 1/2 tsp salt
- 1/2 tsp ginger powder
- Half cup + 1 tbsp butter, cubed and very cold*
- 1.5 pounds fresh strawberries, halved
- zest of one lemon
- 1 1/2 tbsp lemon juice
- 1/2 – 1 tbsp fresh ginger, minced**
- 1 tbsp cornstarch
- 2 tbsp honey
- 1 egg, beaten
- 1 tbsp sugar (optional)
Instructions:
- Start with the dough by adding the flour, salt and ginger powder to a food processor and pulse to combine. Add the cold butter and continue to pulse until dough begins to resemble peas. Drizzle in one tablespoon of ice cold water and continue to pulse until the dough comes together. This may require an extra tablespoon or so of water, but make sure to add it slowly. Finally, form dough into a disc, cover in plastic wrap and refrigerate for 30 minutes.
- While the dough is resting, create the filling. Combine the strawberries, zest, lemon juice, ginger, honey and cornstarch in a bowl with a pinch of salt and set aside.
- Place the dough disc onto a lightly floured surface and roll it out to 1/8-inch thick. Carefully transfer to a parchment lined baking sheet. Scoop the filling into the middle of the pie dough with a slotted spoon, trying to avoid adding the excess liquid. Spread the filling out, leaving a 1.5 inch border all the way around. Work your way around the perimeter, folding the edges of the dough overtop of the filling. Place the entire baking sheet in the fridge to firm up the butter again, while the oven preheats.
- Preheat your oven to 400 degrees Fahrenheit.
- When your oven is ready, remove the galette from the fridge and brush the pastry edges with the beaten egg. Sprinkle the sugar over the egg wash and bake for 30-35 minutes, or until crust is golden brown. Remove from oven and let cool for 10 minutes before serving!
NOTES:
*I like to cube my butter ahead of time and place it in the freezer while I prep the other ingredients.
**Depending on how much of a kick you want from the ginger, I would measure it according to the people you are serving. If you just want a hint of ginger, put in 1/2 tbsp. If you want to really taste it, add up to 1 tbsp.
The post Strawberry Honey Ginger Galette appeared first on Never. Not. Eating..
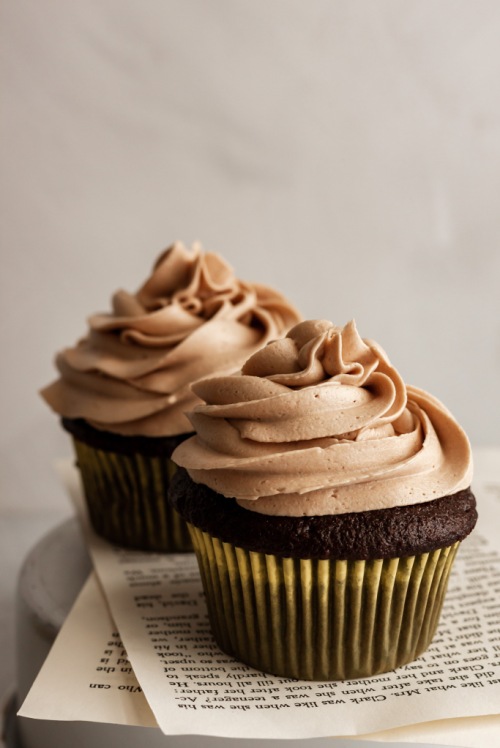
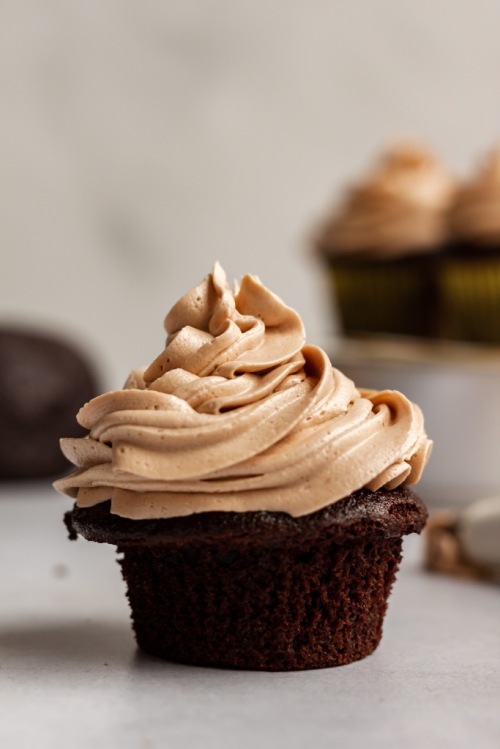
]]>The post Vegan Mocha Buttercream appeared first on Never. Not. Eating..
]]>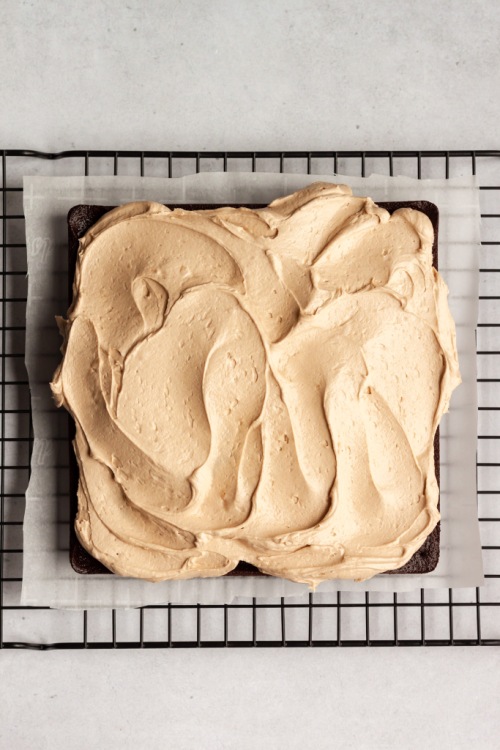
This recipe has the word “vegan” in front of it, but if you aren’t vegan or prefer to use dairy-based products, you can make 1:1 swaps at any point!
I love how simple, yet different this recipe is. If you are looking for a change from your normal chocolate and vanilla frostings, this is IT. Trust me, it’s so good.
The Ingredients
Here is what you will need:
- vegetable shortening
- vegan butter
- salt
- vanilla
- cocoa powder
- instant coffee
- powdered sugar
Use a stand mixer to bring all of the ingredients together and you will have a light, fluffy, perfect buttercream. It’s great for frosting cakes or cupcakes with. I love it on a rich chocolate cake!
Check out that swirly swirl!
This post contains affiliate links and I may earn a small commission when purchases are made after clicking the links, at no cost to you. Thank you!
Vegan Mocha Buttercream
Servings: Makes about 4 cups
Prep time: 10 minutes
Ingredients:
- 1/2 tbsp instant coffee
- 1/2 cup vegetable shortening*
- 1/2 cup vegan butter, softened**
- 1/2 tsp vanilla extract
- pinch of salt
- 2 teaspoons cocoa powder, sifted
- 4 cups powdered sugar
- 1-3 tbsp plant-based milk (I prefer oat milk, but you can use almond, cashew, coconut or soy)
Instructions:
- Stir the instant coffee together with three tablespoons of boiling water until dissolved. Set aside.
- Add the shortening and vegan butter to a stand mixer and mix with paddle attachment on medium speed until light and fluffy. Add in the vanilla, salt and cocoa powder and mix until combined.
- Add one cup of powdered sugar and turn the mixer on low. Pour in about half of the coffee and mix until incorporated. Add another cup of powdered sugar, followed by the rest of the coffee and continue mixing. Add the third cup of powdered sugar, followed by one tablespoon of the milk. Finally, incorporate the last cup of sugar and another tablespoon of milk, if needed. Beat until smooth and you have achieved your desired consistency. If the buttercream is too stiff, add the remaining tablespoon of milk and beat to incorporate.
- Use immediately or store in an airtight container in the fridge for up to 5 days.
NOTES:
*You can use all shortening if you do not have vegan butter.
**This can be substituted for regular, softened butter if desired.

The post Vegan Mocha Buttercream appeared first on Never. Not. Eating..
]]>The post Easy Peanut Butter Coconut Cake appeared first on Never. Not. Eating..
]]>
I immediately knew I needed to try to make my own version, and since Easter is around the corner, it seemed like the perfect cake to test out for the occasion.
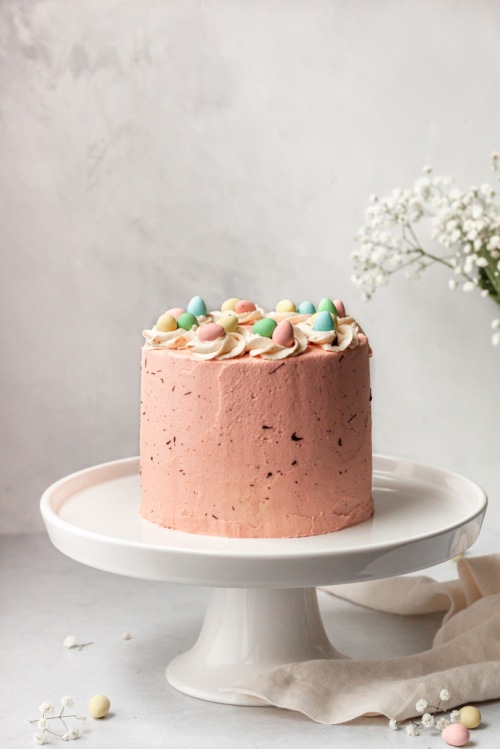
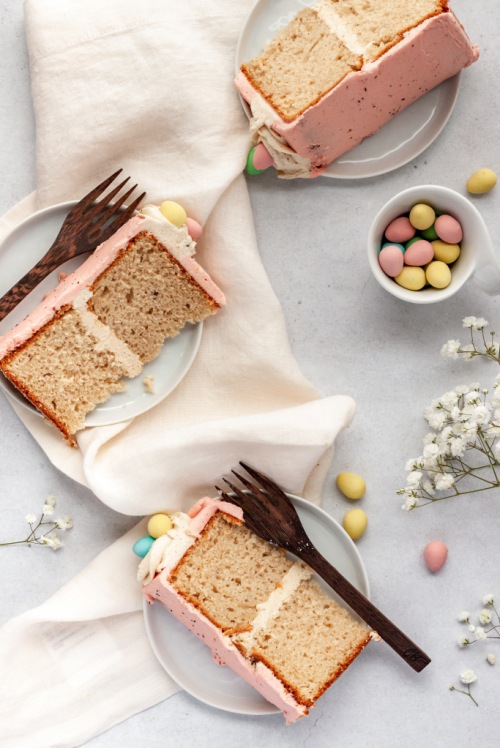
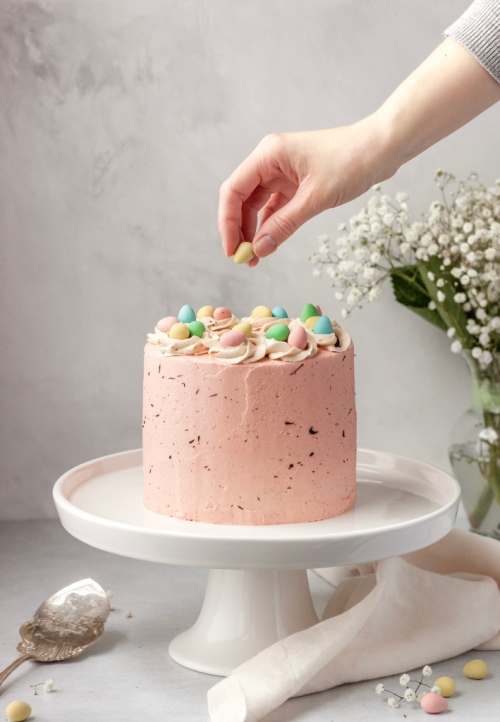
WHAT IS PEANUT BUTTER COCONUT CAKE?
Let me let you in on a little secret – this is a cheater cake. That’s right, I zhuzhed- (how do you even spell that?! Do you know what I’m trying to say though?) up box cake. Sometimes Betty Crocker pulls through.
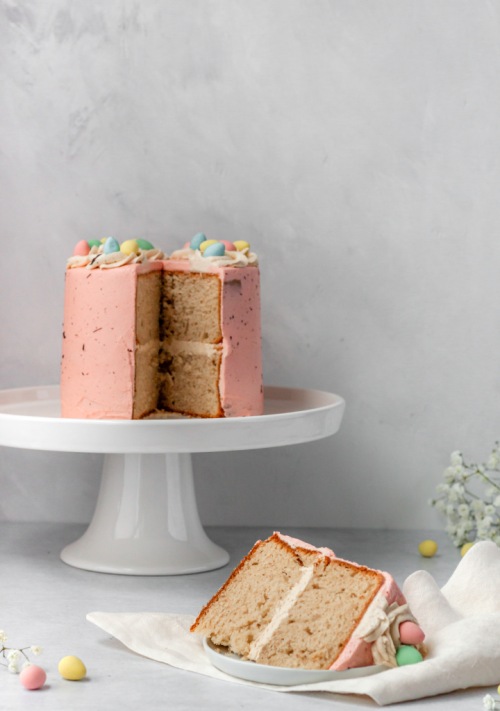
A few weeks ago I purchased a couple of boxes of Betty’s French Vanilla cake because it was on sale for $1.00 – what a steal! Now, I have the perfect use for it. All you need to do is add some peanut butter and swap the milk for coconut milk. It leaves you with this dreamy and decadent, fluffy cake. It’s an Easter miracle!
Oh, and the icing is also a peanut butter buttercream! You’re welcome.
THE INGREDIENTS
This is the simplest cake you will ever make! These are the ingredients you will need:
- boxed french vanilla cake
- eggs
- vegetable oil
- coconut milk (canned and full-fat)
- peanut butter
- icing sugar
- shortening
- butter
DECORATING THIS PEANUT BUTTER COCONUT CAKE
For the decoration, I used gel food colouring (a tiny bit of red) to dye my icing a pale pink colour, reserving a small amount of the original colour (which was slightly brown, from the pb) to create “nests” on top. I filled each nest with a few mini eggs and then melted down some chocolate, which I “flicked” onto my cake using a paintbrush to create a speckling.
Wishing you all a very happy spring and a lovely, cake-filled Easter, if you celebrate!
MORE EASY DESSERT RECIPES TO TRY
Gluten Free Stone Fruit Galette (a brilliant summer dessert)
Apple Cardamom Hand Pies with a Rum Glaze (just store-bought puff pastry and a quick filling)
Vegan Pumpkin Coconut Cake (pumpkin + coconut = goals)
TOOLS I USED TO MAKE THIS EASY PEANUT BUTTER COCONUT CAKE
If this recipe sounds like something you would want to make, click on the images below to see some helpful tools I used to get the job done.


This post contains affiliate links and I may earn a small commission when purchases are made after clicking the links, at no cost to you – thank you!
Easy Peanut Butter Coconut Cake
Servings: Makes four 6-inch cake layers (enough for two small cakes)
Prep time: 15 minutes
Cook time: 30 minutes
INGREDIENTS
- 2 boxes of French Vanilla cake mix (432 g each)
- 6 large eggs
- 3/4 cup vegetable oil
- 1 can full fat coconut milk (400 ml)
- 3/4 cup smooth peanut butter
For the icing:
- 1/2 cup vegetable shortening
- 1/2 cup butter, at room temperature
- 1 tbsp meringue powder (optional)
- 1/2 cup smooth peanut butter
- pinch of salt
- 4 cups powdered sugar
- 4-6 tbsp coconut milk
INSTRUCTIONS
- Preheat oven to 350 degrees Fahrenheit. Butter four 6-inch cake pans, line the bottoms with parchment paper and dust with flour.
- Firstly, dump the cake mix into a large bowl. Create a well in the middle of the mix and add the eggs and oil. Pour the coconut milk into a measuring cup and add water to bring it up to an even 2 cups. Pour into the bowl with the other ingredient and add the peanut butter. Mix all of these ingredients well with an electric mixer, starting on low and working up to medium speed, for about 1-2 minutes. Divide batter between the four cake pans – it works out to be approximately 450g per pan. Bake in the oven for 30-35 minutes, or until a toothpick comes out clean. Cool completely before icing.
For the icing:
- Combine the shortening, butter and peanut butter in a medium bowl and mix with an electric mixer until light and fluffy.
- Add the meringue powder (if using), the salt and one cup of powdered sugar and beat until combined, starting on low.
- Drizzle in one tablespoon of coconut milk and beat. Continue to alternate between adding one cup of powdered sugar and one tablespoon of milk until all of the powdered sugar has been used. If icing is too thick, continue to add half of a tablespoon of milk at a time until you have reached desired consistency.
ASSEMBLY TIPS
- Use a sharp serrated knife to level off the rounded top of each cake
- Place a large dollop in the middle of the first layer and gently push it out to the sides with an offset spatula until it is hanging off the edges
- Flip the second layer upside down before placing on top of the bottom layer
- Add another large dollop on the top of the cake and again, push the icing out to the sides with a back and forth motion, trying to avoid lifting the spatula in an upwards direction
- Once the top is levelled out, use the icing that spilled over the edge from the centre to fill in any gaps on the sides where the two layers meet, and add more icing to help cover the rest of the sides
I hope you enjoyed this easy cake recipe! If you have any feedback or comments, please leave them below! Don’t forget to follow me on Instagram @nevernoteatingca for more recipes, tips and tricks!
The post Easy Peanut Butter Coconut Cake appeared first on Never. Not. Eating..
]]>The post Tropical Banana Flambé appeared first on Never. Not. Eating..
]]>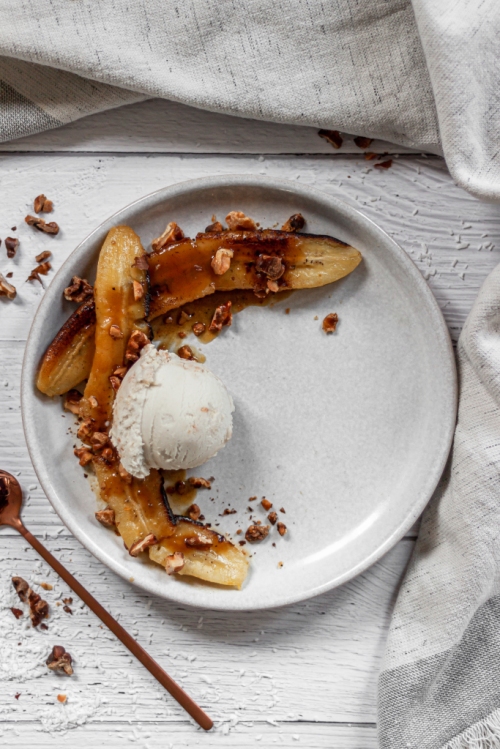
Okay, nevermind, Rona’s still stomping on our parades, so, let’s bring the Caribbean to us. Grab your piñas and your lighters and let’s set fuego to this *****…Whattt?! I meant “house.”
This recipe is inspired by one of my sweet besties. Let me take you back – We were in university. My girl had just got back from a trip down south. She was looking all bronzed and fine while the rest of us had adopted that Canadian winter glow. Girl says she’s going to show us this dessert she learned how to make while on vacay. She starts lighting fire to this pan filled with bananas, butter, orange juice and rum. Coolest thing I had ever seen, hands down. I immediately started making this all the time. I gained the Freshman 15. The end.
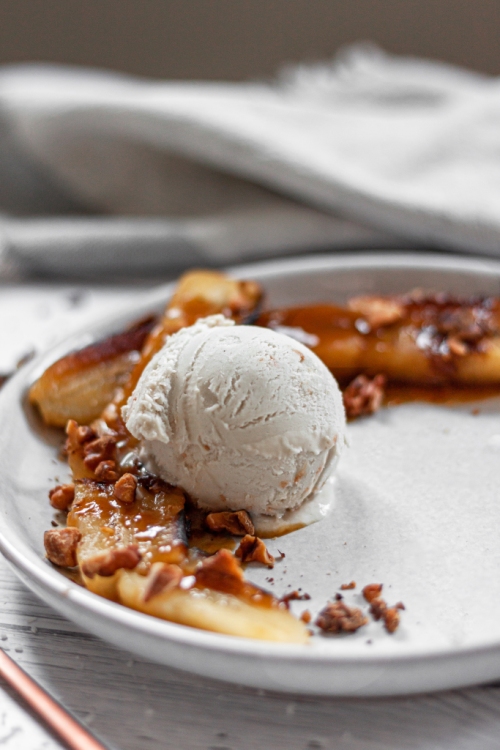
Okay, so my recipe isn’t exactly the same as what’s described above. Since I am OBSESSED with Piña Coladas, I decided to use pineapple juice instead of orange juice, to mimic my favourite tropical drink. A pinch of nutmeg also gives it that WAH-BAM that is just so WAH-BAMMY. Know what I’m sayin’?
Top your ‘nanas with some toasted walnuts and a scoop of vanilla or coconut ice cream (I prefer Halo Top Toasted Coconut) and it’s a fiesta in your kitchen!
Here are a few tips when it comes to lighting things on fire:
- Don’t wear loose, hangy clothing (we don’t want you catching on fire now, do we?!)
- Remove the pan from the burner before carefully adding the alcohol
- Use a long-reach click lighter to avoid any burns
- Once lit, bask in it for a few seconds and then shake the pan until it extinguishes (and it will)
- Don’t panic! The fire WILL go out
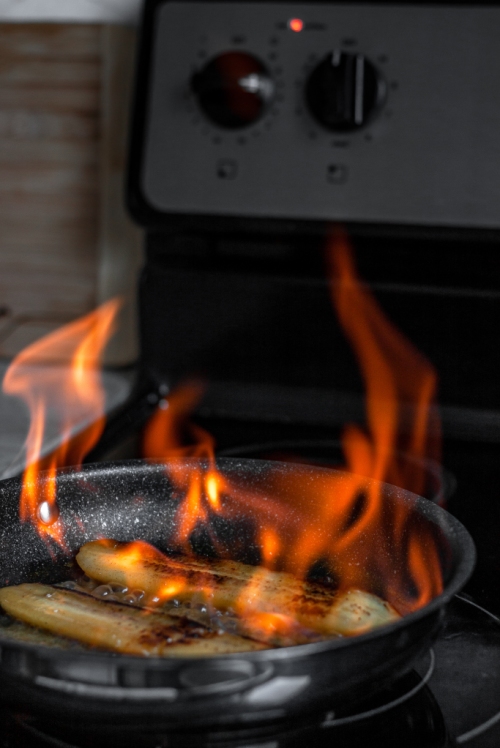
*If for any reason you experience a stovetop fire in your home, place a larger lid on top of the pan and turn off the burner…do not throw water on it
I do realize that now 90% of you will not attempt a flambé. Maybe it’s best we just skip to the recipe…Don’t be scared!
Tropical Banana Flambé
Servings: 1-2
Prep time: 2 minutes
Cook time: 10 minutes
Ingredients:
- 2 tbsp chopped walnuts
- 1 tbsp vegan butter (or regular butter)
- 1 firm banana (not green, but barely ripe), sliced lengthwise down the centre
- 1/3 cup pineapple juice (you can buy or make yourself by putting pineapple through a juicer)
- Pinch of nutmeg (optional)
- 1 oz of spiced dark rum
- dairy-free, vegan vanilla or coconut ice cream (or regular ice cream)
Instructions:
- Preheat oven to 350 degrees Fahrenheit. Spread the walnuts onto a parchment lined baking sheet and bake for 5-10 minutes, watching closely to avoid burning. Set aside.
- Set a pan over medium-high heat and add the butter. When the butter is hot, add the two banana halves, cut side down. Let carmelize in the pan for 3-5 minutes, watching closely as not to burn. Flip and add the pineapple juice to the pan along with the nutmeg, if desired. Let the juice simmer for about 2 minutes, or until reduced by half. Remove pan from heat and carefully add the rum. Ignite a long-range click lighter at the edge of the pan closest to you. The pan should flare up immediately. Give the pan a shake to eliminate the flame and then remove from heat (read above for safety tips).
- Transfer bananas to a plate and drizzle with the remaining sauce in the pan. Top with the toasted walnuts and a scoop of vanilla ice cream, or, my favourite – Halo Top’s Toasted Coconut ice cream. Enjoy!
**Use extreme caution when igniting alcohol.
If you would like to see a video of this recipe in action, check it out on my instagram highlights (@nevernoteatingca)
The post Tropical Banana Flambé appeared first on Never. Not. Eating..
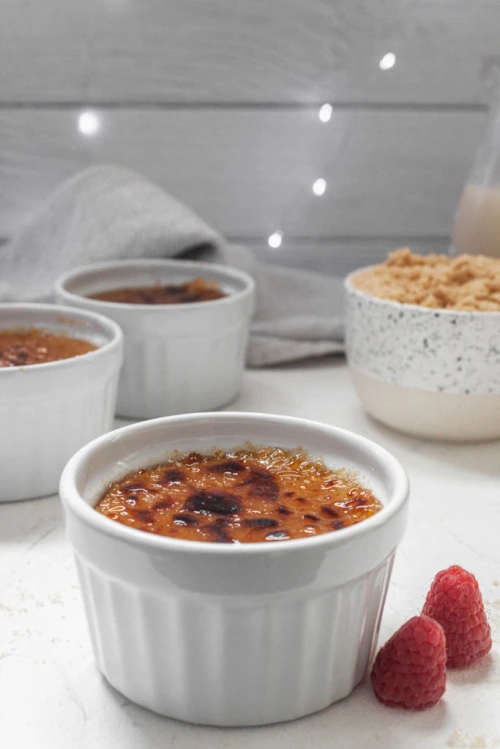
]]>The post Sweet Potato Creme Brulee (Vegan, GF) appeared first on Never. Not. Eating..
]]>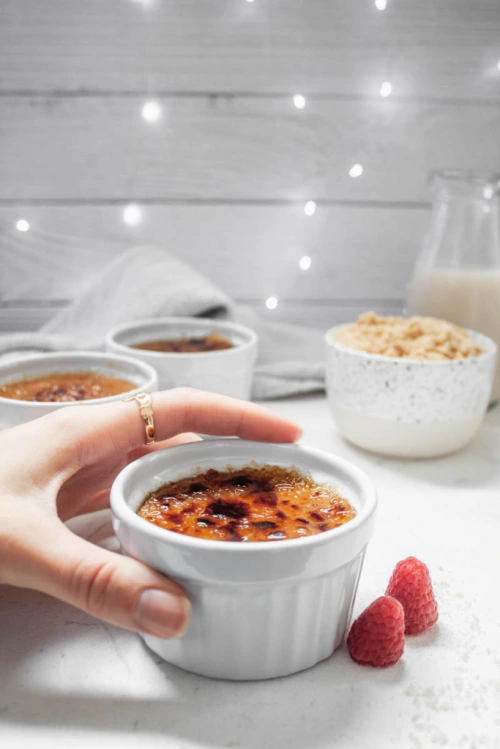
WHAT IS SWEET POTATO CREME BRULEE?
I really love sweet potatoes and I always have them at this time of year. I prefer them to white potatoes and always experiment with different ways of using them. This week, I turned them into the cutest little desserts, that are also dairy-free and gluten-free! ‘Cause who doesn’t love to be free?!

INGREDIENTS
So, real talk: My appreciation for coconut milk grows by the day. Nature seriously did us a solid by serving us coconuts, and I am down for it. You can very likely turn any animal-based recipe into a plant-based one with a simple can of coconut milk, just in case you were wondering!
Coconut milk and sweet potatoes are the two main ingredients in this recipe. You will also need a sweetener, and since sweet potatoes and maple go really well together, I use syrup (that pure Canadian kind)! Some cinnamon and fresh nutmeg bring in the warm, cozy feelings of winter. Finally, the glue that holds it all together is the agar agar. Agar agar is basically a vegan gelatin. You can buy it on Amazon, or if you have any specialty grocery stores in your ‘hood, try that!
HOW TO MAKE SWEET POTATO CREME BRULEE
The first step is to roast the sweet potato. I really hate a mess (and I’m lazy), so I just pierce my potato with a fork a few times and stick it directly on the rack of my oven, place a piece of tin foil on the rack below it (to catch any drippings), set my oven to 400 degrees and walk away for an hour. You will see the potato begin to ooze out (yes, it’s normal) and that’s usually how you know it is ready. Stick a fork in it, just in case.
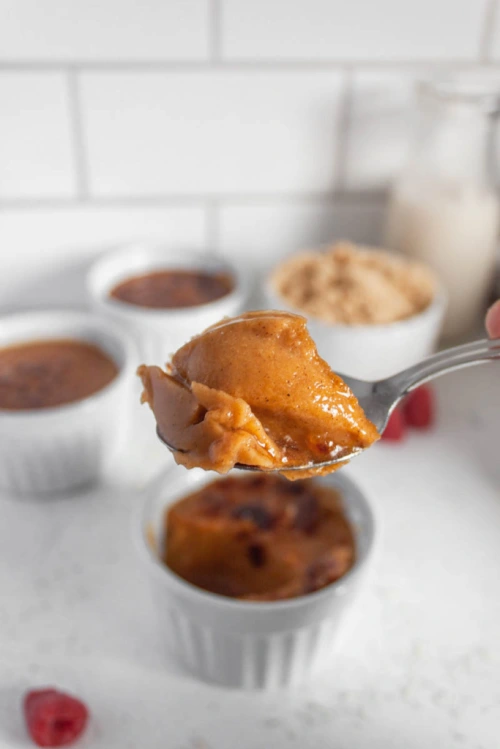
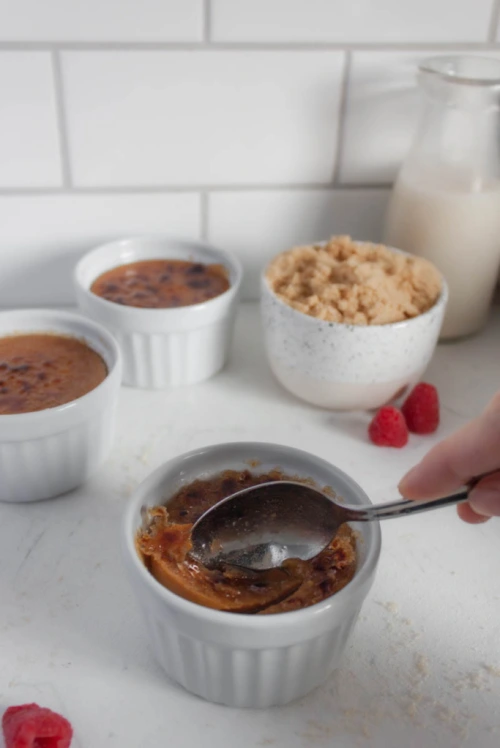
Next, you place the potato, milk and syrup in a blender and blend until smooth. Transfer to a pot with some salt and the spices and bring to a boil. Add the agar agar and reduce heat, whisking for about a minute to ensure the agar is completely combined. Strain the mixture and pour into small ramekins and when ready to serve, top with some sugar (I do a mix of white and brown) and torch!
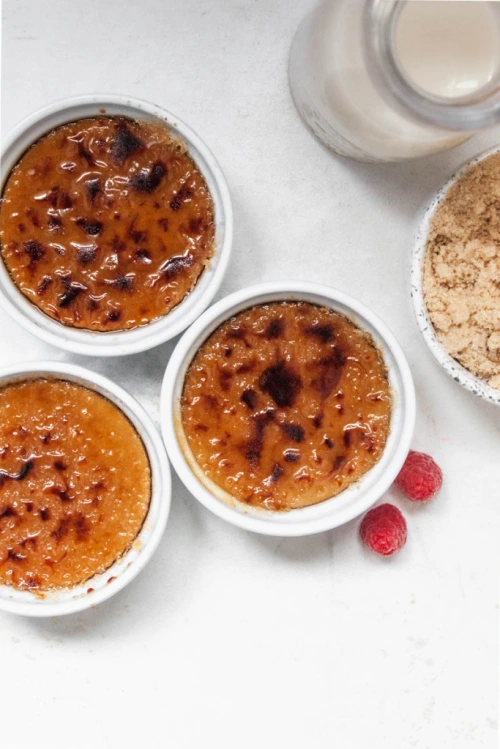
Your holiday guests will love cracking the hardened sugar on top and diving in to this semi-healthy treat!
OTHER VEGAN DESSERTS
Vegan Whipped Cream (the perfect dessert topping)
Vegan Rice Crispy Chocolate Treats (a perfect bite-sized snack)
Chocolate Chai Ganache (amazing for cake decorating)
TOOLS I USED TO MAKE THIS RECIPE


Sweet Potato Creme Brulee (Vegan, GF)
Servings: 4
Prep time: 5 minutes
Cook time: 1 hour 10 minutes
Ingredients:
- 1 medium sweet potato
- 1 can full-fat coconut milk
- 1/2 cup coconut milk (I use Silk brand)
- 2 tbsp maple syrup
- 1 tsp cinnamon
- pinch of fresh nutmeg
- A pinch salt
- 1/2 tsp agar agar
- 1 tsp pure vanilla extract
- 4 tbsp sugar (I mix equal parts white and brown)
Instructions:
- Preheat oven to 400 degrees Fahrenheit. Pierce the sweet potato with a fork a few times. When oven is ready, place potato directly on the middle rack, and put a piece of tin foil on the rack below it, to catch any drippings. Bake for 1 hour, or until fork inserts easily into the centre. Carefully remove skin.
- To your blender, add the sweet potato, both coconut milks and the syrup. Blend until smooth and then transfer to a pot.
- Place the pot on the stove over medium-high heat. Add the salt, cinnamon and nutmeg and bring to a boil, stirring often. Once boiling, add the agar agar, lower the heat to a simmer and whisk continuously for one minute, or until the agar agar is completely dissolved. Remove from heat and whisk in the vanilla.
- Strain the mixture through a fine mesh sieve directly into four small ramekins. Place in the fridge to firm up for at least one hour.
- Right before serving, sprinkle the tops of each ramekin with one tablespoon of the sugar and use a kitchen torch to melt the sugar until it is a deep brown colour. Let it sit for a minute before serving.
- Crack the top with a spoon and enjoy!
The post Sweet Potato Creme Brulee (Vegan, GF) appeared first on Never. Not. Eating..
]]>