The post Creamy Vegan Mushroom Rigatoni appeared first on Never. Not. Eating..
]]>
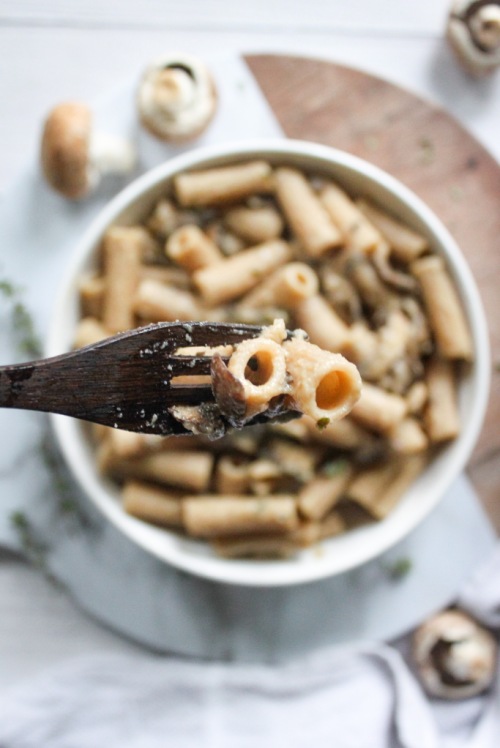
Now I love those little fungi so much. That’s why I had to dedicate this pasta to them – to say I’m sorry for a lifetime of neglect, and it won’t happen again.
One thing I never neglected – Rigatoni. Isn’t it such a great pasta choice? Those sweet little grooves that hold all the sauce? Yes, please! I love using spelt pasta, but any pasta works for this recipe. Make sure you cook it to al dente, as it will continue to cook once added to that creamy mushroom sauce!
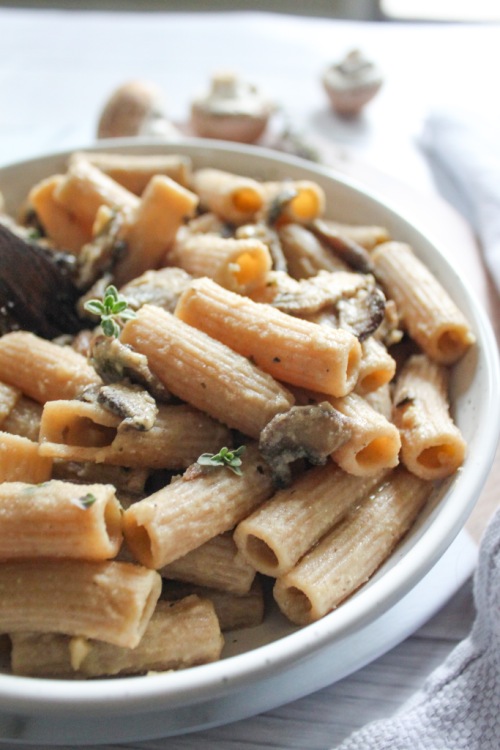
The sauce – Simple, yet delicious. Creamy, but vegan. This easy-to-make sauce requires only a few ingredients:
- garlic
- mushrooms
- thyme
- white wine
- stock
- coconut milk
- vegan butter
Start by adding the mushrooms to some olive oil and salt in a pan. Cook them down and caramelize them up! Next, add in the garlic, thyme and white wine. Cook until you cannot smell the alcohol anymore and then add the stock and milk. Let simmer until it thickens up, and transfer the pasta into the sauce to finish cooking. Finally, add in some of the pasta water to bring everything together and you got yourself some mushroom pasta!
Let’s all show our love to mushrooms!
Creamy Vegan Mushroom Rigatoni
Servings: 2
Prep time: 5 minutes
Cook time: 20 minutes
Ingredients:
- 200 g rigatoni
- 3 cups sliced mushrooms
- olive oil
- salt
- pepper
- 2 cloves garlic, minced
- 2 sprigs thyme, stems removed
- 1/4 cup white wine
- 3/4 cup vegetable stock
- 3/4 cup full-fat canned coconut milk
- 1 tbsp vegan butter
Instructions:
- Cook the pasta according to package instructions, in heavily salted boiling water. Reserve 1/4 cup of the pasta water before draining.
- Add two tablespoons of olive oil to a large saucepan over medium-low heat. When the oil begins to move easily in the pan, add the mushrooms and a pinch of salt. Cook for 6-8 minutes, stirring occasionally. Add the garlic and thyme to the pan and cook until fragrant, about 30 seconds. Add the wine and let simmer for about 5 minutes, or until the alcohol smell is gone. Pour in the vegetable stock, stir, and follow with the coconut milk. Let the sauce simmer until thickened, about 10 minutes. Finish with the butter and some cracks of fresh black pepper.
- Transfer the pasta into the pan, pour in the reserved pasta water, and mix to coat with the sauce. Taste and adjust seasoning as necessary. Enjoy!
The post Creamy Vegan Mushroom Rigatoni appeared first on Never. Not. Eating..
]]>The post Easy Butternut Squash Fettuccine “Alfredo” with Whipped Ricotta appeared first on Never. Not. Eating..
]]>- Smooth and rich like an alfredo but without the dairy and calorie count
- Vegetable bonus blended right into the sauce
- A lot less fat content than regular alfredo
- Cloud-like whipped ricotta (okay, it’s dairy, but some things are just worth it)
That is all. Hopefully you are convinced.

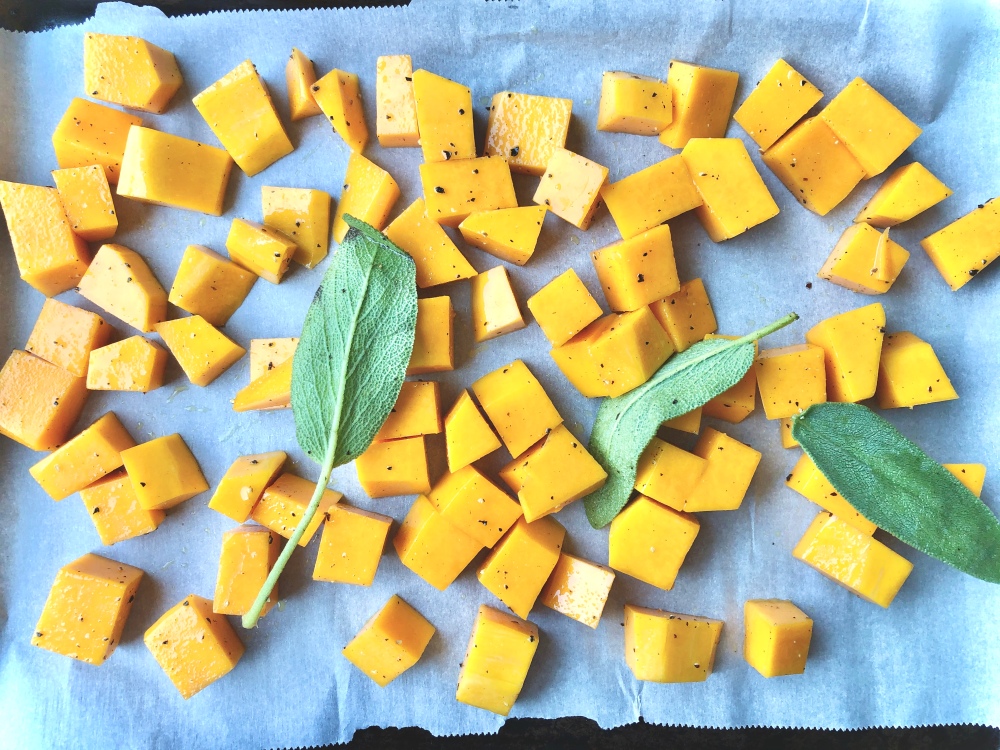
This recipe starts like any good vegetarian recipe – with a few cups of roasted vegetables. So sharpen your knife and start cubin’ up that butternut squash, add a few sage leaves, do the drizzy with some EVOO and season with S & P! Pop it in the oven and forget about it (well, for 20 minutes, until you have to give ’em a toss)!
In the meantime, throw some fettuccine into a pot of heavily salted boiling water and cook until al dente.
When the squash is slightly caramelized and tender, remove from oven and let’s start the transformation from solid –> liquid(ish). Grab your blender – I use my Ninja for everything…it is A.M.A.Z.I.N.G. – transfer the squash and some veggie stock and blend until smooth.
On the same sheet tray that you had the squash on, add two tablespoons of breadcrumbs and a quarter cup of chopped walnuts and put back into the oven to toast up. This only takes a few minutes, so watch carefully! When browned, remove from oven and toss in a few finely chopped sage leaves and some melted butter and set aside…YUM.
Let’s continue shall we…I’m drooling. Okay – grab a pan, heat some olive oil and saute some diced shallots until transparent. Add in a few cloves of minced garlic and it’s ready for the sauce. Pour in the butternut squash puree and add some more stock to the pan, cooking and stirring until smooth and combined.
Next, add half of a cup of canned coconut milk and simmer for a few minutes until sauce has thickened.
While the sauce is finishing, grab your ricotta from the fridge and beat with a hand mixer with 1 tablespoon of freshly squeezed lemon juice, a pinch of salt and a few grinds of pepper. Whip until it is smooth and creamy and spreadable and marvelous.

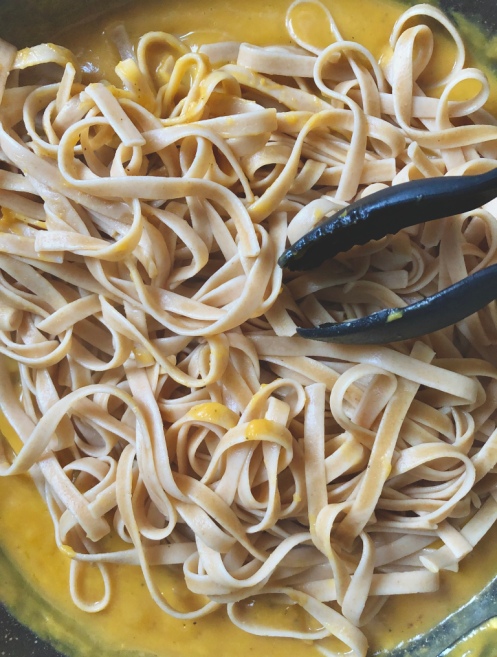
The Grand Finale: When the sauce coats the back of a spoon, it’s ready for it’s best friend – pasta – to join it in the pan. Toss the pasta around with a pair of tongs and be sure to coat every last strand with that velvety sauce. Turn the heat off and add a squeeze of lemon juice to bring it altogether.
Plating: Start with the whipped ricotta. Maybe even be fancy and make a little “swoop” on your plate!

Next, add the fettuccine, and then top with the bread crumb/walnut mixture. And now it’s time to manger, manger (that’s French, mmmm kay?!)!

One question – Are you a “use a spoon to assist in the delicate twirling of the noodles around your fork” kind of person, or a “shove noodles in mouth as quickly as possible, I’m not worried about whether they are hanging from my mouth” kind of person? Because I’m definitely number two.

^ A twirling attempt…strictly for pictures.
Easy Butternut Squash Fettuccine “Alfredo” with Whipped Ricotta
Servings: 4
Prep time: 15 minutes
Cook time: 40 minutes
Ingredients:
- Olive oil
- 3 cups of butternut squash, cubed
- 6-8 sage leaves, separated
- 325 g fettuccine (or 4 serving sizes)
- 1/2 cup ricotta cheese
- 1.5 tablespoons fresh lemon juice, separated
- 2 tbsp bread crumbs
- 1/4 cup walnuts, finely chopped
- 1 tbsp butter, melted
- 1 cup vegetable stock, separated
- 1 shallot, finely diced
- 2 cloves garlic, minced
- 1/2 cup canned coconut milk
- salt and pepper to taste
Instructions:
- Preheat oven to 375 degrees F.
- Line a baking sheet with parchment paper and add squash, 1 tbsp olive oil, 3-4 sage leaves, a few pinches of salt and some fresh black pepper and toss to coat. Place in the oven and roast for 30-40 minutes or until you see slightly caramelized edges and squash is fork-tender.
- Meanwhile, bring a pot of heavily salted water to a boil and add fettuccine. Cook until the pasta is al dente (according to package directions…or taste one)! Reserve one quarter cup of the pasta water and then drain the fettuccine and set aside.
- For the whipped ricotta: Add ricotta, 1 tablespoon of lemon juice and a pinch of salt and pepper to a medium bowl. Use a hand mixer and whip on medium speed until ricotta is smooth and fluffy – about 3-4 minutes. Place in fridge to keep cool.
- For the crumb topping: On a baking sheet lined with parchment paper, toast the bread crumbs and walnuts in the oven for about 5-8 minutes, or until golden brown. Watch carefully so they don’t burn. Remove from oven and add 3-4 finely chopped sage leaves and the melted butter. Toss and set aside.
- When the squash is done cooking transfer to a blender (don’t discard the sage leaves, transfer to blender as well) and add 1/2 cup of vegetable stock. Blend until smooth.
- Heat a tablespoon of olive oil in a large pan over medium-low heat. Add the shallot and saute for a few minutes until it starts to turn translucent. Add the garlic and cook for 30 seconds, or until fragrant. Pour the blended squash into the pan and add the quarter cup of pasta water and the other 1/2 cup of stock, stirring for a few minutes until smooth. Add the coconut milk and simmer until it thickens and coats the back of a metal spoon. Squeeze a bit of lemon juice overtop of the sauce and then add the pasta. Turn the heat off and toss the pasta around until coated with the sauce.
- To plate, spread some whipped ricotta on the bottom of your plate. Add the pasta on top and then sprinkle with the bread crumb/walnut crumble. Bravo!
The post Easy Butternut Squash Fettuccine “Alfredo” with Whipped Ricotta appeared first on Never. Not. Eating..
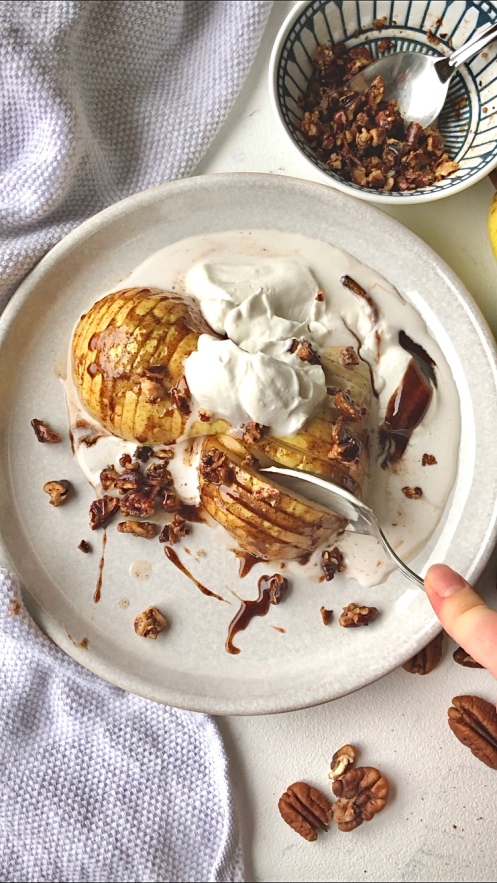
]]>The post Maple Chai Hasselback Pears with Candied Pecans and Coconut Whip Cream appeared first on Never. Not. Eating..
]]>This is a dessert that you can feel good about. It is paleo, vegan and gluten-free and therefore could just be replaced for tonight’s dinner and you are winning.
To hasselback something means to make a number of thinly-spaced slices which take on the job of sucking up all of the delicious sauces that will be poured on top, and in this case, it’s an aromatic maple syrup and chai spice hybrid. Holy Hannah.
To successfully hasselback your pears for this recipe, cut them in half and remove the core with your knife. Starting with one half at a time, place slice-side down between two chopsticks (or butter knives if you don’t have them) and use a sharp knife to cut slices all the way across the length of the pear. The chopsticks act as a stopper so that your slices don’t go all the way through the fruit.
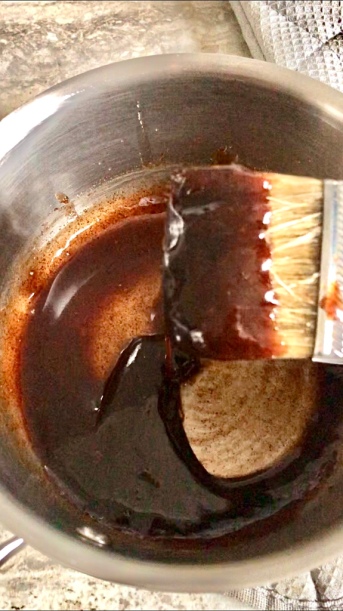
The maple chai glaze starts with maple syrup and coconut oil in a small saucepan, whisked together with cinnamon, cardamom, ground ginger, allspice, cloves, nutmeg and some black pepper. Simmer for just a few minutes. You will see it thicken slightly. Turn off heat and finish off with some vanilla and flaky sea salt and then it’s ready for drizzling.
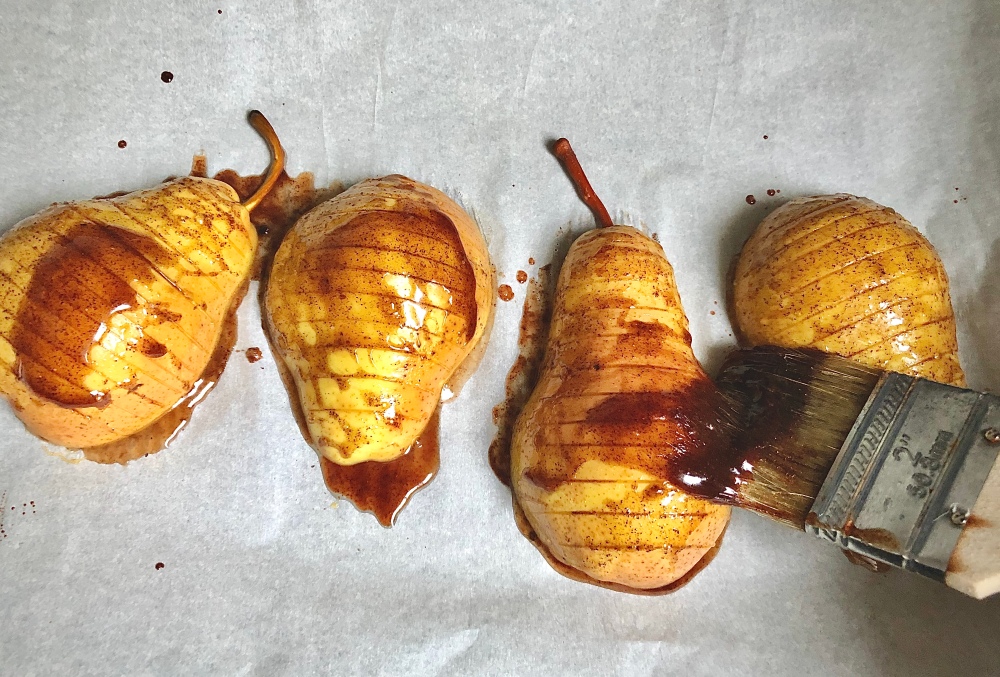
Brush some of the glaze on the pears and pop ’em in the oven to start tenderizing, about 15 minutes. Remove from oven and carefully (they are hot!) use your fingers to separate some of the slices so that you can brush even more glaze onto and into the pears. Bake for another 10-15 minutes until the pears are fork-tender.
Grab some pecans and give them a fine chop. Place them on a baking sheet lined with parchment and pop them in the oven to toast up real quick. Keep watch – you don’t want them to burn! After about 6-7 minutes, pull them out and toss them with a bit of brown sugar and either coconut oil (if you are vegan or paleo), or butter.
To prep for the whip cream, place a metal mixing bowl into the freezer with your wire beaters for at least 15 minutes before making this recipe. Place a can of coconut milk in the fridge overnight or a few days for best results. This allows the full fat “cream” layer to separate from the more transparent “water” layer. We will only be using the cream for this recipe, but don’t throw away that precious coconut water that you find at the bottom of the can! You can blend it into smoothies or use it instead of almond milk in my Power Boosting Smoothie Bowl recipe!

Carefully scoop the cream into the bowl that was in the freezer. With your hand mixer, beat the cream for a minute. You should see it start to thicken. Add your vanilla and maple syrup (or honey) and beat for two more minutes until it resembles regular whip cream. Chill until ready to use.
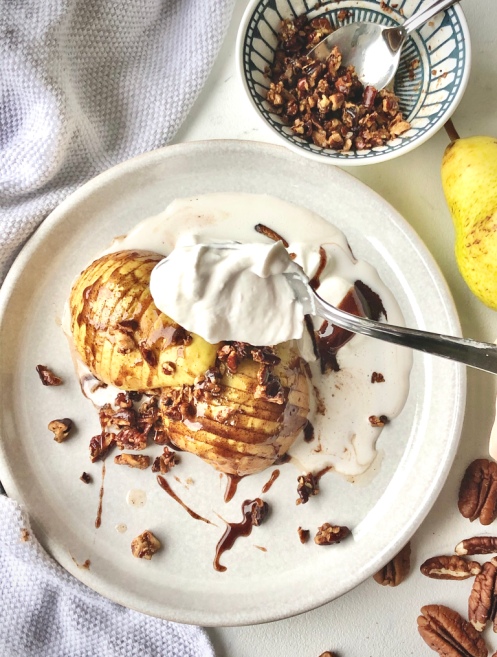
Assembly time – Place your pear halves on a plate and top with pecans and whip cream. Drizzle with the extra maple chai glaze and thank me later.
Maple Chai Hasselback Pears with Candied Pecans and Coconut Whip Cream
Servings: 2
Prep time: 10 minutes
Cook time: 25 minutes
Ingredients:
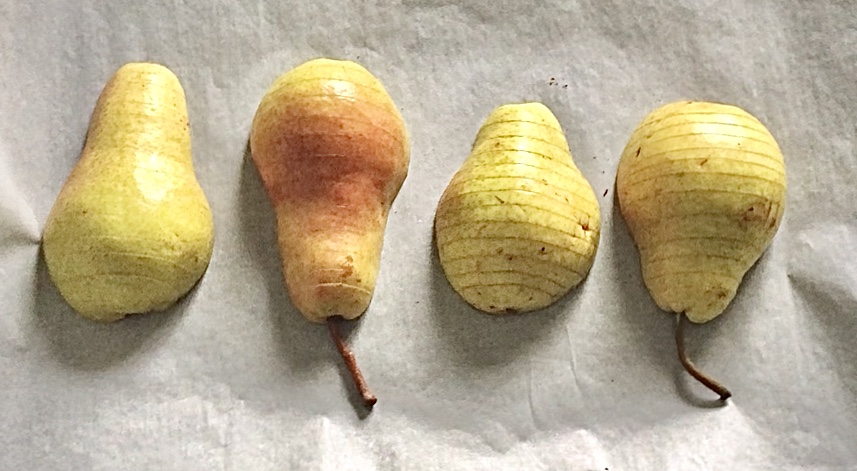
- 2 ripe pears (Bosc or Bartlett), halved and cores removed
For the maple chai glaze:
- 1/4 cup pure maple syrup
- 1 tbsp coconut oil
- 1 tsp cinnamon
- 1/2 tsp ground cardamom
- 1/4 tsp ground ginger
- pinch of cloves
- pinch of allspice
- pinch of nutmeg
- fresh black pepper
- 1/2 tsp vanilla
- pinch of flaky sea salt
For the candied pecans:
- 1/3 cup finely chopped pecans
- 1 tsp brown sugar
- 1 tbsp coconut oil, melted (or butter, if not vegan)
For the whip cream:
- one can of full fat coconut milk (I find the brand Aroy-d works well), chilled at least overnight
- one tsp pure vanilla extract
- one tbsp pure maple syrup (or honey, if not vegan)
Instructions:
- Preheat oven to 375 degrees F. Place a metal bowl and wire beaters into the freezer.
- Prepare the pears by placing one half at a time, slice-side down, between two chopsticks (or butter knives). Use a sharp knife to cut slices all the way across the length of the pear. The chopsticks act as a stopper so that your slices don’t go all the way through the fruit. Set aside while you prepare the glaze.
For the maple chai glaze:
- Add maple syrup, coconut oil, cinnamon, cardamom, ginger, cloves, allspice, nutmeg and a few grinds of black pepper to a small saucepan and bring to a simmer over medium heat. Simmer for 4 minutes. It will thicken slightly. Remove from heat.
- Brush the glaze over the hasselback pears and place pears into the oven to bake for 15 minutes.
- Remove from oven and use your fingers to separate the slices a little more (careful, it will be hot). Brush over more of the glaze, making sure it seeps into the grooves that you helped separate, and return to oven for another 10-15 minutes, or until fork tender. Remove and let cool for a few minutes.
For the candied pecans:
- Place the pecans on a small baking sheet lined with parchment paper. Toast in the oven alongside the pears for about 6 minutes or until fragrant. Watch carefully to avoid burning.
- Remove from oven and add brown sugar and coconut oil (or butter) to the nuts, tossing together. Set aside.
For the coconut whip cream:
- While the pears are baking, make your whip cream. Remove the can of coconut milk from the fridge. Open carefully and scoop out the solidified cream, placing into the metal bowl that was chilling in the freezer earlier. Do not add the water at the bottom of the can.
- Beat on medium speed for 1-2 minutes, until it has began to noticeably thicken up.
- Add vanilla and maple syrup and beat for another 2 minutes on high, until it resembles regular whip cream. Place back in the fridge to stay cold.
Assemble:
Place the baked pears onto a plate. Add candied pecans and coconut whip cream. Drizzle over the remaining maple chai glaze. Dig in!
The post Maple Chai Hasselback Pears with Candied Pecans and Coconut Whip Cream appeared first on Never. Not. Eating..
]]>