The post Vegan Whipped Cream (Vanilla Bean) appeared first on Never. Not. Eating..
]]>I’m here to tell you that you can vegan-ify whipped cream using coconut milk instead of dairy cream. Irish coffee topping? Check! Berries and cream? Check! Pie topping? Check! This vegan whipped cream recipe does it all!

WHAT IS VEGAN WHIPPED CREAM?
It’s a fact that a high percentage of humans living on Earth have a sensitivity to dairy, so if that’s true for you, or you eat a plant-based diet, why not try this delicious and completely vegan whipped cream? It is made with solidified coconut milk instead of dairy cream. When placed in the fridge, canned coconut milk firms up and becomes perfect for whipping into a delicious dream cloud of a dessert topping!
WHY I LIKE THIS RECIPE
I recently took a food sensitivity test and guess what? Yup, that’s right – dairy was marked as an inflammatory food for my body. This didn’t surprise me, knowing that more than two-thirds of the world is lactose intolerant. I naturally try to steer clear of having dairy in my diet anyway, but this test really gave me the push I needed to avoid it on most days.
This Vegan Whipped Cream is the perfect substitute for the real thing. It whips up to a luscious texture that mimics that of real whipped cream. I like knowing that I am able to still enjoy some of my favourite desserts, despite it not having traditional ingredients in it. If I can make it plant based, I will!

INGREDIENTS
This Vegan Whipped Cream recipe only calls for three ingredients:
- canned coconut milk
- powdered sugar
- one vanilla bean (or vanilla extract)

MAKING VEGAN WHIPPED CREAM
This recipe couldn’t be easier. All you need to do is place all of the ingredients into a bowl and whip until stiff peaks form – it actually takes less time than a dairy-based whip cream!
TIPS
- Make sure your canned coconut milk is full-fat and a good quality brand. I use Aroy-D.
- Try not to shake your can, you want to keep the coconut milk and water separate.
- Place the can of coconut milk in the fridge for as long as possible. It needs at least 24 hours for the milk to firm up. I usually just place one can in the fridge when I buy it and leave it in there for a few weeks, until I decide I want to make whipped cream.
- Place your bowl and beater attachments into the freezer for at least 15 minutes beforehand to make sure it stays nice and cold.
- Place the cold bowl in a larger bowl filled with ice if you are making this on a hot day.

OTHER VEGAN RECIPES TO TRY
Chocolate Chai Ganache (the perfect vessel for this whipped cream).
Vegan Rice Crispy Chocolate Treats (the most-fun little snack)!
Vegan Protein Energy Balls (the perfect pre-gym pump-me-up).
TOOLS I USED TO MAKE THIS VEGAN WHIPPED CREAM
Click on the images below to see what I used for this recipe.


Vegan Whipped Cream (Vanilla Bean)
Servings: Approximately 2 cups
Prep time: 20 minutes
INGREDIENTS
- 1 can full-fat coconut milk (placed in the fridge for at least 24 hours)
- 3 tbsp powdered sugar
- 1/2 vanilla bean or 2 tsp pure vanilla extract
INSTRUCTIONS
- Set up your station – Place a medium bowl and the beater attachments from your hand mixer into the freezer for at least 15 minutes. Measure out your sugar and set aside. Slice the vanilla bean lengthwise, scraping the inner seeds out with a knife and set aside. Alternatively, measure out your vanilla extract into a small bowl.
- Open the cold can of coconut milk, being careful not to shake it. Remove the bowl and attachments from the freezer and scoop out the top, solid part of the canned milk into the bowl. Don’t throw away the water at the bottom of the can – reserve it for smoothies or other recipes.
- Add the powdered sugar and vanilla to the bowl with the coconut milk. Whip on medium-high speed until stiff peaks form, approximately 1-2 minutes. Taste the whipped cream – if you would like it sweeter, add another tablespoon of powdered sugar and whip to combine.
Store in an airtight container in the fridge for up to 3 days.
The post Vegan Whipped Cream (Vanilla Bean) appeared first on Never. Not. Eating..
]]>The post Easy Za’atar Socca appeared first on Never. Not. Eating..
]]>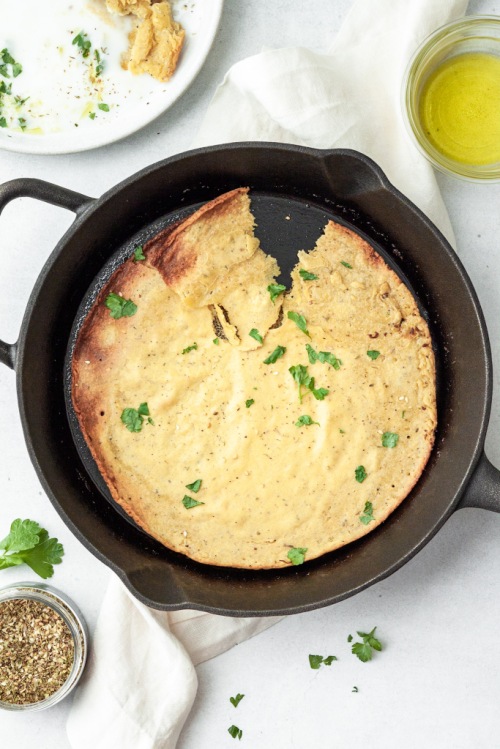
WHAT IS EASY ZA’ATAR SOCCA?
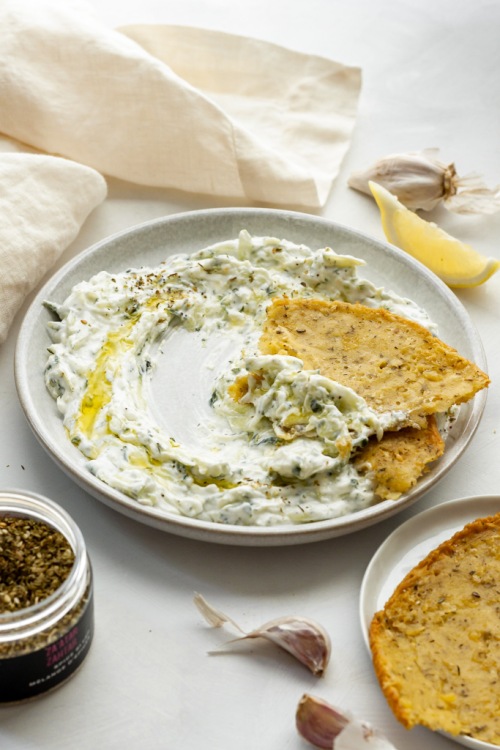
Crispy, gluten-free and the perfect vessel for dipping. I could ask for nothing more in my life. Socca is an Italian-French, crepe-like flatbread that is just so delicious. Try it with my Homemade Tzatziki recipe!
TIPS FOR MAKING SOCCA
The most important tool for perfecting this recipe, in my opinion, is a cast iron pan. It’s crucial to get the pan and oil scorching hot before pouring in the batter the ensure you achieve even heat distribution and crispy socca. Check out this one from Amazon.
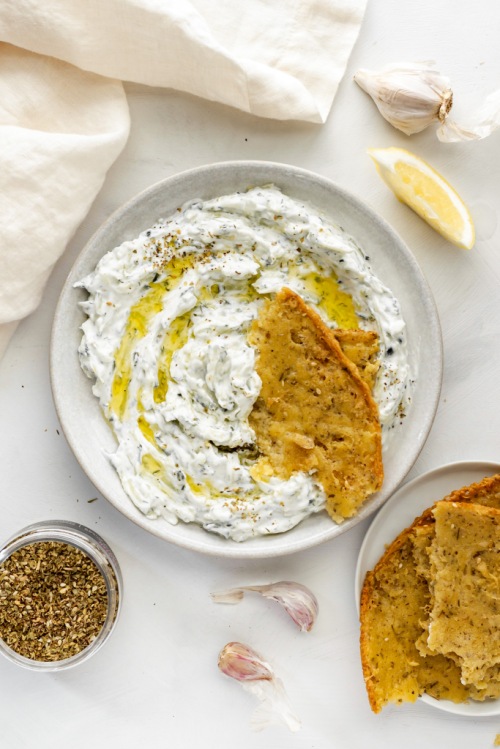
What do you eat Socca with? If not just as is, then try it with your favourite dips, stews or curries. It is great for picking up sauce or just adding that missing piece to a meal!
This recipe only requires these three ingredients (salt and water don’t really count as an ingredient…right?!):
- chickpea flour
- za’atar
- olive oil
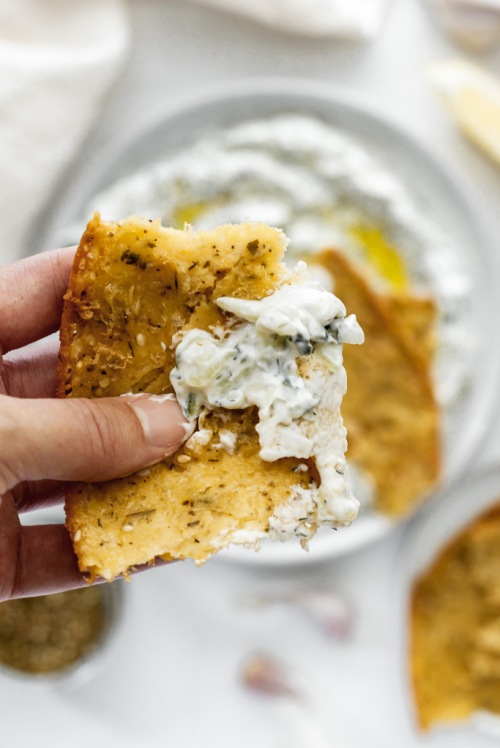
The easiest, most delicious gluten-free bread you will ever make!
This post contains affiliate links and I may earn a small commission when purchases are made after clicking the links, at no cost to you. Thank you for supporting me!
Easy Za’atar Socca
Serving size: Makes 2 large flatbreads
Prep time: 5 minutes
Cook time: 10-12 minutes
Ingredients:
- 1 cup chickpea flour
- 1/2 tsp salt
- 1 tsp za’atar
- 1 tbsp olive oil + more for the pan
- 1 cup water
Instructions:
- In a medium bowl, whisk together the flour, salt, za’atar, 1 tablespoon of olive oil and water until smooth. Set aside.
- Preheat oven to 450 degrees Fahrenheit. Coat the bottom of a cast iron pan with olive oil (about 2 tbsp) and place in the oven for 5 minutes to heat the oil. Remove carefully and pour in half of the batter, swirling the pan around to help spread it out. Cook in the oven for 10-12 minutes, or until edges turn brown and bread is cooked through. Remove from oven and repeat this process for the remaining half of the batter.
NOTES:
Socca is best when served immediately after cooking, but you can store in an airtight container in the fridge for a few days, if necessary.
The post Easy Za’atar Socca appeared first on Never. Not. Eating..
]]>The post Vegan Mocha Buttercream appeared first on Never. Not. Eating..
]]>
This recipe has the word “vegan” in front of it, but if you aren’t vegan or prefer to use dairy-based products, you can make 1:1 swaps at any point!
I love how simple, yet different this recipe is. If you are looking for a change from your normal chocolate and vanilla frostings, this is IT. Trust me, it’s so good.

The Ingredients
Here is what you will need:
- vegetable shortening
- vegan butter
- salt
- vanilla
- cocoa powder
- instant coffee
- powdered sugar
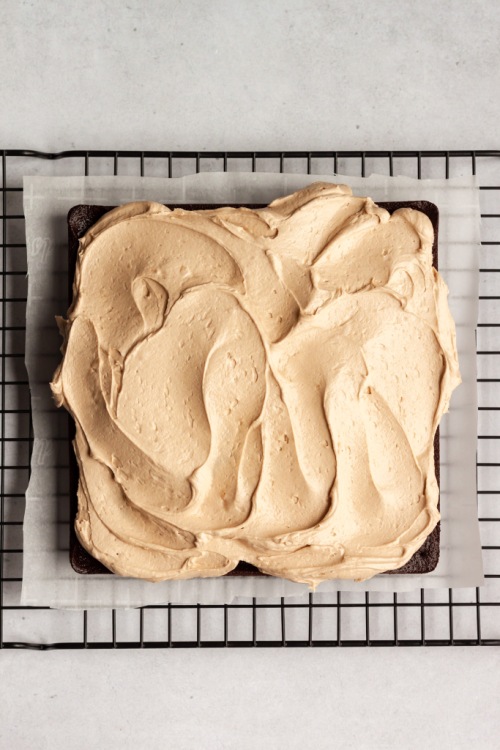
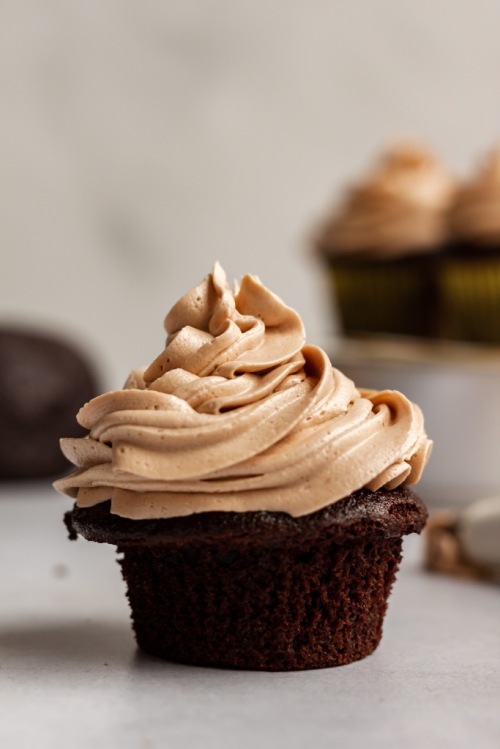
Use a stand mixer to bring all of the ingredients together and you will have a light, fluffy, perfect buttercream. It’s great for frosting cakes or cupcakes with. I love it on a rich chocolate cake!
Check out that swirly swirl!
This post contains affiliate links and I may earn a small commission when purchases are made after clicking the links, at no cost to you. Thank you!
Vegan Mocha Buttercream
Servings: Makes about 4 cups
Prep time: 10 minutes
Ingredients:
- 1/2 tbsp instant coffee
- 1/2 cup vegetable shortening*
- 1/2 cup vegan butter, softened**
- 1/2 tsp vanilla extract
- pinch of salt
- 2 teaspoons cocoa powder, sifted
- 4 cups powdered sugar
- 1-3 tbsp plant-based milk (I prefer oat milk, but you can use almond, cashew, coconut or soy)
Instructions:
- Stir the instant coffee together with three tablespoons of boiling water until dissolved. Set aside.
- Add the shortening and vegan butter to a stand mixer and mix with paddle attachment on medium speed until light and fluffy. Add in the vanilla, salt and cocoa powder and mix until combined.
- Add one cup of powdered sugar and turn the mixer on low. Pour in about half of the coffee and mix until incorporated. Add another cup of powdered sugar, followed by the rest of the coffee and continue mixing. Add the third cup of powdered sugar, followed by one tablespoon of the milk. Finally, incorporate the last cup of sugar and another tablespoon of milk, if needed. Beat until smooth and you have achieved your desired consistency. If the buttercream is too stiff, add the remaining tablespoon of milk and beat to incorporate.
- Use immediately or store in an airtight container in the fridge for up to 5 days.
NOTES:
*You can use all shortening if you do not have vegan butter.
**This can be substituted for regular, softened butter if desired.

The post Vegan Mocha Buttercream appeared first on Never. Not. Eating..
]]>The post Tropical Banana Flambé appeared first on Never. Not. Eating..
]]>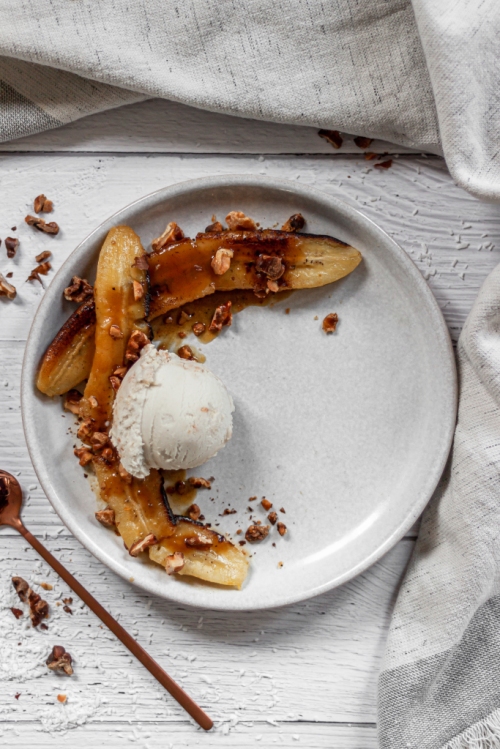
Okay, nevermind, Rona’s still stomping on our parades, so, let’s bring the Caribbean to us. Grab your piñas and your lighters and let’s set fuego to this *****…Whattt?! I meant “house.”
This recipe is inspired by one of my sweet besties. Let me take you back – We were in university. My girl had just got back from a trip down south. She was looking all bronzed and fine while the rest of us had adopted that Canadian winter glow. Girl says she’s going to show us this dessert she learned how to make while on vacay. She starts lighting fire to this pan filled with bananas, butter, orange juice and rum. Coolest thing I had ever seen, hands down. I immediately started making this all the time. I gained the Freshman 15. The end.
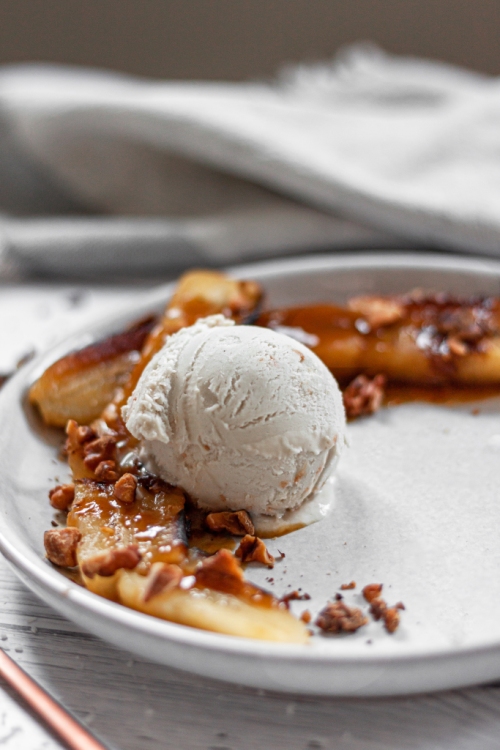
Okay, so my recipe isn’t exactly the same as what’s described above. Since I am OBSESSED with Piña Coladas, I decided to use pineapple juice instead of orange juice, to mimic my favourite tropical drink. A pinch of nutmeg also gives it that WAH-BAM that is just so WAH-BAMMY. Know what I’m sayin’?
Top your ‘nanas with some toasted walnuts and a scoop of vanilla or coconut ice cream (I prefer Halo Top Toasted Coconut) and it’s a fiesta in your kitchen!
Here are a few tips when it comes to lighting things on fire:
- Don’t wear loose, hangy clothing (we don’t want you catching on fire now, do we?!)
- Remove the pan from the burner before carefully adding the alcohol
- Use a long-reach click lighter to avoid any burns
- Once lit, bask in it for a few seconds and then shake the pan until it extinguishes (and it will)
- Don’t panic! The fire WILL go out
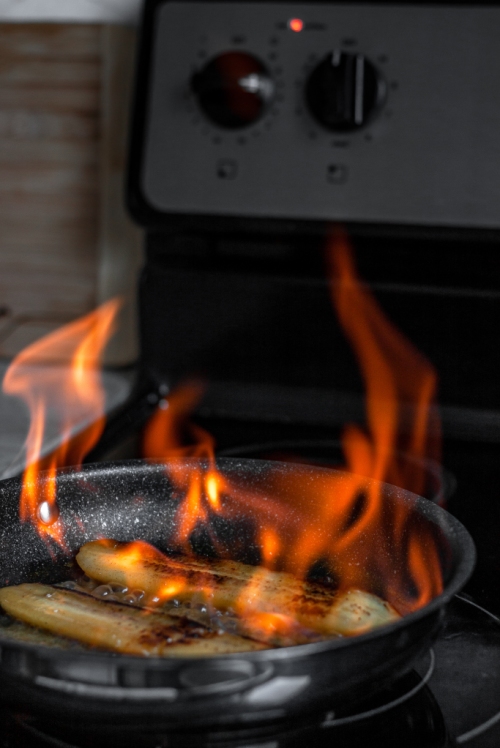
*If for any reason you experience a stovetop fire in your home, place a larger lid on top of the pan and turn off the burner…do not throw water on it
I do realize that now 90% of you will not attempt a flambé. Maybe it’s best we just skip to the recipe…Don’t be scared!
Tropical Banana Flambé
Servings: 1-2
Prep time: 2 minutes
Cook time: 10 minutes
Ingredients:
- 2 tbsp chopped walnuts
- 1 tbsp vegan butter (or regular butter)
- 1 firm banana (not green, but barely ripe), sliced lengthwise down the centre
- 1/3 cup pineapple juice (you can buy or make yourself by putting pineapple through a juicer)
- Pinch of nutmeg (optional)
- 1 oz of spiced dark rum
- dairy-free, vegan vanilla or coconut ice cream (or regular ice cream)
Instructions:
- Preheat oven to 350 degrees Fahrenheit. Spread the walnuts onto a parchment lined baking sheet and bake for 5-10 minutes, watching closely to avoid burning. Set aside.
- Set a pan over medium-high heat and add the butter. When the butter is hot, add the two banana halves, cut side down. Let carmelize in the pan for 3-5 minutes, watching closely as not to burn. Flip and add the pineapple juice to the pan along with the nutmeg, if desired. Let the juice simmer for about 2 minutes, or until reduced by half. Remove pan from heat and carefully add the rum. Ignite a long-range click lighter at the edge of the pan closest to you. The pan should flare up immediately. Give the pan a shake to eliminate the flame and then remove from heat (read above for safety tips).
- Transfer bananas to a plate and drizzle with the remaining sauce in the pan. Top with the toasted walnuts and a scoop of vanilla ice cream, or, my favourite – Halo Top’s Toasted Coconut ice cream. Enjoy!
**Use extreme caution when igniting alcohol.
If you would like to see a video of this recipe in action, check it out on my instagram highlights (@nevernoteatingca)
The post Tropical Banana Flambé appeared first on Never. Not. Eating..
]]>The post Creamy Vegan Mushroom Rigatoni appeared first on Never. Not. Eating..
]]>
Now I love those little fungi so much. That’s why I had to dedicate this pasta to them – to say I’m sorry for a lifetime of neglect, and it won’t happen again.
One thing I never neglected – Rigatoni. Isn’t it such a great pasta choice? Those sweet little grooves that hold all the sauce? Yes, please! I love using spelt pasta, but any pasta works for this recipe. Make sure you cook it to al dente, as it will continue to cook once added to that creamy mushroom sauce!
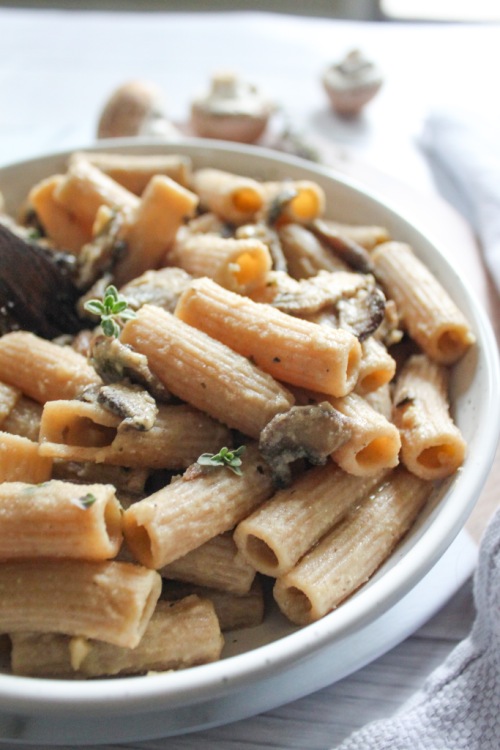
The sauce – Simple, yet delicious. Creamy, but vegan. This easy-to-make sauce requires only a few ingredients:
- garlic
- mushrooms
- thyme
- white wine
- stock
- coconut milk
- vegan butter
Start by adding the mushrooms to some olive oil and salt in a pan. Cook them down and caramelize them up! Next, add in the garlic, thyme and white wine. Cook until you cannot smell the alcohol anymore and then add the stock and milk. Let simmer until it thickens up, and transfer the pasta into the sauce to finish cooking. Finally, add in some of the pasta water to bring everything together and you got yourself some mushroom pasta!
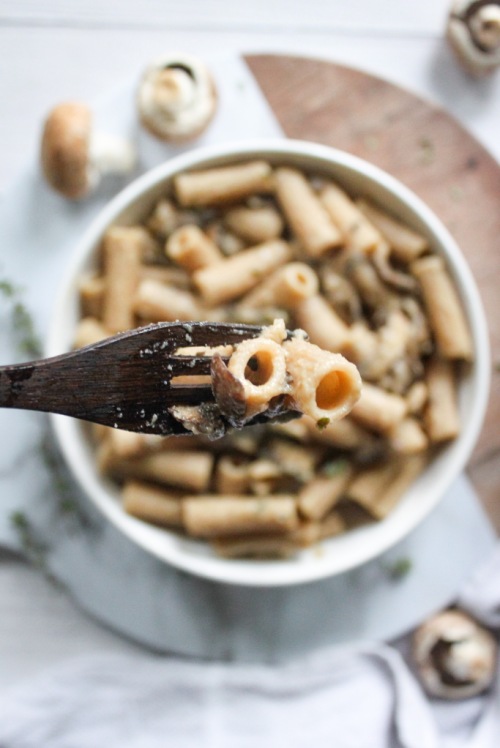
Let’s all show our love to mushrooms!
Creamy Vegan Mushroom Rigatoni
Servings: 2
Prep time: 5 minutes
Cook time: 20 minutes
Ingredients:
- 200 g rigatoni
- 3 cups sliced mushrooms
- olive oil
- salt
- pepper
- 2 cloves garlic, minced
- 2 sprigs thyme, stems removed
- 1/4 cup white wine
- 3/4 cup vegetable stock
- 3/4 cup full-fat canned coconut milk
- 1 tbsp vegan butter
Instructions:
- Cook the pasta according to package instructions, in heavily salted boiling water. Reserve 1/4 cup of the pasta water before draining.
- Add two tablespoons of olive oil to a large saucepan over medium-low heat. When the oil begins to move easily in the pan, add the mushrooms and a pinch of salt. Cook for 6-8 minutes, stirring occasionally. Add the garlic and thyme to the pan and cook until fragrant, about 30 seconds. Add the wine and let simmer for about 5 minutes, or until the alcohol smell is gone. Pour in the vegetable stock, stir, and follow with the coconut milk. Let the sauce simmer until thickened, about 10 minutes. Finish with the butter and some cracks of fresh black pepper.
- Transfer the pasta into the pan, pour in the reserved pasta water, and mix to coat with the sauce. Taste and adjust seasoning as necessary. Enjoy!
The post Creamy Vegan Mushroom Rigatoni appeared first on Never. Not. Eating..
]]>The post Vegan Pumpkin Coconut Cake appeared first on Never. Not. Eating..
]]>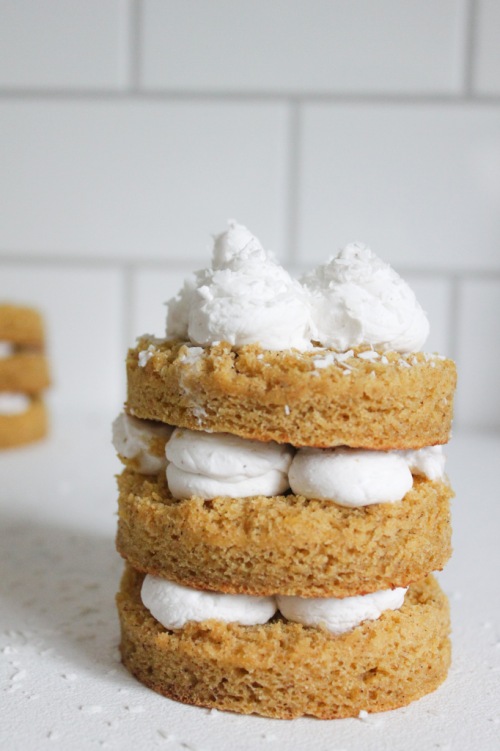
That’s right…Eggless, milkless, and as a bonus – glutenless! No bad foods allowed. A perfect Thanksgiving dessert for the upcoming long weekend!
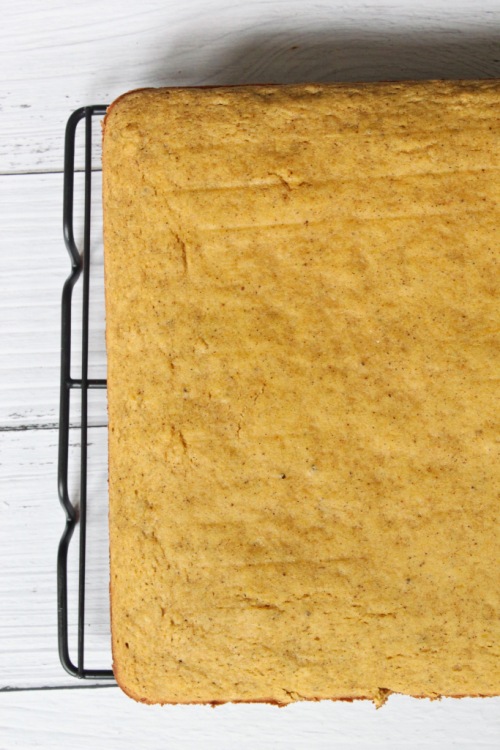
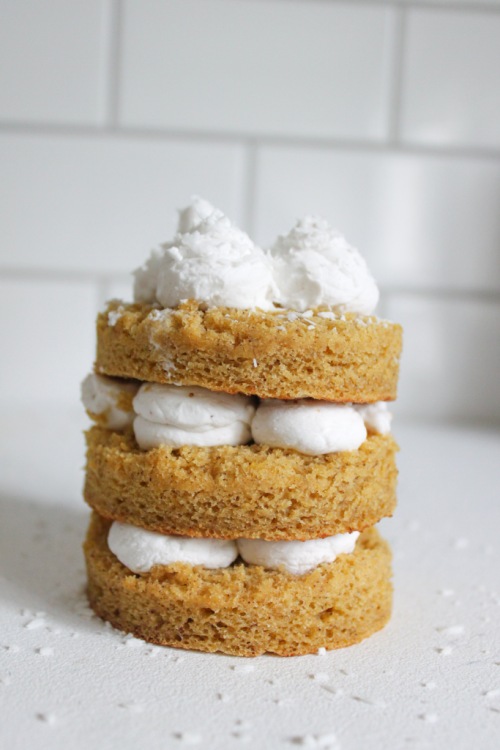
This cake takes minutes to put together, minutes to bake, and seconds to eat. It is moist and fluffy and perfect. You can make individually stacked cakes (as seen in the photos), or you can make one, two-layered cake.
Here is what you will need for the cake:
- My homemade pumpkin puree (or store bought, but it’s just not as fresh)
- Gluten-free flour
- Apple cider vinegar
- Oat milk
- Pumpkin pie spice
- Salt
- Banana
- Brown sugar
- Vanilla
- Baking soda
- Baking powder
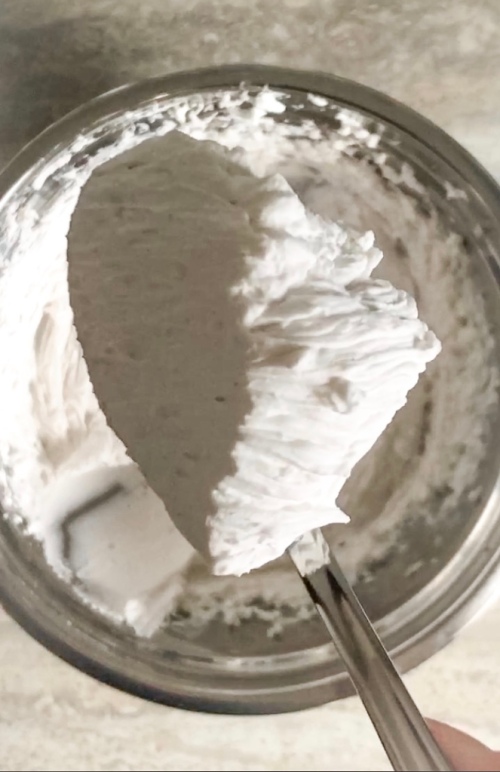
For the whipped coconut cream:
- Canned coconut milk
- Vanilla
- Cinnamon
- Salt
- Powdered sugar
To make the cake, prepare a baking pan by greasing it, lining the bottom with parchment paper and then sprinkling with flour. Combine the apple cider vinegar and oat milk and let sit for 5 minutes. This is a buttermilk substitute, which helps makes the cake fluffy and gives it a bit of a tang. Next, blend all of the ‘wet’ ingredients together – the pumpkin, banana, vanilla and brown sugar. In a separate bowl, sift together the flour, baking soda, baking powder, salt and pumpkin pie spice. Add the dry ingredients and milk mixture to the wet ingredients in four additions, starting with the flour. Pour into prepared baking pan. This will bake for around 12-15 minutes.
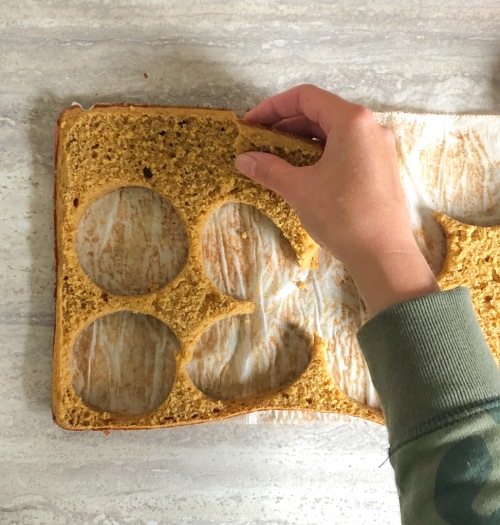
Once cooled, you can assemble you mini cakes (or one large cake) by using a round cookie cutter and cutting out circles to stack on top of one another. Alternatively, you can slice the cake down the middle and create a two-layered cake. This is a good option if you want to feed a larger party.
Baking this cake fills your house with all the smells of Fall and that, my friends, is never a bad thing! Happy baking!
Vegan Pumpkin Coconut Cake
Serving size: Makes three individual cakes or one, two-layer cake
Prep time: 10 minutes
Cook time: 12 minutes
Ingredients:
- 1/2 tbsp apple cider vinegar
- 1/2 cup oat milk (or any plant-based milk)
- 1 cup pure pumpkin (not pumpkin pie filling)
- 1 banana, mashed
- 1/2 cup brown sugar, tightly packed
- 1 tsp pure vanilla extract, separated
- 1.5 cups gluten-free flour
- 1 tsp baking soda
- 1 tsp baking powder
- 1 tsp pumpkin pie spice
- 1/2 tsp salt
- 1 14 oz can full-fat coconut milk (placed in the fridge for at least 24 hours)
- 2 tbsp powdered sugar
- 1/4 tsp cinnamon
- 2 tbsp dried coconut flakes, for topping (optional)
Instructions:
- Preheat the oven to 350 degrees Fahrenheit. Grease a 13 x 9 inch rectangular pan, line with parchment paper and dust with flour. Place a mixing bowl and electric mixer attachment into the freezer (to prepare for the whipped cream).
- Combine apple cider vinegar and oat milk together in a small bowl. Set aside.
- Beat pumpkin, banana, brown sugar and 1/2 tsp vanilla together in a large bowl until smooth.
- In a separate bowl, sift the flour, baking soda, baking powder, pumpkin pie spice and salt together.
- In four additions, add the flour mixture and oat milk to the wet ingredients, starting with the flour, and beating until combined.
- Pour batter into prepared pan and bang the pan on the counter a few times to release any air bubbles. Bake for 12-15 minutes, or until an inserted toothpick comes out clean. Remove from oven and let cool in the pan for five minutes before flipping onto a wire rack to finish cooling completely.
- While the cake cools, make the whipped cream. Remove the bowl and mixers from the freezer and carefully open the can of coconut milk from the fridge. Scoop the solid white part at the top of the can into a bowl (refrigerate the water at the bottom of the can and save for smoothies). Beat the coconut solids on medium speed for 30 seconds. Add the powdered sugar, the cinnamon, the rest of the vanilla and a pinch of salt. Beat for another minute until it is thick and creamy.
- When the cake is cool, use a round cookie cutter to cut out nine circles (or cut the cake in half to make two layers). Spread some of the whipped cream onto the first cut out circle. Top with the second and repeat. Add some whipped cream on top of the third circle and sprinkle with some of the dried coconut, if desired. Alternatively, if making one large cake, spread some of the whipped cream on the first layer of cake, top with the second layer and then dollop the rest of the whipped cream on top. Sprinkle with coconut flakes.
- Serve immediately or store in the fridge for up to 48 hours.
The post Vegan Pumpkin Coconut Cake appeared first on Never. Not. Eating..
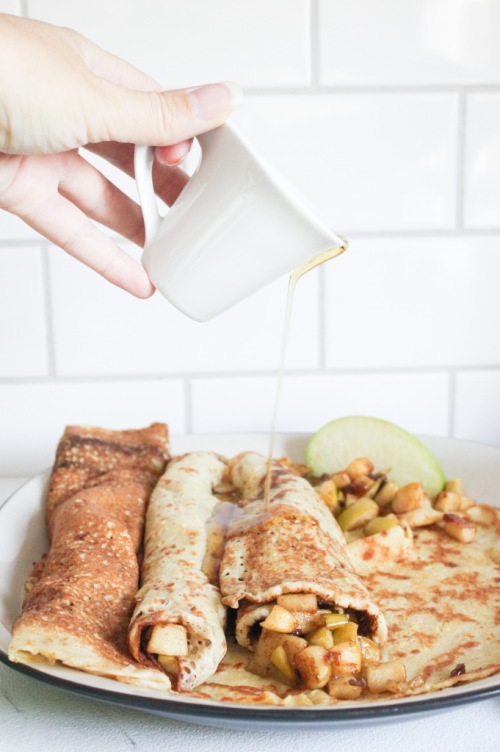
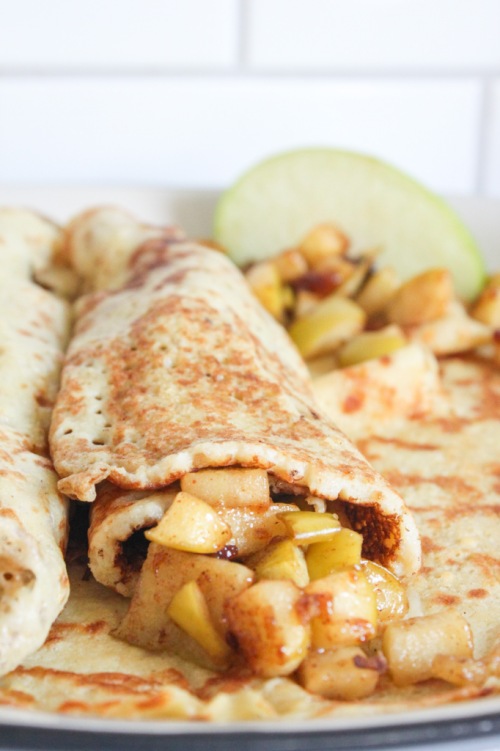
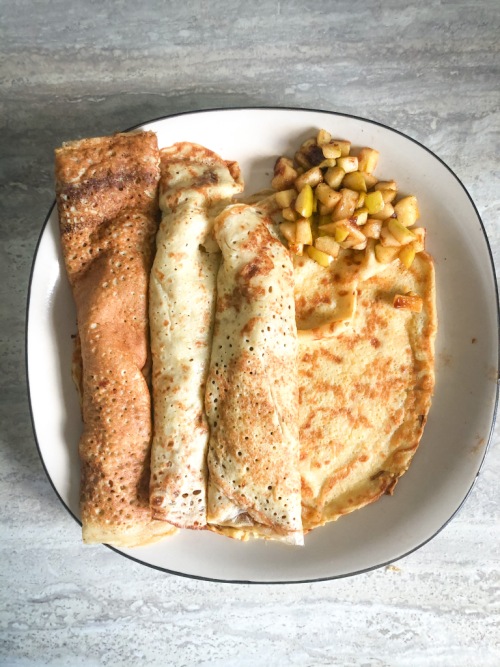
]]>The post Gluten Free Crepes with an Apple Cinnamon Compote appeared first on Never. Not. Eating..
]]>
I’ve used my soup maker to make an abundance of different recipes, such as: soup (duh!), smoothies, juices, pancakes and my favourite, alcoholic beverages. It’s truly simple to use and does all of the cooking and blending for you, allowing time to clean up your kitchen, or do something more fun, like snack while you wait for your food. If you have a soup maker, or are thinking of purchasing one, check out my Instagram account for some more fun recipes to make in it – @nevernoteatingca
So let’s talk about these crepes. Firstly, I struggle to call them “crepes,” because as a kid, my family and I only ever ate “Finnish pancakes,” which were more crepe-like in appearance, but were never referred to as crepes. Those were our style of pancakes. We never ate traditional American pancakes. But you know what?! I’m all about pleasing the people. People see flat pancakes, they say “crepes.” So, this is for you.
Secondly, if you follow my IG account, or have read some of my posts, or even tried some of my recipes (thank you), you know that I like to put a healthier spin on foods that aren’t so healthy. Therefore, I have made these “crepes” with gluten-free flour, plant-based milk and no refined sugar. If you want to indulge a bit more, feel free to sub in the healthy ingredients for the not-so-healthy ones.
I can’t decided whether my favourite part of this dish is the pancake…I mean crepe…or the filling. It’s apple season right now, and nothing goes better together than apples and cinnamon. And nutmeg. Nutmeg is bomb. The filling is tart and sweet and ooey and gooey. It’s a great addition to these less-sweet crepes. I prefer to use honeycrisp or granny smith apples for this, but you can definitely use whatever you have on hand. I also like to keep the skins on, mostly because I’m lazy, but feel free to peel your apples if that’s your jam.
Below you will find two ways to make this recipe. The first is the easiest way, but you need a soup maker for that! The second is more traditional, but totally yummy just the same.
May your day be enhanced with pancake-crepes and fall fillings!
Gluten Free Crepes with an Apple Cinnamon Compote
Serving Size: Makes 10 large crepes
Prep time: 5 minutes
Cook time: 20 minutes
Ingredients
- 2.5 cups dairy-free milk
- 2 eggs, beaten
- 2 tbsp maple syrup, plus more for serving
- 1 tsp vanilla extract
- 1.5 cups gluten free flour
- 1/2 tsp salt
- 2 medium apples, finely diced (I use honeycrisp or granny smith)
- 1/2 tsp lemon zest
- 1 tbsp lemon juice
- 1/2 tsp cinnamon
- pinch of fresh nutmeg
- 1/2 tbsp of cornstarch
- 1 tbsp maple syrup or brown sugar
- coconut oil or butter (for the pan)
Instructions
With a soup maker:
- Add the milk, eggs, syrup, vanilla, flour and salt to your soup maker. Set to “juice.” When finished mixing, skip to step 3 below.
Without a soup maker:
- Whisk together milk, eggs, syrup and vanilla and set aside.
- In a medium bowl, whisk flour and salt together. Add the wet ingredients and whisk until combined.
- Place a large pan over medium-high heat and add half a tablespoon of coconut oil (or butter). When the pan is very hot, add about 1/3-1/2 cup of the crepe batter (depending on the size of your pan). Swirl the pan around until the batter coats the entire bottom. There shouldn’t be a lot of batter sitting on top.
- Let the crepe cook until the edges begin to come up from the pan and the bottom is browned. Flip and cook on the other side for about 2 minutes or until darker spots begin to develop on the underside. Remove from pan, place on a plate and store in the oven or microwave to keep warm. Continue with the remainder of the batter.
For the filling:
- While the crepes cook, add the apples, zest, lemon juice, cinnamon, nutmeg, cornstarch and sugar to a bowl and stir to combine. Let sit for at least 5 minutes.
- Preheat a large pan over medium-low heat. Add a half tablespoon of coconut oil or butter to the pan. When melted, add the apples. Let cook until apples are fork tender, about 8-10 minutes, stirring occasionally.
Assembly:
- Top each crepe with a few spoonfuls of the filling and a drizzle of maple syrup. Roll and enjoy!
The post Gluten Free Crepes with an Apple Cinnamon Compote appeared first on Never. Not. Eating..
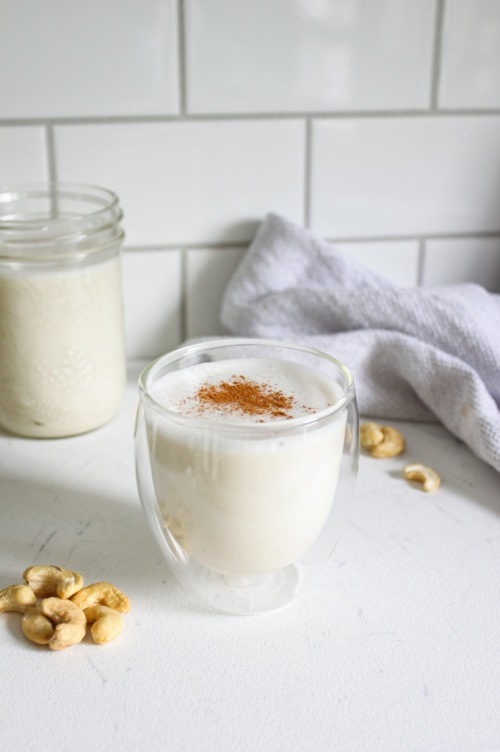
]]>The post Homemade Cashew Milk appeared first on Never. Not. Eating..
]]>
Did you know that the majority of the world is lactose intolerant (around 65% of the population)? Doesn’t that seem strange to anyone else?! With all of the research around dairy products and their long-term effects, it has really put me off of drinking milk for the last decade. Luckily, you can milk a nut. Just kidding, nuts don’t have nipples.
But seriously, plant-based milks are a thing, and they are easy to make. They can sub in for anything you do with cow’s milk, but you don’t get the runs after drinking them…Score!
There are so many types of non-dairy milks out there nowadays – soy, almond, coconut, oat. But, my favourite is cashew. It’s so creamy and delicious.

To make cashew milk, you need two things – cashews and water. Easy peasy. You can also add flavourings, like vanilla, or sweeteners, like maple syrup or honey. The best part about homemade nut milk (other than how easy it is), is that you know exactly what is going into it, and also what isn’t going into it – preservatives. Yah, baby.
To begin, you need to soak one cup of raw cashews in water overnight. In the morning, drain and rinse the cashews, add them to your high-powered blender (or soup maker, which is what I use) with your choice of additions and blend until smooth. That’s literally it. You don’t even need to strain cashew milk, like you would almond milk.
I hope this post has inspired you to make your own cashew milk at home. It is significantly less expensive than store-bought, healthier for you and takes only minutes. Tag me on Instagram if you try out this recipe – @nevernoteatingca
Homemade Cashew Milk
Prep time: 2 minutes (plus overnight soaking)
Cook time: 2 minutes
Ingredients:
- 1 cup raw cashews
- 3 cups water
- pinch of salt (optional)
- 1 teaspoon vanilla extract (optional)
- 1 tablespoon maple syrup (optional)
Instructions:
- Place your cashews in a bowl and cover with water. Let them soak overnight.
- Drain the cashews and rinse thoroughly. Transfer them to a high-powered blender, or soup maker. Add three cups of water as well as the salt, vanilla and syrup, if using. If using a blender, blend for about one minute, or until completely smooth. If using a soup maker, set to “juice” and press ON/OFF.
- Pour into a large mason jar or a container with an air-tight lid. Store in the fridge for up to 4 days.
NOTES:
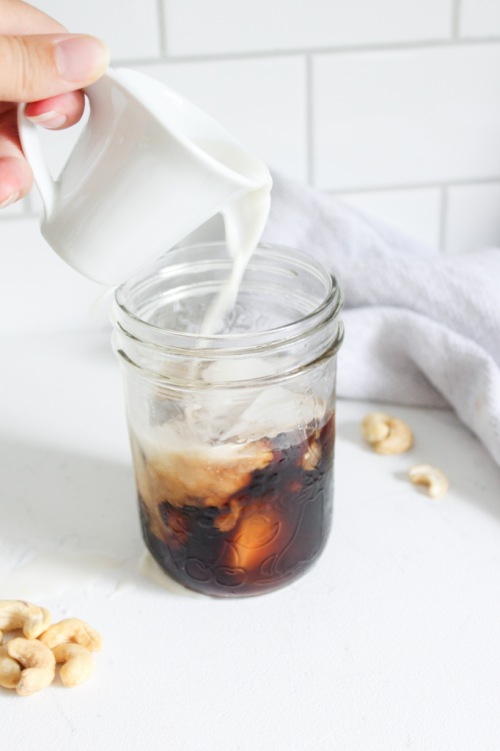
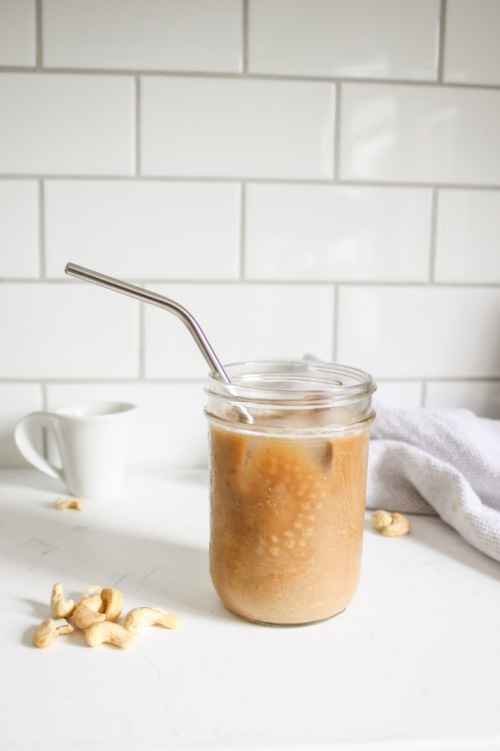
*I like to serve it with a dash of cinnamon or stir it into my morning cold brew over ice.
**Separation is normal…Shake well before serving!
The post Homemade Cashew Milk appeared first on Never. Not. Eating..
]]>The post The Triple P’s – Pink Pitaya Pancakes (Vegan & GF) appeared first on Never. Not. Eating..
]]>
Not only is pink a pretty hue, but it has also made its mark on our planet. Pink ribbons are used to raise awareness for breast cancer, a pink shirt is a symbol for anti-bullying, and pink flowers and hearts are given to express one’s love for another.
Pink food is more enjoyable as well, and that’s a fact. Okay, fine…it’s not a fact, but it’s my very strong opinion and I dare you to challenge me!
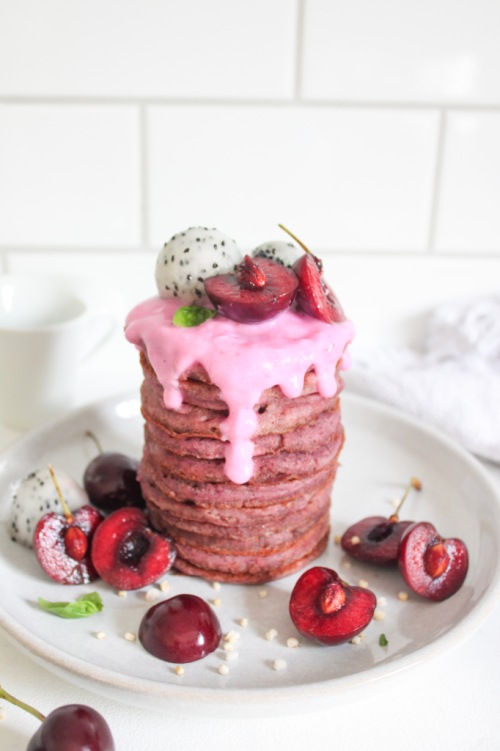
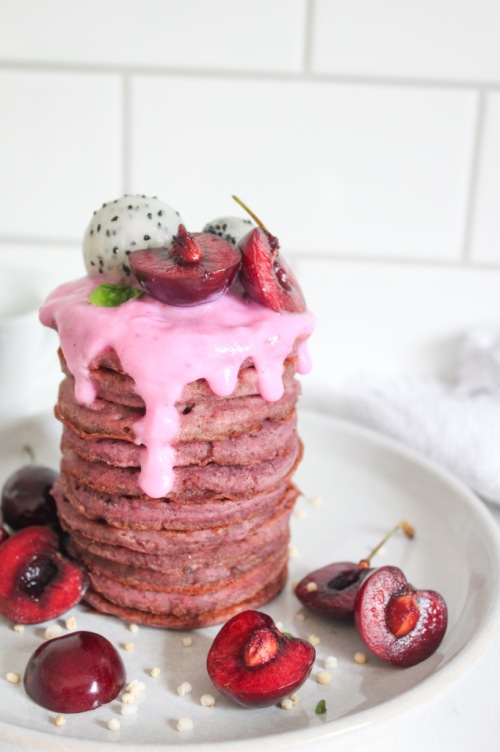
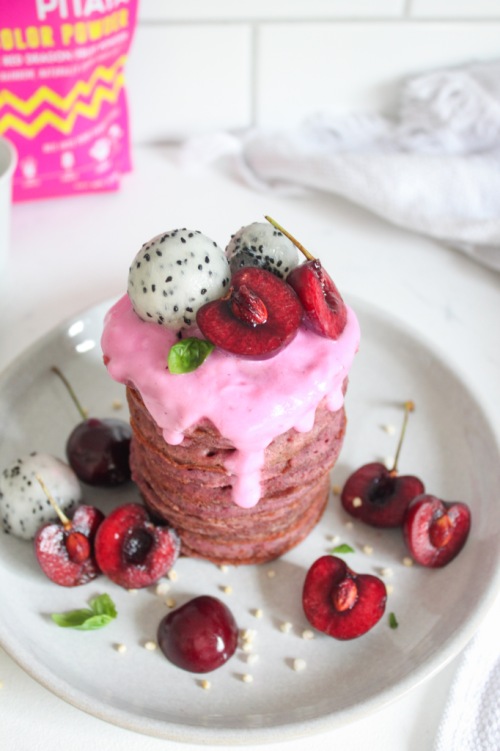
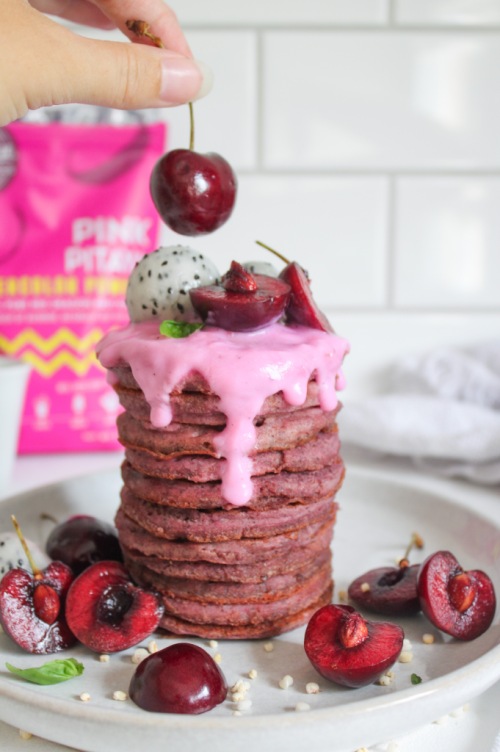
Anywho, since we now agree that pink food is better than non-pink food, I have a pretty sweet recipe for you – The Triple P’s! PINK PITAYA PANCAKES.
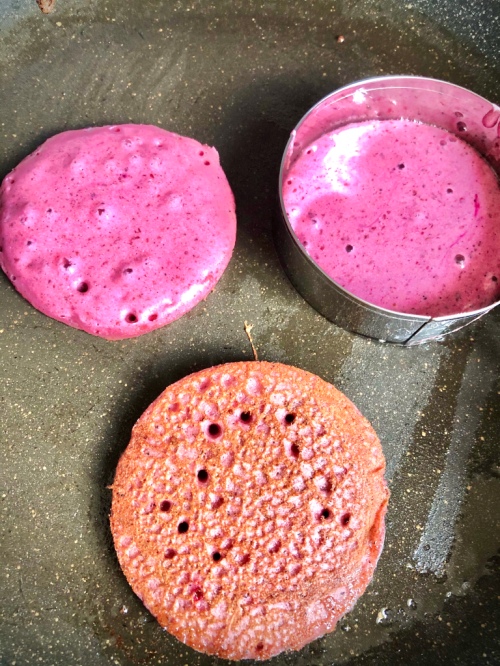
Since we’ve already discussed the importance of the colour pink, let’s talk about pitayas. If you don’t know, a pitaya is a fruit, commonly known as “dragonfruit” in North America. It has a pink skin with scale-like spikes shooting out of the exterior. It’s quite unique in appearance, and also quite beautiful. The inside of a pitaya can be white or a bright pink, with little black seeds, similar to that of a kiwi. It has a very mild taste and soft, fleshy texture. The pitaya I am using in this recipe is actually in powder form. The fruit is dried out and then finely ground so it can be used in smoothies, baking, and today – PANCAKES! You can find pink pitaya powder here.
And, these aren’t just any pancakes, peeps. These are gluten-free, vegan, and refined sugar-free! You. Are. Welcome. So, what replaces all of the glutenous, sugary, dairy-forward ingredients, you ask? Well, let’s start with the dry:
Buckwheat flour – I love, love, love using buckwheat flour as a substitute for all-purpose. It is NOT made out of wheat, and therefore is gluten-free. Buckwheat is actually a seed and it is ground up and sold in ‘flour’ form. I consider it to be the best GF flour for pancakes because it holds up and acts the most similar to regular flour. I also really like the nuttier taste.
Flax – Eggs are a typical pancake ingredient, but if I added them to this recipe then the pancakes wouldn’t be vegan. So instead, I use a flax ‘egg,’ which is literally just flax meal and water mixed together and left to sit for a few minutes to thicken up. It’s the perfect vegan binder.
Oat Milk – In any standard flapjack recipe, you will either find milk or buttermilk. And, again, since I’m going for vegan pancakes today, dairy products just don’t cut it. That’s why I have created my vegan ‘buttermilk’ by mixing some organic apple cider vinegar with oat milk instead of the baby cow elixir. You can also use white vinegar for this, if you don’t have ACV. Make sure you are using a certified gluten-free oat milk, as oats themselves do not have gluten in them, but often can be cross-contaminated with other glutenous products. If you can’t find a gluten-free oat milk, you can definitely use almond, cashew or soy milk instead!
Maple Syrup – Finally, the sweet stuff. Obviously white refined sugar is standard, but that shiz is so bad for you, man. I typically could eat these pancakes without any sugar, just because I’m sweet enough, but sometimes I like to add a little maple syrup to bring out the Canadian in me. It’s completely optional, but you do you. You can add more than what is called for if you like a sweeter pancake.
Alright, I think I’ve covered all of the important bases here. Let’s make some flippy flappies!
The Triple P’s – Pink Pitaya Pancakes (Vegan, GF)
Serving size: Makes about 15 small pancakes
Prep time: 10 minutes
Cook time: 15 minutes
Ingredients:
- 1 tbsp flax meal
- 1/2 tsp apple cider vinegar or white vinegar
- 3/4 cup gluten-free oat milk (or your preferred dairy-free milk)
- 1/2 cup buckwheat flour
- 1/2 tsp baking powder
- 1/4 tsp baking soda
- 1/4 tsp salt
- 1 tsp maca powder (optional)
- 1.5 tbsp pink pitaya powder (optional)
- 1-3 tbsp pure maple syrup (according to how sweet you want them, I do 1 tbsp)
- 1/2 tsp pure vanilla extract
- coconut oil
Instructions:
- To a small bowl, add flax meal and 2.5 tablespoons of water. Mix well and place in the fridge for at least 5 minutes.
- Add vinegar and plant-based milk to a measuring cup and stir. Set aside.
- To a medium bowl, add buckwheat flour, baking powder, baking soda, salt, maca powder and pitaya powder, if using. Whisk to combine and set aside.
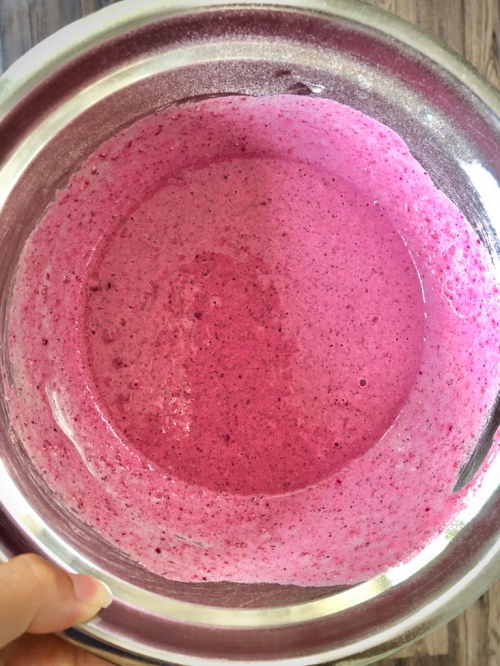
- Add the maple syrup and vanilla to the measuring cup with the vinegar and milk. Remove flax mixture from the fridge and add to the milk mixture as well. Stir and then pour into the dry ingredients. Whisk until combined.
- Add about 1/2 tablespoon of coconut oil to a pan set over medium heat. When the oil is hot, use a ladle to pour some of the pancake batter into the pan. When bubbles begin to appear around the edges (about 1-2 minutes), flip the pancake and cook for 30 seconds to one minute more. Remove from heat and continue with rest of batter, adding more coconut oil as needed.
- Serve immediately or store in an airtight container in the fridge for up to three days.
NOTES:
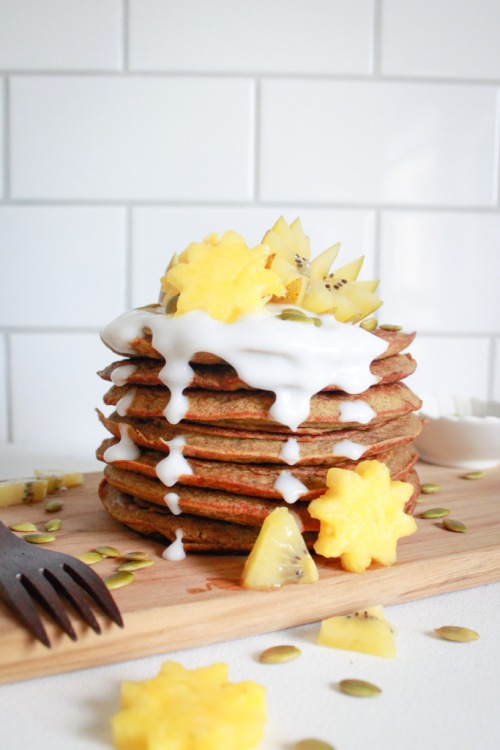
I love serving these with fresh fruit, yogurt and pure maple syrup.
This recipe feeds approximately two people. You can double the recipe if feeding a larger family.
The post The Triple P’s – Pink Pitaya Pancakes (Vegan & GF) appeared first on Never. Not. Eating..
]]>The post The Fluffiest Gluten-Free Pumpkin Pancakes appeared first on Never. Not. Eating..
]]>
Not only are these pancakes gluten-free, they are also dairy-free and refined sugar-free. You. Are. Welcome.
This recipe was inspired by the extra pumpkin puree that I had after making my favourite pumpkin pasta dish. I hate waste and when I was thinking about what I could use the leftovers for, my brain immediately went to pancakes. Usually when I try recipes for pancakes that are gluten-, dairy- and refined sugar-free, they often turn out flat. It was my goal to create healthy pancakes that taste and look like normal pancakes. I think these are it. And, by “think” I mean “know.” I just didn’t want to sound cocky.

Because these pancakes are refined sugar-free, they are on the less-sweet side. They include the natural sweetness from a banana, but feel free to add some brown or white sugar to the wet ingredients. I, personally like to aggressively drizzle them with maple syrup after they are made and ready-to-eat, and this covers the necessary sweetness!

To start, whisk up all of your dry ingredients. Buckwheat flour, baking powder, baking soda, cinnamon, nutmeg and salt. The use of buckwheat is what makes these pancakes gluten-free. Buckwheat is actually a seed, not a wheat, as the name suggests. The seeds are ground up into a flour. It is my preferred ingredient for pancakes as I have found it to have a similar outcome as regular wheat flour, unlike other gluten-free flours, like almond and coconut.

The wet ingredients include: pumpkin (of course), canned coconut milk, a mashed banana, an egg and some vanilla. These all get whisked together. When combined, add in the dry ingredients and stir until everything has been incorporated. The batter will be thick. Set it aside to allow the ingredients to get to know one another.

When ready, add the batter to a hot pan. I find it easiest to use two spoons to help shape your pancakes the way you would like them. They only need a minute or two on each side until they are ready.

Serve with your toppings of choice. I love fresh fruit on these, cinnamon, and some yogurt. Oh, and pools of maple syrup, of course!
The Fluffiest Gluten-Free Pumpkin Pancakes
Servings: Makes 8 pancakes
Prep time: 5 minutes
Cook time: 10-15 minutes
Ingredients:
- 1 cup buckwheat flour
- 1 tsp baking powder
- 1/2 tsp baking soda
- 1/2 tsp cinnamon
- 1/4 tsp freshly grated nutmeg (or the packaged powder)
- 1/2 tsp salt
- 1/2 cup pure pumpkin puree (not pie filling)
- 1 very ripe banana, mashed
- 1 egg, beaten
- 1 cup canned coconut milk
- 1/2 tsp pure vanilla extract
- Coconut oil
Instructions:
- In a small bowl, whisk the buckwheat flour, baking powder, baking soda, cinnamon, nutmeg and salt together. Set aside.
- In a large bowl, whisk the pumpkin, banana, beaten egg, coconut milk and vanilla together until smooth. Add the dry ingredients and stir until everything has been combined. Batter will be thick. Set aside for a few minutes to allow the flavours to meld.
- Preheat a pan over medium-high heat. Add a tablespoon of coconut oil to grease the pan. Use two spoons to dollop the batter into the pan and to help spread and shape the pancakes. Cook for 1-2 minutes – you will notice the edges begin to set and bubbles begin to form on top – and flip, cooking another minute. Remove from pan and continue with the rest of the batter.
- Serve with your choice of topping – I recommend pure maple syrup, fresh fruit and dairy-free yogurt!
The post The Fluffiest Gluten-Free Pumpkin Pancakes appeared first on Never. Not. Eating..
]]>