The post Vegan Ice Cream Bars appeared first on Never. Not. Eating..
]]>
This has been one of the hottest summers on record, and I’m just a bit mad at myself that I developed these ice cream bars now, instead of at the beginning of summer. Then again, it’s not like I’m going to stop eating them when the weather cools down…I’m an ice-cream-all-year-long kinda gal!
HEALTHIER THAN STORE-BOUGHT
So here are a few reasons why you should make these bars, STAT:
- The recipe includes natural sugar from pure maple syrup only, and you can omit it entirely if you wish.
- They are vegan.
- They are made quickly in a blender.
- You like delicious treats.
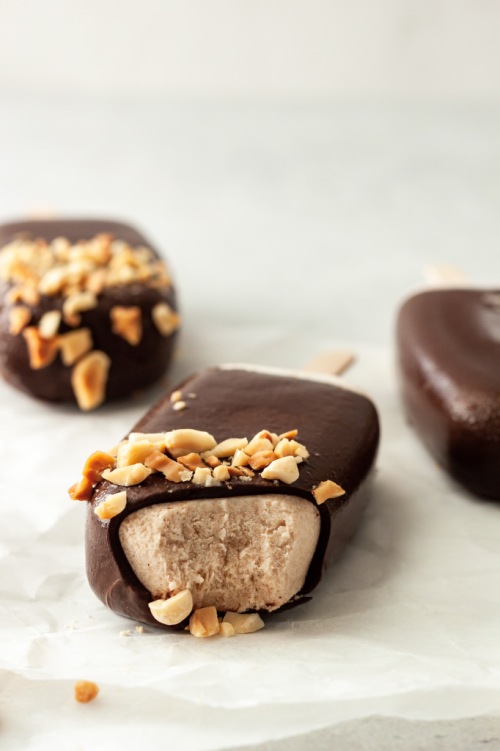
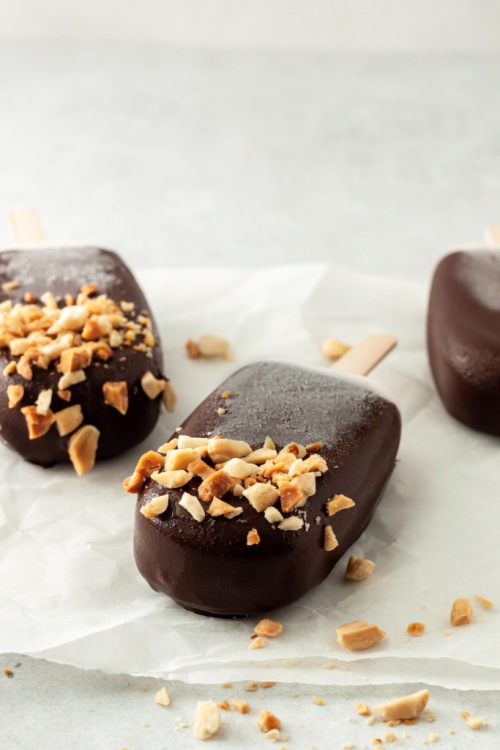
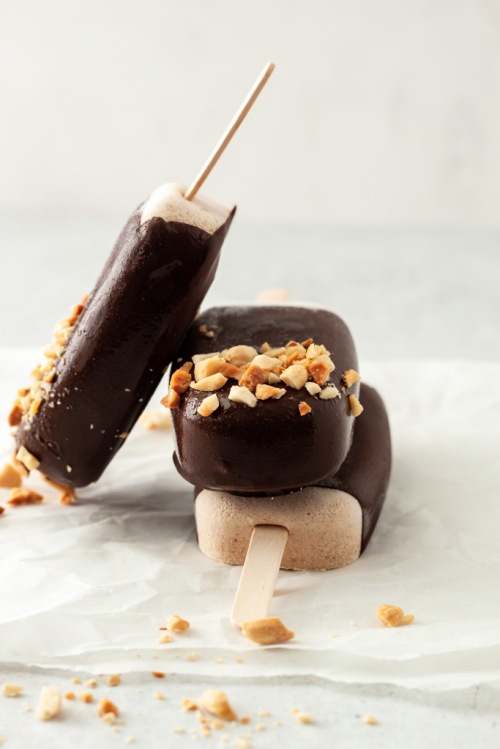
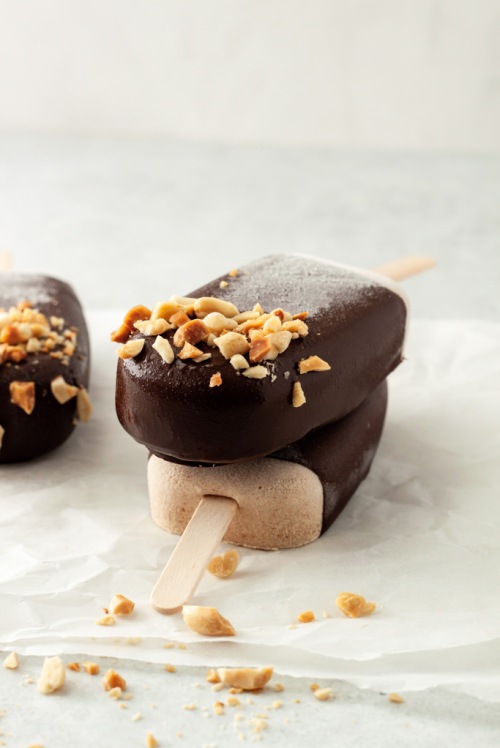
These remind me of the Magnum bars you can buy at the grocery store. The only difference is you know all of the ingredients going into them, and they are way healthier than anything you would get out of a box.
HOW TO MAKE VEGAN ICE CREAM BARS
The recipe for these bars is simple – blend all ingredients together using a high-powered blender. Pour into the cutest popsicle molds. Freeze for a few hours until firm. Dip in chocolate and sprinkle on some crushed peanuts.
When you bite into one of these little babes, you first get the crack of the chocolate, followed by the creaminess of the filling which is made rich by coconut milk and nut butter. It’s beyond good. Ice cream goals!

OTHER VEGAN TREATS TO TRY
Vegan Protein Energy Balls (the perfect pre-workout snack)
Vegan Mocha Buttercream (my favourite cake topping)
Sweet Potato Creme Brulee (a great holiday dessert)
This post contains affiliate links and I may earn a small commission when purchases are made after clicking the links, at no cost to you. Thank you for supporting me!
Vegan Ice Cream Bars
Serving size: Makes 8 bars
Prep time: 10 minutes
Freeze time: 4 hours
Ingredients:
- 1 can full-fat coconut milk (refrigerated for at least 24 hours)
- 1/2 cup nut butter (I love using cashew or peanut butter for this)
- 1/2 cup coconut yogurt
- 2-3 tbsp pure maple syrup
- 1/2 tbsp pure vanilla extract
- 1/4 tsp cinnamon powder (optional)
- 85 g dark vegan chocolate (chopped)
- 1 tbsp coconut oil
- 1/4 cup peanuts, chopped
Instructions:
- Remove coconut milk from the fridge and carefully open the can. Scoop the solid white part out into a high-powered blender. Reserve the coconut water in the bottom of the can for tomorrow’s smoothie!
- Add the nut butter, yogurt, syrup, vanilla and cinnamon to the blender and blend until smooth. Pour into popsicle molds and place in the freezer until firm, about four hours.
- Over a double boiler*, melt the chocolate with the coconut oil, stirring often. Pour into a tall cup wide enough for the popsicles to fit in. Dip each popsicle into the chocolate and lay on a piece of parchment paper. Immediately sprinkle with the chopped peanuts.
- Store in the freezer for up to 10 days.
NOTES:
*For the double boiler – fill a small pot with an inch or two of water. Bring to a gentle simmer and place a larger bowl on top with a wooden spoon in between to let the steam escape. Place the chocolate and coconut oil in the bowl and stir frequently. Alternatively, you can melt the chocolate in the microwave in short, 20-30 second increments, stirring in between.
Tip – Take the ice cream bar out of the freezer and let sit a few minutes before consuming!
The post Vegan Ice Cream Bars appeared first on Never. Not. Eating..
]]>The post Dark Chocolate Protein Nuggets appeared first on Never. Not. Eating..
]]>
I was in Costco the other day and I found these Keto Nuggets and decided to give them a shot. I’ve been looking for something that I can eat post-dinner that isn’t too terrible for you. I really just can’t get behind the idea that dinner is the last meal that I will eat in a day. I don’t vibe with that. Anyway, back to my story: I purchased them and they were pretty darn good! But, since it’s me and I need to make mostly everything from scratch, I decided that instead of buying them again, I was going to make them. And here we are!

So these “nuggets” are super quick and easy. The nuts and seeds in the recipe can easily be swapped out for your favourite nuts and seeds, as long as you abide by the number of grams listed!
I like to toast the almonds and pecans to get that roasty toasty flavah before dousing them in the melted chocolate. So good!

Note: There isn’t any extra sugar added to these…Just what is in the chocolate. I like things less-sweet, but also because I always use maple syrup, honey or agave to sweeten my food, and their properties could potentially seize the chocolate. Chocolate is super temperamental, and even the tiniest drop of water could ruin an entire bowl. Because all of my preferred sweeteners are in liquid form, I didn’t want to add any and compromise the chocolate.

You can definitely find a lot of the ingredients at Costco or your local bulk food store, but here are some links to the required products if you prefer to shop online:
- Pecans
- Almonds
- Hemp hearts
- Pumpkin seeds
- Chia seeds
- Shredded coconut
- Flaky sea salt
- Dark chocolate
- Coconut oil
Another very helpful item is a kitchen scale. This is so great to have on hand, especially if you do a lot of baking. I used my scale for this recipe as it is the most accurate, especially when you are measuring nuts – their awkward shape always fits differently into measuring cups.
Let’s make some nuggets!

This post contains affiliate links and I may earn a small commission when purchases are made after clicking the links, at no cost to you. Thank you for supporting me!
Dark Chocolate Protein Nuggets
Prep time: 10 minutes
Cook time: 10 minutes
Cool time (inactive): 1 hour
Ingredients:
- 1/2 tsp Flaky sea salt
Instructions:
- Preheat oven to 350 degrees Fahrenheit and line a large baking sheet with parchment paper.
- Spread the pecans out on the parchment paper and bake in oven for 3 minutes.
- Pull out the baking sheet and add the almonds. Bake for another 3-6 minutes, or until just starting to become brown. Watch carefully! They will burn easily.
- To a large bowl, mix together the toasted nuts, hemp hearts, pumpkin seeds, chia seeds, coconut and salt and set aside.
- Add the chocolate and coconut oil to a double boiler*, over low heat. Stir frequently with a spatula until almost completely melted. Remove and continue stirring until the remaining solid pieces melt.
- Pour the chocolate over the nut and seed mixture and use a wooden spoon to mix until all of the nuts and seeds are coated. Spread the mixture out onto a parchment lined baking sheet (you can use the same parchment you used for roasting the nuts). Place in the fridge for at least one hour to set.
- When fully set, remove from fridge and break into bite-size “nuggets.” Store in an airtight container in the fridge for up to 2 weeks!
NOTES:
*For the double boiler, fill a small pot with one – to two-inches of water and place over medium low heat. Add a larger glass, or heatproof bowl on top of the pot with a wooden spoon in between to let the steam escape. Place the chocolate and coconut oil into the glass bowl to melt.
The post Dark Chocolate Protein Nuggets appeared first on Never. Not. Eating..
]]>The post Gooey Caramelized Banana Oatmeal appeared first on Never. Not. Eating..
]]>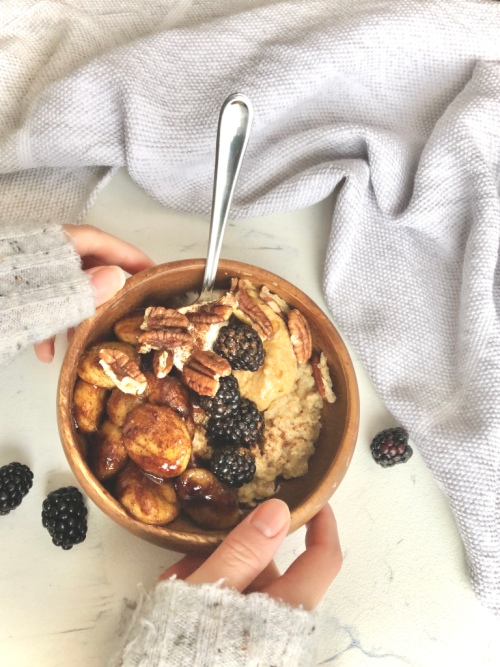
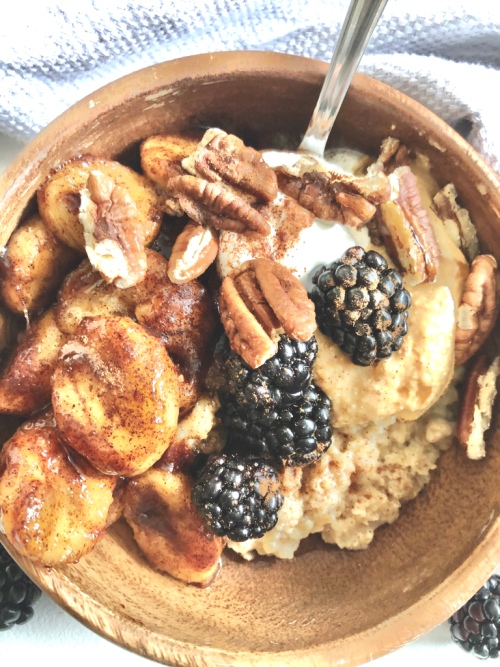
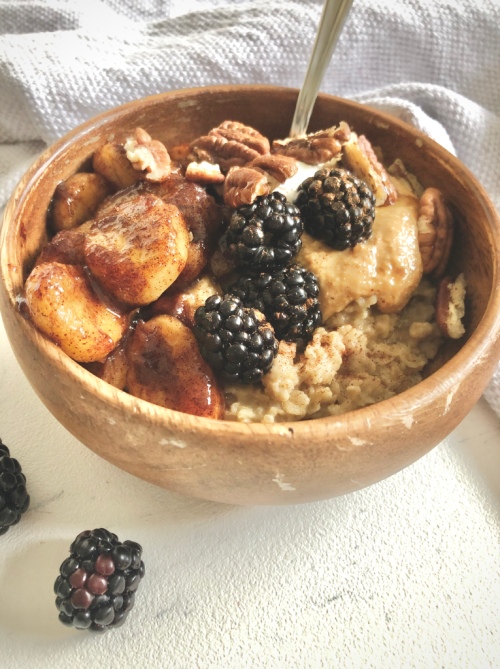
This oatmeal is a 100% plant-based, animal-friendly, environment-saving bowl of happiness. It has Sunday morning, sit by the window with a blanket and coffee, petting your dog, written all over it.
Unlike the rest of my family growing up, I never was an oatmeal lover. I found it to be bland and texturally challenging to my palate. My brother loved those packaged brands that you pour boiled water over and I just never understood it and I still don’t. My mom loved Cream of Wheat, and when served to me, I swear I’d have to cover the bowl with a thick layer of brown sugar if I was getting it down. I was an oatmeal outcast in my family.
It is time that I fit in. It’s time that oatmeal was revolutionized. I needed to make it enjoyable, so I covered it in cinnamon and maple syrup and dolloped nut butter on top with some fresh fruit and warm bananas and I think I’m part of the fam now. Fingers crossed.
This quest to assimilate with oatmeal lovers began with my understanding that I just didn’t enjoy oats cooked in water, SO, the first thing that changed was the cooking of the oats themselves. Cashew milk is my new fav, and salt is definitely needed to begin the transformation from yuck to yum. I also added some cinnamon right to the pot as well as maca powder for a healthy boost. The oatmeal comes to a boil with double the milk and then simmers for a few minutes until thick and creamy.
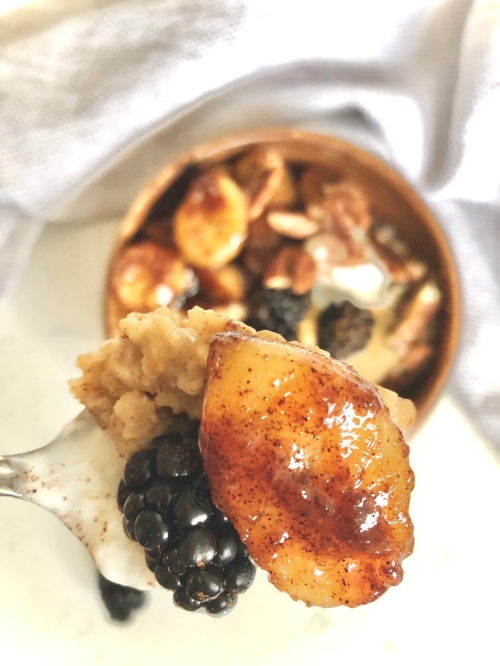
Separately, in a pan, I added coconut oil with maple syrup and some more cinnamon, brought this to a simmer and added my sliced bananas. These cook in the sauce and become sticky, gooey, delicious little bites to slather over to the oatmeal.

Finally, the topping queen works her magic with a creamy nut butter, fresh fruit to lighten things up, toasted pecans and a dollop of coconut yogurt to provide a very welcomed temperature contrast.
Now, that is an oatmeal that I can get behind!
I hope if you were like me and are upset about regular oatmeal, that this recipe inspires you to try again. Oatmeal lovers unite!
Gooey Caramelized Banana Oatmeal
Serving size: 1
Prep time: 2 minutes
Cook time: 6-7 minutes
Ingredients:
- 1/3 cup quick oats
- 2/3 cup non-dairy milk (I prefer cashew)
- 1/4 tsp salt
- 1 tsp cinnamon, separated
- 1/2 tsp maca powder (optional)
- 1/2 tbsp coconut oil
- 3 tbsp maple syrup
- 1 banana, sliced
- Optional toppings: Nut butter, coconut yogurt, toasted pecans*, fresh fruit
Instructions:
- To a small pot, add oats, milk, salt, 1/2 tsp cinnamon and maca powder. Bring to a boil and turn heat on low to simmer for 3-5 minutes, or until creamy.
- While the oats are cooking, add coconut oil, maple syrup and remaining 1/2 tsp cinnamon to a medium saucepan. Bring to a simmer and add the banana. Mix to coat bananas and continue to cook for 3-4 minutes, until bananas are soft and caramelized.
- Spoon the oatmeal into a bowl and top with bananas, nut butter, yogurt, toasted pecans, fresh fruit, a dash of cinnamon and a bit more maple syrup.
NOTES:
*Toast pecans in a 350 degree oven for 5-7 minutes, watching carefully to avoid burning.
The post Gooey Caramelized Banana Oatmeal appeared first on Never. Not. Eating..
]]>