The post Cinnamon Vanilla Cashew Butter Recipe appeared first on Never. Not. Eating..
]]>WHAT IS CINNAMON VANILLA CASHEW BUTTER?
Well, I’m so glad you asked! It’s your regular nut butter with a gorgeous, put-me-in-the-holiday-mood kick! Who doesn’t love warm notes of cinnamon and dreamy vanilla? This nut butter is dressed up and ready for a night on the town. It’s all-natural and all-delicious!

WHY I LIKE THIS CINNAMON VANILLA CASHEW BUTTER
I am someone who is obsessed with nut butters, but ever since groceries have skyrocketed in price, peanut and other nut butters are basically unaffordable. I mean, seven dollars for a jar of peanut butter…are you nuts?! So now, I head to Costco, buy a large bag of cashews for cheap and makes TONS of nut butter with it. It’s much more cost effective, not to mention I can see everything going into it!

THE INGREDIENTS
Another great thing about this recipe is the minimal ingredients. Just three to be exact (not including salt). They are:
- raw cashews
- cinnamon
- vanilla
- pink Himalayan sea salt
HOW TO MAKE CINNAMON VANILLA CASHEW BUTTER
The first, and arguably, the most important step of this recipe is toasting the cashews. With an oven set to 350 degrees Fahrenheit, roast cashews for 5-8 minutes, checking often. Nuts burn easily and quickly, so it’s important that you keep an eye on them. Once they start turning light brown, remove them from the oven.
Now, you just add all of the ingredients to a food processor and blend until smooth, or until it reaches your desired consistency. Make sure you have a high processed blender, like the Vitamix, or the Ninja, and be patient with it! It takes about 15-20 minutes to become “butter,” so just trust the process.

TIPS
- Use 100% real vanilla – it’s much better than the artificial stuff
- Have a spatula while the nut butter is blending and scrape down the sides often
- Give the engine of your blender a break now and again to preserve it’s life
OTHER HEALTHY SPREADS YOU NEED TO TRY
Vegan Cilantro Lime Dressing (I put this stuff on everything)
Pink Hummus (perfect for date night or Valentine’s Day)
3-Ingredient Strawberry Chia Jam (would go perfectly with this cashew butter)
TOOLS I USED TO MAKE CINNAMON VANILLA CASHEW BUTTER
Click below to access the tools I used for this recipe:


Cinnamon Vanilla Cashew Butter
Servings: Makes approximately 1 cup
Prep time: 20 minutes
Cook time: 5 minutes
Ingredients:
- 2.5 cups raw cashews
- 1 tsp cinnamon powder
- 1/2 tbsp pure vanilla extract
- 1/4 – 1/2 tsp pink Himalayan sea salt (or just regular sea salt)
Instructions:
- Preheat your oven to 350 degrees Fahrenheit and place cashews on a baking sheet. Bake for 5-8 minutes, or until they begin turning a light golden brown colour. Watch carefully – they burn quickly!
- Once the cashews are toasted, add them to a food processor with the cinnamon, vanilla and 1/4 teaspoon of salt. Pulse a few times and then blend. Stop the motor every so often and scrap the sides down. It will look very grainy at first, but after about 15 minutes of blending and scraping, it will start to smooth out. The longer you blend, the smoother it becomes.
- Once the cashews have reached the texture you like, taste it and add more salt if desired. Spoon the butter into an airtight container and store in the fridge for up to 5 weeks.

The post Cinnamon Vanilla Cashew Butter Recipe appeared first on Never. Not. Eating..
]]>The post Caramelized Pear Trifle appeared first on Never. Not. Eating..
]]>
WHAT IS A TRIFLE?
Trifle is an English dessert that usually includes alcohol-soaked cake, beneath layers of custard, fruit and whipped cream. There are many different ways to compose a trifle, but the key is for all of those beautiful ingredients to be layered in a glass bowl so they are visible to those who will be eating it.

THE LAYERS OF THIS CARAMELIZED PEAR TRIFLE
This may not be your traditional trifle, but nothing I do is traditional, so you’ll have to excuse me as I add my own flair to my recipes. This trifle includes four delicious layers – a winter spiced pear cake, gooey caramelized pears, a crunchy walnut crumble and fluffy vanilla whipped cream.
Winter Spiced Pear Cake – This cake is one of my favourites, as it’s actually completely vegan (if you want to make it on it’s own), and gluten-free! I add ginger, cinnamon and nutmeg, to give it that warm, cozy, winter appeal.
Caramelized Pears – You can’t have a caramelized pear trifle without caramelized pears! Finely diced pears warmed with brown sugar and cinnamon – these pears are to-die-for in this trifle, and on their own…by the spoonful!
Crunchy Walnut Crumble – Dessert isn’t dessert without a crunch factor, and this is it. Toasted walnuts tossed with melted butter and sugar bring this dessert to life!
Vanilla Whipped Cream – The perfect and prettiest topping to finish it all off!

HOW TO MAKE THIS DESSERT FULLY VEGAN
The cake itself is actually a fully vegan cake, so if you would like to keep this dessert vegan, follow the instructions below:
- Make the cake layer in the exact same way.
- For the caramelized pear and crunchy walnut layers – substitute regular butter for vegan butter.
- For the whipped cream, use canned coconut milk that has been chilling in the fridge for at least 24 hours, instead of whipping cream. Scoop the top, solid milk from the can and whip in the same manner as the recipe suggests!

THE PERFECT TIME TO MAKE THIS TRIFLE
When I think of pears, I often think of winter and warm spices. This trifle would definitely be a kick-ass dessert to serve during any fall or winter holiday – Thanksgiving, Christmas, New Year’s – you name it! Each individual component can be made the day before and then assembled prior to serving. This is definitely a dessert that feeds a crowd!
OTHER DELICIOUS LAYERED DESSERTS YOU MUST TRY:
Vegan Coconut Panna Cotta with a Mango Compote (made in individual serving cups!)
Dark Chocolate Almond Butter Bars (what’s better than nut butter + chocolate?!)
This post contains affiliate links and I may earn a small commission when purchases are made after clicking the links, at no cost to you. Thank you!
Caramelized Pear Trifle
*I highly recommend reading through this recipe in full first, before making.
Serving size: 8-10
Prep time: 45 minutes
Cook time: 35 minutes
Ingredients
For the spiced cake layer:
- 1 cup full-fat, canned coconut milk
- 1 tbsp apple cider vinegar
- 3/4 cup brown sugar, packed
- 1 banana, mashed
- 2 tsp vanilla
- 2 cups gluten-free flour, plus 1 tbsp for dusting cake pans, I use Bob’s Red Mill
- 1 tsp cinnamon, separated
- 1/2 tsp dried ginger
- 1/4 tsp nutmeg
- 1 tsp salt
- 3/4 tsp baking powder
- 1/2 tsp baking soda
For the caramelized pear layer:
- 2 tbsp unsalted butter (or vegan butter)
- 4 pears, small dice (I like to use Bartlett)
- 1/4 cup brown sugar
- 1/2 tsp cinnamon powder
- pinch of salt
For the crunchy walnut layer:
- 1 cup walnuts, chopped into small pieces
- 2 tbsp unsalted butter (or vegan butter), melted
- 1 tbsp brown sugar
- pinch of salt
For the vanilla whipped cream layer:
- 2 cups heavy whipping cream
- 2 tbsp powdered sugar
- 1 tbsp pure vanilla extract
Instructions
For the spiced cake layer:
- Preheat oven to 350 degrees Fahrenheit and prepare two, six-inch cake pans by buttering, lining the bottom with parchment, and dusting with some of the gluten free flour.
- Stir the apple cider vinegar into the coconut milk and set aside.
- Using a stand mixer or a hand mixer, beat together the brown sugar, banana and vanilla in a large bowl until combined.
- In a separate, medium bowl, sift the flour, cinnamon, ginger, nutmeg, salt, baking powder and baking soda.
- In a few additions, alternate between adding the dry ingredients and coconut milk to the banana mixture, beating until combined and smooth.
- Divide batter evenly between pans and bake for 25-30 minutes, or until inserted toothpick comes out clean.
- Let cool in pan for 5 minutes and then transfer to wire rack to finish cooling.
For the caramelized pear layer:
- Place all ingredients in a saucepan over medium-low heat and cook until the pears are soft, approximately 10 minutes. Remove from heat and set aside while preparing the remainder of the ingredients.
For the crunchy walnut layer:
- Preheat oven to 350 degrees Fahrenheit.
- Place walnuts on a parchment lined baking sheet and toast in the oven for 5-10 minutes, watching very carefully – they burn quickly! Remove when they are starting to look a bit more brown in colour and they become fragrant.
- Mix the walnuts with the melted butter, brown sugar and a pinch of salt and set aside.
For the vanilla whipped cream layer:
- Place a large bowl and beaters into the freezer for at least 15 minutes.
- Pour the heavy whipping cream into the cold bowl and beat on medium-high speed with the cold beaters, until soft peaks form. Add in the powdered sugar and beat again until medium peaks form (about 1-2 minutes in total). Add the vanilla and beat until just combined.
To assemble this Caramelized Pear Trifle:
- Slice the cake rounds into cubes and place 3/4 of them on the bottom of your glass trifle bowl.
- Spoon over half of the caramelized pears.
- Sprinkle half of the crunchy walnuts.
- Top with half of the whipped cream.
- Repeat steps 1-4 with the remaining ingredients and finish it off with a dusting of cinnamon on top! Enjoy!
I recommend serving this trifle immediately. It can be stored in the fridge for up to two days.

The post Caramelized Pear Trifle appeared first on Never. Not. Eating..
]]>The post Chocolate Raspberry Baked Oats appeared first on Never. Not. Eating..
]]>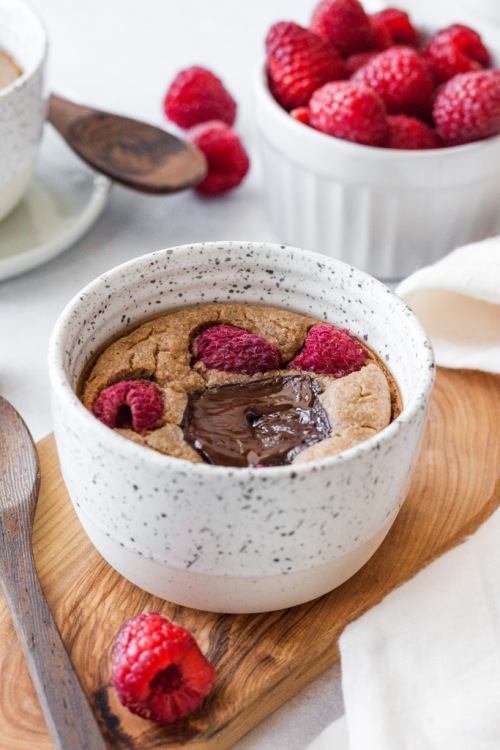
This is a quick, simple and pretty healthy little breakfast idea. It’s basically a better-for-you version of a mug cake. It’s so delicious.
All of the required ingredients get added to your blender and then poured into oven-safe ramekins (how cute are these ones?!) and baked off. You don’t even need a bowl. I used my single-serve cup blender…didn’t even have to dirty my big blender. Goals.
Here is what you will need:
- Rolled oats
- Chia seeds
- Cinnamon
- Baking Powder
- Salt
- Banana
- Almond butter
- Vanilla
- Maple Syrup
- Oat milk
- Raspberries
- Dark Chocolate
It looks like a lot, but you probably have every single one of these items in your house already. Feel free to swap out ingredients as you please – almond butter for peanut butter, maple syrup for agave, oat milk for your favourite plant-based milk…we are flexible here!
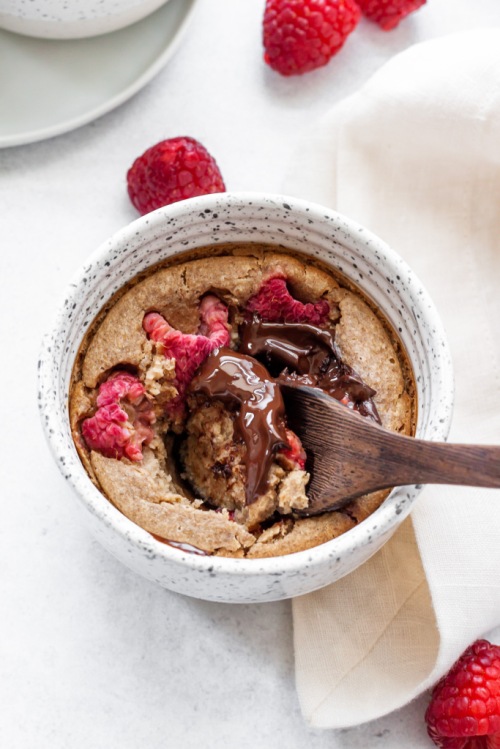
I hope you enjoy these baked oats as much as I did. They are changing the breakfast game!
This post contains affiliate links and I may earn a small commission when purchases are made after clicking the links, at no cost to you. Thank you!
Chocolate Raspberry Baked Oats
Servings: 2
Prep time: 5 minutes
Cook time: 25 minutes
Ingredients:
- 1/2 tsp maca powder (optional)
Instructions:
- Preheat oven to 375 degrees Fahrenheit.
- Place oats and chia seeds in a single-serve blender and blend to make a flour. Add the rest of the ingredients, other than the raspberries and chocolate, and blend until smooth.
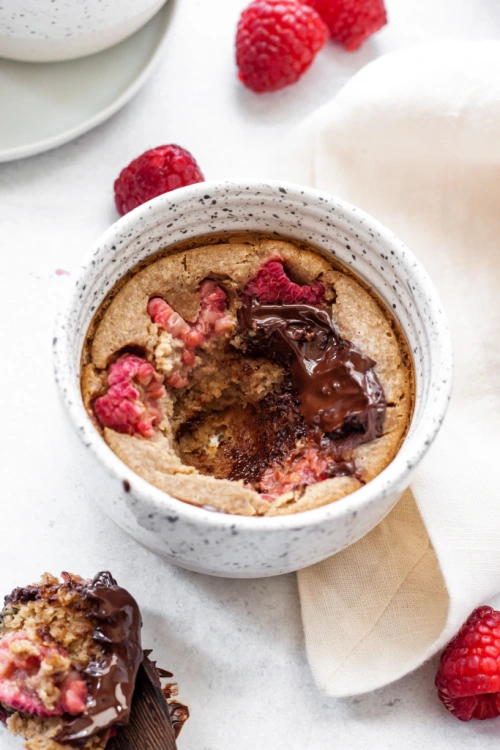
- Pour into one large, or two small ramekins and top with the fresh raspberries and chocolate.
- Bake for 25 minutes, or until the top begins to brown and form cracks. Carefully remove from oven and cool for a few minutes before enjoying!
The post Chocolate Raspberry Baked Oats appeared first on Never. Not. Eating..
]]>The post Apple Cardamom Hand Pies with a Rum Glaze appeared first on Never. Not. Eating..
]]>
This pie recipe is simple, quick and easy. One day I was loungin’ and needed something sweet to eat and I took a peak in my fridge and used what I had on hand. It turned out to be a keeper and that’s proof that this recipe is so simple and easy.
WHAT ARE APPLE CARDAMOM HAND PIES?
They are a classic American dessert transformed into a little handheld present that won’t disappoint. Tender, spiced apples wrapped in a flaky, golden brown pastry, topped with an adult-only rum glaze. I mean….come onnnn! You must.

THE PASTRY
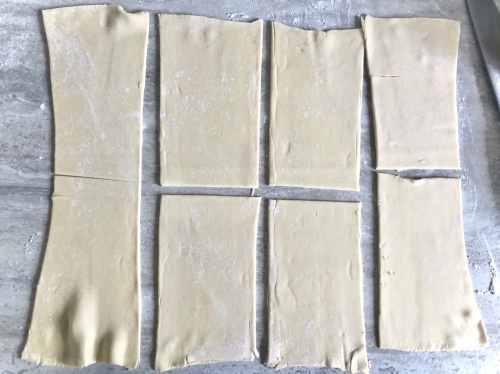
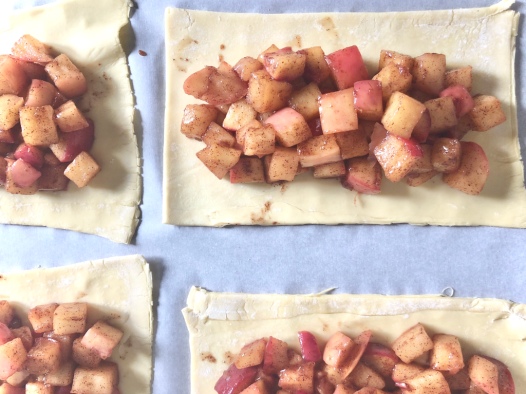
The puff pastry is really what makes this recipe so easy. No fussy pie dough to deal with, just crispy, flaky pillows of amazingness. And all you need is one sheet! Roll it out nice and thin, cut into 8 equal rectangles and fill them up with the tastiest little apples.
You can also make smaller hand pies if you have more control over your portion size than I do. Just cut your puff pastry into 16 squares instead!
THE FILLING
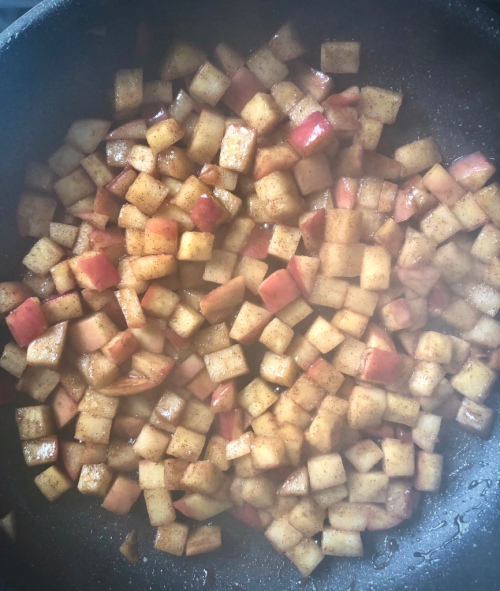
I tend to migrate toward using Honeycrisp apples for my apple-forward baking recipes because they are my absolute favourite. Crispy and sweet, yet tart, they beat out every other apple. You can also use the classic Granny Smith, or whatever you have in your fridge, and they will still be tasty and flavourful!
To prepare the apples, add them to a large skillet with all the cinnamon, cardamom, salt, maple syrup and brown sugar and cook until tender and they begin to release their juices. This stuff is honestly gold – I could just eat it with a spoon.
MAKING THE APPLE CARDAMOM HAND PIES
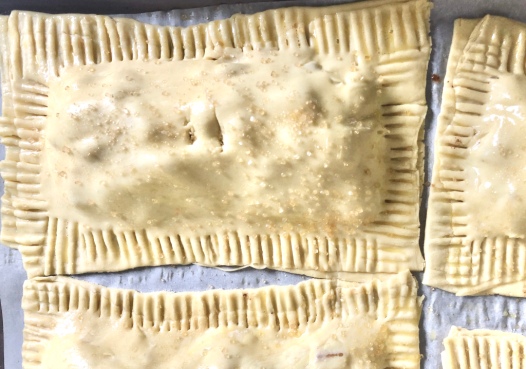
Divide your apples between the four puff pastry rectangles and top with the remaining pastry. Crimp the edges so it looks super cute, and pierce a couple of holes in the top to allow the steam to escape. It is important to let them chill in the fridge for at least half hour at this point. This allows the butter in the dough to firm up again after being handled, and thus, it will melt slower once you bake it. Once chilled, pop them in the oven and watch them transform into the most delicious little treat!

While the pies are baking, make your luscious glaze. Add powdered sugar, rum, vanilla, cinnamon and non-dairy (or regular) milk to a bowl and whisk until smooth. It’s your choice how you want to apply this glaze – you can just pile it on, drizzle it, or spoon it as you go. There’s no judgement here.
I think that’s all I need to tell you about this recipe. Does anyone actually read this part of the post anyways???
MORE FRUIT-FORWARD RECIPES
5-Ingredient Peach Crisp (a summer must-have)
Strawberry Honey Ginger Galette (a dessert with a little sha-bang!)
Tropical Banana Flambe (take me down south)
Grilled Pina Colada French Toast (a heavenly breakfast idea)
TOOLS I USED TO MAKE THESE APPLE CARDAMOM HAND PIES
Click on the images below to see what I use for this recipe.


This post contains affiliate links and I may earn a small commission when purchases are made after clicking the links, at no cost to you. Thank you!
APPLE CARDAMOM HAND PIES WITH A RUM GLAZE
Servings: Makes 4 large hand pies
Prep time: 15 minutes (active), 30 minutes (inactive)
Cook time: 20 minutes
INGREDIENTS
- 1 tbsp coconut oil
- 2 large apples, small dice (I like Honeycrisp or Granny Smith)
- 1 tsp cinnamon
- a quarter tsp cardamom
- 1-2 tbsp maple syrup (depending on how sweet you want them, I do 1 tbsp)
- 1 tbsp brown sugar
- pinch of salt
- 1 tbsp cornstarch
- 1 tbsp water
- a half tsp vanilla
- 1 tbsp freshly squeezed lemon juice
- 1 sheet puff pastry, thawed
- an egg
- 1 tbsp water
- Raw turbinado sugar for topping (optional)
For the glaze:
- 1/4 cup powdered sugar
- 1 tsp dark spiced rum
- 1/2 tsp vanilla
- 1/4 tsp cinnamon
- 1-3 tsp non-dairy milk
INSTRUCTIONS
- Melt coconut oil in a large skillet over medium heat. Add apples, cinnamon, cardamom, maple syrup, brown sugar and salt. Cook until apples begin to soften (8-10 minutes), stirring often.
- While the apples are cooking, prepare your puff pastry. On a lightly floured surface, roll out your puff pastry until it is about 1/4 inch thick. Cut into 8 rectangles (see photo above) and place four of the rectangles on a baking sheet lined with parchment paper.
- Whisking the cornstarch and water together. Add to the apples, stir and remove skillet from heat. Add in the lemon juice and vanilla and mix until combined.
- Use a spoon to scoop the apples into the centre of the four puff pastry rectangles that were placed on the baking sheet. Leave a half-inch border all the way around. Place the other four pastries on top and crimp the edges with a fork. Cut a few slits into the top of each so the steam can escape. Place in fridge for at least 30 minutes to chill.
- Preheat the oven to 400 degrees Fahrenheit.
- Beat the egg and water together to make an egg wash. Remove pies from fridge and brush with the egg wash. Sprinkle the tops with the turbinado sugar. Bake for 18-20 minutes or until puffed up and golden brown. Let cool on a wire rack for 5-10 minutes before serving.
For the glaze:
- Add the powdered sugar, rum, vanilla, cinnamon and one teaspoon of milk to a bowl and whisk. If it is too thick, continue to add more milk, one teaspoon at a time until you reach a drizzle-able consistency.
- Drizzle the hand pies with the glaze and serve warm. Store in the fridge for up to 5 days in an airtight container.
The post Apple Cardamom Hand Pies with a Rum Glaze appeared first on Never. Not. Eating..
]]>The post Panettone Bread Pudding appeared first on Never. Not. Eating..
]]>
Bread pudding – that dessert made with day-old bread soaked in an egg and milk mixture and baked to perfection. Da best. Add in whatever you have on-hand, at your own discretion.
Panettone – An Italian Christmas cake that blows up in the grocery store after Halloween. They come in a million varieties and have a range of additions including chocolate, dried fruit and nuts. This recipe uses a basic but delicious chocolate morsel panettone, but you can use whatever you have left over from the holidays, or just go buy one from the grocery store at the discounted post-Christmas price…it’s a win-win.

Eggnog – Whoever goes through an entire carton of eggnog? The intention is there when you buy it and think how fancy you’re going to be when your guests come over and you’re stirring up rum nogs with a cinnamon stick…but the reality is, it’s hard to drink more than one. So instead of all milk, substitute half for that leftover eggnog when making this recipe.
To prepare the panettone, slice into 1-inch cubes and dry out in the oven for 15-20 minutes at 275 degrees F. While that’s happening, mix the egg base by whisking together five large eggs, one and a half cups eggnog (or canned coconut milk if you don’t have, or are dairy-free) and one and a half cups milk (or coconut milk…I prefer Silk). Add in a teaspoon of cinnamon, a teaspoon and a half of vanilla, a tablespoon of maple syrup, a quarter of a teaspoon of salt and a pinch of nutmeg. When the panettone is dry and cooled, transfer to a 9 x 13 inch baking dish. Sprinkle over your choice of toppings, I like adding chocolate chunks, dried sultana raisins (they plump up beautifully in this recipe) or leftover fresh cranberries. Pour over the egg mixture and press down gently with your hands to soak all exposed panettone.

Cover with plastic wrap and place in the fridge for at least 30 minutes to soak, giving the bread a toss once to make sure every piece of panettone has been given equal opportunity to soak up the liquid. I often leave it in the fridge overnight and make it in the morning as a breakfast dish.
When you are ready to bake, place in a 350 degree F oven for about 35-45 minutes or until set.
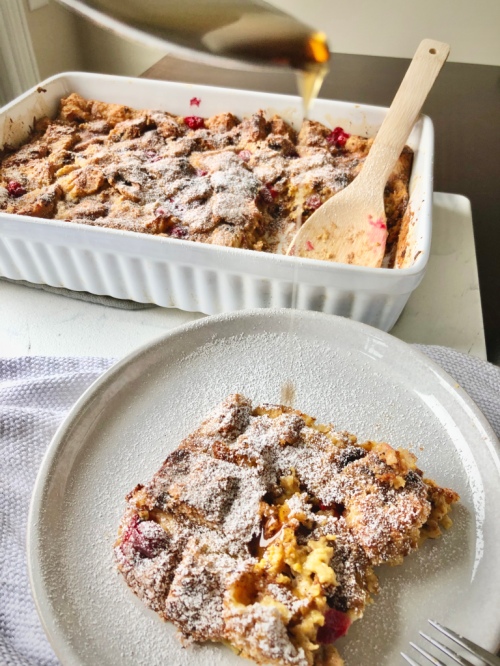
Top with confectioners sugar, my Salted Coconut Caramel Sauce and some fresh fruit and get your yoga pants on and indulge!

Panettone Bread Pudding
Serving size: 8-10
Prep time: 1 hour (includes inactive soaking time)
Cook time: 45 minutes
Ingredients:
- 1 large panettone cake, cut into 1-inch cubes
- 5 large eggs
- 1.5 cups eggnog (or canned coconut milk)
- 1.5 cups coconut milk (I prefer Silk)
- 1 tbsp pure maple syrup
- 1.5 tsp vanilla
- 1 tsp cinnamon
- Pinch of nutmeg
- 1/4 tsp salt
- Optional additions: 3/4 cup fresh cranberries, 1/4 cup dried golden or sultana raisins, 1/2 cup chocolate chunks
- Salted Coconut Caramel Sauce
Instructions:
- Preheat oven to 275 degrees F.
- Line a baking sheet with parchment paper. Add the panettone cubes in a single layer and dry out in the oven for 15-20 minutes or until fully dry. Cool completely.
- While the panettone is in the oven, make the egg mixture. Lightly beat the eggs in a large bowl. Add the eggnog, coconut milk, maple syrup, vanilla, cinnamon, nutmeg and salt. Whisk to combine.
- Evenly spread the panettone cubes into a 9 x 13 inch oven-safe baking dish. Distribute your preferred toppings over the cubes and then pour over the egg mixture, pressing down lightly to help the panettone soak up the liquid. Cover with plastic wrap and put in the fridge for at least 30 minutes, or overnight, pressing down once or twice throughout.
- Preheat the oven to 350 degrees F.
- Remove the plastic wrap and place the bread pudding into the oven. Bake for 35-45 minutes, or until the pudding has fully set. Cool for 5 minutes in the dish before serving.
- Top with confectioners sugar, fresh fruit and caramel sauce.
The post Panettone Bread Pudding appeared first on Never. Not. Eating..
]]>