The post Chocolate Chai Ganache (Vegan, Gluten-Free) appeared first on Never. Not. Eating..
]]>
WHAT IS CHOCOLATE CHAI GANACHE?
A ganache is traditionally a mixture of chocolate and warmed cream. It is often used as a filling or icing for cakes, to serve with fruit or something to stuff pastries with! It is also really addicting on it’s own…by the spoonful. Just sayin’.
THE INGREDIENTS
This Chocolate Chai Ganache is fully vegan, meaning no dairy whatsoever! Whoop, whoop! Instead, I use full-fat coconut milk. You can also use a lower-fat coconut milk, if you prefer. To make this recipe, you will need three ingredients – vegan chocolate, chai tea bags and one can of coconut milk.

THE PROCESS
The first step is to infuse that beautiful chai flavour into the coconut milk. Pour the coconut milk into a small saucepan and add two chai tea bags. Bring to a gentle simmer for 15 minutes. You don’t want to simmer for much longer, or else you will lose more of the liquid. 15 minutes is the perfect length of time to retain enough liquid and still get a rich chai flavour!
When the milk is ready, simply pour it over the vegan chocolate, wait one minute, and then stir until all of the chocolate is melted. See below for different ways you can use this ganache and how the recipe may change slightly, depending on it’s purpose.

CHOCOLATE CHAI GANACHE AS A GLAZE
If you are tired of the overly sweet American buttercream usually used on the outside of cakes, try making this ganache and pouring it over your cake instead. To make this the perfect glaze consistency, use 1 can of coconut milk to 1 cup of chocolate. Once it has cooled, pour it over a cold cake and watch it drip over the sides and coat your cake in a luscious layer of pure YUM.
CHOCOLATE CHAI GANACHE AS A FILLING
Okay, this may be my favourite way to use ganache – INSIDE cakes. Cake layer one goes down, a thick layer of ganache goes on top, cake layer two goes down – perfection! It is important that, if you are making a filling, the texture is thicker so it doesn’t ooze out of the sides of your cake. Therefore, use 1 can of coconut milk to one and a quarter cup of chopped chocolate. After the coconut milk has been poured over the chocolate and stirred completely, the chocolate will begin to firm up. You can even put it in the fridge to speed up the process, but you still want to be able to spread it easily, so keep an eye on it!

DON’T MISS THESE OTHER VEGAN DESSERTS
Vegan Ice Cream Bars (similar to Magnums)
Vegan Mocha Buttercream (fill your cakes with ganache and top them with this perfect buttercream)
Sweet Potato Creme Brulee (perfect for a dinner party)
This post contains affiliate links and I may earn a small commission when purchases are made after clicking the links, at no cost to you. Thank you!
Chocolate Chai Ganache (Vegan, Gluten-Free)
Prep time: 2 minutes
Cook time: 15 minutes
INGREDIENTS
| Purpose | Vegan Chocolate | Coconut Milk | Chai |
|---|---|---|---|
| Glazing cakes | 1 cup, chopped (or chunks) | 1 can (400 ml) | 2 tea bags |
| Filling cakes | 1 1/4 cup, chopped (or chunks) | 1 can (400 ml) | 2 tea bags |
INSTRUCTIONS
- Add coconut milk and tea bags to a small pot and bring to a gentle simmer for 15 minutes, uncovered.
- Place vegan chocolate into a heat-proof bowl, remove the tea bags from the pot, and strain the coconut milk over the chocolate. Let sit for one minute and then whisk until the chocolate is fully melted. Let cool before using.
TIPS:
- If GLAZING – when the ganache has cooled, pour it over an assembled cake that has been elevated and has a baking tray underneath to catch the drips.
- If FILLING – you can place the ganache in the fridge to help cool and firm up, but you want it to be spreadable, so make sure it doesn’t get too firm.
The post Chocolate Chai Ganache (Vegan, Gluten-Free) appeared first on Never. Not. Eating..
]]>The post Vegan Protein Energy Balls appeared first on Never. Not. Eating..
]]>
WHAT ARE PROTEIN BALLS?
Protein Balls are a grab-and-go snack that have enough protein and fibre to fill you up between meals. They are usually vegan (like these ones!) and made with natural ingredients that carry a number of health benefits.
HEALTH BENEFITS
These particular protein balls include a number of healthy ingredients that deliver essential nutrients to the body. Protein helps to repair muscle and improve skin, hair and nails. Fibre, from the Medjool Dates, helps relieve constipation. Dates are also known to be full of antioxidants, can reduce cholesterol and make you feel full, longer.

THE INGREDIENTS
To make this recipe, you will need:
- dates
- your favourite nut butter
- protein powder
- almond flour
- vanilla extract
- maca powder (optional)
- dark, vegan chocolate

TOOLS NEEDED TO MAKE VEGAN PROTEIN ENERGY BALLS
The main tool needed for this recipe is a high-powered food processor. It breaks down the dates and takes minutes to incorporate everything together.
OTHER VEGAN SNACK IDEAS
Are you vegan or going vegan? Check out these other snack ideas that fulfill cravings:
- Vegan Ice Cream Bars
- Dark Chocolate Protein Nuggets
- Vegan Power Muffins
- Vegan Chocolate Bars (my favourite)

This post contains affiliate links and I may earn a small commission when purchases are made after clicking the links, at no cost to you. Thank you for supporting me!
Vegan Protein Energy Balls
Serving size: Makes 15 balls
Prep time: 10 minutes
Soak time: 1 hour
Ingredients
- 10 Medjool dates, pitted and soaked in water for 1 hour
- 1/4 cup almond butter
- 1 cup almond flour
- 1 scoop (28 g) vanilla protein powder
- 1/4 tsp cinnamon
- 1 tsp maca powder (optional)
- 1/2 tbsp vanilla extract
- pinch of salt
- 1 cup vegan chocolate
- 1 tbsp coconut oil
Instructions
- Drain the dates and add them to a food processor with the almond butter, flour, protein powder, cinnamon, maca, vanilla and salt. Pulse until the mixture comes together. Use a 1-tablespoon cookie scoop to scoop the mixture out and roll into balls. Place the protein balls onto a cookie sheet and refrigerate while preparing the chocolate coating.
- Over a double broiler, melt the chocolate and coconut oil until smooth. You can also do this in the microwave in 20 second increments, stirring the chocolate after each session.
- Coat the protein balls in the chocolate and place on a parchment lined baking sheet. Refrigerate until solid, approximately 30 minutes, and then transfer to an airtight container to store in the fridge for up to 10 days.

The post Vegan Protein Energy Balls appeared first on Never. Not. Eating..
]]>The post Dark Chocolate Protein Nuggets appeared first on Never. Not. Eating..
]]>
I was in Costco the other day and I found these Keto Nuggets and decided to give them a shot. I’ve been looking for something that I can eat post-dinner that isn’t too terrible for you. I really just can’t get behind the idea that dinner is the last meal that I will eat in a day. I don’t vibe with that. Anyway, back to my story: I purchased them and they were pretty darn good! But, since it’s me and I need to make mostly everything from scratch, I decided that instead of buying them again, I was going to make them. And here we are!

So these “nuggets” are super quick and easy. The nuts and seeds in the recipe can easily be swapped out for your favourite nuts and seeds, as long as you abide by the number of grams listed!
I like to toast the almonds and pecans to get that roasty toasty flavah before dousing them in the melted chocolate. So good!

Note: There isn’t any extra sugar added to these…Just what is in the chocolate. I like things less-sweet, but also because I always use maple syrup, honey or agave to sweeten my food, and their properties could potentially seize the chocolate. Chocolate is super temperamental, and even the tiniest drop of water could ruin an entire bowl. Because all of my preferred sweeteners are in liquid form, I didn’t want to add any and compromise the chocolate.

You can definitely find a lot of the ingredients at Costco or your local bulk food store, but here are some links to the required products if you prefer to shop online:
- Pecans
- Almonds
- Hemp hearts
- Pumpkin seeds
- Chia seeds
- Shredded coconut
- Flaky sea salt
- Dark chocolate
- Coconut oil
Another very helpful item is a kitchen scale. This is so great to have on hand, especially if you do a lot of baking. I used my scale for this recipe as it is the most accurate, especially when you are measuring nuts – their awkward shape always fits differently into measuring cups.
Let’s make some nuggets!

This post contains affiliate links and I may earn a small commission when purchases are made after clicking the links, at no cost to you. Thank you for supporting me!
Dark Chocolate Protein Nuggets
Prep time: 10 minutes
Cook time: 10 minutes
Cool time (inactive): 1 hour
Ingredients:
- 1/2 tsp Flaky sea salt
Instructions:
- Preheat oven to 350 degrees Fahrenheit and line a large baking sheet with parchment paper.
- Spread the pecans out on the parchment paper and bake in oven for 3 minutes.
- Pull out the baking sheet and add the almonds. Bake for another 3-6 minutes, or until just starting to become brown. Watch carefully! They will burn easily.
- To a large bowl, mix together the toasted nuts, hemp hearts, pumpkin seeds, chia seeds, coconut and salt and set aside.
- Add the chocolate and coconut oil to a double boiler*, over low heat. Stir frequently with a spatula until almost completely melted. Remove and continue stirring until the remaining solid pieces melt.
- Pour the chocolate over the nut and seed mixture and use a wooden spoon to mix until all of the nuts and seeds are coated. Spread the mixture out onto a parchment lined baking sheet (you can use the same parchment you used for roasting the nuts). Place in the fridge for at least one hour to set.
- When fully set, remove from fridge and break into bite-size “nuggets.” Store in an airtight container in the fridge for up to 2 weeks!
NOTES:
*For the double boiler, fill a small pot with one – to two-inches of water and place over medium low heat. Add a larger glass, or heatproof bowl on top of the pot with a wooden spoon in between to let the steam escape. Place the chocolate and coconut oil into the glass bowl to melt.
The post Dark Chocolate Protein Nuggets appeared first on Never. Not. Eating..
]]>The post Dark Chocolate Almond Butter Bars appeared first on Never. Not. Eating..
]]>
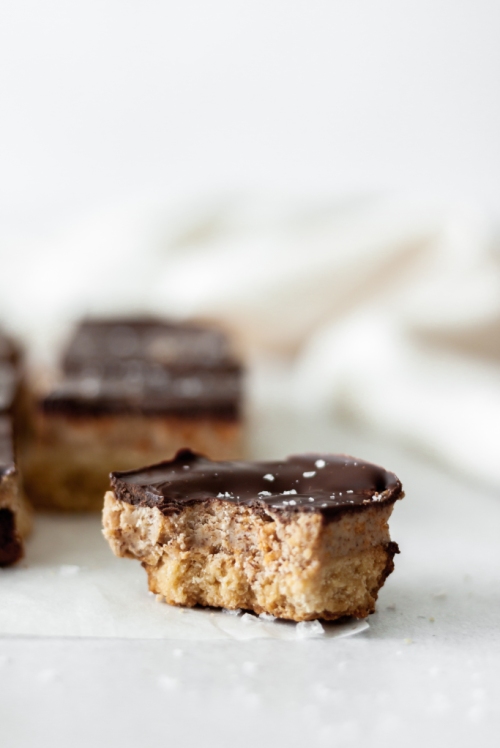
I’m a HUGE choco + peanut butter fan, but I thought I’d switch it up today and choose a slightly healthier nut butter to create a slightly less-healthy dessert. Balance.

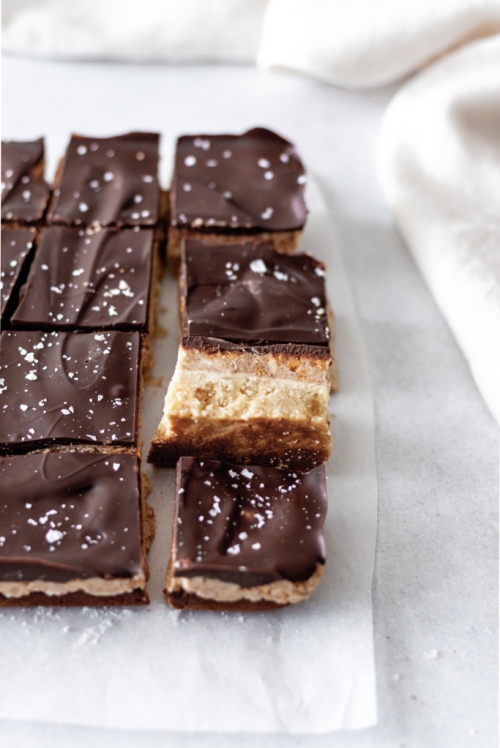
These bars have a thick shortbread-type bottom layer, a crunchy and sweet almond butter centre, and a lush dark chocolate top. They are friggin’ delish.
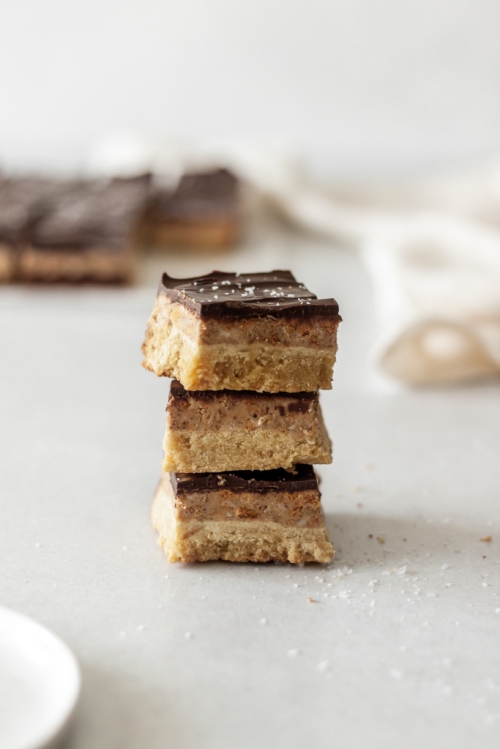
In order to keep these bars gluten-free, I’ve made the crust with a mix of almond flour and Bob’s Red Mill Gluten-Free All Purpose Flour, and I’ve crushed up my favourite gluten-free cereal to add texture to the middle. Feel free to swap for any gluten-filled flour or cereal you wish!
Let’s make them!
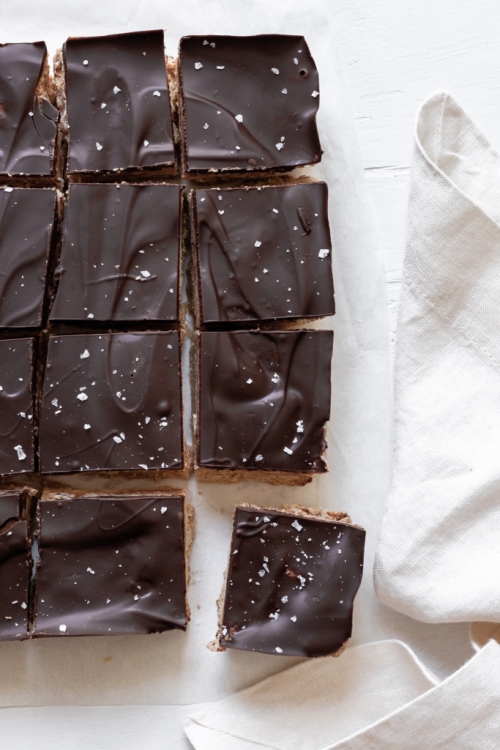
Dark Chocolate Almond Butter Bars
Servings: Makes 16 squares
Prep time: 10 minutes
Cook time: 10 minutes
Cool time: 1 hour
Ingredients:
For the bottom layer:
- 1 cup almond flour
- 1 1/2 cups gluten-free flour
- pinch of salt
- 3-4 tbsp agave
- 4 tbsp (1/4 cup) cold coconut oil
For the almond butter layer:
- 1/2 cup smooth almond butter
- 1/3 cup coconut oil, melted
- 1 cup powdered sugar
- 1 cup of your favourite gluten-free cereal, made into crumbs (makes a heaping 1/2 cup)
- pinch of salt
- 1/2 tbsp vanilla
For the chocolate layer:
- 150 g dark chocolate, chopped
- flaky sea salt, for topping (optional)
Instructions:
- Preheat oven to 350 degrees Fahrenheit and line an 8 x 8 inch baking pan with parchment paper.
- For the bottom layer – Combine the flours and salt in a food processor and pulse to combine. Add the coconut oil and three tablespoons of agave and pulse. If the dough does not start coming together, add the fourth tablespoon of agave. Dump into parchment lined pan and use your hands or the bottom of a glass to distribute evenly. Pierce the top a few times with a fork. Bake for 10-15 minutes, or until it turns light brown around the edges. Cool completely.
- For the almond butter layer – Combine all ingredients in a large bowl and stir to combine. Dollop the mixture onto the cooled bottom layer and use your hands to press down and spread evenly. Set aside.
- For the chocolate layer – Add the chocolate to a glass or heatproof bowl set over a double boiler. Melt, watching closely and stirring often. Alternatively, melt the chocolate in the microwave in small increments. Pour melted chocolate over the almond butter layer and place in the fridge to set for at least an hour. Cut into squares and serve!
Store in an airtight container in the fridge for up to 5 days.
The post Dark Chocolate Almond Butter Bars appeared first on Never. Not. Eating..
]]>The post S’more Cups appeared first on Never. Not. Eating..
]]>
Memories of s’mores by the fire are the best memories. Trying to get your ‘mallow perfectly toasted to your liking, and then fanangling it onto your chocolate-topped graham cracker without burning your fingers – Epic!
Well, this dessert is easier to eat and there is no fanangling necessary. Graham cracker crust underneath a smooth chocolate ganache, topped with toasted marshmallows. YUM.

Let’s talk toasting. You can toast your marshmallows in a few different ways. I highly recommend purchasing a kitchen torch, like the one found here. This is what I use. It is a great way to control the amount of toastiness and is easy to pack along on trips to the cottage (or campground). It also will come in handy down the road for other desserts, such as Creme Brulee.

If you don’t plan to buy a torch, then you can use your oven broiler for this. Set the broiler to low and throw a few marshmallows on a parchment lined baking sheet and pop it in the oven, watching very carefully. They will only need a few seconds under the broiler. You can lift them from the parchment with a spatula to transfer to the top of your dessert.

Thirdly, if you are around a campfire, you can swap the mini marshmallows for large ones and roast them up to perfection before sliding them onto the top of these cups. Either way, these are delicious!

A classic with a twist!
S’more Cups
Serving size: Makes about 15 cups
Prep time: 15 minutes
Chill time: 1.5 hours
Ingredients:
- 10 full sheet graham crackers (about 1.5 cups of crumbs)
- 1 tbsp brown sugar
- 3 tbsp salted butter, melted
- 300 g good quality dark chocolate, chopped into small pieces
- 150 ml heavy cream
- 1/2 tsp pure vanilla extract
- mini marshmallows (about 2 cups)
Instructions:
- Prepare your muffin trays by lining 15 cups with paper or silicone muffin liners. Set aside.
- Place the graham crackers into your food processor and pulse until they resemble small crumbs (see photo). Skip this step if using prepackaged graham cracker crumbs. Transfer crumbs to a bowl and stir together with the sugar. Add the butter and mix to combine. Press a large spoonful into the bottom of each muffin liner. Use the bottom of a glass or a measuring cup to firmly flatten and evenly press down the crust. Place in freezer for at least an hour to set up.
- In the meantime, make the ganache. Place your chocolate into a large, heat-proof bowl. Add the heavy cream to a small saucepan over medium-high heat. Watch carefully. When you see tiny bubbles begin to form around the edges, remove from heat and pour over the chocolate. Do not let the cream boil. Let it sit in the bowl with the chocolate for 3-4 minutes and then whisk to combine. Add the vanilla and whisk until smooth. Spoon the ganache on top of each of the graham cracker crusts and smooth out. Refrigerate until set, about 30 minutes.
- Right before eating, remove the cups from the fridge and peel off the liners. Add a few mini marshmallows to the top and use a kitchen torch to carefully toast them. Alternatively, set your oven to broil and place a few marshmallows in a small circle on a parchment lined baking sheet (do this for the number of s’more cups you will be eating at that time). Place the baking sheet under the broil for a few seconds and watch carefully. When toasted to your liking, remove from oven and use a spatula to transfer the marshmallows to the top of your cups. If you are around a campfire, roast a large marshmallow to your liking and place on top of your cup!
NOTES:
These are great to make-ahead and bring with you on a camping/cottaging trip. You can also make this into one large s’more pie dessert by filling a 9-inch tart pan instead of individual cups.
The post S’more Cups appeared first on Never. Not. Eating..
]]>The post Peanut Butter and Jam Cups appeared first on Never. Not. Eating..
]]>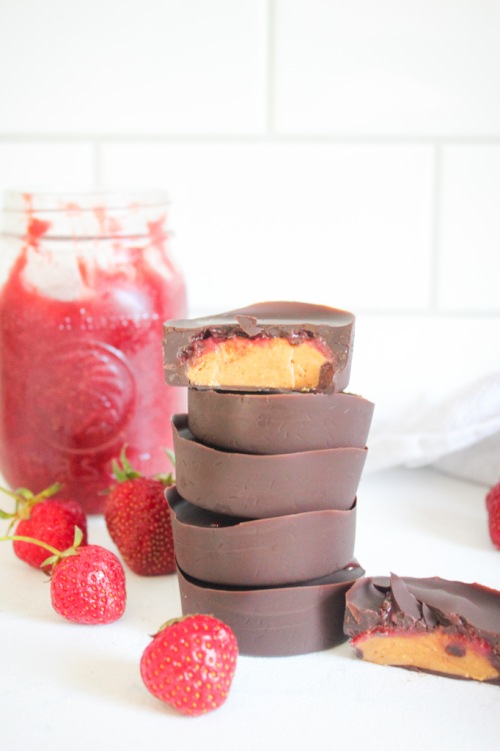
I recently posted a Strawberry Rhubarb Jam recipe, and since then have been trying to find different ways of incorporating it into a variety of different dishes. Since peanut butter is jam’s homeboy, I thought, why not add it to my classic 5-ingredient PB cups?!
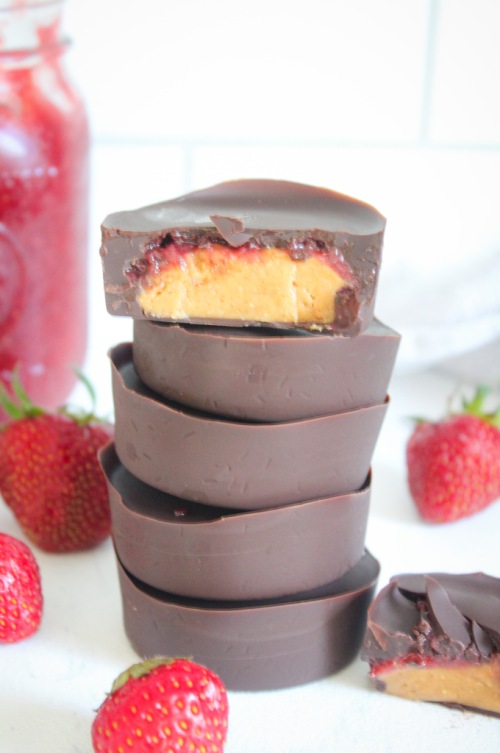
A healthier version of the regular PB cup, with a POW of sweet jam. Yaaasss!
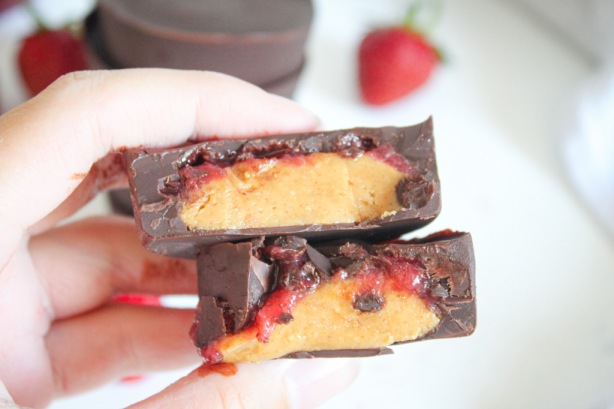
To make these little beauties, you only need:
- Dark chocolate
- Peanut butter (try my Homemade Peanut Butter)
- Maple syrup
- Vanilla
- Coconut oil
- Jam
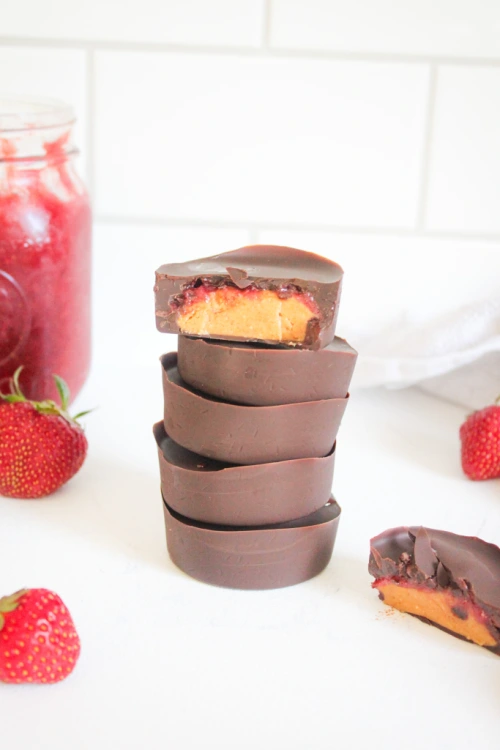
These take minutes to whip up, minutes to set and seconds to eat. You will not regret it!
Peanut Butter and Jam Cups
Serving size: Makes 12 peanut butter cups
Prep time: 25 minutes
Cook time: 5 minutes
Ingredients:
- 1 cup natural peanut butter
- 2 tbsp pure maple syrup
- 1 tsp pure vanilla extract
- 300 g dark chocolate, separated and chopped into small pieces
- 1 tbsp coconut oil
- 1/4 cup your favourite jam (try my Strawberry Rhubarab Jam)
Instructions:
- In a medium-sized bowl, mix together peanut butter, maple syrup and vanilla until combined. Form into twelve, 1-inch balls and flatten onto a plate lined with parchment paper. Place in freezer while you prepare the chocolate.
- Fill a small pot with one inch of water and place over a burner on medium-high heat. Bring water to a simmer. In a heatproof bowl, add 250 g of the chocolate as well as the coconut oil. Place a wooden spoon in the pot with simmering water and the bowl on top of the pot. The spoon allows the steam to escape. Use a rubber spatula to constantly stir the chocolate until melted. Remove from heat.
- To temper the chocolate, slowly add in the remaining 50 g of chocolate, one small chunk at a time, stirring until melted after each addition. This process takes a bit of time, but helps to set the chocolate properly.
- To a silicone muffin tray (or into muffin liners), pour in enough melted chocolate to just coat the bottom of twelve of the cups. Remove the peanut butter discs from the freezer and place one in each of the cups with chocolate. Add a small dollop of the jam to each one and then top them off with the remainder of the melted chocolate, making sure to completely cover the peanut butter and jam. Refrigerate for 15 minutes to set.
Store these in the fridge and remove a few minutes before serving.
The post Peanut Butter and Jam Cups appeared first on Never. Not. Eating..
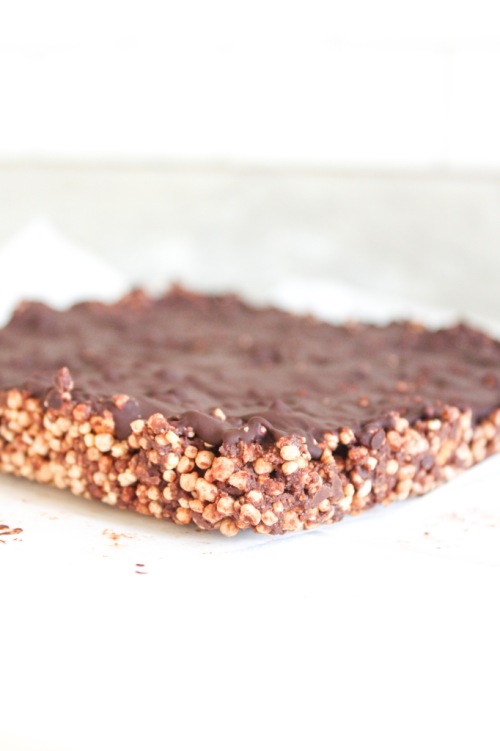
]]>The post Gluten-Free Cereal Bars appeared first on Never. Not. Eating..
]]>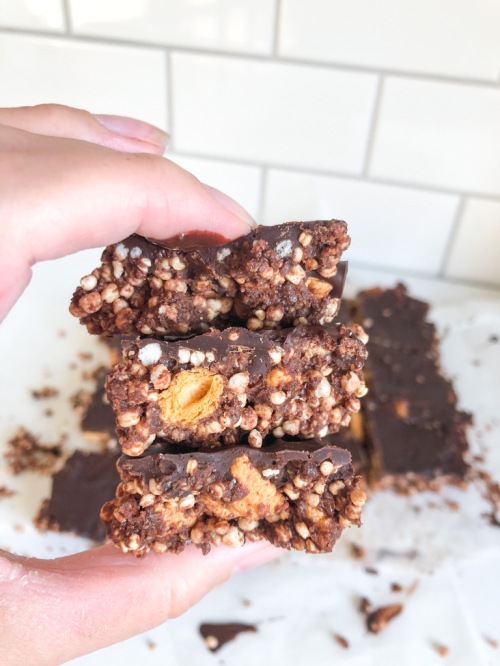
These chocolate cereal bars are crispy, crunchy and so satisfying. They have currently replaced my after-dinner-before-bedtime snack.
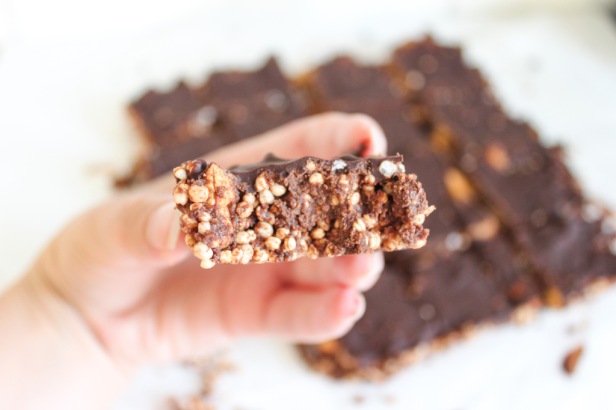
Here is what you will need to make them:
- Your favourite gluten-free cereal (I use a combination of Quaker Corn Squares and Puffed Quinoa)
- Peanut butter (try out my homemade peanut butter, found here)
- Pure vanilla extract
- Pure maple syrup
- Cinnamon
- Dark chocolate
- Flaky sea salt (optional)
These take minutes and are such a yummy treat. Check out the recipe below!
Gluten-Free Cereal Bars
Serving size: Fills an 8 x 8 inch square pan
Prep time: 5 minutes
Cook time: 8-10 minutes
Set time: 20 minutes
Ingredients:
- 200 g dark chocolate, divided
- 1/2 cup peanut butter
- 1/2 tsp pure vanilla extract
- 1/4 tsp cinnamon (optional)
- 1 tbsp pure maple syrup
- 1.5 cups corn square cereal*
- 1 cup puffed quinoa*
- Flaky sea salt (optional)
Instructions:
- Prepare an 8 x 8 inch square baking pan by lining it with two pieces of parchment paper for easy release.
- Over a double boiler, or in the microwave, melt 75 g of the chocolate in a medium-sized heat-resistant bowl. Once melted, add the peanut butter, vanilla, cinnamon and maple syrup. Stir to combine.
- Place the corn squares and puffed quinoa in a separate, large bowl. Pour the chocolate-peanut butter mix over and use your hands to incorporate the ingredients. Press into prepared baking pan.
- Melt the remainder of the dark chocolate and pour over cereal mixture. Spread evenly. Top with flaky sea salt, if desired. Place in the fridge to set for at least 20 minutes. Cut into squares and store in an airtight container in the fridge.
NOTES:
*Feel free to use your favourite gluten-free cereals
The post Gluten-Free Cereal Bars appeared first on Never. Not. Eating..
]]>The post The Best Chocolate Chunk Banana Bread appeared first on Never. Not. Eating..
]]>
I’ve only ever made one banana bread recipe, and it’s this one. It is my absolute favourite…moist, fluffy and delicious. I’ve played around with the recipe a little bit over the years – making it dairy-free, egg-free and including less sugar – and it always works out pretty well, regardless of the change. In the recipe below, you will see the original recipe as well as some healthier adaptations, if you so wish. Your choice.

The dry: You are going to need flour (All Purpose, but sometimes I do half AP and half whole wheat), baking soda, baking powder and salt. Mix, mix, mix.

The wet: Beat one cup of sugar (less if you want) with two eggs (or use “flax eggs” – mix two tablespoons of ground flax with five tablespoons of water and let sit for ten minutes in the fridge to thicken), vanilla and vegetable oil until combined.

In three additions, add the dry mixture alternatively with half a cup of buttermilk (for non-dairy, mix together half a tablespoon of white vinegar with half cup of almond milk and let sit for five minutes before adding to the wet ingredients), mixing just to combine. Do not over mix!

Now comes the part that makes this bread drool-worthy. Toss in a bunch of dark chocolate chunks – the more, the merrier. Mash up those bananas with a fork and dump them right in, too! NOTE: Your bananas should have a brown peel. They are so much sweeter when they are at this stage and perfect for banana bread. I promise.

Oh Em Gee. Look at that yumminess… Talk about goals.
Carefully fold in the bananas and chocolate chunks and then pour into a greased loaf pan.

Toss a couple more chocolate chunks on top to make it look pretty…and for more chocolate chunks on top. Duh.
Now it’s time for the oven. Waiting is the worst part, but it is so worth it in the end. Bake for 45-55 minutes or until a toothpick inserted into the middle comes out clean.

Cool on a wire rack and just try not to eat it. Or eat it…we’re working on our winter bodies…right?!

The Best Chocolate Chunk Banana Bread
Prep time: 10 minutes
Cook time: 50 minutes
Ingredients:
- 2 cups all-purpose flour*
- 3/4 teaspoon baking soda
- 1/2 teaspoon baking powder
- 3/4 teaspoon salt
- 1 cup sugar
- 1/2 cup canola oil
- 2 large eggs
- 1 teaspoon pure vanilla
- 1/2 cup buttermilk**
- 3 overripe bananas, mashed
- 1 cup dark chocolate chunks
Instructions:
- Preheat the oven to 350 degrees and grease a loaf pan.
- In a medium-sized bowl, whisk together the flour, baking soda, baking powder and salt. Set aside.
- In a separate, larger bowl, beat the sugar, oil, eggs and vanilla together until smooth and combined.
- Add the dry ingredients and buttermilk alternately in three additions, being careful not to over mix the batter.
- Add the mashed bananas and chocolate chunks and carefully fold with a spatula until incorporated into the mixture.
- Pour into prepared pan and bake for 45-55 minutes, or until a toothpick inserted in the middle comes out clean.
- Run a butterknife along the edges of the loaf to loosen and turn out onto a wire rack to cool completely.
NOTES:
*You can also use whole wheat flour or half AP and half whole wheat.
**If you are dairy-free, substitute the buttermilk for almond milk mixed with 1/2 tablespoon of white vinegar (let sit for about 5 minutes)
The post The Best Chocolate Chunk Banana Bread appeared first on Never. Not. Eating..
]]>