The post Cinnamon Vanilla Cashew Butter Recipe appeared first on Never. Not. Eating..
]]>WHAT IS CINNAMON VANILLA CASHEW BUTTER?
Well, I’m so glad you asked! It’s your regular nut butter with a gorgeous, put-me-in-the-holiday-mood kick! Who doesn’t love warm notes of cinnamon and dreamy vanilla? This nut butter is dressed up and ready for a night on the town. It’s all-natural and all-delicious!

WHY I LIKE THIS CINNAMON VANILLA CASHEW BUTTER
I am someone who is obsessed with nut butters, but ever since groceries have skyrocketed in price, peanut and other nut butters are basically unaffordable. I mean, seven dollars for a jar of peanut butter…are you nuts?! So now, I head to Costco, buy a large bag of cashews for cheap and makes TONS of nut butter with it. It’s much more cost effective, not to mention I can see everything going into it!

THE INGREDIENTS
Another great thing about this recipe is the minimal ingredients. Just three to be exact (not including salt). They are:
- raw cashews
- cinnamon
- vanilla
- pink Himalayan sea salt
HOW TO MAKE CINNAMON VANILLA CASHEW BUTTER
The first, and arguably, the most important step of this recipe is toasting the cashews. With an oven set to 350 degrees Fahrenheit, roast cashews for 5-8 minutes, checking often. Nuts burn easily and quickly, so it’s important that you keep an eye on them. Once they start turning light brown, remove them from the oven.
Now, you just add all of the ingredients to a food processor and blend until smooth, or until it reaches your desired consistency. Make sure you have a high processed blender, like the Vitamix, or the Ninja, and be patient with it! It takes about 15-20 minutes to become “butter,” so just trust the process.

TIPS
- Use 100% real vanilla – it’s much better than the artificial stuff
- Have a spatula while the nut butter is blending and scrape down the sides often
- Give the engine of your blender a break now and again to preserve it’s life
OTHER HEALTHY SPREADS YOU NEED TO TRY
Vegan Cilantro Lime Dressing (I put this stuff on everything)
Pink Hummus (perfect for date night or Valentine’s Day)
3-Ingredient Strawberry Chia Jam (would go perfectly with this cashew butter)
TOOLS I USED TO MAKE CINNAMON VANILLA CASHEW BUTTER
Click below to access the tools I used for this recipe:


Cinnamon Vanilla Cashew Butter
Servings: Makes approximately 1 cup
Prep time: 20 minutes
Cook time: 5 minutes
Ingredients:
- 2.5 cups raw cashews
- 1 tsp cinnamon powder
- 1/2 tbsp pure vanilla extract
- 1/4 – 1/2 tsp pink Himalayan sea salt (or just regular sea salt)
Instructions:
- Preheat your oven to 350 degrees Fahrenheit and place cashews on a baking sheet. Bake for 5-8 minutes, or until they begin turning a light golden brown colour. Watch carefully – they burn quickly!
- Once the cashews are toasted, add them to a food processor with the cinnamon, vanilla and 1/4 teaspoon of salt. Pulse a few times and then blend. Stop the motor every so often and scrap the sides down. It will look very grainy at first, but after about 15 minutes of blending and scraping, it will start to smooth out. The longer you blend, the smoother it becomes.
- Once the cashews have reached the texture you like, taste it and add more salt if desired. Spoon the butter into an airtight container and store in the fridge for up to 5 weeks.

The post Cinnamon Vanilla Cashew Butter Recipe appeared first on Never. Not. Eating..
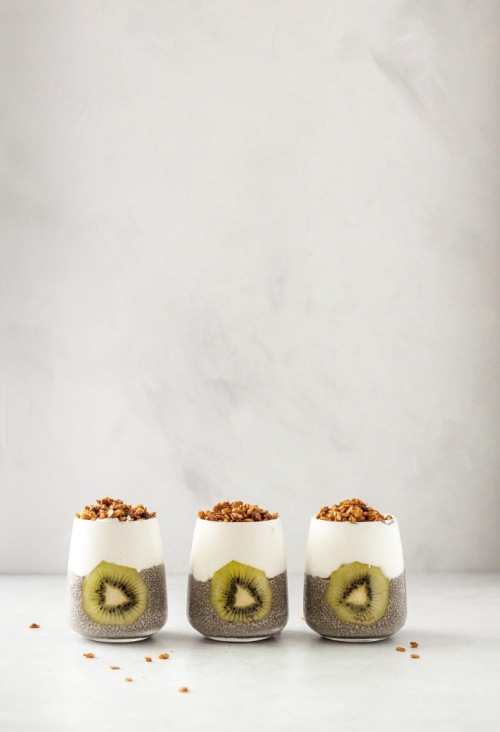
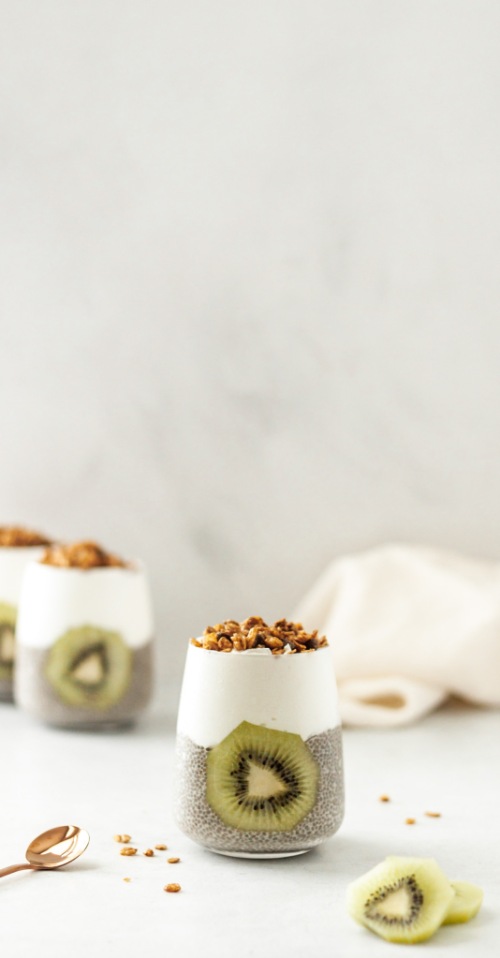
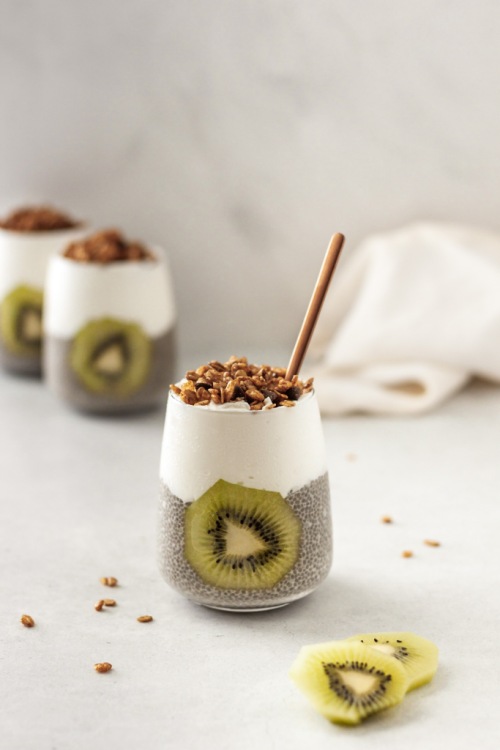
]]>The post Easy Chia Pudding Parfait appeared first on Never. Not. Eating..
]]>
WHY CHOOSE CHIA SEEDS?
I love chia pudding as my morning meal because these seeds are full of energy-boosting nutrients to start your day. Firstly, FIBRE. Absolutely essential for a healthy lifestyle, fibre enhances gut health and makes you feel full, longer.
Chia seeds are also high in protein. Protein is needed in the body to help rebuild muscle, strengthen hair, skin and nails, and provide energy. Chia seeds are a great way to incorporate protein into your diet, especially as a vegetarian or vegan!
This superfood is also high in iron. As someone with low iron, I’m always searching for more iron-rich foods to add to my diet. Iron helps carry oxygen throughout the body and develop red blood cells.
If that isn’t convincing enough, chia seeds also contain calcium, good fats, antioxidants and have no sugar. Get yourself a bag of seeds and I’ll show you how to use them in this yummy parfait recipe!
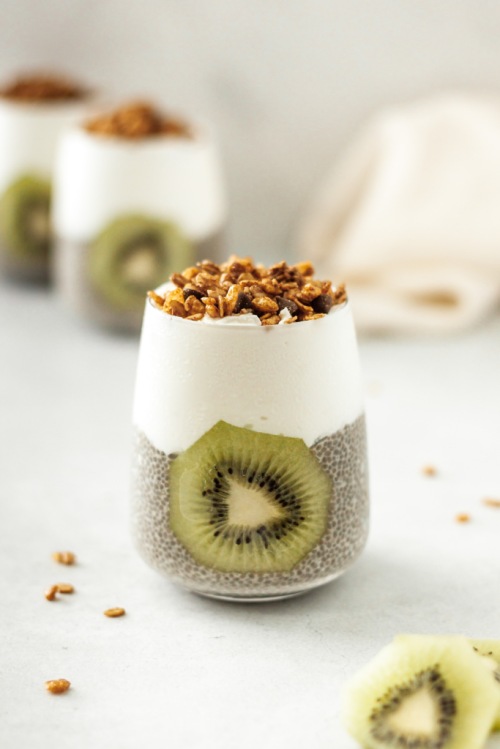
WHAT YOU NEED TO KNOW ABOUT MAKING THIS EASY CHIA PUDDING PARFAIT
Chia seeds are like sponges – any liquid added to them gets sucked up and the seeds expand and become almost gel-like. You can add any kind of milk you prefer, but this recipe is fully vegan and therefore calls for plant-based milk.
HOW TO MAKE EASY CHIA PUDDING PARFAIT
When mixing the seeds with your choice of liquid, I like to whisk them together in a bowl to avoid forming clumps. I set the bowl in the fridge for about 10 minutes and then whisk again. After another 10 minutes, the seeds have usually absorbed their capacity of liquid and are ready to be made into a parfait!
Depending on you, many of the extra ingredients in this recipe can be swapped out for others you prefer.
For example, if maple syrup isn’t your favourite choice of sweetener, feel free to switch it up by adding agave or honey (not vegan). Cinnamon can be taken out completely or swapped with a superfood powder, such as beetroot or spirulina. Maybe you would like to get funky with it and use an almond extract or a hazelnut syrup instead of the vanilla. Be crafty! The possibilities are endless.
STORING YOUR EASY CHIA PUDDING PARFAIT
If you are following this recipe to meal prep, it makes four servings. I love using these cute little mason jars to store them in, as they are airtight and keep them fresh in the fridge.
OTHER MEAL PREP IDEAS
Vegan Power Muffins (for a quick energy boost)
Middle Eastern Orzo Pilaf (makes a great side to any meal)
The Fluffiest Gluten-Free Pumpkin Pancakes (perfect for the kiddos – make ahead and pop in the toaster for a quick breakfast)
This post contains affiliate links and I may earn a small commission when purchases are made after clicking the links, at no cost to you. Thank you for supporting me!
Easy Chia Pudding Parfait
Servings: 4
Prep time: 5 minutes
Chill time: 20 minutes
Ingredients:
- 1/2 cup chia seeds
- 1.5 cups plant-based milk
- 2 tbsp pure maple syrup
- 1 tsp pure vanilla extract
- 1/4 tsp cinnamon
- pinch of salt
- 1 cup coconut yogurt
- fresh fruit, for topping
- granola, for topping
Instructions:
- In a medium bowl, whisk together the chia seeds, milk, maple syrup, vanilla, cinnamon and salt. Place in the fridge for 20 minutes, whisking a few times in between.
- Divide the mixture between 4 mason jars, or bowls, if serving immediately. Top with 1/4 cup of yogurt and some of the fruit. Sprinkle with granola before serving!
Store jars in the fridge for up to 4 days.
The post Easy Chia Pudding Parfait appeared first on Never. Not. Eating..
]]>The post Grilled Piña (Colada) French Toast appeared first on Never. Not. Eating..
]]>
Whenever I travel to the Caribbean, I have piña coladas on rotate. They are thick, slushy and sweet, and just the perfect hot-day drink. And, obviously my inspiration for this recipe!

A traditional piña colada has rum, coconut milk and pineapple juice, and we’re keeping it consistent with this recipe! The spiced rum and coconut milk come together with some fragrant vanilla, eggs and warm spices to create the batter for the bread. Speaking of the bread, I chose to use brioche for this recipe, because seriously there is nothing better than brioche. Eggy, buttery and just darn delicious.

I love cooking my french toast in my cast iron. It helps with even heat distribution, and that means a beautiful browning on either side of the toast! I also use a ribbed cast iron to grill up some pineapple to top the french toast off with. It’s muy deliciosa!
Grilled Piña (Colada) French Toast
Servings: 3-4
Prep time: 10 minutes
Cook time: 20 minutes
Ingredients:
- 2 large eggs
- 1 tsp vanilla
- pinch of salt
- 1/2 tsp cinnamon
- pinch of fresh nutmeg
- 1/2 cup canned coconut milk
- 1/2 cup coconut milk (I use Silk Brand)
- 2 oz of spiced dark rum (optional)
- 12-14 slices of day old brioche bread
- vegan butter (or regular butter)
- coconut oil
- 1/2 of a fresh pineapple, sliced into flatter wedges
- pure maple syrup, for topping
- 1/4 cup coconut flakes, for topping (optional)
Instructions:
- Whisk the eggs, vanilla, salt, cinnamon, nutmeg, coconut milks and rum in a shallow container, until combined.
- Add a tablespoon of butter to a hot pan (temperature at medium-high). Dip a slice of brioche into the milk mixture and then transfer to pan. Cook for 2-4 minutes, or until golden brown, and then flip and repeat. Continue with the rest of the brioche.
- While the french toast is cooking, preheat your grill over medium-high heat. Add the Pineapple slices right to your grill if using an outdoor barbeque, or, oil your indoor grill with 1 tablespoon of coconut oil first, then add the pineapple. Grill for 2-3 minutes on each side, or until you see those nice grill marks!
- Place a few slices of french toast on a plate, top with a few pieces of grilled pineapple, sprinkle with the coconut flakes, and drizzle with pure maple syrup. Salud!
The post Grilled Piña (Colada) French Toast appeared first on Never. Not. Eating..
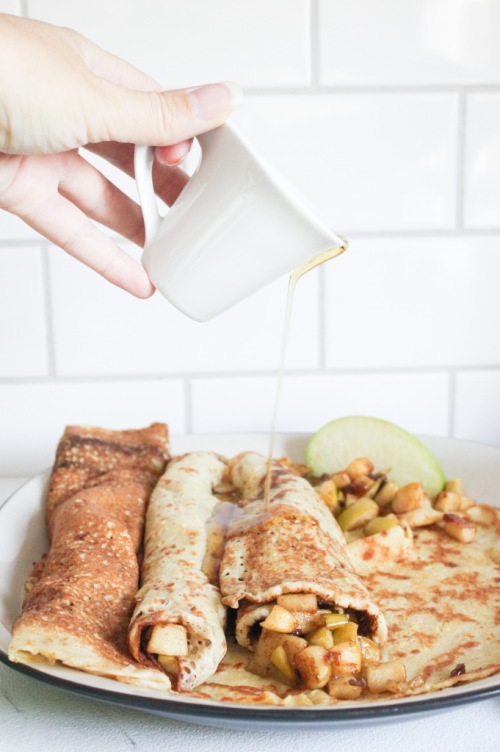
]]>The post Gluten Free Crepes with an Apple Cinnamon Compote appeared first on Never. Not. Eating..
]]>
I’ve used my soup maker to make an abundance of different recipes, such as: soup (duh!), smoothies, juices, pancakes and my favourite, alcoholic beverages. It’s truly simple to use and does all of the cooking and blending for you, allowing time to clean up your kitchen, or do something more fun, like snack while you wait for your food. If you have a soup maker, or are thinking of purchasing one, check out my Instagram account for some more fun recipes to make in it – @nevernoteatingca
So let’s talk about these crepes. Firstly, I struggle to call them “crepes,” because as a kid, my family and I only ever ate “Finnish pancakes,” which were more crepe-like in appearance, but were never referred to as crepes. Those were our style of pancakes. We never ate traditional American pancakes. But you know what?! I’m all about pleasing the people. People see flat pancakes, they say “crepes.” So, this is for you.
Secondly, if you follow my IG account, or have read some of my posts, or even tried some of my recipes (thank you), you know that I like to put a healthier spin on foods that aren’t so healthy. Therefore, I have made these “crepes” with gluten-free flour, plant-based milk and no refined sugar. If you want to indulge a bit more, feel free to sub in the healthy ingredients for the not-so-healthy ones.
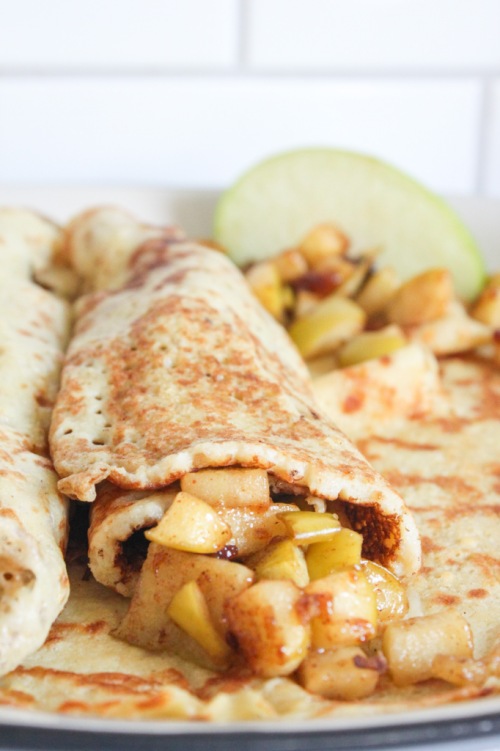
I can’t decided whether my favourite part of this dish is the pancake…I mean crepe…or the filling. It’s apple season right now, and nothing goes better together than apples and cinnamon. And nutmeg. Nutmeg is bomb. The filling is tart and sweet and ooey and gooey. It’s a great addition to these less-sweet crepes. I prefer to use honeycrisp or granny smith apples for this, but you can definitely use whatever you have on hand. I also like to keep the skins on, mostly because I’m lazy, but feel free to peel your apples if that’s your jam.
Below you will find two ways to make this recipe. The first is the easiest way, but you need a soup maker for that! The second is more traditional, but totally yummy just the same.
May your day be enhanced with pancake-crepes and fall fillings!
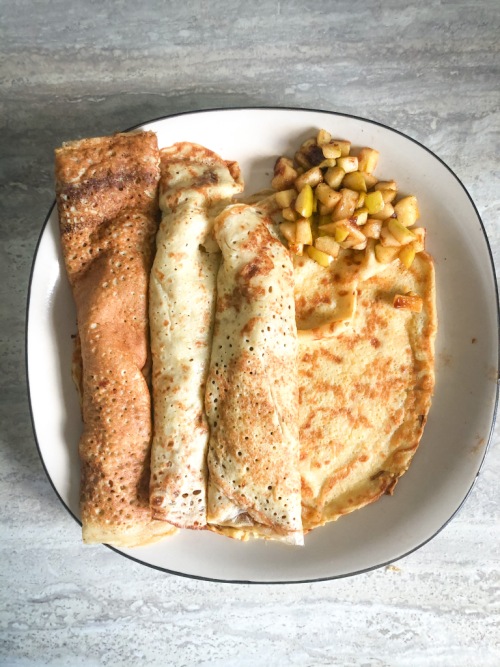
Gluten Free Crepes with an Apple Cinnamon Compote
Serving Size: Makes 10 large crepes
Prep time: 5 minutes
Cook time: 20 minutes
Ingredients
- 2.5 cups dairy-free milk
- 2 eggs, beaten
- 2 tbsp maple syrup, plus more for serving
- 1 tsp vanilla extract
- 1.5 cups gluten free flour
- 1/2 tsp salt
- 2 medium apples, finely diced (I use honeycrisp or granny smith)
- 1/2 tsp lemon zest
- 1 tbsp lemon juice
- 1/2 tsp cinnamon
- pinch of fresh nutmeg
- 1/2 tbsp of cornstarch
- 1 tbsp maple syrup or brown sugar
- coconut oil or butter (for the pan)
Instructions
With a soup maker:
- Add the milk, eggs, syrup, vanilla, flour and salt to your soup maker. Set to “juice.” When finished mixing, skip to step 3 below.
Without a soup maker:
- Whisk together milk, eggs, syrup and vanilla and set aside.
- In a medium bowl, whisk flour and salt together. Add the wet ingredients and whisk until combined.
- Place a large pan over medium-high heat and add half a tablespoon of coconut oil (or butter). When the pan is very hot, add about 1/3-1/2 cup of the crepe batter (depending on the size of your pan). Swirl the pan around until the batter coats the entire bottom. There shouldn’t be a lot of batter sitting on top.
- Let the crepe cook until the edges begin to come up from the pan and the bottom is browned. Flip and cook on the other side for about 2 minutes or until darker spots begin to develop on the underside. Remove from pan, place on a plate and store in the oven or microwave to keep warm. Continue with the remainder of the batter.
For the filling:
- While the crepes cook, add the apples, zest, lemon juice, cinnamon, nutmeg, cornstarch and sugar to a bowl and stir to combine. Let sit for at least 5 minutes.
- Preheat a large pan over medium-low heat. Add a half tablespoon of coconut oil or butter to the pan. When melted, add the apples. Let cook until apples are fork tender, about 8-10 minutes, stirring occasionally.
Assembly:
- Top each crepe with a few spoonfuls of the filling and a drizzle of maple syrup. Roll and enjoy!
The post Gluten Free Crepes with an Apple Cinnamon Compote appeared first on Never. Not. Eating..
]]>The post The Fluffiest Gluten-Free Pumpkin Pancakes appeared first on Never. Not. Eating..
]]>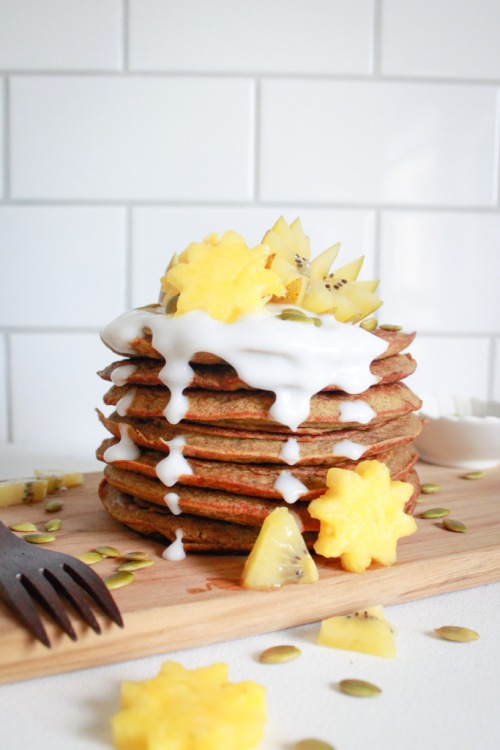
Not only are these pancakes gluten-free, they are also dairy-free and refined sugar-free. You. Are. Welcome.
This recipe was inspired by the extra pumpkin puree that I had after making my favourite pumpkin pasta dish. I hate waste and when I was thinking about what I could use the leftovers for, my brain immediately went to pancakes. Usually when I try recipes for pancakes that are gluten-, dairy- and refined sugar-free, they often turn out flat. It was my goal to create healthy pancakes that taste and look like normal pancakes. I think these are it. And, by “think” I mean “know.” I just didn’t want to sound cocky.

Because these pancakes are refined sugar-free, they are on the less-sweet side. They include the natural sweetness from a banana, but feel free to add some brown or white sugar to the wet ingredients. I, personally like to aggressively drizzle them with maple syrup after they are made and ready-to-eat, and this covers the necessary sweetness!

To start, whisk up all of your dry ingredients. Buckwheat flour, baking powder, baking soda, cinnamon, nutmeg and salt. The use of buckwheat is what makes these pancakes gluten-free. Buckwheat is actually a seed, not a wheat, as the name suggests. The seeds are ground up into a flour. It is my preferred ingredient for pancakes as I have found it to have a similar outcome as regular wheat flour, unlike other gluten-free flours, like almond and coconut.

The wet ingredients include: pumpkin (of course), canned coconut milk, a mashed banana, an egg and some vanilla. These all get whisked together. When combined, add in the dry ingredients and stir until everything has been incorporated. The batter will be thick. Set it aside to allow the ingredients to get to know one another.

When ready, add the batter to a hot pan. I find it easiest to use two spoons to help shape your pancakes the way you would like them. They only need a minute or two on each side until they are ready.

Serve with your toppings of choice. I love fresh fruit on these, cinnamon, and some yogurt. Oh, and pools of maple syrup, of course!
The Fluffiest Gluten-Free Pumpkin Pancakes
Servings: Makes 8 pancakes
Prep time: 5 minutes
Cook time: 10-15 minutes
Ingredients:
- 1 cup buckwheat flour
- 1 tsp baking powder
- 1/2 tsp baking soda
- 1/2 tsp cinnamon
- 1/4 tsp freshly grated nutmeg (or the packaged powder)
- 1/2 tsp salt
- 1/2 cup pure pumpkin puree (not pie filling)
- 1 very ripe banana, mashed
- 1 egg, beaten
- 1 cup canned coconut milk
- 1/2 tsp pure vanilla extract
- Coconut oil
Instructions:
- In a small bowl, whisk the buckwheat flour, baking powder, baking soda, cinnamon, nutmeg and salt together. Set aside.
- In a large bowl, whisk the pumpkin, banana, beaten egg, coconut milk and vanilla together until smooth. Add the dry ingredients and stir until everything has been combined. Batter will be thick. Set aside for a few minutes to allow the flavours to meld.
- Preheat a pan over medium-high heat. Add a tablespoon of coconut oil to grease the pan. Use two spoons to dollop the batter into the pan and to help spread and shape the pancakes. Cook for 1-2 minutes – you will notice the edges begin to set and bubbles begin to form on top – and flip, cooking another minute. Remove from pan and continue with the rest of the batter.
- Serve with your choice of topping – I recommend pure maple syrup, fresh fruit and dairy-free yogurt!
The post The Fluffiest Gluten-Free Pumpkin Pancakes appeared first on Never. Not. Eating..
]]>