The post Flourless Oatmeal Blueberry Cookies appeared first on Never. Not. Eating..
]]>
WHAT ARE FLOURLESS OATMEAL BLUEBERRY COOKIES?
These healthy cookies are a guilt-free, post-dinner or pre-workout snack! They are made in one bowl, with only natural ingredients and no refined sugar. I make them every week because I refuse to allow dinner to be my final meal of the night.

WHY I LIKE THESE COOKIES
I don’t just like these cookies – I am obsessed with them! The blueberries add the juiciest “pop” and a perfect sweetness that is unmatched, in my opinion. I also feel good about eating them (every day), as they only contain natural ingredients, all of which are pantry staples.

THE INGREDIENTS
You only need a few pantry ingredients to make this recipe:
- banana
- peanut butter
- egg
- vanilla
- maple syrup
- cinnamon
- salt
- oats
- blueberries
MAKING FLOURLESS OATMEAL BLUEBERRY COOKIES
You will honestly be amazed with how easy these are to make. Grab a big mixing bowl and add all of the wet ingredients – a mashed banana, peanut butter, egg, vanilla and syrup. Whisk together – that’s right, you don’t even need an electric mixer!
Add in the dry ingredients – the salt, cinnamon and oats. Switch over to a spatula to make sure everything has been mixed fully. Finally, fold in the blueberries and save a few to put on top of the cookies before baking. Scoop the dough onto a parchment lined cookie sheet, using a large cookie scoop and flatten them with the palm of your hand (they will not rise in the oven, so no need to space them too far apart). Bake for 12-14 minutes and enjoy!

TIPS
- Choose an all-natural nut butter to maintain the healthiness of this recipe (look at the ingredient list on the jar – it should only have one ingredient)!
- You can use fresh or frozen blueberries for this recipes, either one works beautifully!
- The cookie dough will be on the wetter side – don’t worry, they will bake up nicely and easily release from the baking sheet when they are fully cooked.
OTHER HEALTHY TREATS YOU NEED TO TRY
Vegan Rice Crispy Chocolate Treats (a fun, bite-sized snack)
No-Measure Oatmeal Almond Butter Cookies (skip the measuring with these perfect failproof cookies)
Healthy Pumpkin Oatmeal Chocolate Chip Cookies (the perfect Fall version of these Flourless Oatmeal Blueberry Cookies)
TOOLS I USED TO MAKE THESE FLOURLESS OATMEAL BLUEBERRY COOKIES
Click on the images below to see what I used for this recipe.


FLOURLESS OATMEAL BLUEBERRY COOKIES
Servings: Makes 8 large cookies
Prep time: 10 minutes
Cook time: 13 minutes
Ingredients
- 1 very ripe banana, mashed
- 1/4 cup peanut butter (or any nut butter)
- 1 tbsp pure vanilla extract
- 2 tbsp pure maple syrup
- 1 large egg
- 1/2 tsp cinnamon
- 1/2 tsp salt
- 2 1/4 – 2 1/2 cups rolled oats
- 1 cup fresh or frozen blueberries
Instructions
- Preheat your oven to 350 degrees Fahrenheit.
- In a large bowl, whisk together the mashed banana, peanut butter, vanilla and maple syrup. Next, add in the egg and whisk until fully combined.
- Add the cinnamon, salt and 2 1/4 cups of oats to the bowl. Mix with a spatula. If the dough is very wet, add in the extra 1/4 cup of oats. The mixture should be slightly on the wetter side.
- Fold in the blueberries and then use a 1.5 tablespoon cookie scoop to form 12 cookies (alternatively, roll into balls using wet hands). Place on a parchment lined baking sheet and use your palm to flatten each cookie. As these will not spread, you don’t need to leave too much space between them.
- Bake for 13 minutes, remove from oven and let cool for a minute on the baking sheet before transferring to a wire rack to cool completely.
- Once they have fully cooled, store in an airtight container for up to four days.

The post Flourless Oatmeal Blueberry Cookies appeared first on Never. Not. Eating..
]]>The post Vegan Whipped Cream (Vanilla Bean) appeared first on Never. Not. Eating..
]]>I’m here to tell you that you can vegan-ify whipped cream using coconut milk instead of dairy cream. Irish coffee topping? Check! Berries and cream? Check! Pie topping? Check! This vegan whipped cream recipe does it all!

WHAT IS VEGAN WHIPPED CREAM?
It’s a fact that a high percentage of humans living on Earth have a sensitivity to dairy, so if that’s true for you, or you eat a plant-based diet, why not try this delicious and completely vegan whipped cream? It is made with solidified coconut milk instead of dairy cream. When placed in the fridge, canned coconut milk firms up and becomes perfect for whipping into a delicious dream cloud of a dessert topping!
WHY I LIKE THIS RECIPE
I recently took a food sensitivity test and guess what? Yup, that’s right – dairy was marked as an inflammatory food for my body. This didn’t surprise me, knowing that more than two-thirds of the world is lactose intolerant. I naturally try to steer clear of having dairy in my diet anyway, but this test really gave me the push I needed to avoid it on most days.
This Vegan Whipped Cream is the perfect substitute for the real thing. It whips up to a luscious texture that mimics that of real whipped cream. I like knowing that I am able to still enjoy some of my favourite desserts, despite it not having traditional ingredients in it. If I can make it plant based, I will!

INGREDIENTS
This Vegan Whipped Cream recipe only calls for three ingredients:
- canned coconut milk
- powdered sugar
- one vanilla bean (or vanilla extract)

MAKING VEGAN WHIPPED CREAM
This recipe couldn’t be easier. All you need to do is place all of the ingredients into a bowl and whip until stiff peaks form – it actually takes less time than a dairy-based whip cream!
TIPS
- Make sure your canned coconut milk is full-fat and a good quality brand. I use Aroy-D.
- Try not to shake your can, you want to keep the coconut milk and water separate.
- Place the can of coconut milk in the fridge for as long as possible. It needs at least 24 hours for the milk to firm up. I usually just place one can in the fridge when I buy it and leave it in there for a few weeks, until I decide I want to make whipped cream.
- Place your bowl and beater attachments into the freezer for at least 15 minutes beforehand to make sure it stays nice and cold.
- Place the cold bowl in a larger bowl filled with ice if you are making this on a hot day.

OTHER VEGAN RECIPES TO TRY
Chocolate Chai Ganache (the perfect vessel for this whipped cream).
Vegan Rice Crispy Chocolate Treats (the most-fun little snack)!
Vegan Protein Energy Balls (the perfect pre-gym pump-me-up).
TOOLS I USED TO MAKE THIS VEGAN WHIPPED CREAM
Click on the images below to see what I used for this recipe.


Vegan Whipped Cream (Vanilla Bean)
Servings: Approximately 2 cups
Prep time: 20 minutes
INGREDIENTS
- 1 can full-fat coconut milk (placed in the fridge for at least 24 hours)
- 3 tbsp powdered sugar
- 1/2 vanilla bean or 2 tsp pure vanilla extract
INSTRUCTIONS
- Set up your station – Place a medium bowl and the beater attachments from your hand mixer into the freezer for at least 15 minutes. Measure out your sugar and set aside. Slice the vanilla bean lengthwise, scraping the inner seeds out with a knife and set aside. Alternatively, measure out your vanilla extract into a small bowl.
- Open the cold can of coconut milk, being careful not to shake it. Remove the bowl and attachments from the freezer and scoop out the top, solid part of the canned milk into the bowl. Don’t throw away the water at the bottom of the can – reserve it for smoothies or other recipes.
- Add the powdered sugar and vanilla to the bowl with the coconut milk. Whip on medium-high speed until stiff peaks form, approximately 1-2 minutes. Taste the whipped cream – if you would like it sweeter, add another tablespoon of powdered sugar and whip to combine.
Store in an airtight container in the fridge for up to 3 days.
The post Vegan Whipped Cream (Vanilla Bean) appeared first on Never. Not. Eating..
]]>The post Healthy Pumpkin Oatmeal Chocolate Chip Cookies appeared first on Never. Not. Eating..
]]>
WHAT ARE PUMPKIN OATMEAL CHOCOLATE CHIP COOKIES?
These cookies are a one-bowl miracle – they are simple to make, healthy and perfect for autumn. Refined-sugar free, these little treats can be eaten without guilt, for breakfast or as a snack in-between meals.

WHY I LIKE THESE PUMPKIN OATMEAL CHOCOLATE CHIP COOKIES
Other than for obvious reasons, I love these cookies because they are a fun and healthy way to incorporate pumpkin into a recipe. It has proven to be challenging to find recipes made with pumpkin puree that aren’t packed with processed sugars and unhealthy fats. I also love making my own pumpkin puree (recipe found here) to ensure I know exactly what is going into my baking!

THE INGREDIENTS
A few simple pantry ingredients are all you will need to make these cookies:
- Banana
- Pumpkin puree (NOT pie filling)
- Cashew butter (or any nut butter)
- Vanilla
- Maple syrup
- An egg
- Spices (pumpkin pie and cinnamon)
- Oats
- Dark chocolate chips
MAKING HEALTHY PUMPKIN OATMEAL CHOCOLATE CHIP COOKIES
The first thing you will want to do is whisk together all of your wet ingredients – mash up the banana and add in the puree, nut butter, vanilla, maple syrup and egg.
Add your spices, some salt, the oats and chocolate chips right into the wet ingredients and mix with a spatula. Once combined, use a large cookie scoop to portion your cookies, placing them on a parchment lined baking sheet. These will not spread out, so you don’t need to worry about spacing them out too much. Flatten them with the palm of your hand and bake for 11-14 minutes.

TIPS
- Choose an all-natural nut butter to maintain the healthiness of this recipe (look at the ingredient list on the jar – it should only have one ingredient)!
- Don’t use pumpkin pie filling. Make sure you have pure pumpkin puree – click here for a recipe, or find it canned at any grocery store.
- The cookie dough will be on the wetter side – don’t worry, they will bake up nicely and easily release from the baking sheet when they are fully cooked.
OTHER HEALTHY TREATS YOU NEED TO TRY
No-Measure Oatmeal Almond Butter Cookies (skip the measuring with these failproof cookies)
Vegan Rice Crispy Chocolate Treats (a fun, bite-size snack)
Vegan Ice Cream Bars (like a Magnum, but vegan)

TOOLS I USED TO MAKE THESE PUMPKIN OATMEAL CHOCOLATE CHIP COOKIES
Click on the images below to see what I used for this recipe.
Healthy Pumpkin Oatmeal Chocolate Chip Cookies
Servings: Makes a dozen cookies
Prep time: 10 minutes
Cook time: 13 minutes
Ingredients
- 1 very ripe banana, mashed
- 1/4 cup pure pumpkin puree
- 1/4 cup cashew butter (or any nut butter)
- 1 tsp pure vanilla extract
- 2 tbsp pure maple syrup
- 1 large egg
- 1/2 tsp pumpkin pie spice
- 1/4 tsp cinnamon
- 1/2 tsp salt
- 2 1/4 – 2 1/2 cups rolled oats
- 3/4 cup sugar-free dark chocolate chips
Instructions
- Preheat your oven to 350 degrees Fahrenheit.
- In a large bowl, whisk together the mashed banana, pumpkin puree, cashew butter, vanilla and maple syrup. Add in the egg and whisk until fully combined.
- Add the pumpkin pie spice, cinnamon, salt and 2 1/4 cups of oats to the bowl. Mix with a spatula. If the dough is very wet, add in the extra 1/4 cup of oats. The mixture should be slightly on the wetter side.
- Fold in the chocolate chips and then use a 1.5 tablespoon cookie scoop to form 12 cookies (alternatively, roll into balls using wet hands). Place on a parchment lined baking sheet and use your palm to flatten each cookie. As these will not spread, you don’t need to leave too much space between them.
- Bake for 13 minutes, remove from oven and let cool for 2 minutes on the baking sheet before transferring to a wire rack to cool completely.
- Once they have fully cooled, store in an airtight container for up to four days.

The post Healthy Pumpkin Oatmeal Chocolate Chip Cookies appeared first on Never. Not. Eating..
]]>The post Chocolate Chai Ganache (Vegan, Gluten-Free) appeared first on Never. Not. Eating..
]]>
WHAT IS CHOCOLATE CHAI GANACHE?
A ganache is traditionally a mixture of chocolate and warmed cream. It is often used as a filling or icing for cakes, to serve with fruit or something to stuff pastries with! It is also really addicting on it’s own…by the spoonful. Just sayin’.
THE INGREDIENTS
This Chocolate Chai Ganache is fully vegan, meaning no dairy whatsoever! Whoop, whoop! Instead, I use full-fat coconut milk. You can also use a lower-fat coconut milk, if you prefer. To make this recipe, you will need three ingredients – vegan chocolate, chai tea bags and one can of coconut milk.

THE PROCESS
The first step is to infuse that beautiful chai flavour into the coconut milk. Pour the coconut milk into a small saucepan and add two chai tea bags. Bring to a gentle simmer for 15 minutes. You don’t want to simmer for much longer, or else you will lose more of the liquid. 15 minutes is the perfect length of time to retain enough liquid and still get a rich chai flavour!
When the milk is ready, simply pour it over the vegan chocolate, wait one minute, and then stir until all of the chocolate is melted. See below for different ways you can use this ganache and how the recipe may change slightly, depending on it’s purpose.

CHOCOLATE CHAI GANACHE AS A GLAZE
If you are tired of the overly sweet American buttercream usually used on the outside of cakes, try making this ganache and pouring it over your cake instead. To make this the perfect glaze consistency, use 1 can of coconut milk to 1 cup of chocolate. Once it has cooled, pour it over a cold cake and watch it drip over the sides and coat your cake in a luscious layer of pure YUM.
CHOCOLATE CHAI GANACHE AS A FILLING
Okay, this may be my favourite way to use ganache – INSIDE cakes. Cake layer one goes down, a thick layer of ganache goes on top, cake layer two goes down – perfection! It is important that, if you are making a filling, the texture is thicker so it doesn’t ooze out of the sides of your cake. Therefore, use 1 can of coconut milk to one and a quarter cup of chopped chocolate. After the coconut milk has been poured over the chocolate and stirred completely, the chocolate will begin to firm up. You can even put it in the fridge to speed up the process, but you still want to be able to spread it easily, so keep an eye on it!

DON’T MISS THESE OTHER VEGAN DESSERTS
Vegan Ice Cream Bars (similar to Magnums)
Vegan Mocha Buttercream (fill your cakes with ganache and top them with this perfect buttercream)
Sweet Potato Creme Brulee (perfect for a dinner party)
This post contains affiliate links and I may earn a small commission when purchases are made after clicking the links, at no cost to you. Thank you!
Chocolate Chai Ganache (Vegan, Gluten-Free)
Prep time: 2 minutes
Cook time: 15 minutes
INGREDIENTS
| Purpose | Vegan Chocolate | Coconut Milk | Chai |
|---|---|---|---|
| Glazing cakes | 1 cup, chopped (or chunks) | 1 can (400 ml) | 2 tea bags |
| Filling cakes | 1 1/4 cup, chopped (or chunks) | 1 can (400 ml) | 2 tea bags |
INSTRUCTIONS
- Add coconut milk and tea bags to a small pot and bring to a gentle simmer for 15 minutes, uncovered.
- Place vegan chocolate into a heat-proof bowl, remove the tea bags from the pot, and strain the coconut milk over the chocolate. Let sit for one minute and then whisk until the chocolate is fully melted. Let cool before using.
TIPS:
- If GLAZING – when the ganache has cooled, pour it over an assembled cake that has been elevated and has a baking tray underneath to catch the drips.
- If FILLING – you can place the ganache in the fridge to help cool and firm up, but you want it to be spreadable, so make sure it doesn’t get too firm.
The post Chocolate Chai Ganache (Vegan, Gluten-Free) appeared first on Never. Not. Eating..
]]>The post Caramelized Pear Trifle appeared first on Never. Not. Eating..
]]>
WHAT IS A TRIFLE?
Trifle is an English dessert that usually includes alcohol-soaked cake, beneath layers of custard, fruit and whipped cream. There are many different ways to compose a trifle, but the key is for all of those beautiful ingredients to be layered in a glass bowl so they are visible to those who will be eating it.

THE LAYERS OF THIS CARAMELIZED PEAR TRIFLE
This may not be your traditional trifle, but nothing I do is traditional, so you’ll have to excuse me as I add my own flair to my recipes. This trifle includes four delicious layers – a winter spiced pear cake, gooey caramelized pears, a crunchy walnut crumble and fluffy vanilla whipped cream.
Winter Spiced Pear Cake – This cake is one of my favourites, as it’s actually completely vegan (if you want to make it on it’s own), and gluten-free! I add ginger, cinnamon and nutmeg, to give it that warm, cozy, winter appeal.
Caramelized Pears – You can’t have a caramelized pear trifle without caramelized pears! Finely diced pears warmed with brown sugar and cinnamon – these pears are to-die-for in this trifle, and on their own…by the spoonful!
Crunchy Walnut Crumble – Dessert isn’t dessert without a crunch factor, and this is it. Toasted walnuts tossed with melted butter and sugar bring this dessert to life!
Vanilla Whipped Cream – The perfect and prettiest topping to finish it all off!

HOW TO MAKE THIS DESSERT FULLY VEGAN
The cake itself is actually a fully vegan cake, so if you would like to keep this dessert vegan, follow the instructions below:
- Make the cake layer in the exact same way.
- For the caramelized pear and crunchy walnut layers – substitute regular butter for vegan butter.
- For the whipped cream, use canned coconut milk that has been chilling in the fridge for at least 24 hours, instead of whipping cream. Scoop the top, solid milk from the can and whip in the same manner as the recipe suggests!

THE PERFECT TIME TO MAKE THIS TRIFLE
When I think of pears, I often think of winter and warm spices. This trifle would definitely be a kick-ass dessert to serve during any fall or winter holiday – Thanksgiving, Christmas, New Year’s – you name it! Each individual component can be made the day before and then assembled prior to serving. This is definitely a dessert that feeds a crowd!
OTHER DELICIOUS LAYERED DESSERTS YOU MUST TRY:
Vegan Coconut Panna Cotta with a Mango Compote (made in individual serving cups!)
Dark Chocolate Almond Butter Bars (what’s better than nut butter + chocolate?!)
This post contains affiliate links and I may earn a small commission when purchases are made after clicking the links, at no cost to you. Thank you!
Caramelized Pear Trifle
*I highly recommend reading through this recipe in full first, before making.
Serving size: 8-10
Prep time: 45 minutes
Cook time: 35 minutes
Ingredients
For the spiced cake layer:
- 1 cup full-fat, canned coconut milk
- 1 tbsp apple cider vinegar
- 3/4 cup brown sugar, packed
- 1 banana, mashed
- 2 tsp vanilla
- 2 cups gluten-free flour, plus 1 tbsp for dusting cake pans, I use Bob’s Red Mill
- 1 tsp cinnamon, separated
- 1/2 tsp dried ginger
- 1/4 tsp nutmeg
- 1 tsp salt
- 3/4 tsp baking powder
- 1/2 tsp baking soda
For the caramelized pear layer:
- 2 tbsp unsalted butter (or vegan butter)
- 4 pears, small dice (I like to use Bartlett)
- 1/4 cup brown sugar
- 1/2 tsp cinnamon powder
- pinch of salt
For the crunchy walnut layer:
- 1 cup walnuts, chopped into small pieces
- 2 tbsp unsalted butter (or vegan butter), melted
- 1 tbsp brown sugar
- pinch of salt
For the vanilla whipped cream layer:
- 2 cups heavy whipping cream
- 2 tbsp powdered sugar
- 1 tbsp pure vanilla extract
Instructions
For the spiced cake layer:
- Preheat oven to 350 degrees Fahrenheit and prepare two, six-inch cake pans by buttering, lining the bottom with parchment, and dusting with some of the gluten free flour.
- Stir the apple cider vinegar into the coconut milk and set aside.
- Using a stand mixer or a hand mixer, beat together the brown sugar, banana and vanilla in a large bowl until combined.
- In a separate, medium bowl, sift the flour, cinnamon, ginger, nutmeg, salt, baking powder and baking soda.
- In a few additions, alternate between adding the dry ingredients and coconut milk to the banana mixture, beating until combined and smooth.
- Divide batter evenly between pans and bake for 25-30 minutes, or until inserted toothpick comes out clean.
- Let cool in pan for 5 minutes and then transfer to wire rack to finish cooling.
For the caramelized pear layer:
- Place all ingredients in a saucepan over medium-low heat and cook until the pears are soft, approximately 10 minutes. Remove from heat and set aside while preparing the remainder of the ingredients.
For the crunchy walnut layer:
- Preheat oven to 350 degrees Fahrenheit.
- Place walnuts on a parchment lined baking sheet and toast in the oven for 5-10 minutes, watching very carefully – they burn quickly! Remove when they are starting to look a bit more brown in colour and they become fragrant.
- Mix the walnuts with the melted butter, brown sugar and a pinch of salt and set aside.
For the vanilla whipped cream layer:
- Place a large bowl and beaters into the freezer for at least 15 minutes.
- Pour the heavy whipping cream into the cold bowl and beat on medium-high speed with the cold beaters, until soft peaks form. Add in the powdered sugar and beat again until medium peaks form (about 1-2 minutes in total). Add the vanilla and beat until just combined.
To assemble this Caramelized Pear Trifle:
- Slice the cake rounds into cubes and place 3/4 of them on the bottom of your glass trifle bowl.
- Spoon over half of the caramelized pears.
- Sprinkle half of the crunchy walnuts.
- Top with half of the whipped cream.
- Repeat steps 1-4 with the remaining ingredients and finish it off with a dusting of cinnamon on top! Enjoy!
I recommend serving this trifle immediately. It can be stored in the fridge for up to two days.

The post Caramelized Pear Trifle appeared first on Never. Not. Eating..
]]>The post No-Measure Oatmeal Almond Butter Cookies appeared first on Never. Not. Eating..
]]>
What are No-Measure Oatmeal Almond Butter Cookies?
I am always finding ways to “healthify” traditional treats, and I was in the mood for some cookies this time around. I had a few ingredients that I needed to get rid of, so I decided to try my hand at some no-measure Oatmeal Almond Butter Cookies, and it turned out to be a success! So much so, I make them all the time with the ingredients that need to get used up in my home.
I just eyeball all of my ingredients into a bowl, mix them up and form them into cookies! They are refined sugar-free, dairy-free and gluten-free.

The Ingredients for No-Measure Oatmeal Almond Butter Cookies
This is where it gets fun! You can change the ingredients in any way that suits you and what you have in your kitchen! Generally, I like to use the following staple ingredients in my cookies:
Overripe bananas
I like using bananas as a sugar substitute in my baking. They also bring more moisture into the cookies and help to bind the ingredients together. It is important to use overripe bananas for a sweeter result. I typically only use one banana, unless I am hoping to yield a larger batch of cookies…in that case, I will add another!
Almond butter (or any preferred nut butter)
Nut butters have high fat, fibre and protein and, therefore, can serve a number of purposes when added to baked goods. Firstly, nut butters are a good replacement for oils or butters, due to their fat content. The fibre in nut butters help to balance out the sugars in a recipe. Protein gives these cookies a bit more structure and allows them to hold up well! I like to add a healthy pour of almond butter…say a 1/2 cup or so!
Egg
As in any baking recipe, the job of the egg is to bind everything together and create structure. Think of it as the “glue” that holds everything together. If I’m hoping for eight cookies, I use one egg.

Gluten-free rolled oats
The oats are the main dry ingredient in this recipe and they replace the flour in a normal cookie recipe. Without the oats, your cookies would lack form and be very “goopy.” They are also much healthier than all-purpose flour! This is the ingredient that I truly have no measurements for – just pour in a bit at a time until the batter is not too wet, but not too dry. Eyeball it!
Vanilla
You should not skip this flavour bomb! Always use pure vanilla extract in any baking you do. If you would like to see how you can make your own at home, check out my Instagram reel (@nevernoteatingca). It takes two minutes to make!
Cinnamon
I like adding cinnamon to these cookies to add a little bit of warmth. Plus, I just love cinnamon!
Maple syrup
Along with the bananas, the maple syrup offers sweetness to these cookies. Depending on how much of a sweet tooth you have, pour in a small amount, or add a bit more to amplify that maple flavour!
Sugar-free chocolate
Because I wanted to make these cookies healthy, I decided to use sugar-free chocolate, but you can use whatever chocolate you want! I like a lot of little chocolate pools in my cookies, so I add a LOT of chocolate!

How to bring the ingredients together
Begin by using a hand mixer or a whisk to mix all of the wet ingredients together, just as you would in any normal baking recipe. Mash the banana(s) and pour in some almond butter, add an egg, some vanilla and maple syrup, according to how sweet you would like it.
Next, sprinkle in some cinnamon and pour in a small amount of oats, mixing until everything is combined. Continue to add more oats until the batter comes together and is not too wet, but not too dry. Fold in some chocolate and scoop onto a parchment-lined baking sheet. Flatten the cookies with your palm and bake in a 350 degree oven for around 10 minutes, or until cookies are set and release easily from the tray. You will notice the bottoms beginning to brown when they are ready.

Other healthy recipes you NEED to check out:
Vegan Protein Energy Balls (the perfect post-work, pre-workout snack)
Dark Chocolate Protein Nuggets [high protein, high (good) fat…these get you through the day]
Vegan Power Muffins (a morning pick-me-up)
This post contains affiliate links and I may earn a small commission when purchases are made after clicking the links, at no cost to you. Thank you!
No-Measure Oatmeal Almond Butter Cookies
*This recipe is NO-MEASURE. Please read above to get an idea of the purpose and amount of each ingredient.
Prep time: 10 minutes
Bake time: 10-13 minutes
Ingredients:
- banana(s), mashed
- nut butter
- egg(s)
- maple syrup
- vanilla
- salt
- cinnamon
- rolled oats (aim for gluten-free)
- sugar-free chocolate
Instructions:
- Preheat oven to 350 degrees Fahrenheit.
- Use a hand mixer or a whisk to combine the mashed banana(s), nut butter, egg(s), maple syrup and vanilla.
- Add in a big pinch of salt, a sprinkle of cinnamon and some rolled oats. Stir with a wooden spoon to combine. Continue to add more oats until the batter is not too wet, but not too dry. It should be slightly sticky. Fold in the chocolate.
- Using a large cookie scoop, scoop the batter onto a parchment-lined cookie sheet. Flatten each cookie using the palm of your hand and bake for 10-13 minutes or until the cookies have set up and release easily from the cookie sheet. Let cool on a wire rack and store in an airtight container.
*Check out my Instagram reel to see a video on how these cookies come together!

The post No-Measure Oatmeal Almond Butter Cookies appeared first on Never. Not. Eating..
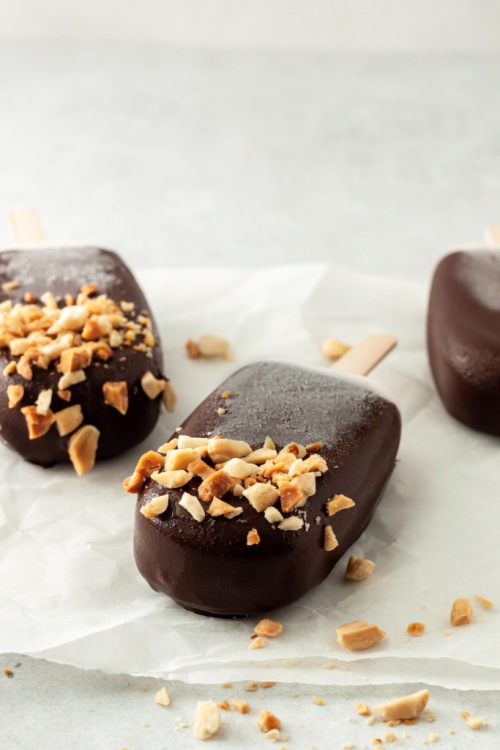
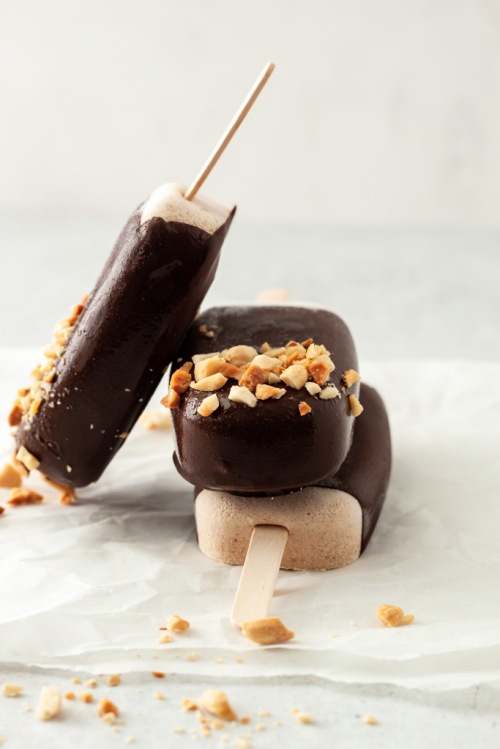
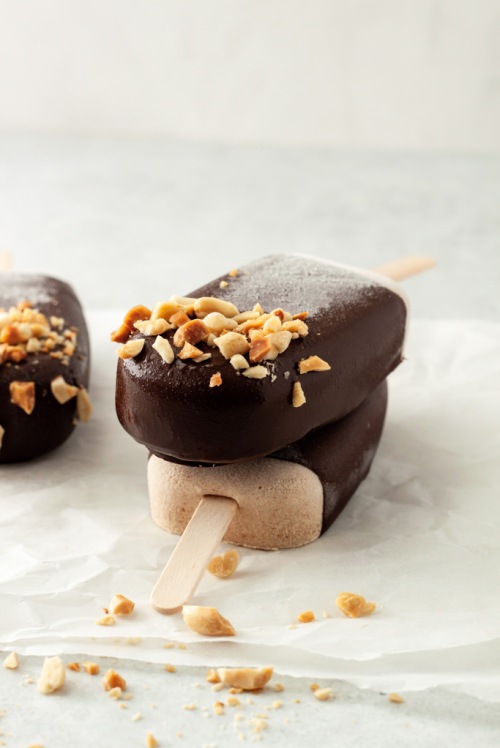
]]>The post Vegan Ice Cream Bars appeared first on Never. Not. Eating..
]]>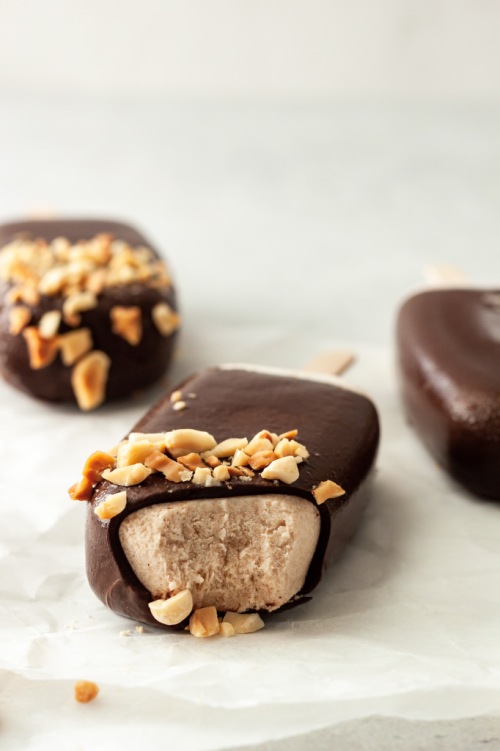
This has been one of the hottest summers on record, and I’m just a bit mad at myself that I developed these ice cream bars now, instead of at the beginning of summer. Then again, it’s not like I’m going to stop eating them when the weather cools down…I’m an ice-cream-all-year-long kinda gal!
HEALTHIER THAN STORE-BOUGHT
So here are a few reasons why you should make these bars, STAT:
- The recipe includes natural sugar from pure maple syrup only, and you can omit it entirely if you wish.
- They are vegan.
- They are made quickly in a blender.
- You like delicious treats.
These remind me of the Magnum bars you can buy at the grocery store. The only difference is you know all of the ingredients going into them, and they are way healthier than anything you would get out of a box.
HOW TO MAKE VEGAN ICE CREAM BARS
The recipe for these bars is simple – blend all ingredients together using a high-powered blender. Pour into the cutest popsicle molds. Freeze for a few hours until firm. Dip in chocolate and sprinkle on some crushed peanuts.
When you bite into one of these little babes, you first get the crack of the chocolate, followed by the creaminess of the filling which is made rich by coconut milk and nut butter. It’s beyond good. Ice cream goals!

OTHER VEGAN TREATS TO TRY
Vegan Protein Energy Balls (the perfect pre-workout snack)
Vegan Mocha Buttercream (my favourite cake topping)
Sweet Potato Creme Brulee (a great holiday dessert)
This post contains affiliate links and I may earn a small commission when purchases are made after clicking the links, at no cost to you. Thank you for supporting me!
Vegan Ice Cream Bars
Serving size: Makes 8 bars
Prep time: 10 minutes
Freeze time: 4 hours
Ingredients:
- 1 can full-fat coconut milk (refrigerated for at least 24 hours)
- 1/2 cup nut butter (I love using cashew or peanut butter for this)
- 1/2 cup coconut yogurt
- 2-3 tbsp pure maple syrup
- 1/2 tbsp pure vanilla extract
- 1/4 tsp cinnamon powder (optional)
- 85 g dark vegan chocolate (chopped)
- 1 tbsp coconut oil
- 1/4 cup peanuts, chopped
Instructions:
- Remove coconut milk from the fridge and carefully open the can. Scoop the solid white part out into a high-powered blender. Reserve the coconut water in the bottom of the can for tomorrow’s smoothie!
- Add the nut butter, yogurt, syrup, vanilla and cinnamon to the blender and blend until smooth. Pour into popsicle molds and place in the freezer until firm, about four hours.
- Over a double boiler*, melt the chocolate with the coconut oil, stirring often. Pour into a tall cup wide enough for the popsicles to fit in. Dip each popsicle into the chocolate and lay on a piece of parchment paper. Immediately sprinkle with the chopped peanuts.
- Store in the freezer for up to 10 days.
NOTES:
*For the double boiler – fill a small pot with an inch or two of water. Bring to a gentle simmer and place a larger bowl on top with a wooden spoon in between to let the steam escape. Place the chocolate and coconut oil in the bowl and stir frequently. Alternatively, you can melt the chocolate in the microwave in short, 20-30 second increments, stirring in between.
Tip – Take the ice cream bar out of the freezer and let sit a few minutes before consuming!
The post Vegan Ice Cream Bars appeared first on Never. Not. Eating..
]]>The post Dark Chocolate Protein Nuggets appeared first on Never. Not. Eating..
]]>
I was in Costco the other day and I found these Keto Nuggets and decided to give them a shot. I’ve been looking for something that I can eat post-dinner that isn’t too terrible for you. I really just can’t get behind the idea that dinner is the last meal that I will eat in a day. I don’t vibe with that. Anyway, back to my story: I purchased them and they were pretty darn good! But, since it’s me and I need to make mostly everything from scratch, I decided that instead of buying them again, I was going to make them. And here we are!

So these “nuggets” are super quick and easy. The nuts and seeds in the recipe can easily be swapped out for your favourite nuts and seeds, as long as you abide by the number of grams listed!
I like to toast the almonds and pecans to get that roasty toasty flavah before dousing them in the melted chocolate. So good!

Note: There isn’t any extra sugar added to these…Just what is in the chocolate. I like things less-sweet, but also because I always use maple syrup, honey or agave to sweeten my food, and their properties could potentially seize the chocolate. Chocolate is super temperamental, and even the tiniest drop of water could ruin an entire bowl. Because all of my preferred sweeteners are in liquid form, I didn’t want to add any and compromise the chocolate.

You can definitely find a lot of the ingredients at Costco or your local bulk food store, but here are some links to the required products if you prefer to shop online:
- Pecans
- Almonds
- Hemp hearts
- Pumpkin seeds
- Chia seeds
- Shredded coconut
- Flaky sea salt
- Dark chocolate
- Coconut oil
Another very helpful item is a kitchen scale. This is so great to have on hand, especially if you do a lot of baking. I used my scale for this recipe as it is the most accurate, especially when you are measuring nuts – their awkward shape always fits differently into measuring cups.
Let’s make some nuggets!

This post contains affiliate links and I may earn a small commission when purchases are made after clicking the links, at no cost to you. Thank you for supporting me!
Dark Chocolate Protein Nuggets
Prep time: 10 minutes
Cook time: 10 minutes
Cool time (inactive): 1 hour
Ingredients:
- 1/2 tsp Flaky sea salt
Instructions:
- Preheat oven to 350 degrees Fahrenheit and line a large baking sheet with parchment paper.
- Spread the pecans out on the parchment paper and bake in oven for 3 minutes.
- Pull out the baking sheet and add the almonds. Bake for another 3-6 minutes, or until just starting to become brown. Watch carefully! They will burn easily.
- To a large bowl, mix together the toasted nuts, hemp hearts, pumpkin seeds, chia seeds, coconut and salt and set aside.
- Add the chocolate and coconut oil to a double boiler*, over low heat. Stir frequently with a spatula until almost completely melted. Remove and continue stirring until the remaining solid pieces melt.
- Pour the chocolate over the nut and seed mixture and use a wooden spoon to mix until all of the nuts and seeds are coated. Spread the mixture out onto a parchment lined baking sheet (you can use the same parchment you used for roasting the nuts). Place in the fridge for at least one hour to set.
- When fully set, remove from fridge and break into bite-size “nuggets.” Store in an airtight container in the fridge for up to 2 weeks!
NOTES:
*For the double boiler, fill a small pot with one – to two-inches of water and place over medium low heat. Add a larger glass, or heatproof bowl on top of the pot with a wooden spoon in between to let the steam escape. Place the chocolate and coconut oil into the glass bowl to melt.
The post Dark Chocolate Protein Nuggets appeared first on Never. Not. Eating..
]]>The post Chocolate Raspberry Baked Oats appeared first on Never. Not. Eating..
]]>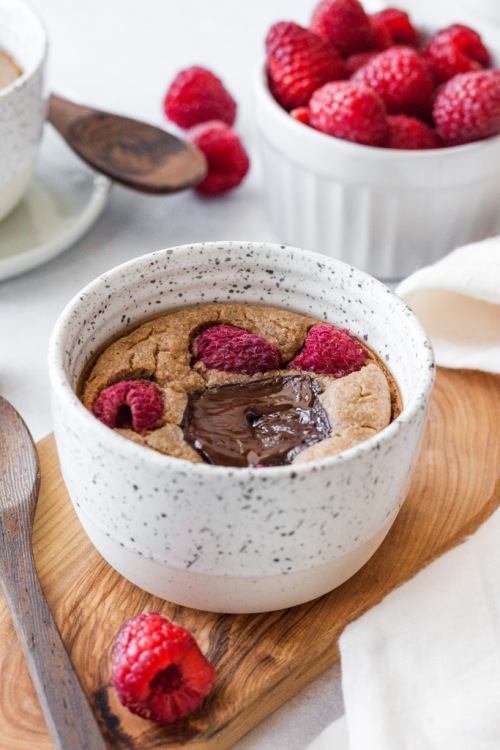
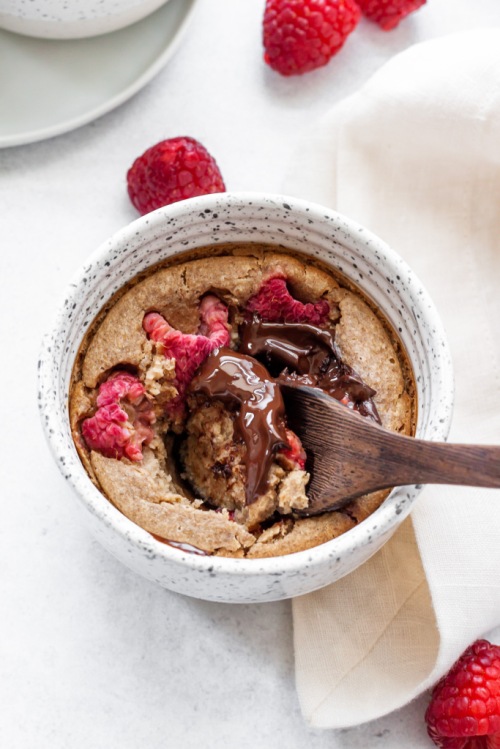
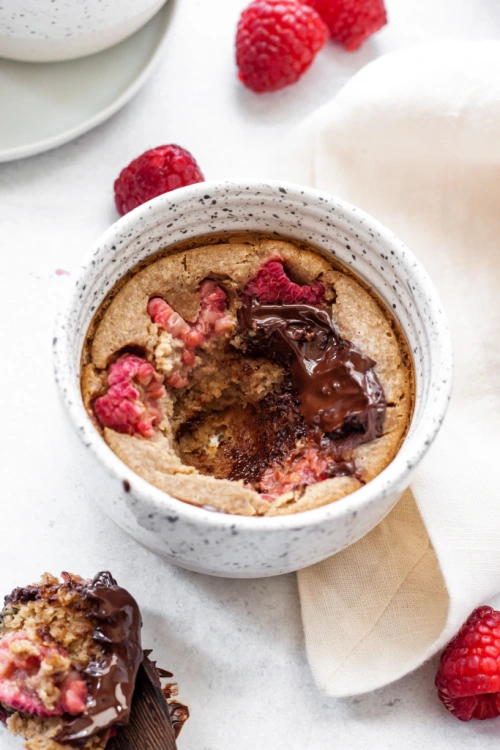
This is a quick, simple and pretty healthy little breakfast idea. It’s basically a better-for-you version of a mug cake. It’s so delicious.
All of the required ingredients get added to your blender and then poured into oven-safe ramekins (how cute are these ones?!) and baked off. You don’t even need a bowl. I used my single-serve cup blender…didn’t even have to dirty my big blender. Goals.
Here is what you will need:
- Rolled oats
- Chia seeds
- Cinnamon
- Baking Powder
- Salt
- Banana
- Almond butter
- Vanilla
- Maple Syrup
- Oat milk
- Raspberries
- Dark Chocolate
It looks like a lot, but you probably have every single one of these items in your house already. Feel free to swap out ingredients as you please – almond butter for peanut butter, maple syrup for agave, oat milk for your favourite plant-based milk…we are flexible here!
I hope you enjoy these baked oats as much as I did. They are changing the breakfast game!
This post contains affiliate links and I may earn a small commission when purchases are made after clicking the links, at no cost to you. Thank you!
Chocolate Raspberry Baked Oats
Servings: 2
Prep time: 5 minutes
Cook time: 25 minutes
Ingredients:
- 1/2 tsp maca powder (optional)
Instructions:
- Preheat oven to 375 degrees Fahrenheit.
- Place oats and chia seeds in a single-serve blender and blend to make a flour. Add the rest of the ingredients, other than the raspberries and chocolate, and blend until smooth.
- Pour into one large, or two small ramekins and top with the fresh raspberries and chocolate.
- Bake for 25 minutes, or until the top begins to brown and form cracks. Carefully remove from oven and cool for a few minutes before enjoying!
The post Chocolate Raspberry Baked Oats appeared first on Never. Not. Eating..
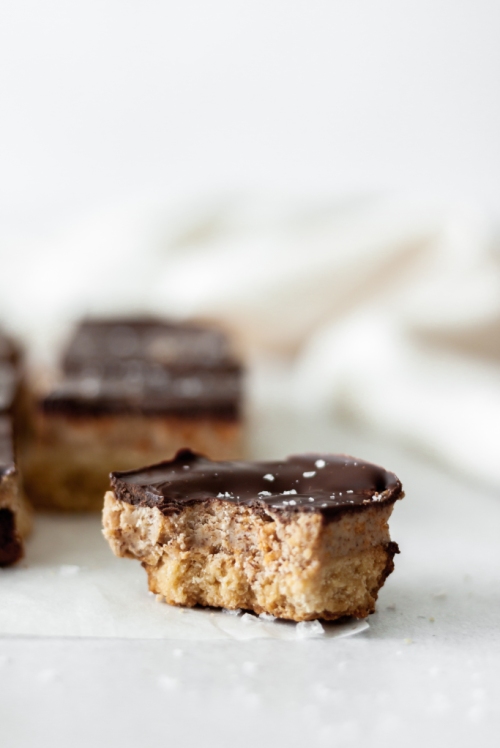
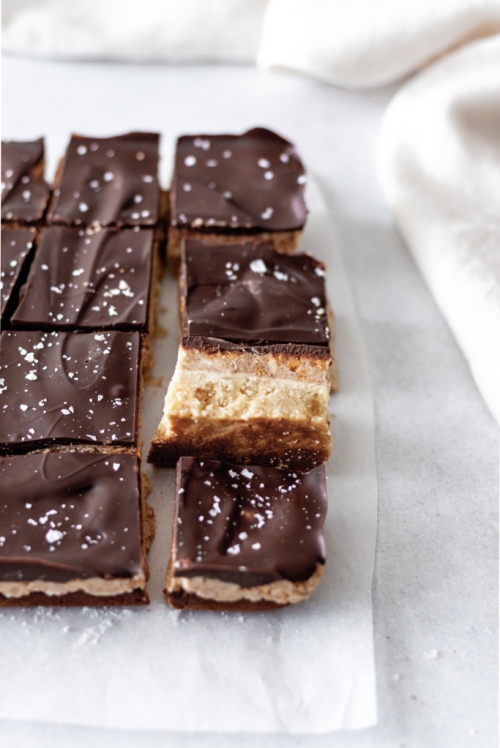
]]>The post Dark Chocolate Almond Butter Bars appeared first on Never. Not. Eating..
]]>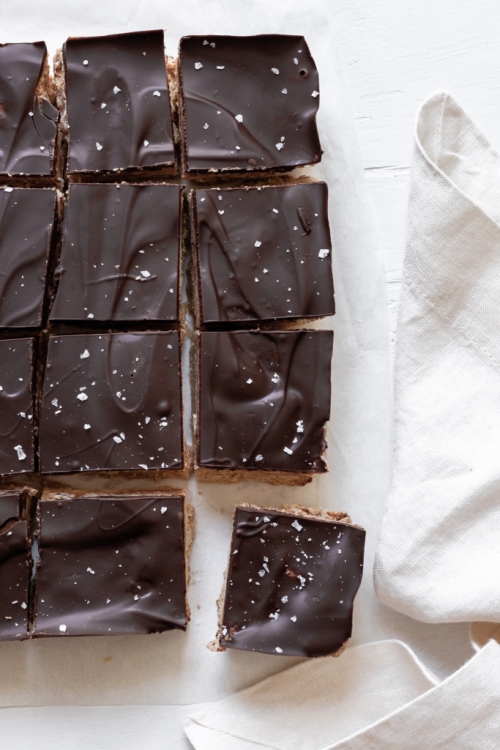
I’m a HUGE choco + peanut butter fan, but I thought I’d switch it up today and choose a slightly healthier nut butter to create a slightly less-healthy dessert. Balance.

These bars have a thick shortbread-type bottom layer, a crunchy and sweet almond butter centre, and a lush dark chocolate top. They are friggin’ delish.
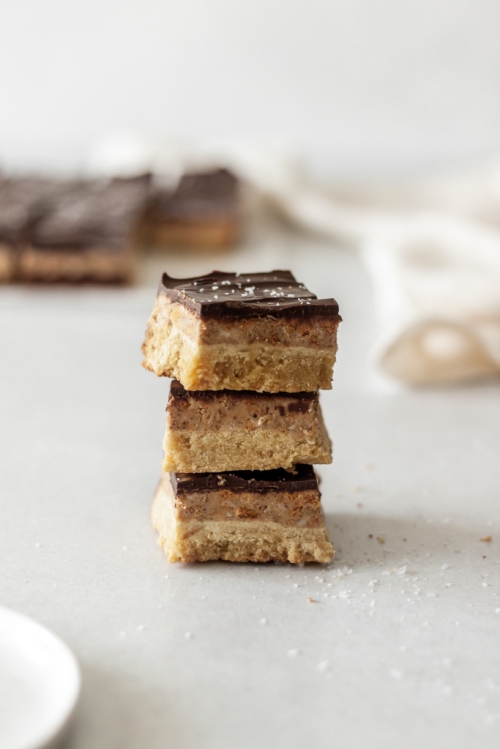
In order to keep these bars gluten-free, I’ve made the crust with a mix of almond flour and Bob’s Red Mill Gluten-Free All Purpose Flour, and I’ve crushed up my favourite gluten-free cereal to add texture to the middle. Feel free to swap for any gluten-filled flour or cereal you wish!
Let’s make them!
Dark Chocolate Almond Butter Bars
Servings: Makes 16 squares
Prep time: 10 minutes
Cook time: 10 minutes
Cool time: 1 hour
Ingredients:
For the bottom layer:
- 1 cup almond flour
- 1 1/2 cups gluten-free flour
- pinch of salt
- 3-4 tbsp agave
- 4 tbsp (1/4 cup) cold coconut oil
For the almond butter layer:
- 1/2 cup smooth almond butter
- 1/3 cup coconut oil, melted
- 1 cup powdered sugar
- 1 cup of your favourite gluten-free cereal, made into crumbs (makes a heaping 1/2 cup)
- pinch of salt
- 1/2 tbsp vanilla
For the chocolate layer:
- 150 g dark chocolate, chopped
- flaky sea salt, for topping (optional)
Instructions:
- Preheat oven to 350 degrees Fahrenheit and line an 8 x 8 inch baking pan with parchment paper.
- For the bottom layer – Combine the flours and salt in a food processor and pulse to combine. Add the coconut oil and three tablespoons of agave and pulse. If the dough does not start coming together, add the fourth tablespoon of agave. Dump into parchment lined pan and use your hands or the bottom of a glass to distribute evenly. Pierce the top a few times with a fork. Bake for 10-15 minutes, or until it turns light brown around the edges. Cool completely.
- For the almond butter layer – Combine all ingredients in a large bowl and stir to combine. Dollop the mixture onto the cooled bottom layer and use your hands to press down and spread evenly. Set aside.
- For the chocolate layer – Add the chocolate to a glass or heatproof bowl set over a double boiler. Melt, watching closely and stirring often. Alternatively, melt the chocolate in the microwave in small increments. Pour melted chocolate over the almond butter layer and place in the fridge to set for at least an hour. Cut into squares and serve!
Store in an airtight container in the fridge for up to 5 days.
The post Dark Chocolate Almond Butter Bars appeared first on Never. Not. Eating..
]]>